How to Fix Cisco Anyconnect ‘Connection attempt failed’ on Windows 10
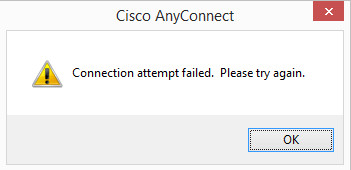
Some Windows users are reportedly getting the ‘Connection attempt failed‘ error when running the Cisco AnyConnect application in the hopes of establishing a virtual private network (VPN). This issue is reported to occur with Windows 8.1 and Windows 10.
As it turns out, this particular issue can occur due to several different common scenarios. Here’s a list of potential culprits that might be triggering this error code:
- Missing Hotfix for TLS Protocol Renegotiation – As it turns out, there are a couple of updates with the potential of causing issues with Cisco AnyConnect. Several affected users have managed to fix the issue by installing every pending update in order to resolve the inconsistency with the TLS protocol renegotiation and fallback behavior.
- Incompatibility with Windows 10 – According to a lot of Windows 10 users, you can expect to see this problem occurring due to an incompatibility affecting the SSL/TLS API that inhibits the Cisco AnyConnect tool from communicating with an outside server. In this case, you should be able to resolve the issue by forcing the vpnui.exe file to open in compatibility mode with Windows 8.
- Error caused by Windows Update KB 3034682 – If you find yourself in a scenario where the issue suddenly started to occur after WU installed update KB 3034682, chances are the update contains a problematic security rule that is interfering with Cisco AnyConnect. In this case, you can resolve the issue by uninstalling and hiding the problematic update with a specialized utility.
- Hyper-V Conflict on Windows 10 – It’s a well-known fact that Hyper-V is known to conflict with a lot of VPN facilitators such as Cisco AnyConnect and this scenario is no exception. If you find yourself in this scenario, you should be able to resolve the issue by disabling Hyper-V prior to launching the application.
- Connection Sharing is Enabled – As it turns out, you can also expect to see this error code popping up due to a network sharing functionality that interferes with Cisco AnyConnect. If this scenario is applicable, you should be able to fix the problem by disabling the network connection sharing from the Network Connections tab.
- Internet Explorer is configured to Work Offline – Since Cisco AnyConnect and IE share some common functionality, you can expect to see this error in those situations where IE’s offline mode is enabled by default. In this case, you can fix the issue by making some changes via the Registry Editor.
Now that you know every potential scenario that might be responsible for the apparition of the ‘Connection attempt failed‘ error, here’s a list of verified methods that other users have successfully deployed in order to bypass the error message:
1. Install every Pending Windows Update
As it turns out, one of the most common instances that might trigger this problem is a security update (3023607) that ends up affecting the default behavior regarding the TLS protocol renegotiation and fallback behavior.
According to some affected users, the issue was finally resolved after they run the Microsoft Update utility and installed every security and cumulative update including March cumulative security update for Internet Explorer (MS15-018) and Vulnerability in SChannel could allow security feature bypass: March 10, 2015 (MS15-031).
If you’re not certain that you have every available Windows update installed on your computer, follow the instructions below:
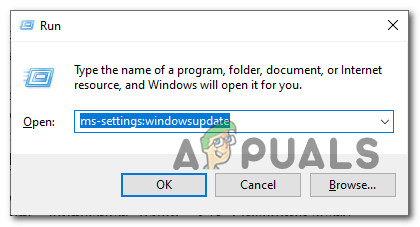
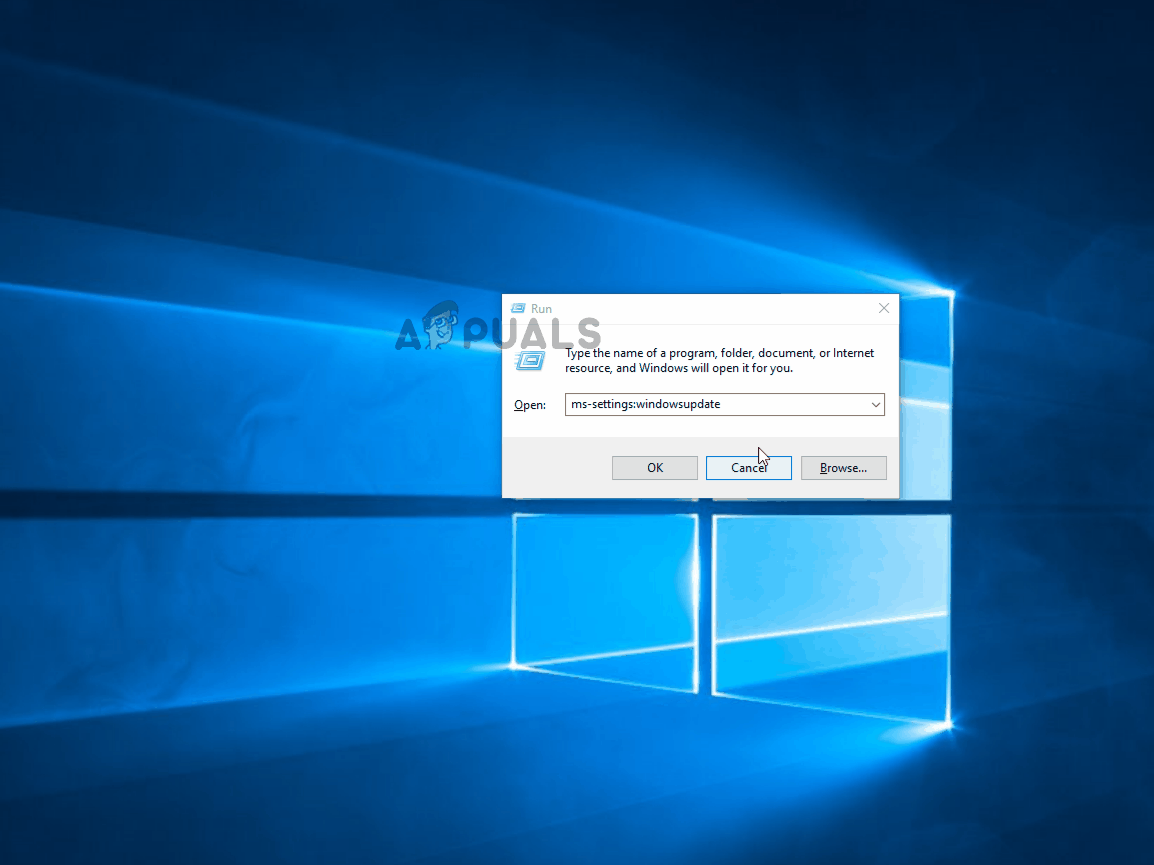
- Press Windows key + R to open up a Run dialog box. Next, type ”ms-settings:windowsupdate’ and press Enter to open up the Windows Update tab of the Settings app.
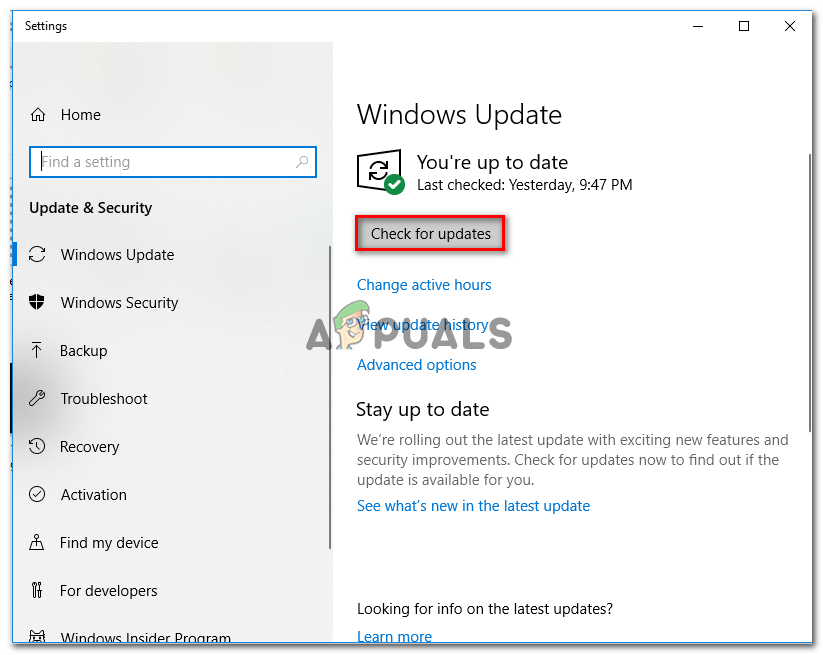
Opening Windows Update - Inside the Windows update screen, go ahead and click on Check for updates. Next, follow the on-screen prompts to install every Windows update that is currently scheduled to be installed.
Installing every pending Windows Update Note: Install every type of update including cumulative and security updates, not just important ones.
- You should keep in mind that if you have a lot of pending updates, you will be prompted to restart before every update is installed. If this happens, restart your PC as instructed, but make sure to return to this screen at the next startup and finish the installation of the rest of the updates.
- After every pending update is installed, reboot your computer once again and see if the Cisco AnyConnect error is now fixed.
2. Run Cisco AnyConnect in Compatibility Mode (Windows 10 only)
If installing every pending update didn’t do the trick for you or you’re encountering the issue on Windows 10, chances are you’re dealing with an incompatibility issue. This most commonly occurs due to a Critical Windows 10 Update (3023607) that changes some details in regards to the SSL/TLS API in a way that breaks the Cisco AnyConnect app.
If you face this issue on Windows 10, the easiest way to fix it is to force the main executable (the one you use to launch Cisco AnyConnect) to run in Compatibility Mode with Windows 8.
In case you find yourself in this particular scenario, follow the instructions below to force the vpnui.exe executable to run in compatibility mode with Windows 8:
- Open File Explorer and navigate to the location where you installed the Cisco AnyCOnnect Mobility Client folder. Unless you installed the utility in a custom location, you’ll find it in:
C:\Program Files (x86)\Cisco\Cisco AnyConnect Secure Mobility Client
- Once you’re inside the correct location, right-click on vpnui.exe and click on the Properties entry from the context menu that just appeared.
- Once you’re inside the Properties screen, click on Compatibility, then go to Compatibility mode and check the box where it says ‘Run this program in compatibility mode for:’.
- After checking the box, it will unlock a list of other versions of Windows, select the list and click on Windows 8.
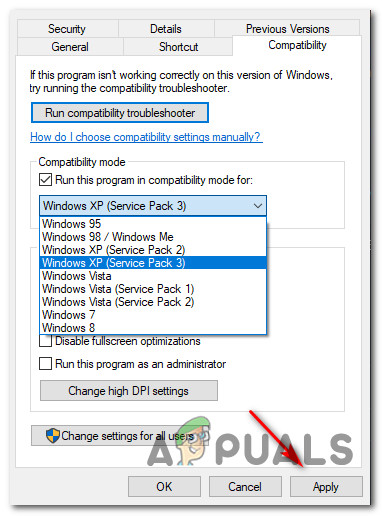
Running Cisco AnyConnect’s executable in Compatibility Mode with Windows 8 - Finally, click on Apply and launch the game to see if the graphics error still occurs.
If you already tried forcing the vpnui.exe executable to run in compatibility mode with Windows 8 and you’re still seeing the same Connection attempt failed error, move down to the next potential fix below.
3. Uninstalling & hide the KB 3034682 update
If the first 2 methods did not work for you or were not applicable, the last resort would be to simply uninstall the problematic update that is causing the update on Windows 10 (3034682).
However, keep in mind that unless you take some steps to hide the problematic update, it will eventually find your way onto your computer and cause the same issue all over again after several system restarts.
But you can prevent this from occurring by using the Microsoft Show or Hide troubleshooter to hide the problematic update after you uninstall the KB 3034682 update.
If you’re looking for specific instructions on how to do this, follow the instructions below:
- Press Windows key + R to open up a Run dialog box. Next, type “ms-settings:windowsupdate” inside the text box and press Enter to open up the Windows Update screen of the Settings app.
- Inside the Windows Update screen, click on View Update history from the left-hand section of the screen.
- Next, from the list of recently installed updates loads up, click on Uninstall updates (at the top of the screen).
- Scroll down through the list of installed updates and locate the KB3034682 update inside the list of installed updates.
- After you manage to locate the correct update, right-click on it and choose Uninstall from the context menu. Then, click Yes at the confirmation prompt to start the process.
- Once the update has been uninstalled, visit the download page of the Microsoft Show or Hide troubleshooter package and download the troubleshooter.
- Once the download is complete, open the .diagcab file and immediately click on the Advanced button. Next, check the box associated with Apply Repairs Automatically.
- Hit Next to advance to the next menu and wait for the utility to finish the scan for updates before finally clicking on Hide Updates.
- Once the operation is complete, check the box associated with the update that you want to hide, then click on Next to advance to hide the selected update from Windows Update.
- Finally, wait until the procedure is complete, then restart your computer and see if the issue has been resolved once the next startup sequence is complete.
If the same issue is still occurring even after you went through the trouble of uninstalling and hiding the problematic update, move down to the next potential fix below.
4. Disabling Hyper-V (Windows 10)
As it turns out, it turns out that you can also expect to encounter this error due to a conflict between Cisco AnyConnect and the main Hyper-V service that’s enabled by default on Windows 10.
Several affected users that were also encountering this problem have reported that they finally managed to fix the ‘Connection attempt failed’ error by temporarily disabling Hyper-V and all associated services before rebooting the computer and using Cisco AnyConnect.
If you suspect this scenario might be applicable to your current situation, follow the instructions below to disable Hyper-V from the Windows Features menu:
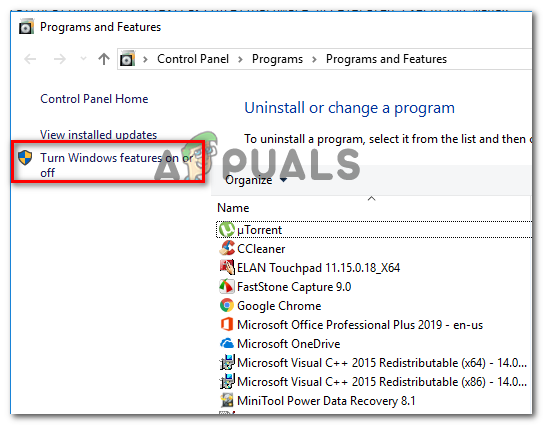
- Start by pressing Windows key + R to open up a Run dialog box. Inside the text box, type ‘appwiz.cpl’ and press Enter to open up the Programs and Features menu. If you are prompted by the UAC (User Account Control), click Yes to grant admin access.

Opening to Programs and Features screen - Next, from the Programs and Features menu, use the menu on the left to click on Turn Windows features on or off. At the User Account Control prompt, click Yes to grant admin access.
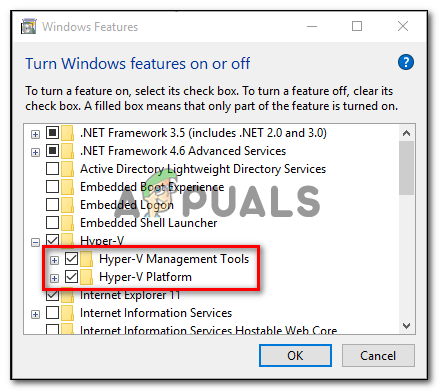
Turning Windows Features On and Off - Once you’re inside the Windows Features screen, scroll down through the list of Windows Features and uncheck the box associated with Hyper-V. Next, click on Ok to save the changes.
Disabling Hyper V - Once the Hyper-V functionality is disabled, restart your computer and see if the problem is fixed once the next startup is complete.
5. Disable Network Connection sharing
If none of the methods above have worked for you, and you are currently sharing a network connection via the Microsoft Hosted Network Virtual Adapter, you might be able to resolve the ‘Connection attempt failed‘ error by disabling the shared network connection.
If this scenario is applicable to your particular scenario, several affected users have managed to fix this issue by accessing the Network Connections tab and modifying the default Sharing configuration so that network connection sharing is not allowed.
If you’re looking for specific step-by-step instructions on how to do this, follow the instructions below:
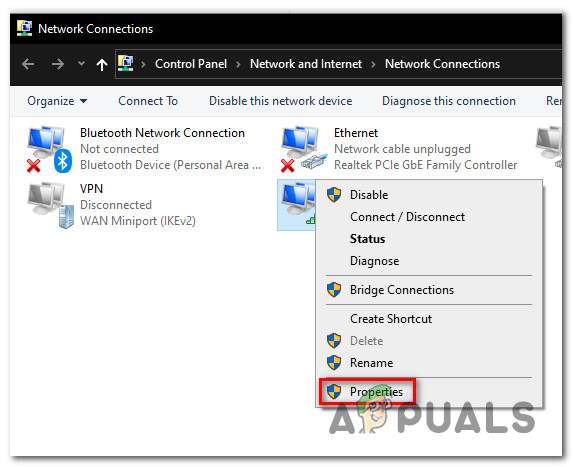
- Start by press Windows key + R to open up a Run dialog box. Inside the ‘ncpa.cpl’ inside the text box and press Enter to open up the Network Connections tab. If you’re prompted by the UAC (User Account Control), click Yes to grant admin access.

Opening the Network Connections screen - Inside the Network Connections tab, look through the list of network adapters and identify the one created specifically for hosting hotspot networks. Traditionally, it should be named Microsoft Hosted Network Virtual Adapter.
- Once you identify the correct network adapter, right-click on it and choose Properties from the context menu that just appeared.
Accessing the Properties screen of the Hosted Network Virtual Adapter Note: When you see the UAC (User Account Control), click Yes to grant admin access.
- Inside the Properties screen of the Microsoft Hosted Network Virtual Adapter, access the Sharing tab from the menu at the top, then uncheck the box associated with Allow other network users to connect through this computer’s Internet connection.
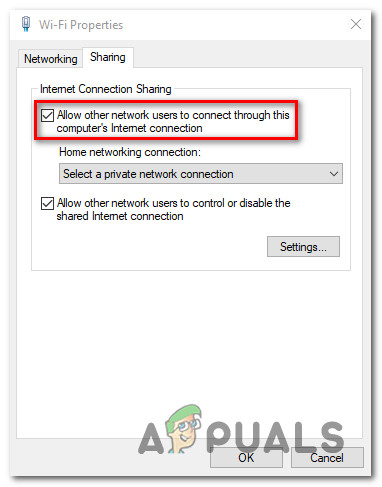
Disabling internet connection sharing - Finally, click Ok to save the changes, then restart your computer.
- Attempt to start the hotspot network once again and see if the issue is now resolved.
In case the same kind of problem is still occurring, move down to the next potential fix below.
6. Disable IE’S Ability to Work Offline via Registry Editor
If none of the methods above have proven to be effective in your case, it’s also possible to face this problem to the fact that Internet Explorer is configured to ‘work in offline mode’. IE’s Offline mode is notoriously known to conflict with a lot of VPN facilitators such as the Cisco AnyConnect software.
This would not be a problem if Microsoft didn’t remove the option to change this default behavior and made it so that the option now defaults to online.
Since there’s no longer an option to make this modification from the GUI menu, you’ll have to resort to a Registry modification.
Follow the instructions below to disable Internet Explorer’s ability to work in Offline Mode via Registry Editor:
- Press Windows key + R to open up a Run dialog box. Next, type ‘regedit’ and press Ctrl + Shift + Enter to open up an elevated Registry Editor prompt. When you are prompted by the UAC (User Account Control), click Yes to grant admin access.

Opening the Registry Editor - Inside the Registry Editor, use the left-hand side menu to navigate to the following location:
HKEY_CURRENT_USER\Software\Microsoft\Windows\CurrentVersion\Internet Settings
Note: You can either navigate to this location manually or you can paste the location directly into the navigation bar and press Enter to get there instantly.
- Once you get to the correct location, move down to the right-hand side section and locate the GlobalUserOffline DWORD key.
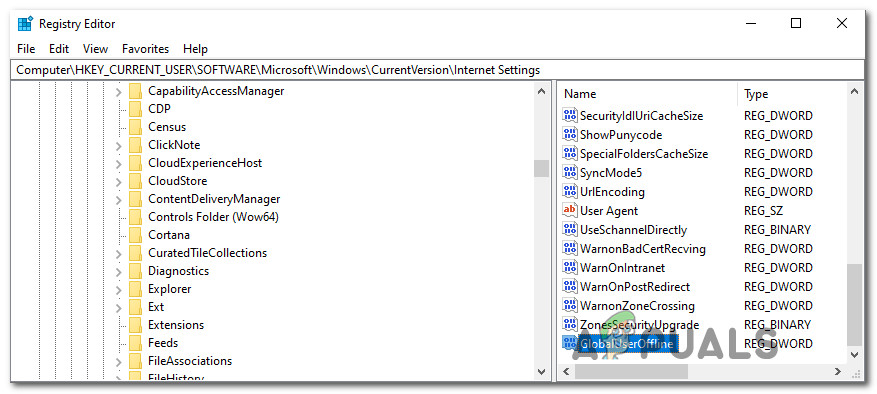
Modifying the value of GlobalUserOffline - When you see it, double-click on it and set the Base to Hexadecimal and the value to 0, and click Ok to save the changes.
- Restart your computer and see if the problem is fixed once the next startup is complete.


