How to Fix Adobe CEF Helper High Memory or CPU Usage?
Adobe CEF Helper can sometimes make your computer slow or hot because it uses a lot of memory or CPU, even if you’re not using any Adobe apps at the moment. This process is part of something called the Chromium Embedded Framework, which Adobe Creative Cloud uses to display its menus and panels.

The main reason for this problem is usually a memory leak or a bug in the Creative Cloud desktop app that keeps the process running when it shouldn’t. Other possible reasons include a broken installation or issues with background services running on your computer.
In this article, we will discuss different ways to solve this error.
1. Repair Adobe Creative Cloud
This issue is most likely to occur when Adobe Creative Cloud files are damaged or have been interfered with by other programs. Try repairing Adobe Creative Cloud to see if the problem is fixed.
-
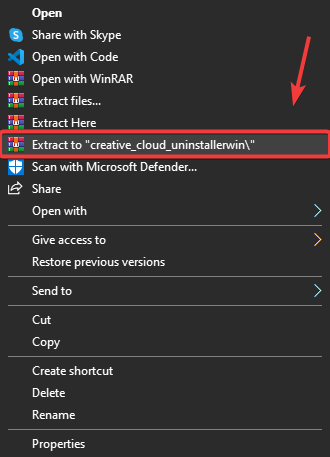
- Download the Creative Cloud Uninstaller from the link according to your Windows version.
- Right-click the downloaded ZIP folder and click Extract to “Creative_Cloud_Uninstallerwin”.
-
- Go to the extracted folder and run the Creative Cloud Uninstaller program.
- A small window will pop up—click Repair.
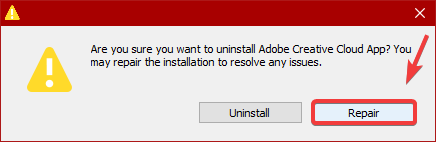
- Once the repair is finished, check if the Adobe CEF Helper still uses high memory or CPU.
2. End the Task Using PowerShell
Simply ending the Adobe CEF Helper from Task Manager doesn’t always work, as it can automatically restart. However, if you have repaired the Creative Cloud files, you can force close it using PowerShell.
-
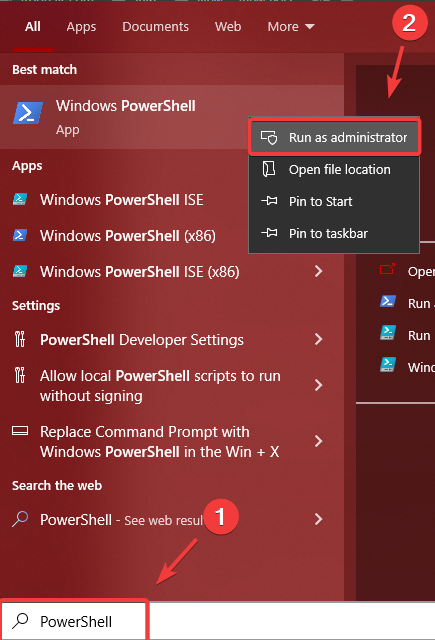
- Press the Windows Key and type PowerShell.
- Right-click on Windows PowerShell and select Run As Administrator.
- Copy and paste the following command into the PowerShell window:
taskkill /t /f /im "Creative Cloud Helper.exe"
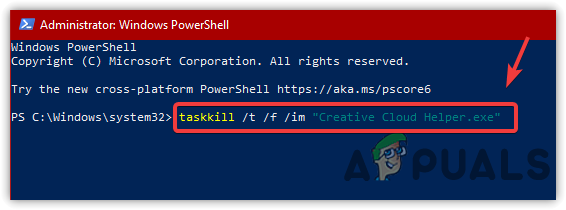
End Tasking Creative Cloud Helper - After doing this, Adobe CEF Helper should stop using high CPU or memory resources.
3. Disable “Launch Creative Cloud at Login”
If the problem is still there, you can try turning off the option to launch Creative Cloud when your computer starts. This will prevent Creative Cloud from running automatically at startup, but won’t stop the processes needed for Creative Cloud apps. Many users reported that this simple trick solved their issue.
- Click Settings in the top right corner of the Adobe Creative Cloud window.
- Go to Preferences and click General.
- Uncheck Launch Creative Cloud at Login.
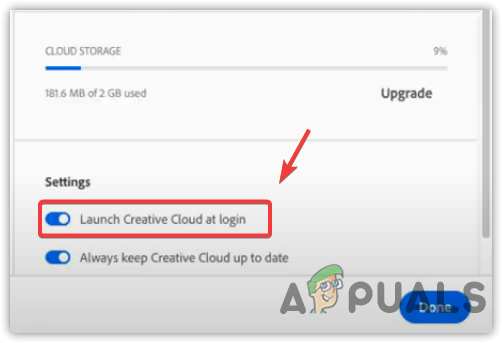
Disabling Launch Creative Cloud At Launching - Restart your computer and see if the high resource usage issue is fixed.
You can also prevent the Adobe CEF Helper process from running by disabling Adobe Creative Cloud at startup. Here’s how to do it from Task Manager:
- Press Ctrl + Shift + Esc to open Task Manager.
- Click on the Startup tab at the top.
- Select Adobe Creative Cloud and click Disable.
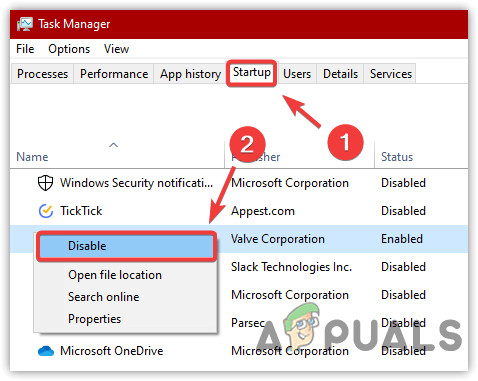
Disabling Startup Apps - Restart your computer and check if the problem is resolved.
4. Perform a Clean Boot
If the above methods haven’t worked, try performing a clean boot. This helps you start Windows with only the essential services and drivers running, so you can see if a third-party program is causing the issue. In this case, we want to disable all unnecessary programs—including Adobe Creative Cloud—to see if that helps.
- Press Win + R to open the Run dialog.
- Type msconfig and press Enter.
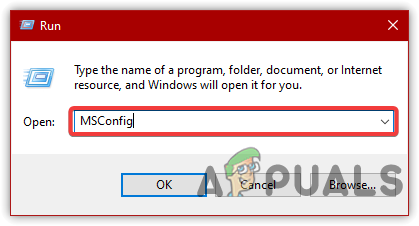
Opening MS Configuration - Under the General tab, select Selective Startup, then go to the Services tab.
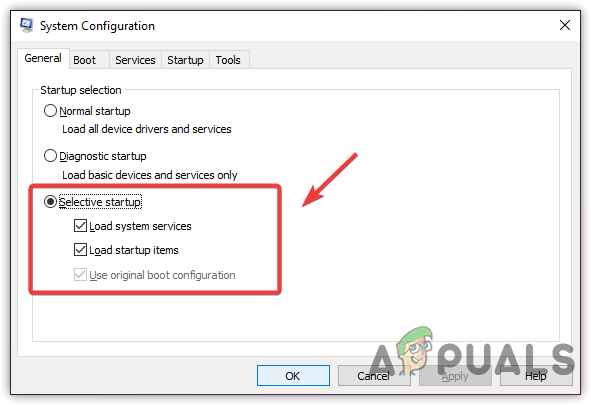
Click Selective Startup - Check the box for Hide All Microsoft Services, then click Disable All.
- Click Apply and then OK.
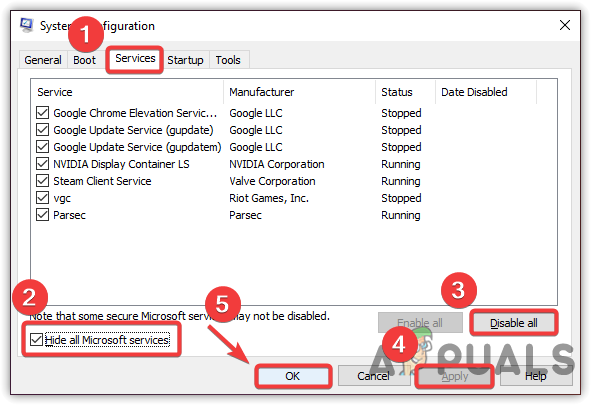
Disabling Irrelevant Applications and Services - Restart your computer and check if Adobe CEF Helper still uses high CPU or memory resources.
5. Disable Third-Party Antivirus
Sometimes, antivirus programs can conflict with Adobe CEF Helper, leading to increased CPU or memory usage. Try disabling your antivirus temporarily to check if it helps.
- Right-click on your antivirus icon in the system tray (bottom-right corner of your screen).
- Hover your mouse over Avast Shields Control (or similar, depending on your antivirus).
- Click Disable For 10 Minutes.
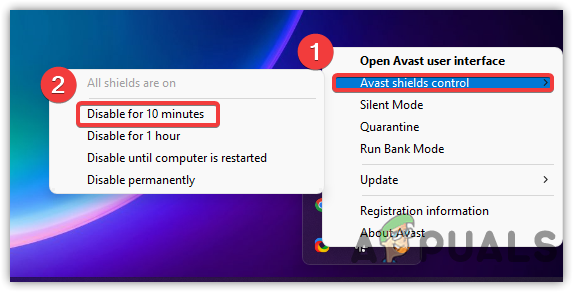
Turning Off the Third-Party Antivirus - Check if the issue is resolved. If so, consider configuring your antivirus to allow Adobe programs or switch to a more compatible antivirus.
6. Reinstall Adobe Creative Cloud App
If none of the above solutions have worked, your last option is to reinstall Adobe Creative Cloud. Many users have found that reinstalling fixes the issue. You’ll need to first uninstall all Adobe apps before removing Creative Cloud itself.
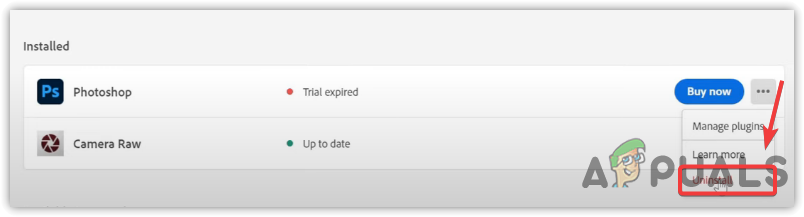
- Open Adobe Creative Cloud and go to the Installed section.
- Click the three dots next to each app and select Uninstall, then click Remove.
Uninstalling Adobe Photoshop - After all apps are uninstalled, go to Settings > Apps.
- Find Adobe Creative Cloud in the list, then click Uninstall.

Uninstalling Adobe Creative Cloud - Click Uninstall again to confirm.
- Finally, download and install Adobe Creative Cloud again from the official website.


