Fix: “Your Network Settings Prevent Content From Loading Privately” For iPhone, iPad and Mac
When iOS 15 was released, Apple improved its privacy protection by hiding IP addresses and limiting senders from detecting users’ location information. However, this caused many Apple users to experience problems with their Mail app when these security features were enabled.
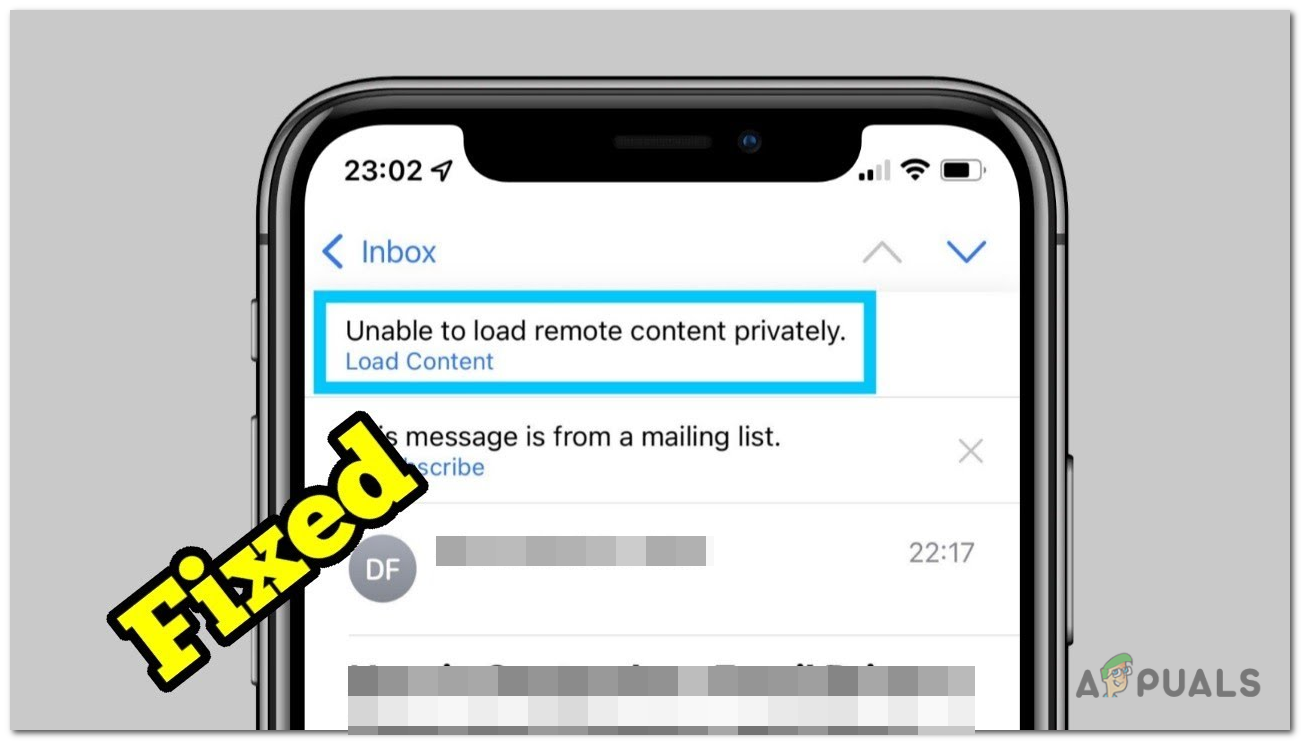
Those users reported loading issues with the mail content and were notified with the message, “Your Network Settings Prevent Content From Loading Privately.” These particular problems usually occur when you have recently upgraded your device to the latest iOS update. This problem can also be caused by bugs in the device and apps. Fortunately, there are a few ways to get rid of this error easily.
Disable ‘Protect Mail Activity’ and ‘Block All Remote Content.’
Since this is the new feature that causes this error, you can potentially resolve the problem by simply disabling it in certain cases. If this doesn’t work, be sure to reactivate the security feature. To disable this feature, follow these steps:
Disabling features on iPhone and iPad
- Open the Settings app from the Home Screen or the App Library.
- Find Mail and open it.
- Go to Privacy Protection.
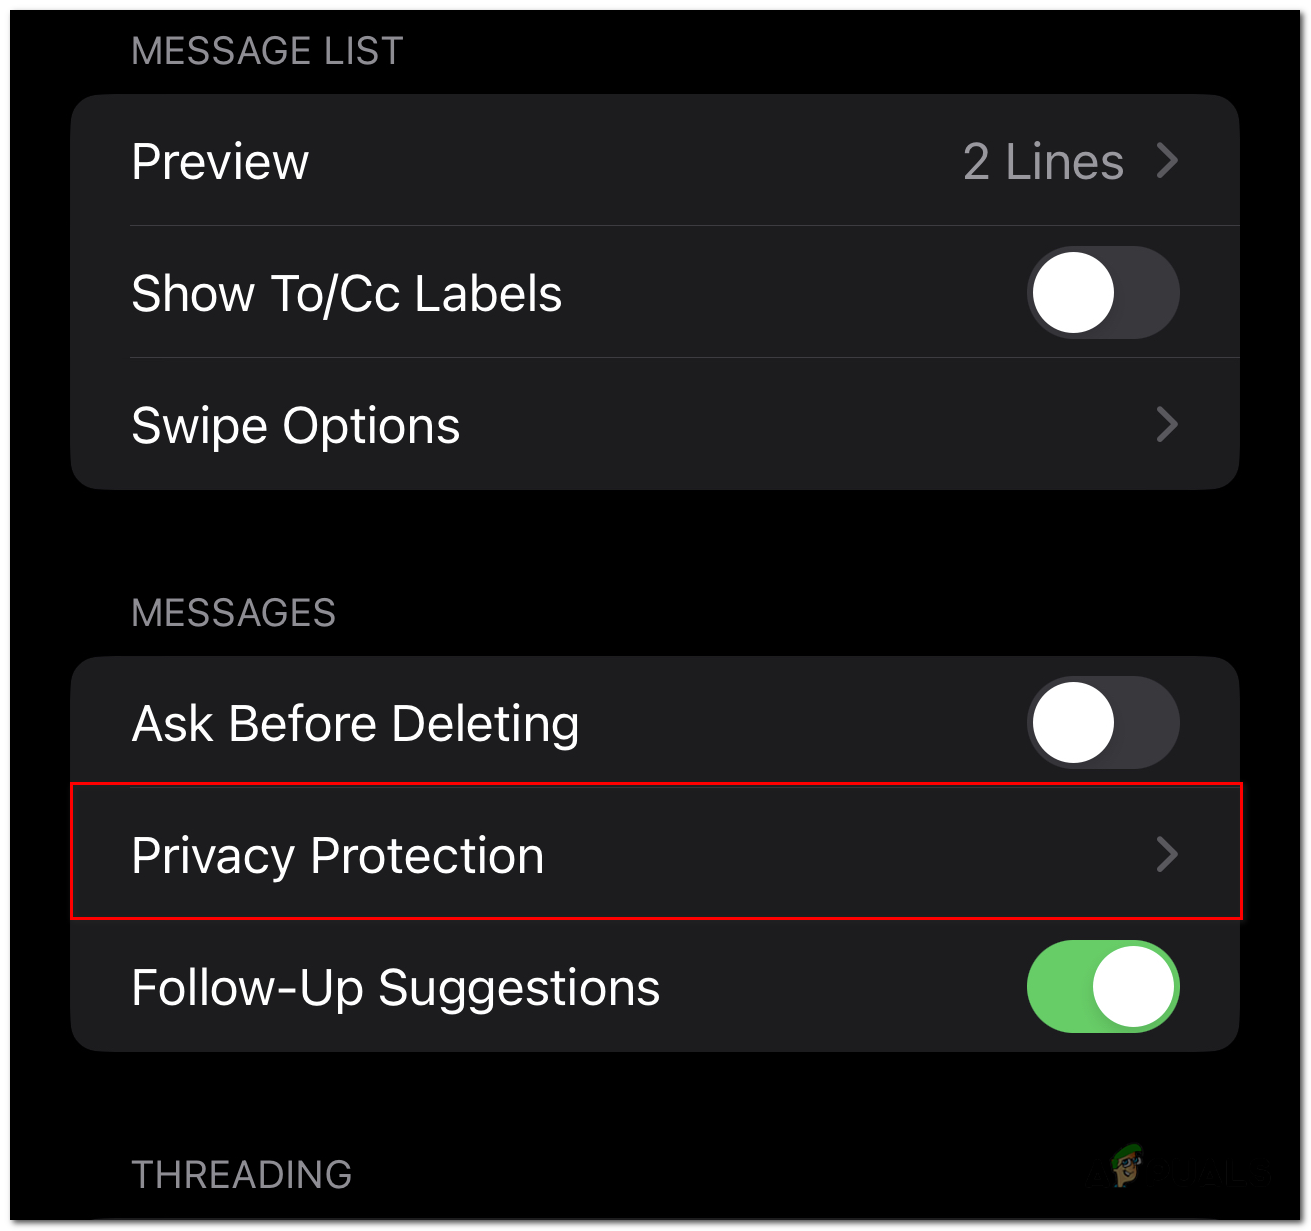
Go to Privacy Protection. - Turn off the “Protect Mail Activity” setting.
- Once its done, turn off the “Block All Remote Content” and “Hide IP Address” settings aswell.
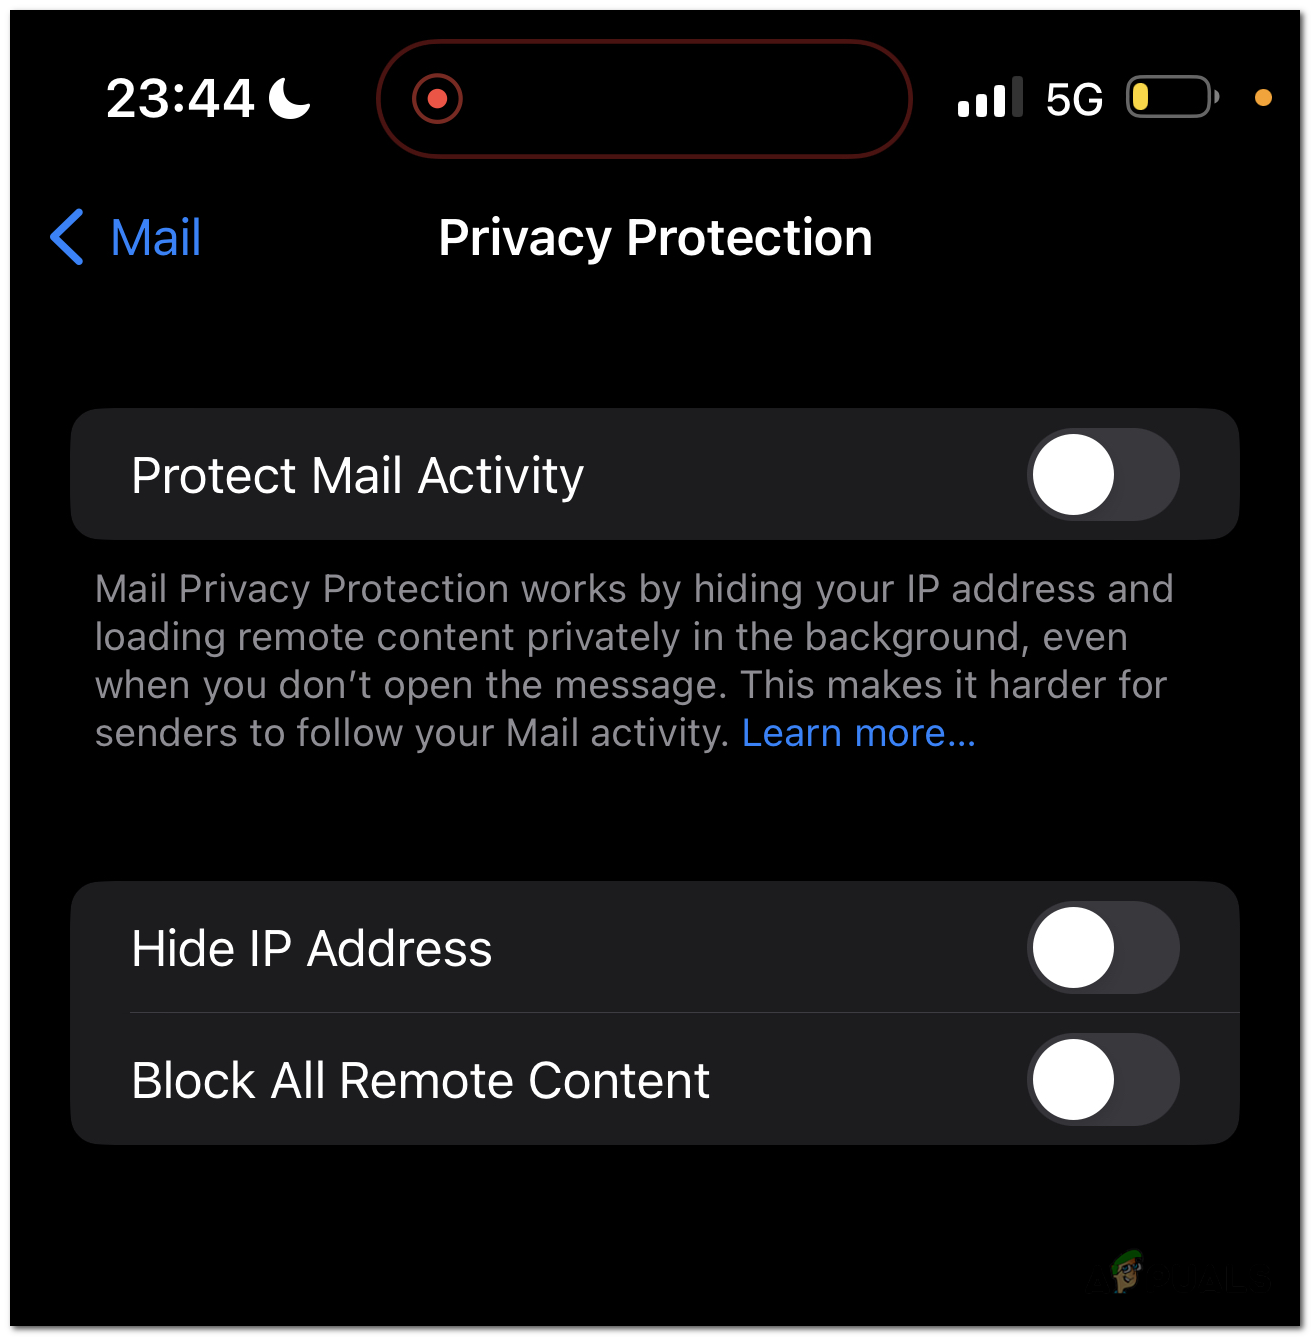
Turn off the “Protect Mail Activity”, “Block All Remote Content” and “Hide IP Address” settings.
Disabling on a Mac
- Open the Mail app.
- Now click on “Mail” button on the top left of the screen.
- Select Settings in the dialog box.
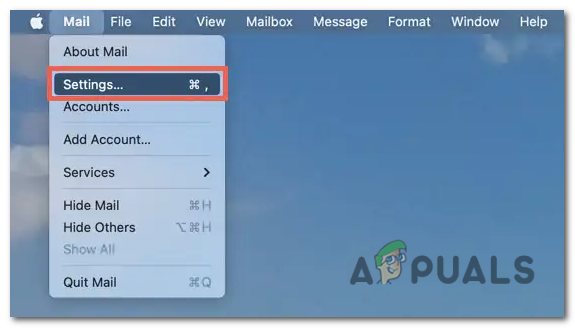
Open Settings. - Switch to the Privacy tab.
- Uncheck the boxes next to “Protect Mail Activity”, “Hide IP Address” and “Block All Remote Content”.
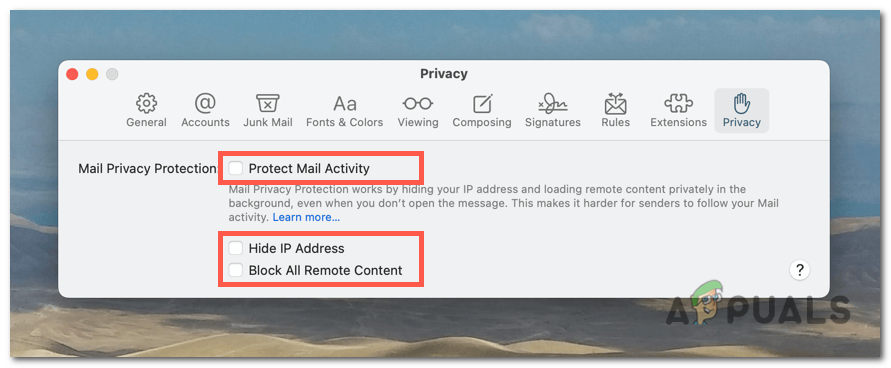
Uncheck the boxes next to “Protect Mail Activity”, “Hide IP Address” and “Block All Remote Content”.
Turning OFF “Limit IP Address Tracking”
On the iPhone, iPad, and Mac, internet connections try by default to hide your IP address from email trackers. Although that’s helpful for privacy, it can lead to the Apple Mail app causing this error. This method will prevent your Apple device from putting these restrictions in place. To turn off ‘Limit IP Address Tracking’, follow these steps:
For iPhone and iPads
- Open the Settings app on your iPhone and head to the Wi-Fi settings.
- Press the info icon next to the Wi-Fi network you are connected to.
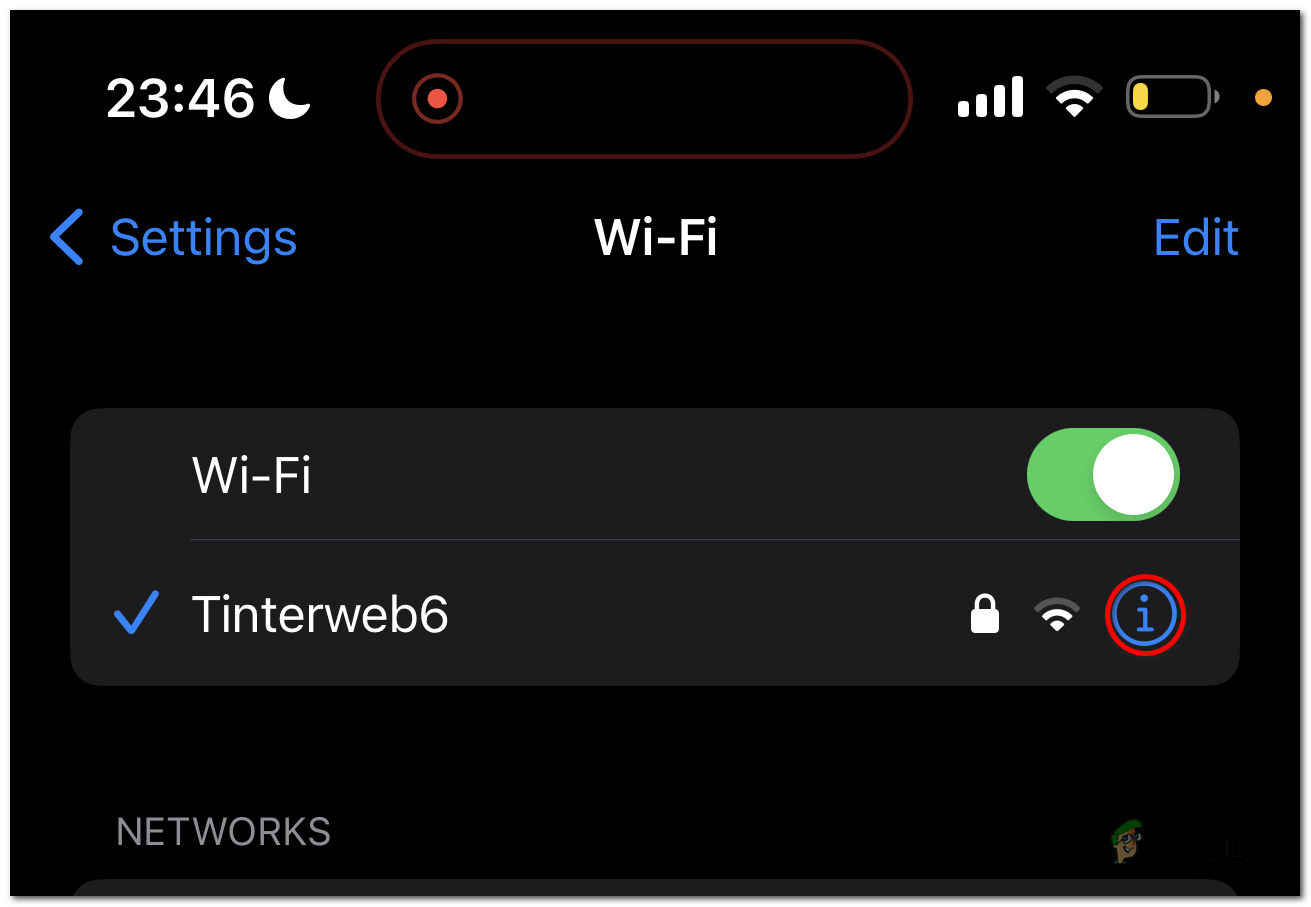
Press the info icon next to the Wi-Fi network. - Scroll down and toggle OFF the “Limit IP Address Tracking” option.
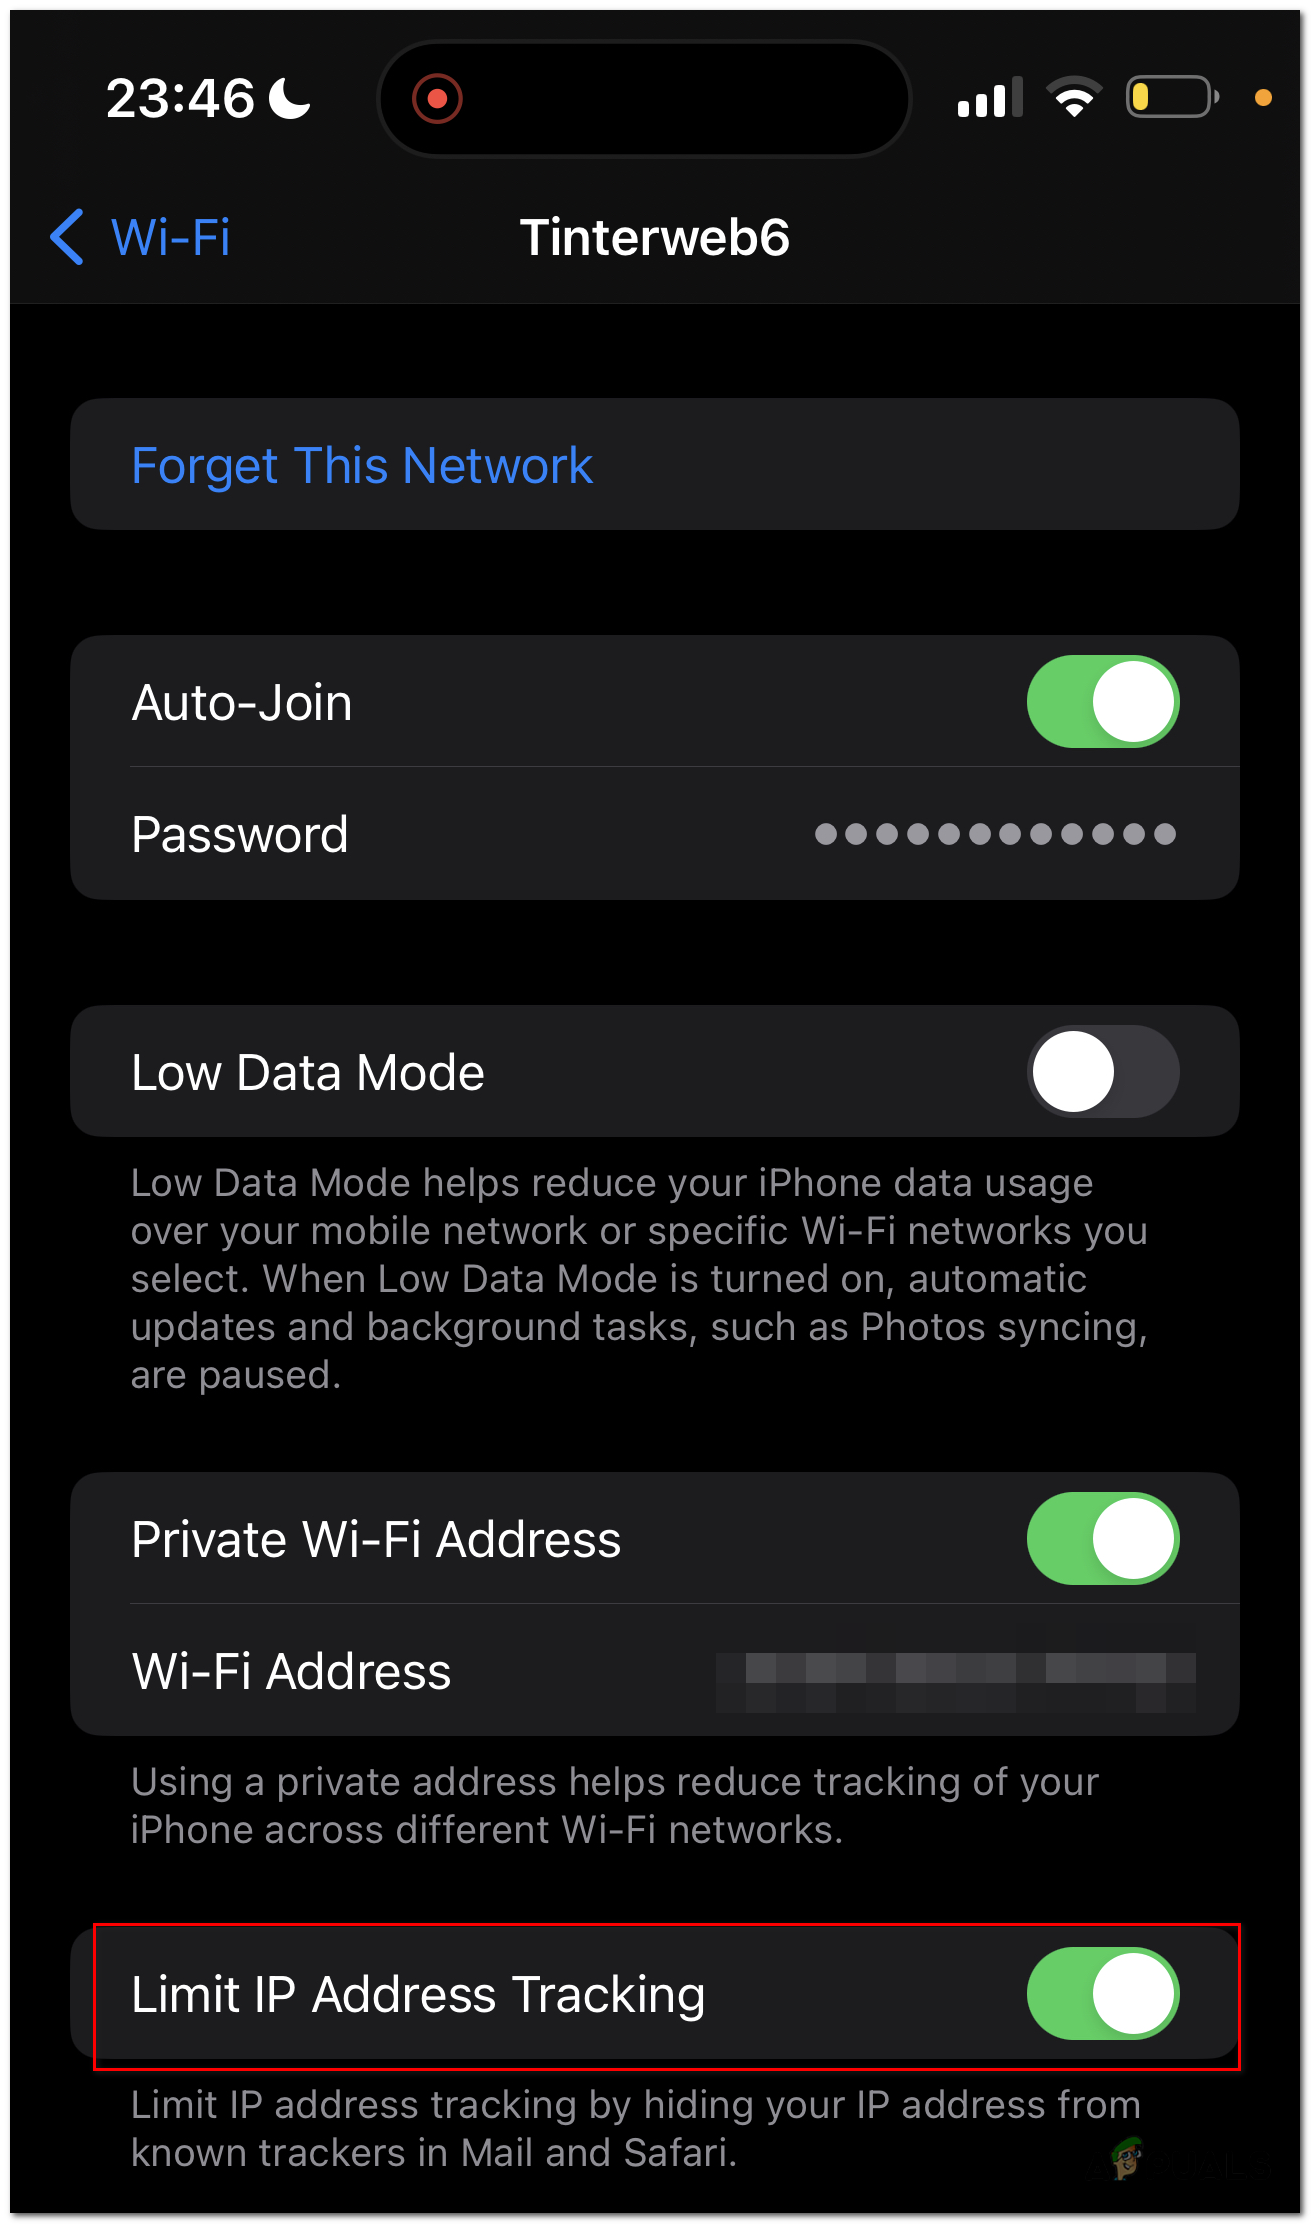
toggle OFF the “Limit IP Address Tracking” option.
If this error shows up while your using Cellular Data, follow these steps instead:
- Open the Settings app on your iPhone and head to the “Mobile Data”.
- Open “Mobile Data Options”.
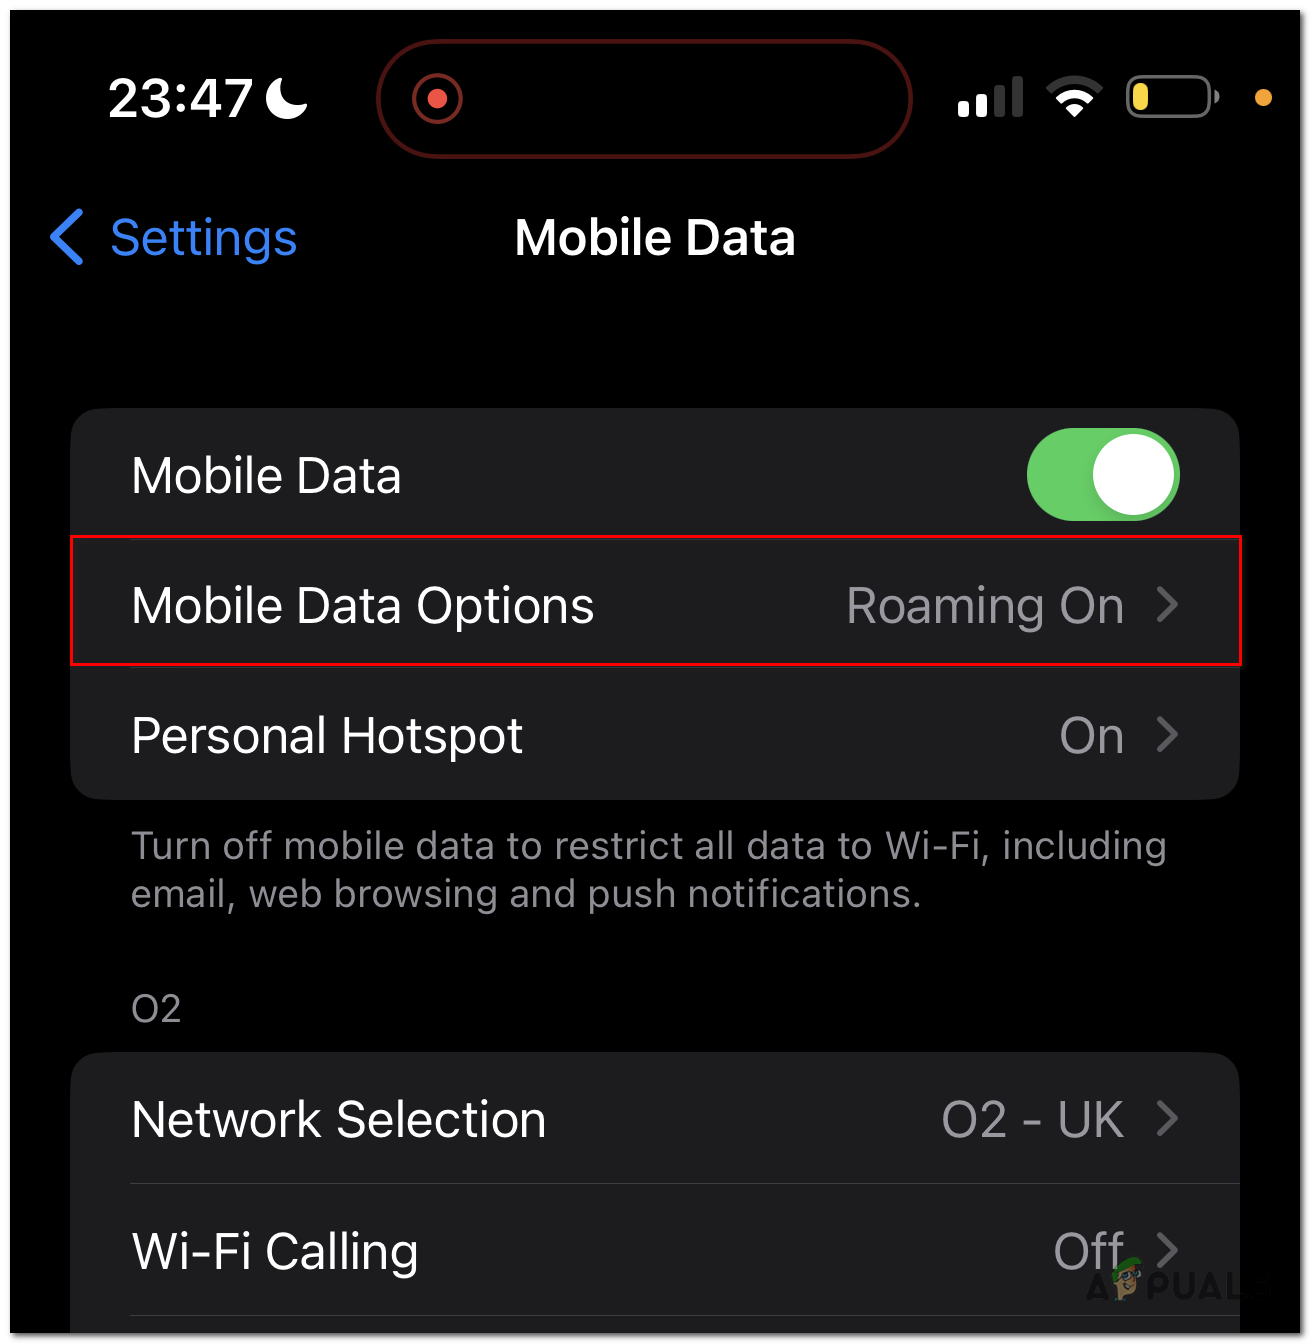
Open “Mobile Data Options”. - Disable the “Limit IP Address Tracking” option.
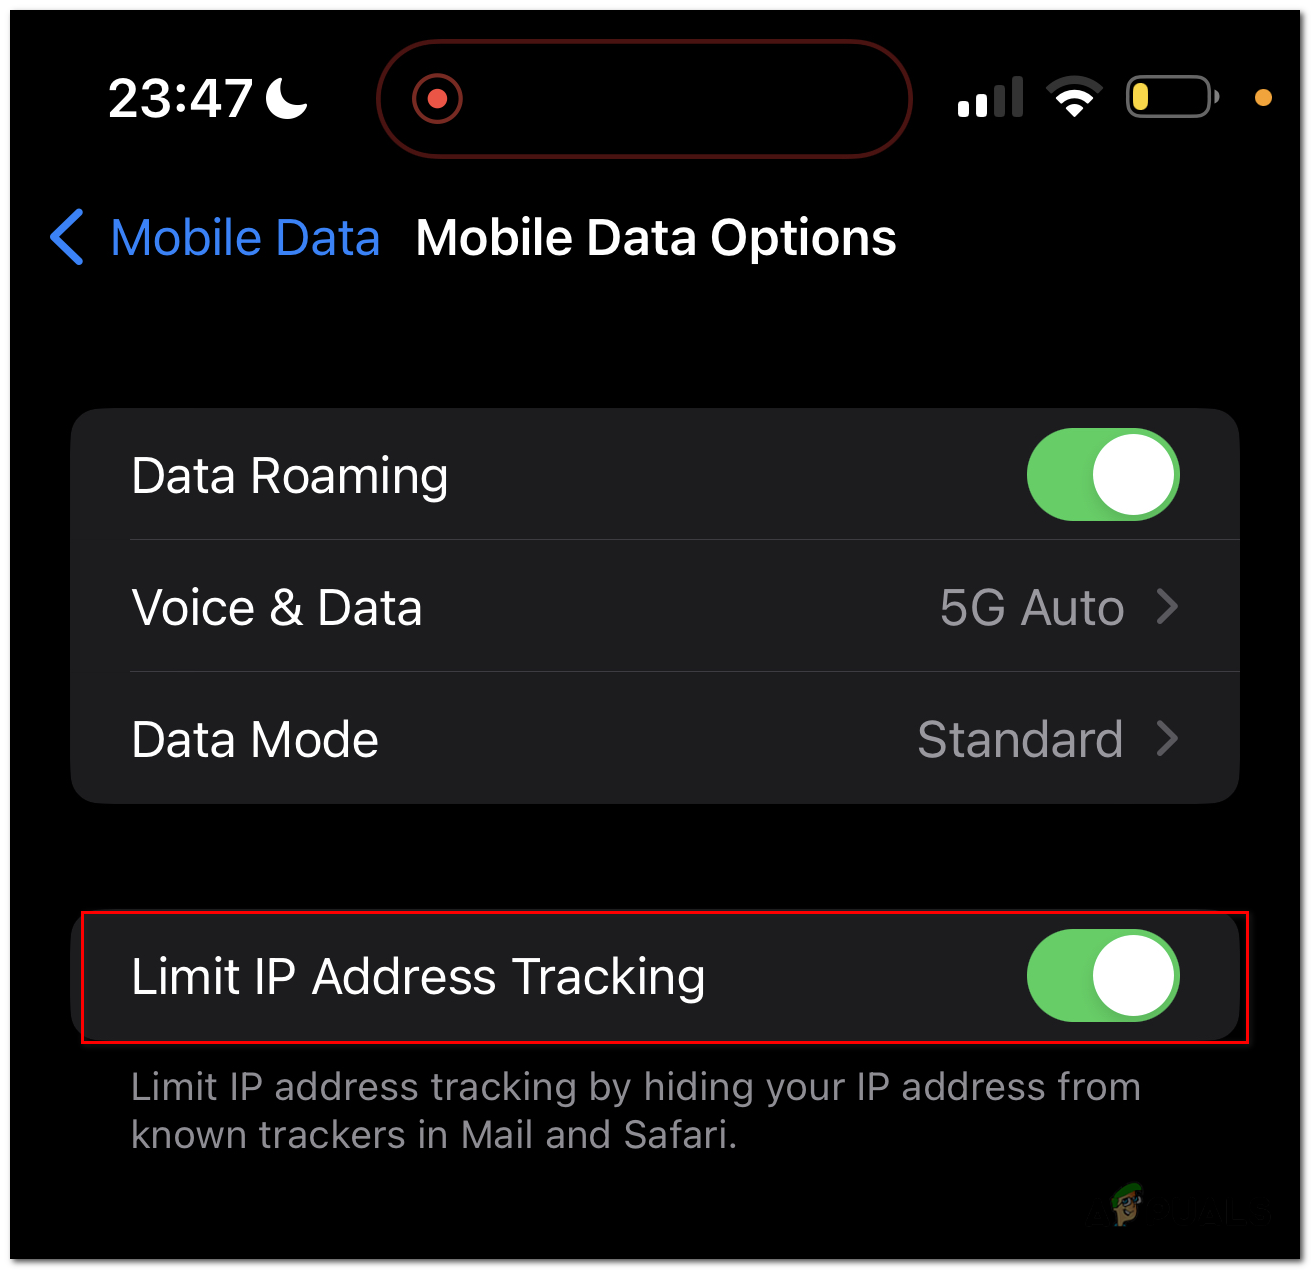
Disable the “Limit IP Address Tracking” option.
For a Mac
- Open the Apple menu, which is located on the top left of the screen.
- Select System Settings.

Select System Settings. - Open the Wi-Fi settings.
- Press the “Details” button next to the Wi-Fi network you are connected to.
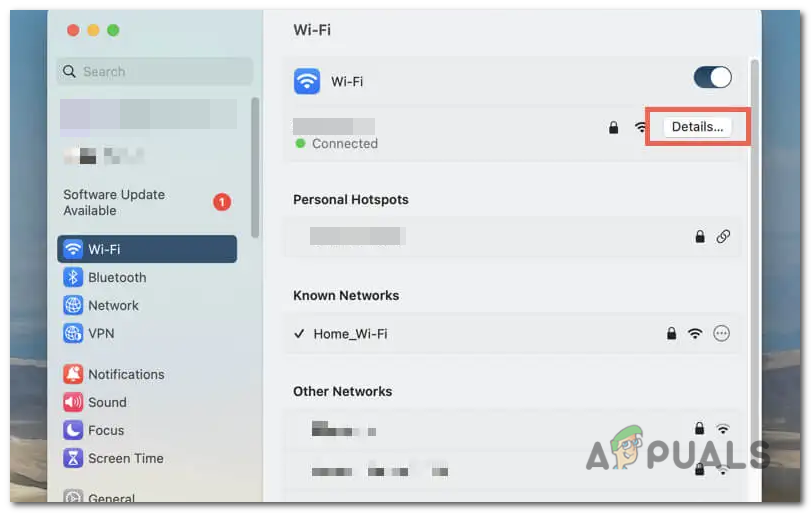
Press the “Details” button next to the Wi-Fi network you are connected to. - Turn OFF the “Limit IP Address Tracking” option.
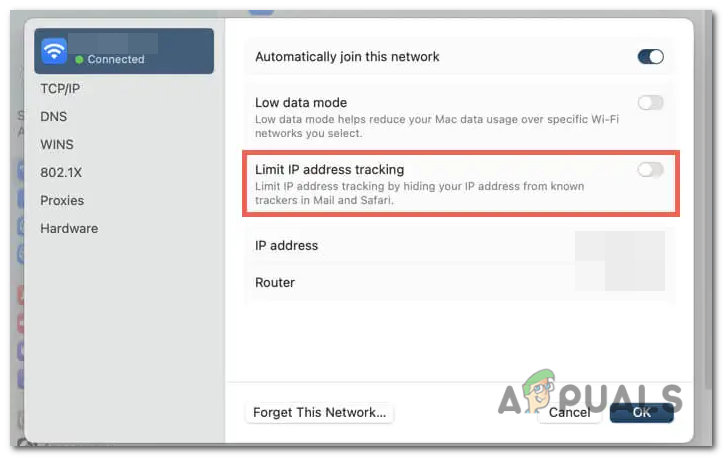
Turn OFF the “Limit IP Address Tracking” option.
iCloud Private Relay Server’s Status
iCloud Private Relay is a feature by Apple that enhances the privacy and security of internet browsing for users. It is designed to provide a more secure and private internet connection by encrypting and routing your internet traffic through two separate relays.
When you use iCloud Private Relay, your data is encrypted and sent through Apple’s own network to a trusted third-party relay. This relay then forwards the traffic to its intended destination, helping to mask your IP address and prevent websites from tracking your online activities.
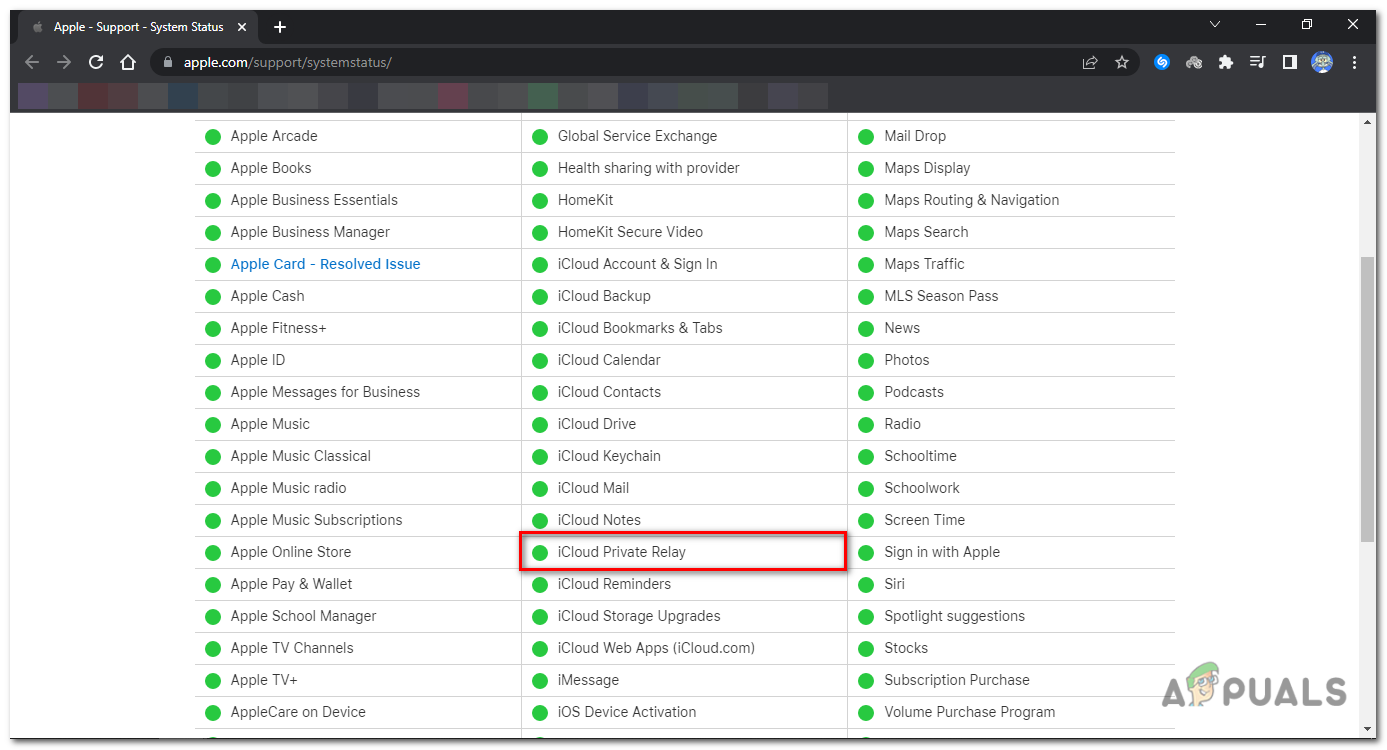
To check the server’s availability, head to Apple’s System Status page using a browser. Scroll down and look for iCloud Private Relay; if it has a green dot next to it, it means it is online, and if it is red, that means the servers are offline.
Disabling iCloud Private Relay
If the servers are online and you are still facing this error, disabling Private Relay will help you get rid of the error. Follow these steps to disable iCloud Private Relay on your iPhone, iPad, or Mac:
Disabling on iPhone and iPad
- Open the Settings app on your iOS device.
- Locate and tap on your Apple ID.
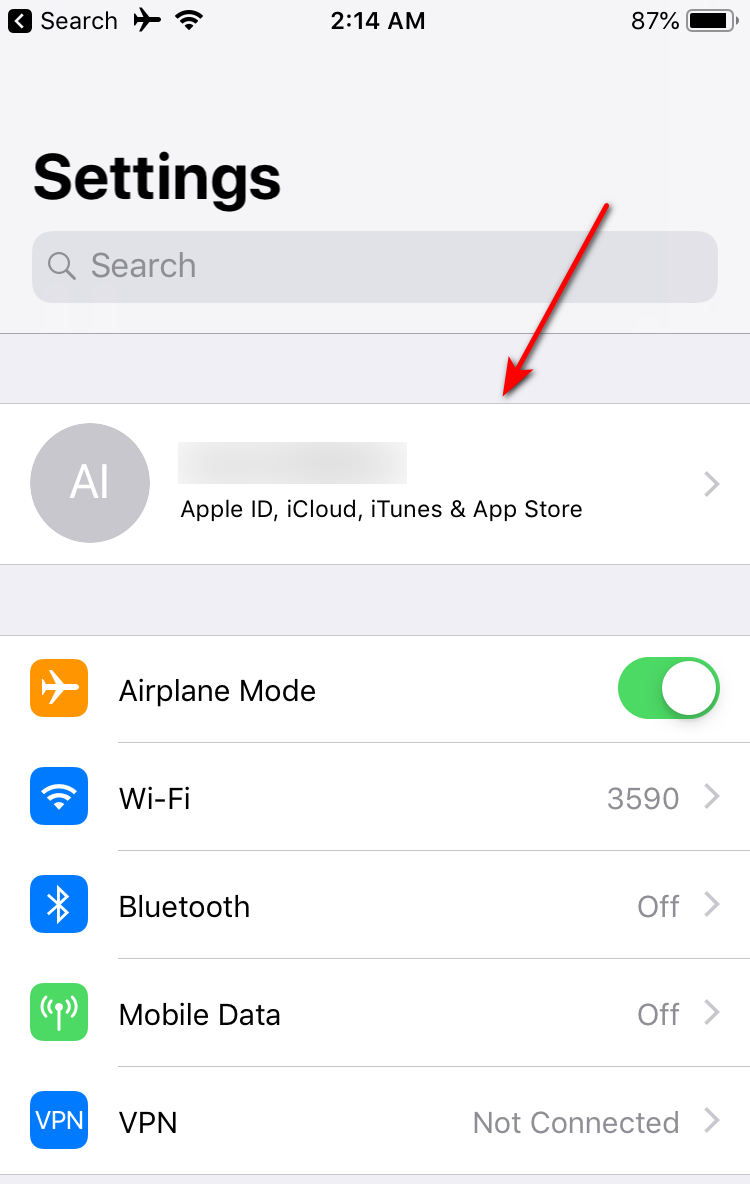
Locate and tap on your Apple ID. - In the Apple ID menu, select iCloud.
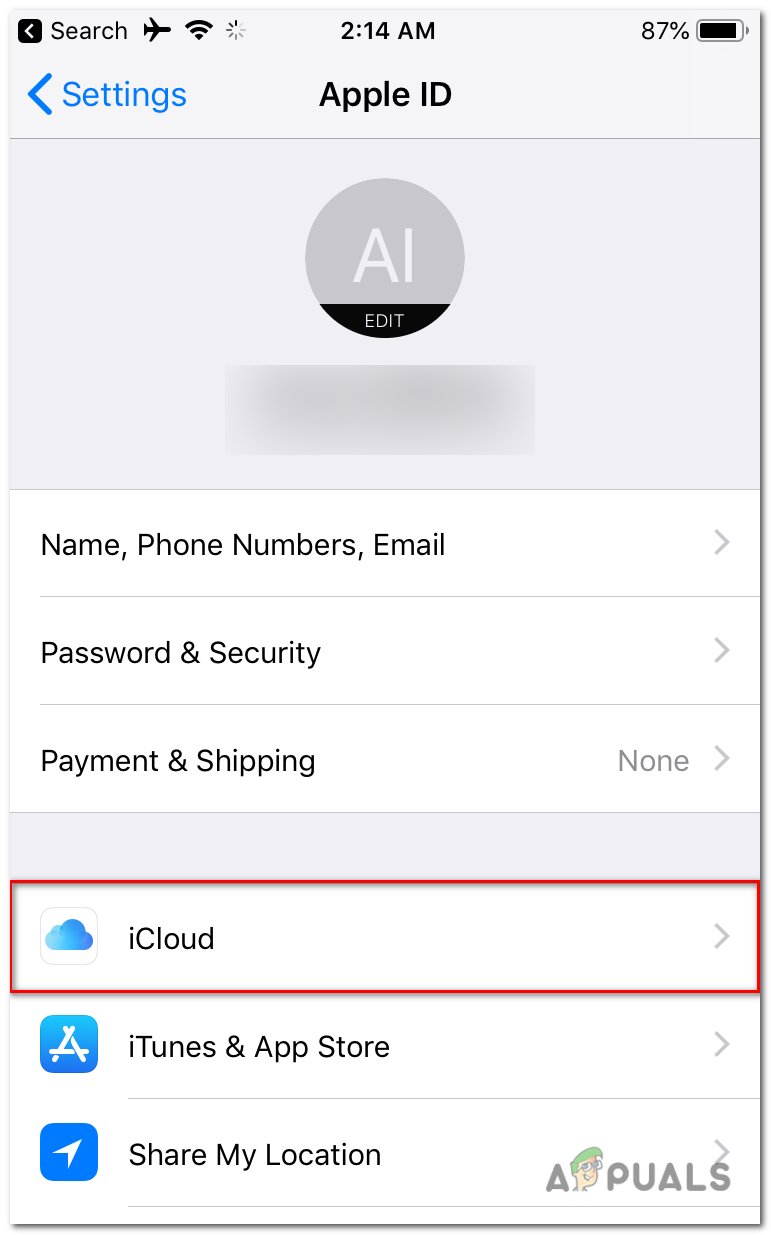
In the Apple ID menu, select iCloud. - Scroll down within the iCloud settings until you reach the section labeled iCloud+.
- Tap on “Private Relay” option.
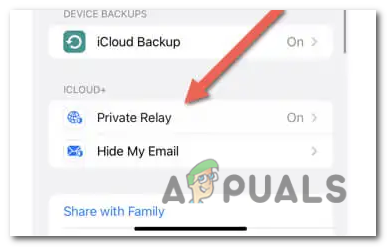
Tap on “Private Relay” option. - Turn OFF the switch next to Private Relay. To temporarily disable Private Relay until tomorrow, choose “Turn Off Until Tomorrow”.
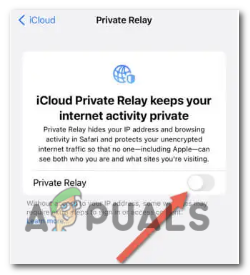
Turn OFF the switch next to Private Relay. - To permanently disable it, select “Turn Off Private Relay”.
Disabling on a Mac
- Open the System Settings app on your Mac.

Open the System Settings app on your Mac. - Open your Apple ID settings.
- Within the Apple ID menu, choose iCloud.
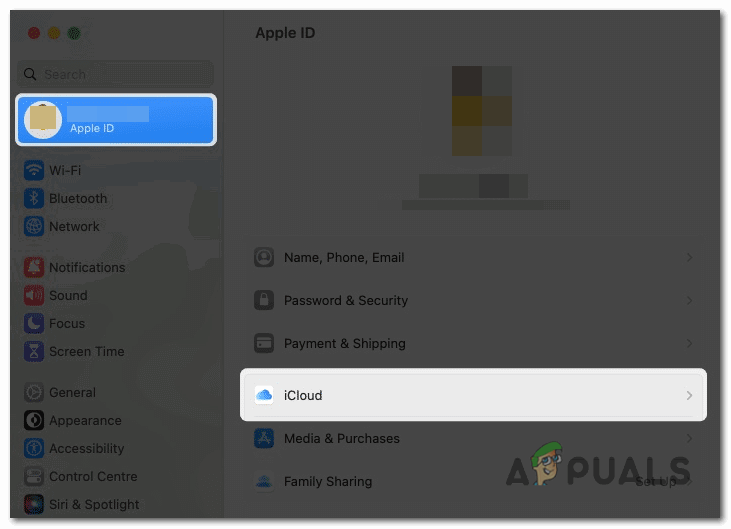
choose iCloud. - Locate and select the Private Relay option.
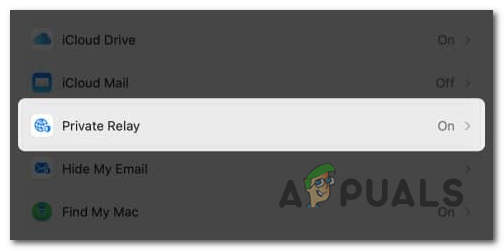
Locate and select the Private Relay option. - Press the Turn Off button.
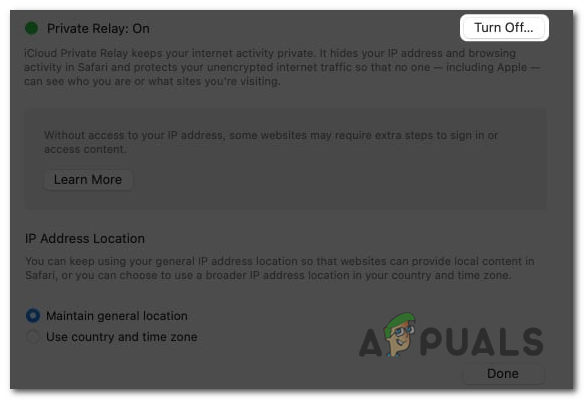
Press the Turn Off button. - Choose between the “Turn Off Until Tomorrow” and “Turn Off Private Relay options”.
Updating to the latest OS update
Updating your Apple device eliminates any potential bugs in the system software and Mail app that might cause this problem.
Updating on iPhone and iPad
- Open the Settings app on your device.
- Scroll down and tap on General.

Scroll down and tap on General. - Within the General menu, select Software Update.
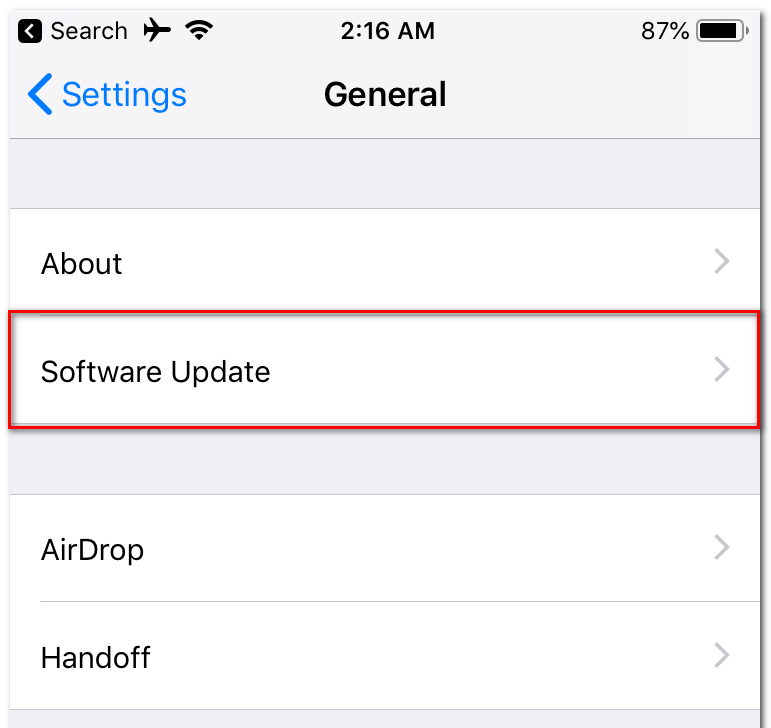
Within the General menu, select Software Update. - Wait for the device to check for any available iOS or iPadOS updates.
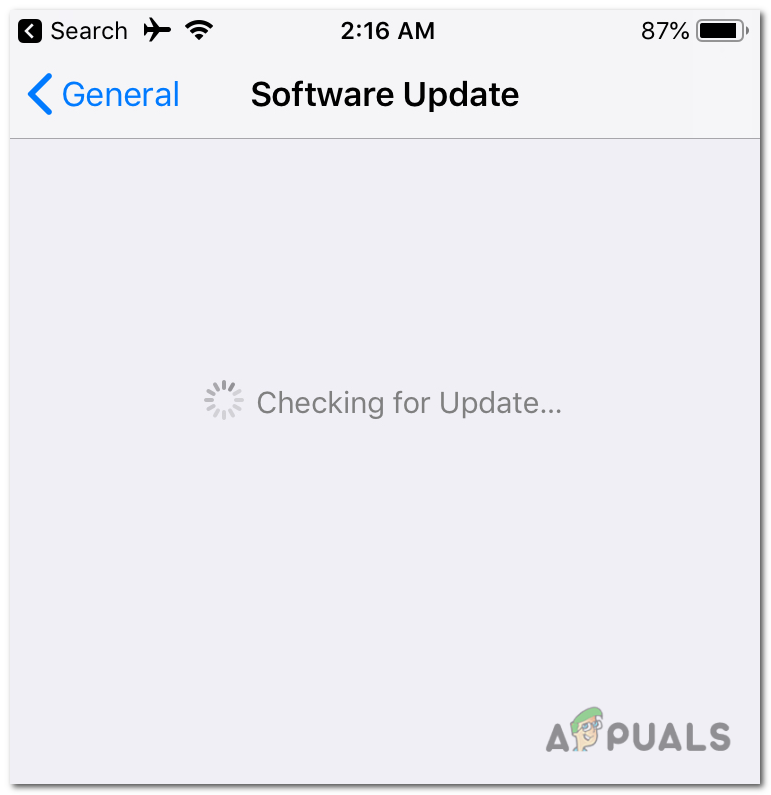
Wait for the device to check for any available iOS or iPadOS updates. - Once the checking process is complete, tap on Download & Install.
Updating on a Mac
- Open the Apple menu located in the top left corner of your screen.
- From the Apple menu, select System Preferences.
- Within System Preferences, locate and select Software Update.
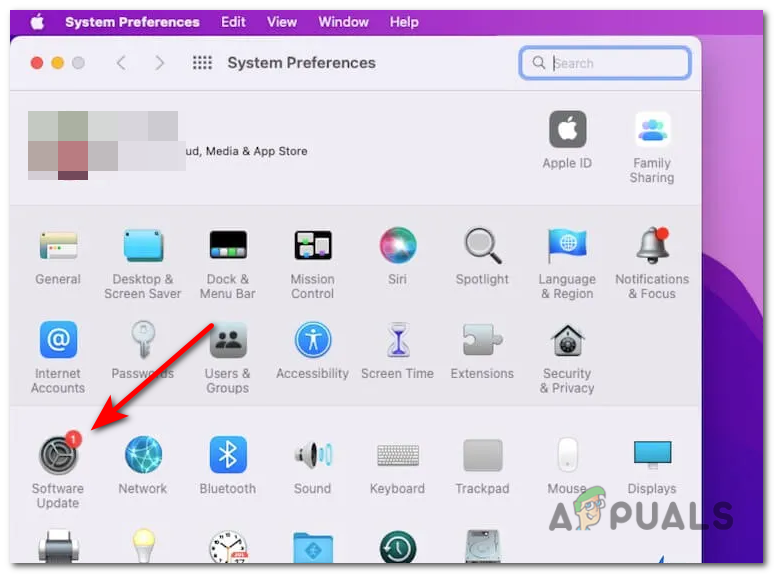
Within System Preferences, locate and select Software Update. - Wait for your Mac to check for any available macOS updates.
- Once the checking process is complete, select the option Update Now.
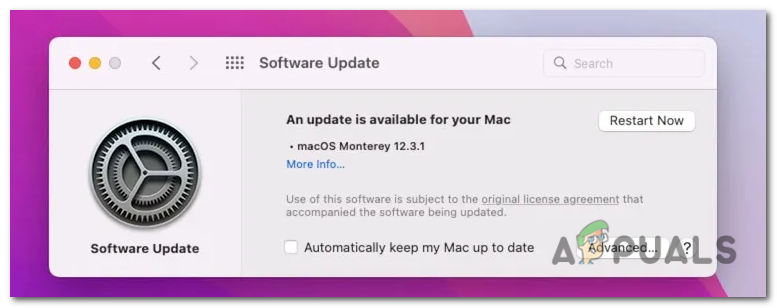
Once the checking process is complete, select the option Update Now.
Resetting Network Preferences
This mail loading issue can be caused by a corrupt or broken network settings configuration on your Apple device, resetting the network preferences to their factory defaults can help you eliminate this error.
However, please note that this process will remove all saved Wi-Fi connections and passwords, so be prepared to manually reconnect them afterwards. Here are the steps to reset network settings on iPhone, iPad, and Mac:
Resetting on iPhone and iPad
- Open the Settings app on your device.
- Select General from the list of options.
- Scroll down and go to “Transfer or Reset iPhone”, and then tap Reset.
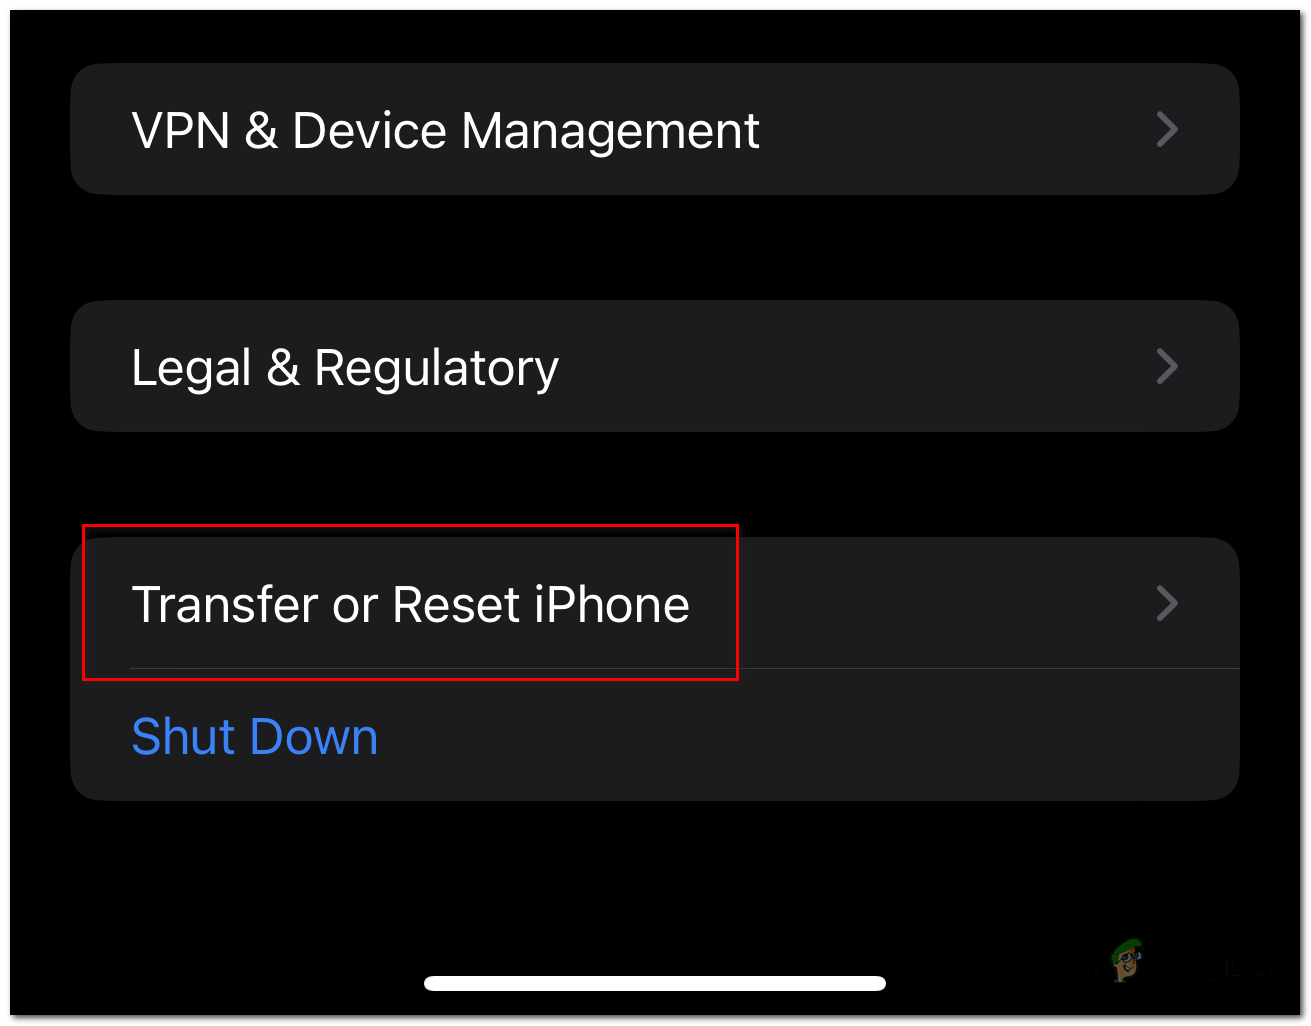
Scroll down and go to “Transfer or Reset iPhone”, and then tap Reset. - Click on “Reset Network Settings”.
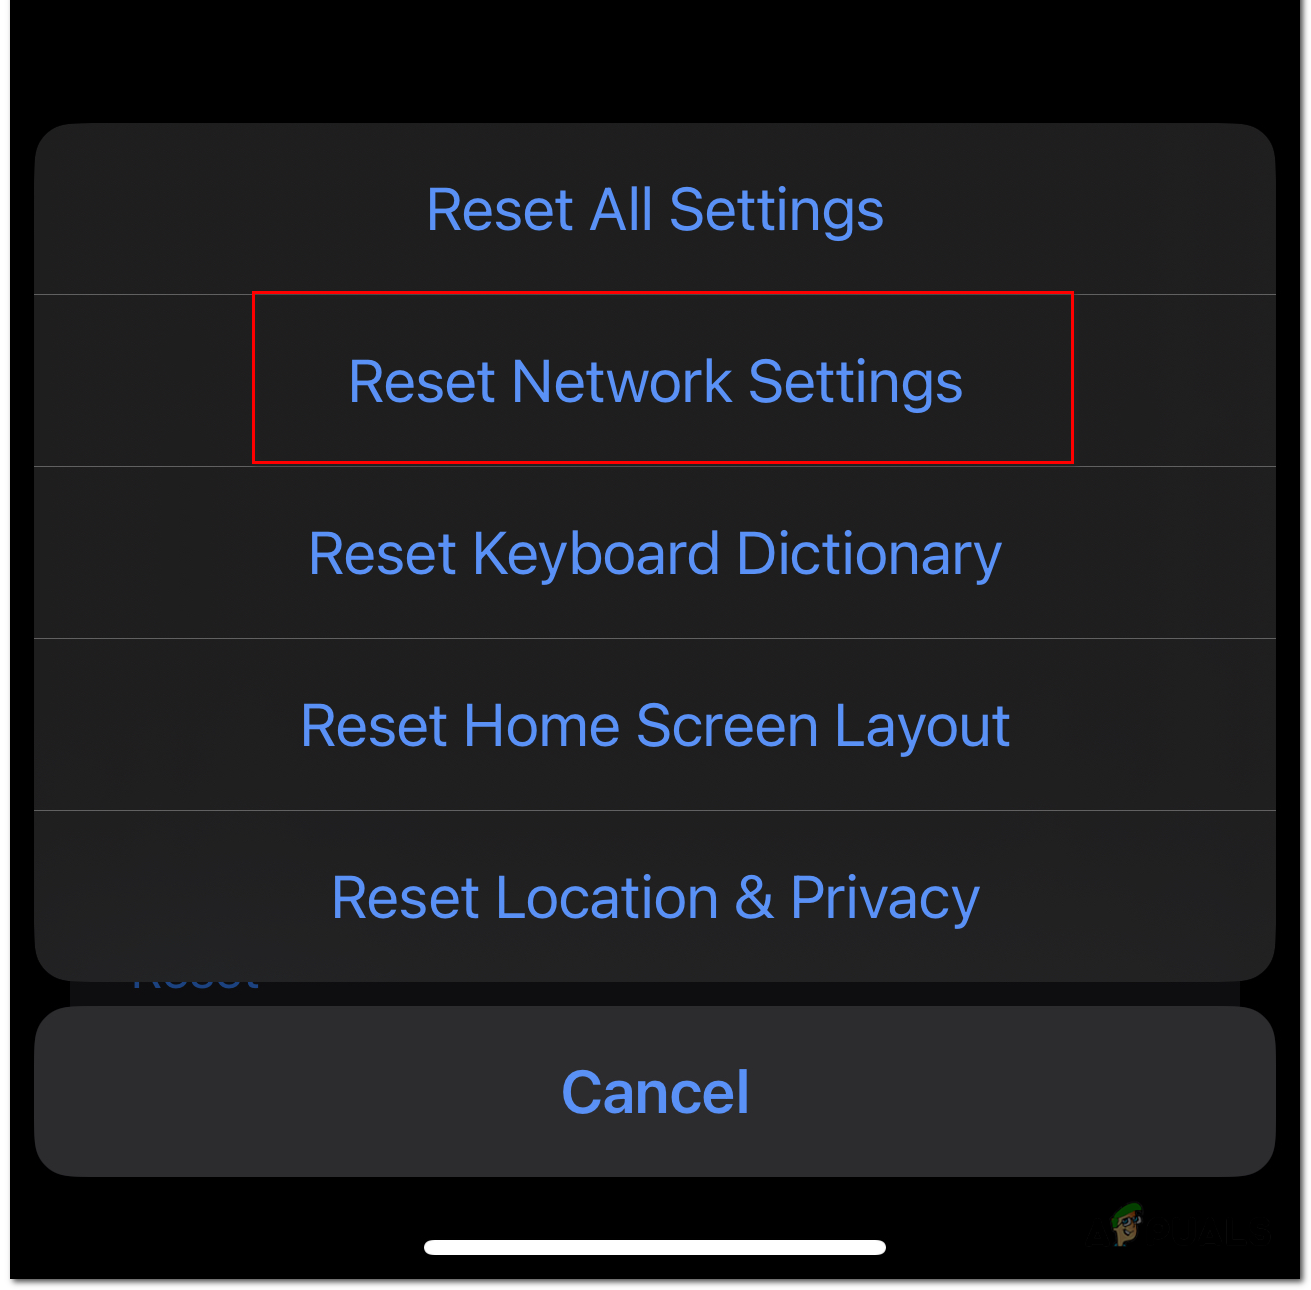
Click on “Reset Network Settings”.
Resetting on a Mac
- Open Finder and select “Go” on the menu bar.
- Choose “Go to Folder” from the drop-down menu.
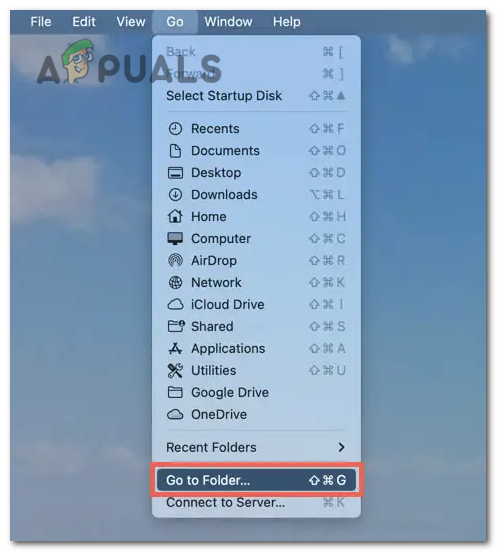
Choose “Go to Folder” from the drop-down menu. - In the text field, enter the following path: “/Library/Preferences/SystemConfiguration/” and press Enter.
/Library/Preferences/SystemConfiguration/
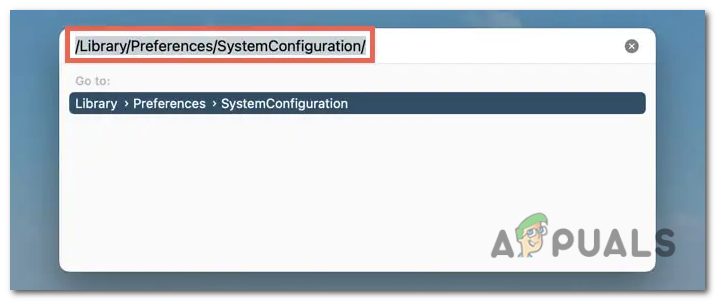
In the text field, enter the following path: “/Library/Preferences/SystemConfiguration/” and press Enter. - Control click the following files from the folder that opens and select Move to Trash:
com.apple.airport.preferences.plist

com.apple.network.identification.plist

com.apple.network.eapolclient.configuration.plist

com.apple.wifi.message-tracer.plist

NetworkInterfaces.plist

Preferences.plist
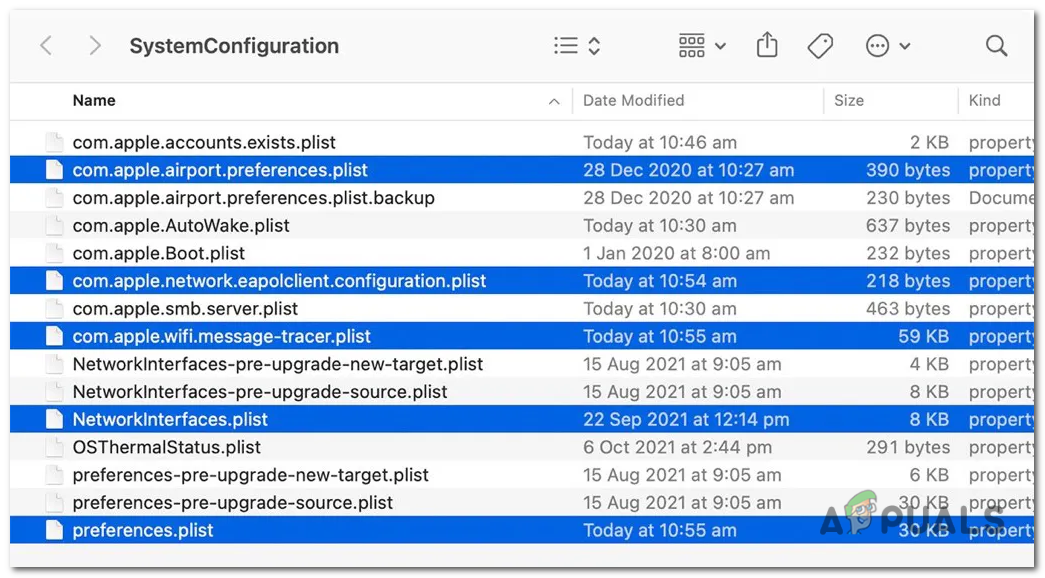
Control click the following files from the folder that opens and select Move to Trash: - Open the Apple menu and select Restart.
- Uncheck the box next to “Reopen windows when logging back in“, and then select Restart again.
 Reviewed by


