How to Resolve XMP Not Working Issue?
You can optimize your system to utilize Extreme Memory Profiles, or XMP, essentially overclocking your RAM. By enabling this feature, your system can exploit faster RAM speeds. Frustration may arise, however, if your system does not engage this function and instead operates at stock speeds. In severe scenarios, the system may fail to boot or complete the Power-On Self Test (POST) after activating this BIOS feature.
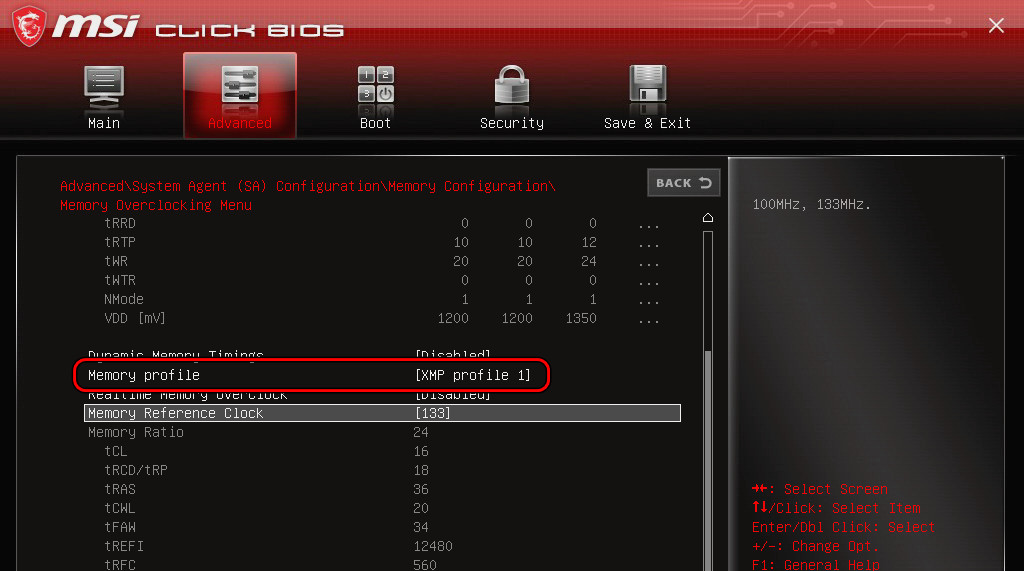
1. Basic Troubleshooting
Start with some fundamental steps.
- Restart: Shut down the system and disconnect the power cable. After waiting a minute, reconnect the power cord and turn on the system.
- Compatible RAM: Verify that the newer RAM sticks you are attempting to use with XMP are compatible with your motherboard. Refer to the Qualified Vendor List (QVL) provided by the motherboard’s manufacturer for confirmation.
2. Check the Current RAM Speeds
Inspect your existing RAM speeds before adjusting any settings.
Open Command Prompt and run:
wmic memorychip get speed

3. Clear the System’s CMOS
The system’s CMOS retains its BIOS configurations, including memory controller settings that can prevent XMP from initializing if they are inaccurate. Resetting the CMOS can resolve the issue.
- Power off the system and disconnect the power cable.
- Open the case and locate the CMOS battery, which is similar to a watch battery but larger.
- Gently remove the battery and hold down the power button for 30 seconds.
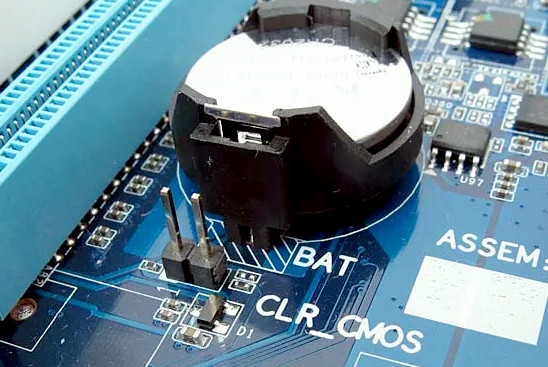
Clear the System’s CMOS - Wait a minute before reinserting the CMOS battery.
- Replace the cover, reconnect the power, and turn on the system.
- Boot into the BIOS, enable XMP, and save the settings.
- Restart the system and observe whether the changes take effect.
- If the issue persists, replace the CMOS battery with a new one and repeat the above steps.
4. Uninstall Conflicting Apps
Some applications may interfere with XMP at the operating system level, preventing the profile from functioning. Overclocking utilities such as the Dell Alienware Command Center may be the cause, and uninstalling any problematic software could resolve the issue.
- Start Windows and right-click on the Start button.
- Select Apps & Features and find the Dell Command Center.
- Click to expand the options and select Uninstall.

Uninstall Dell Alienware Command Center - Proceed with the uninstallation following the on-screen prompts.
- After completion, restart the system and clear the CMOS (refer to previous steps).
- Again, enable XMP in the BIOS and check if it is now functional.
5. Uninstall Intel Iris Xe Graphics Driver
Resource conflicts between XMP and the graphics driver may result in the operating system downgrading RAM speeds to maintain display functionality. This could be the issue when using the Intel Iris Xe Graphics Driver. Uninstalling it could resolve the problem.
- Right-click the Start button and access Device Manager.
- Expand the Display Adapters tab, right-click on the graphics device, and select Uninstall Device. In the confirmation box, select “Delete the driver software for this device.”
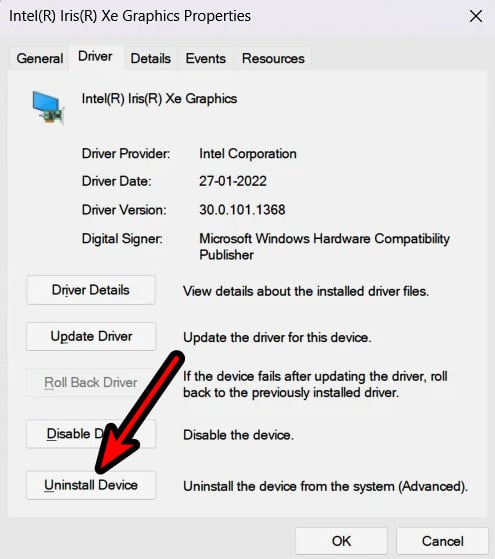
Uninstall Intel Iris Xe Graphics Driver - Follow through the uninstallation process, then restart the system.
- Enter the BIOS setup, enable XMP, and record any improvements upon restarting.
6. Disable Memory Integrity on Windows
Memory Integrity is a feature of Windows’ core isolation that might prevent XMP modules from accessing necessary resources. Disabling this feature could solve the problem.
- Open the Start menu and type Windows Security.
- Launch it, navigate to Device Security, and click on Core Isolation Details.
- Turn off Memory Integrity and reboot the system.
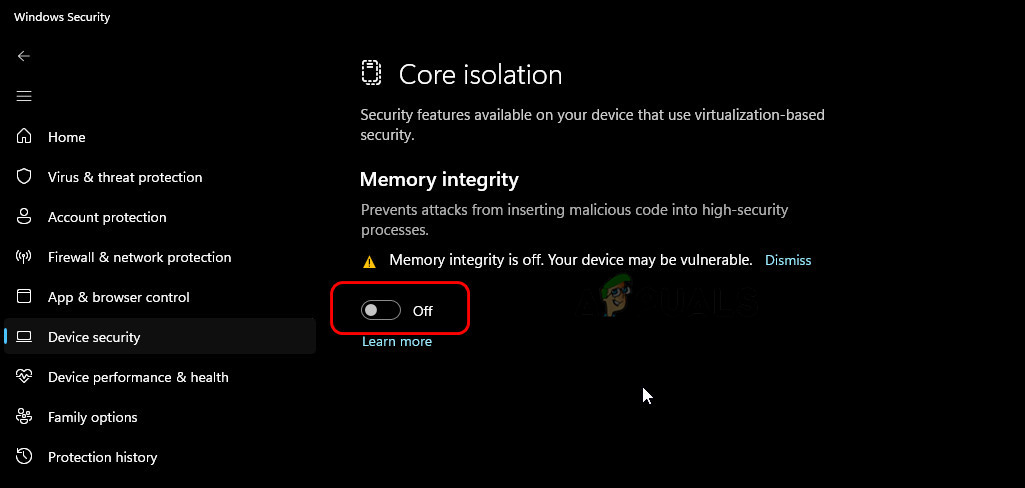
Disable Memory Integrity in Windows
7. Connect the Extra Power Connector on the Motherboard
Motherboards come with multiple power connectors to cater to different power requirements. Some motherboards may need additional power to support XMP, and failing to connect this extra power connector can be a common oversight, especially by gamers. Securing this connection could resolve the issue.
- Turn off the system and disconnect the power cable.
- Open the case and locate any unused power connector, like an 8-pin or 4-pin connector that hasn’t been connected.
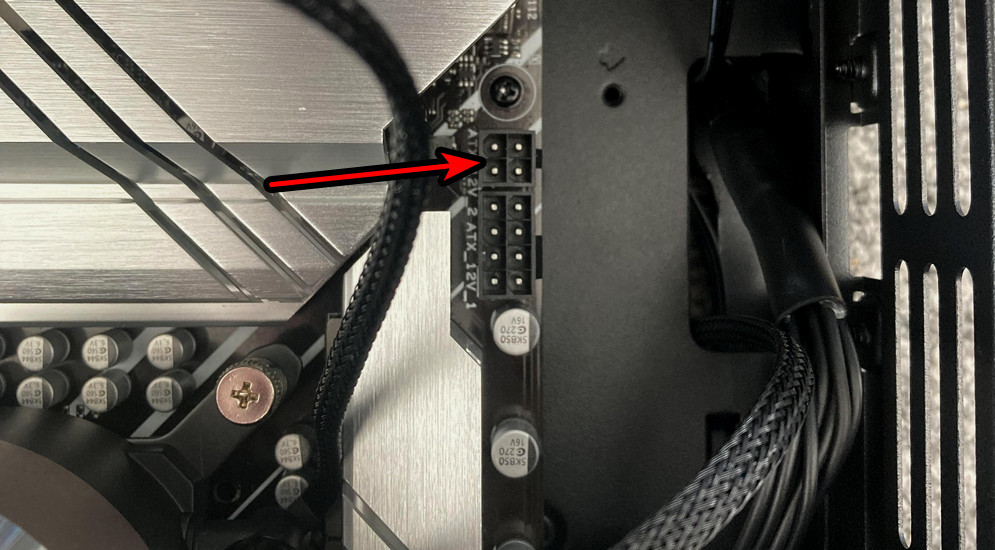
Connect the 4 PIN Power Connector on the Motherboard - Attach the extra power connector appropriately and replace the case cover. If uncertain, refer to the motherboard’s manual or consult an expert for assistance.
- Power on the system and test the efficacy of XMP.
8. Clean and Reseat The RAMs in the XMP Supported Slots
The XMP profile works in specific motherboard slots. If the RAM sticks are incorrectly seated or dust is present in the RAM slots, XMP may not engage. Cleaning and reseating the RAM in the correct slots could resolve this.
- Power down the system and unplug the power cable.
- Open the case and extract the RAM sticks from their slots.
- Clean the slots and RAM using a Compressed Air Can.
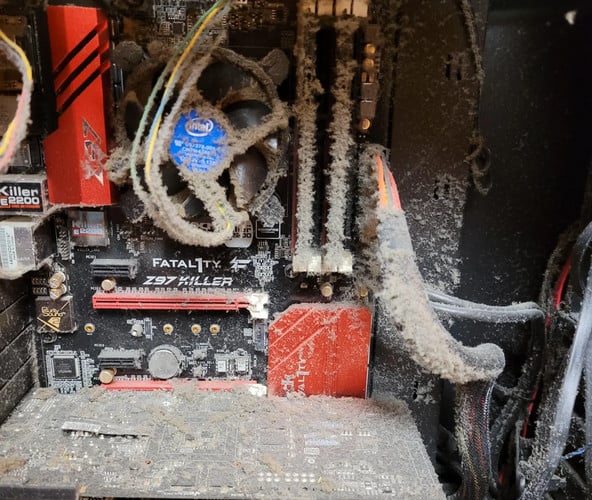
Clean the Internals of the PC - Reinsert the RAM sticks into the correct slots, typically the A2 and B2 slots, which are the second and fourth channels from the CPU and are XMP-compatible.
- If this method doesn’t yield results, proceed to remove the RAM sticks, cooler, and CPU. Ensure proper seating of all components and attempt to engage XMP once more.
9. Try XMP on One Stick at a Time
Faulty memory sticks or incompatibility with other hardware components can cause XMP to fail. Isolate the issue by testing XMP with each stick individually.
- Shut down the system and disconnect it from the power source.
- Open the system and remove all RAM sticks.
- Reinsert just one stick into an XMP-supporting slot.
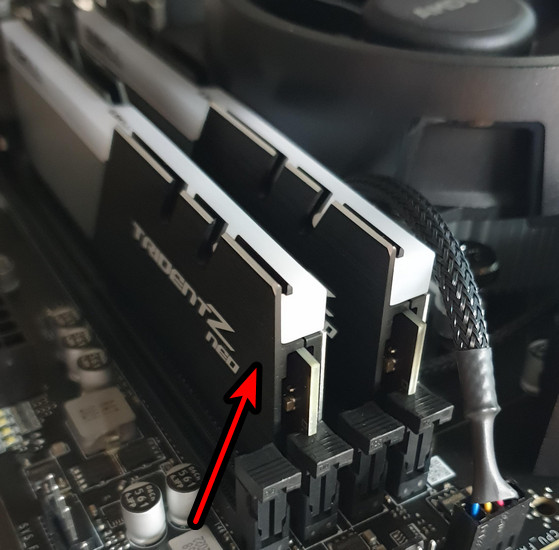
Test XMP with One Memory Stick Only - Close the case, reconnect the power, and reboot into BIOS.
- Enable XMP, save settings, and observe its behavior within the OS.
- Repeat this process with the other RAM sticks, ensuring they are placed in an XMP-compatible slot.
If XMP fails with any of the sticks, it may indicate that the stick is faulty or incompatible. Conduct further testing in a different system if necessary.
10. Edit the BIOS Settings
Certain BIOS settings could interfere with XMP’s functionality. Adjusting these settings may rectify the issue, keeping in mind that labelings and availability may vary depending on the system’s BIOS.
10.1. Update the BIOS to the Latest Version
Follow the specific guidelines of your system’s manufacturer for BIOS updates:
Post-update, reassess XMP functionality. If your system features Management Engine Firmware, ensure it is also up to date.
10.2. Enable Resize Bar and 4G Decoding
- Access the Advanced System Settings in the BIOS, set the Re-size Bar to Enabled, and enable 4G Decoding.
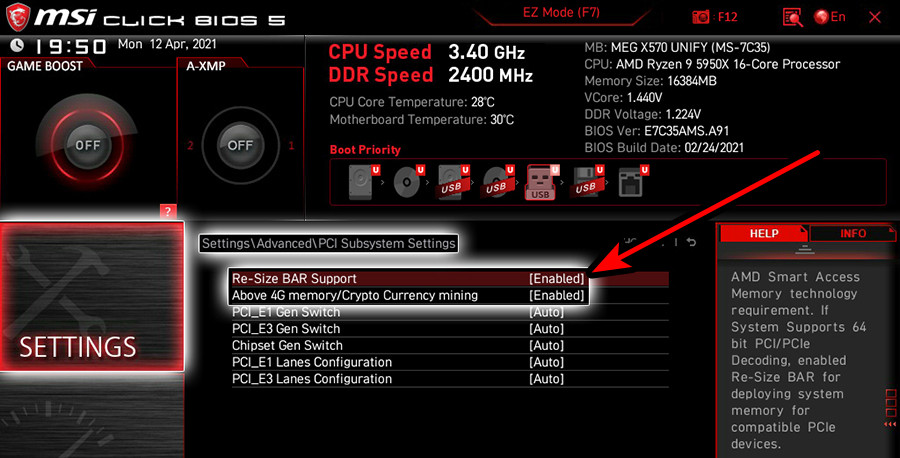
Enable Re-Size Bar in the System’s BIOS - Save changes and reboot the system.
- Upon restart, access BIOS once more and enable XMP.
10.3. Disable RGB Fusion
- Navigate to Peripherals > RGB Fusion within the BIOS.
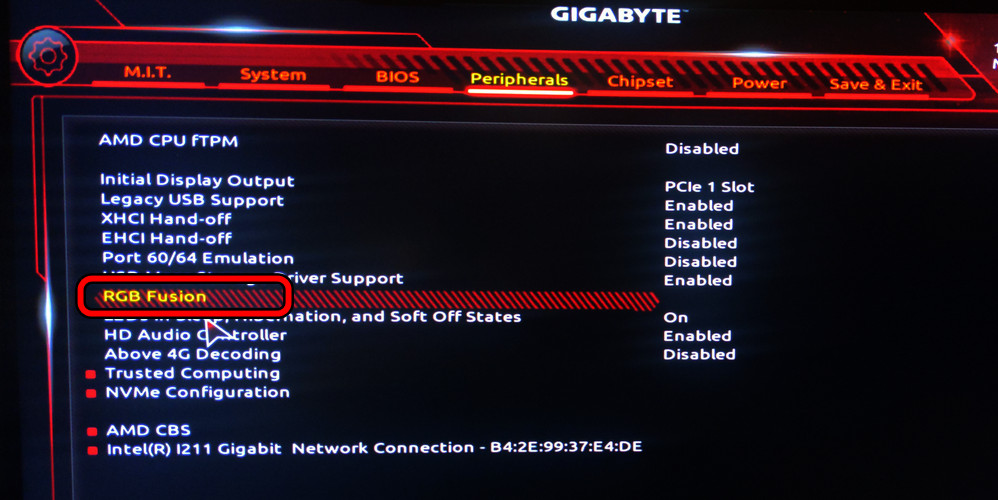
Disable RGB Fusion in the System’s BIOS - Disable RGB Fusion, save, and then restart.
- Attempt to activate XMP again after reboot.
10.4. Disable Fast Memory Boot
- In the BIOS, under Overclocking, locate and disable Fast Memory Boot.
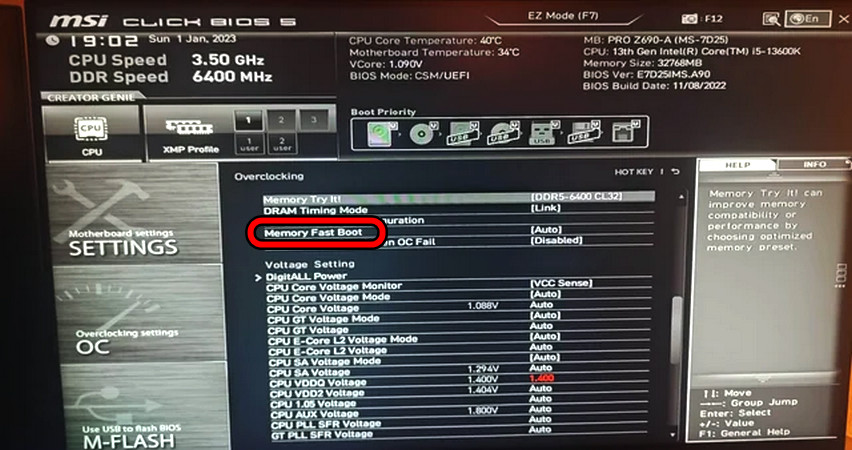
Disable Memory Fast Boot in the System’s BIOS - After saving the changes, reboot and enable XMP to observe any changes.
10.5. Disable Auto Low Latency and High Bandwidth
- Enter the BIOS and proceed to Advanced CPU Settings.
- Turn off Auto Low Latency and High Bandwidth.
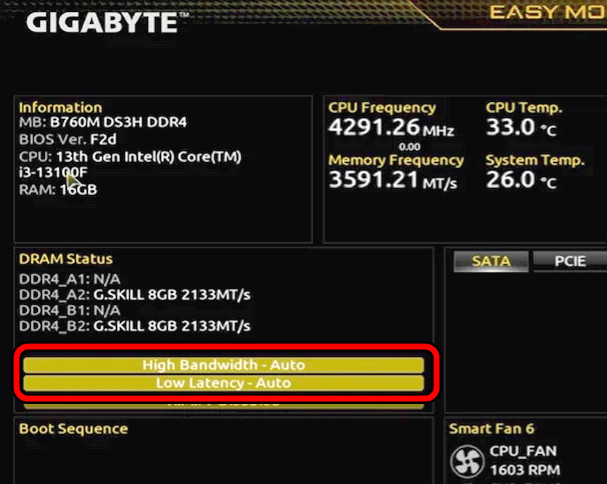
Disable Auto Low Latency and High Bandwidth in the System’s BIOS - Save and restart the system.
- Test XMP effectiveness within the operating system after reboot.
10.6. Reset BIOS to the Defaults
- Inside BIOS, press F5 to load defaults, though the specific key might differ by system.
- Confirm the reset action and save the settings once completed.
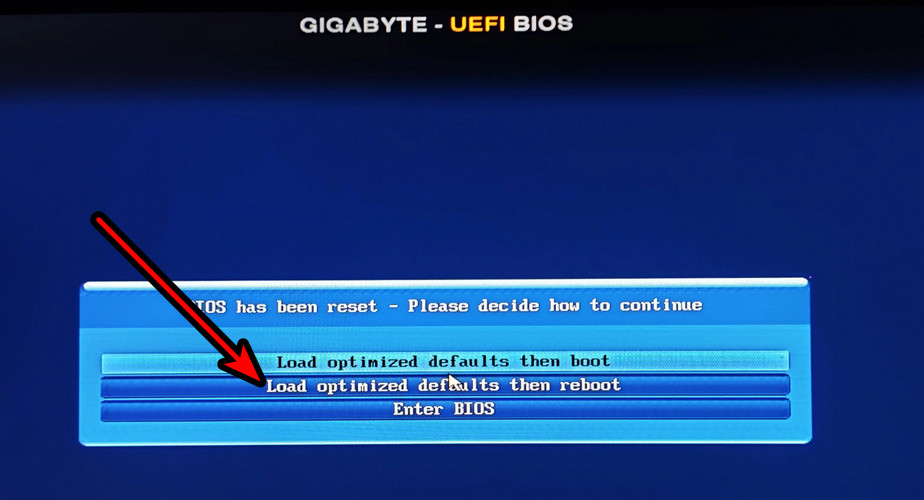
Reset BIOS and Load its Optimized Defaults - Reconfigure XMP settings in the BIOS after restarting.
10.7. Downgrade the System’s BIOS
The procedure for downgrading the BIOS closely resembles the update process. Locate and download an older BIOS version from the OEM’s website and apply the aforementioned instructions to downgrade.
11. Try Different Overclocking Modifications
XMP is essentially a form of RAM overclocking. If other components of the system aren’t aligned with XMP’s requirements, it might not function properly. Trying different overclocking configurations might be beneficial.
Since overclocking varies across different systems, we’ll outline some general steps below. However, precise instructions will depend on your specific hardware configuration.
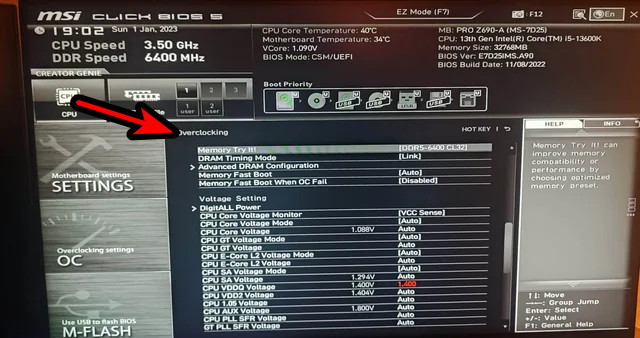
11.1. Increase Voltage
- VCCSA: 1.35V or 1.25V.
- VDDQ TX (CPU): 1.4V.
- DRAM Voltage: 1.4V, 1.36V, 1.35V, 1.25V, or 1.2V.
- IMC Voltage: Within 0.5V of DRAM voltage.
- SoC Voltage: 1.25V or 1.30V.
- QPI/VTT: 1.25V.
- Adjust VDDCR SoC Voltage to offset mode and increase it by 6.5mV.
- VDD/VDDQ: 1.25V, 1.30V, or 1.4V.
- VDD2: 1.4V.
11.2. Timing Values
- Cycle Time (Trc): 57 or 65.
- Timings: 16-18-18-36, 40-40-40, or 36-36-36.
11.3. Frequency
- Frequency: 3000 MHz, 3200 MHz, or the maximum supported by your system.
- Set RAM speeds to the highest levels that both the system’s motherboard and CPU can accommodate. Refer to the system’s manual or the OEM’s website for the correct ratings.
Should the XMP issues persist, reach out to your system’s OEM support. The problem might be with the RAM sticks themselves or potentially with the motherboard, particularly if one of the RAM slots is defective.


