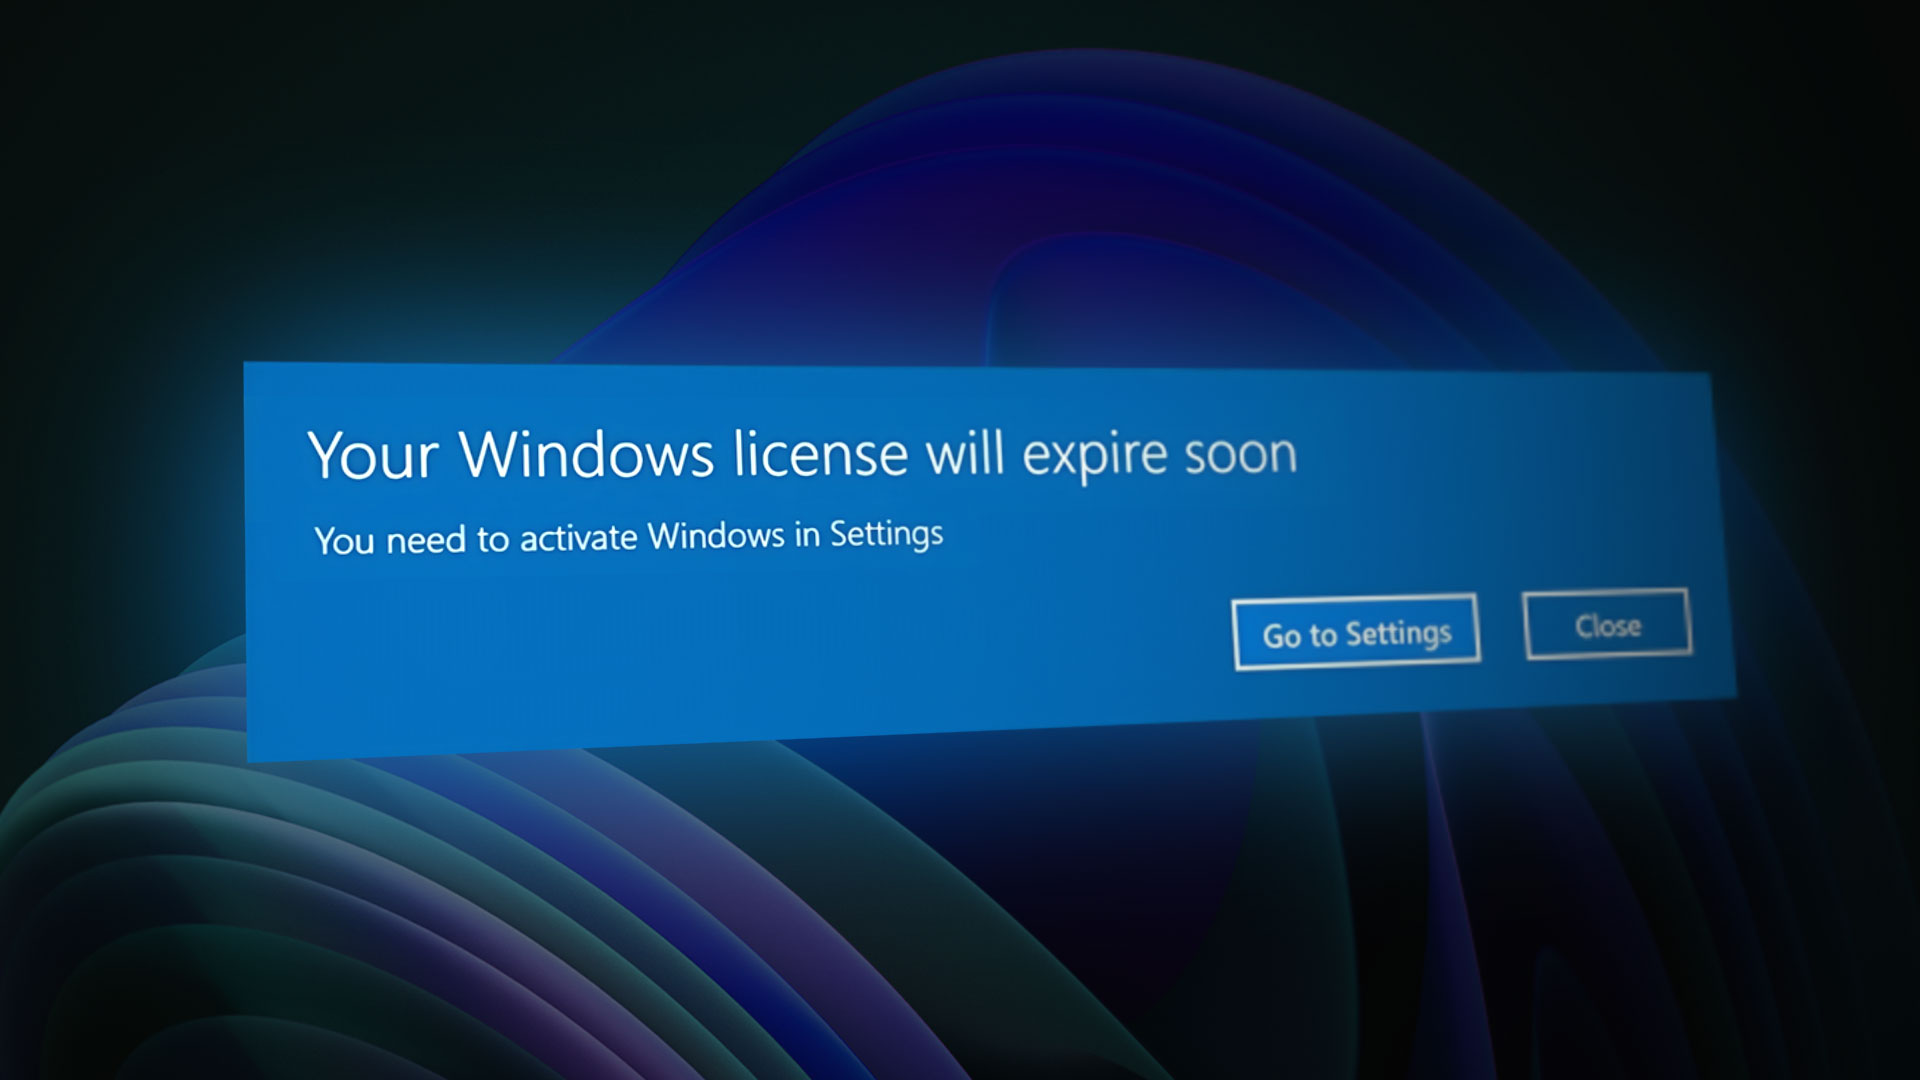
How to Fix ‘Windows Will Expire Soon’ Popup?
If you didn’t know any better, you’d assume that Windows telling you that ‘Windows license will expire soon‘ is just a message giving you a heads-up before your current license will expire. But in reality, this can also be caused by a few different system errors – especially if you’re using an Insider build of Windows 11.
After investigating this issue thoroughly, we discovered that there are several different underlying causes that might ultimately be responsible for this error message on Windows 11. Here’s a list of potential culprits:
- The pop-up message is genuine – Of course, the origin of this error might very well be genuine. If this is the case, you have two ways forward – you can either look to renew your Windows 11 license or you can use a method that will ‘freeze’ the availability of your license (but this comes with other consequences as you’ll see below)
- Current Insider Build is about to expire – It’s not uncommon to see this error message occurring when your insider build (most likely developer build) is about to expire. In case this error message shows because of an expiring build (not license), you can fix it by forcing Windows Update to install the latest available build.
- VLK license needs to be reactivated – If you’re using a Volume License Key license that’s part of a bigger business or organization, your PC needs to regularly connect to your organization server in order to prologue the availability of the license automatically. But if that’s not an option, you can do it yourself from an elevated Command Prompt.
- Development Build glitch – As reported by some users, you can also expect to see this issue due to a glitch that only affects a handful of Developer Windows 11 insider builds. In this case, there is no other resolution than clean installing a public release version of Windows 11.
Update to latest Windows 11 Insider Build (if applicable)
Keep in mind that every Insider Build (including Windows 11 Dev builds) will have an expiration date, except for the builds that Microsoft deems to be eligible for Public Release.
In case you see the ‘Windows license will expire soon‘ on a Windows 11 Development build, the first thing you should do is check the expiration date of the build that you’re currently using.
Note: The expiration date of your current Windows 11 build is not an issue unless you have disabled automated Windows Updates – unless the WU function is disabled, the expiring build will be replaced with a new one and you won’t have to deal with this error message.
To check the expiration date of your current Windows 11 build, Press Windows key + R to open a Run prompt. Inside, type winver and press Enter to open up the About Windows screen.
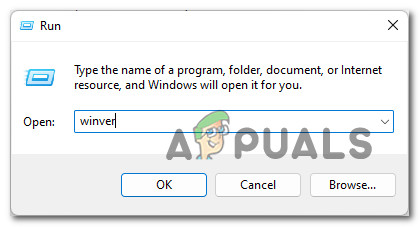
Once you’re inside the About Windows tab, check the expiration date of your current build.

If your current insider build is about to expire, chances are the reason you’re getting ‘Windows license will expire soon‘ error message constantly is because the insider builds that you’re using are expiring along with the license.
In this case, the only way to resolve the issue is by enabling Windows Updates once again and installing every pending Windows Update until you bring your Windows to build to the latest available.
Follow the instructions below to ensure that you’re running on the latest Windows 11 insider build available:
Important: If you have previously taken any steps to prevent your OS from installer new builds, take the time to revert those changes. Otherwise, the instructions below won’t have any effect.
- Press Windows key + R to open up a Run dialog box. Next, type ‘ms-settings:windowsupdate’ inside the text box, then press Enter to open up the Windows Update tab of the Settings app.
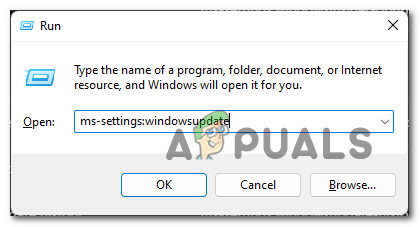
Opening up the Windows Update screen - Once you’re inside the Windows Update screen, move over to the right-hand side section of the screen and click on Check for Updates to see if a new Windows build is available.
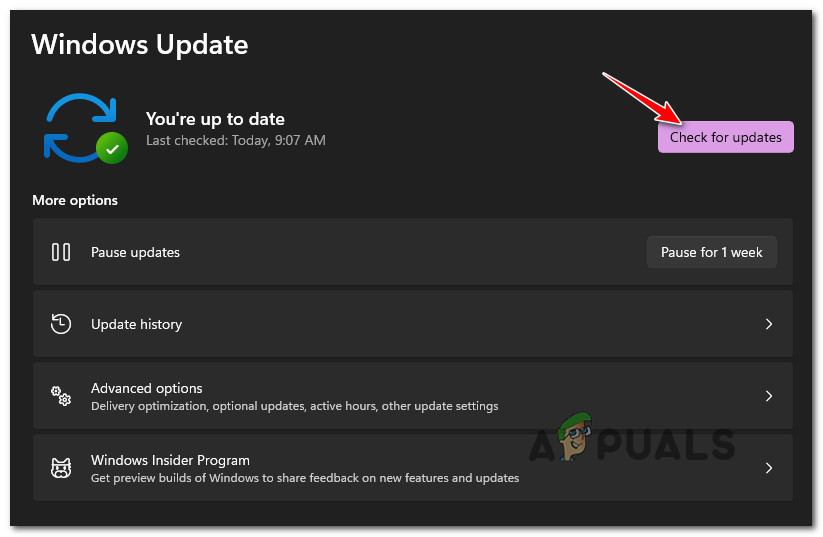
Check for Updates on Windows 11 - If newly available updates are available, click on the Install button and wait until every available update is installed.
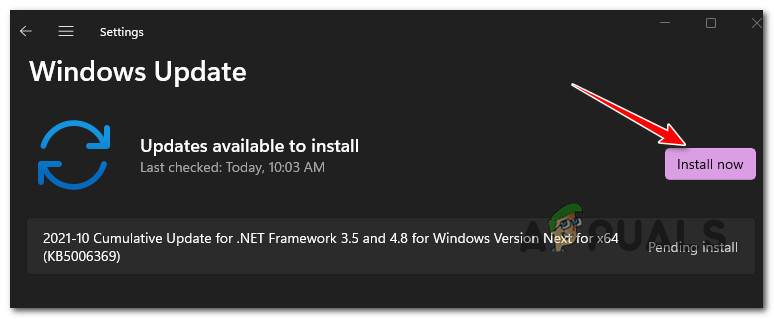
Install every available Windows 11 update Note: If there are a lot of updates waiting to be installed, you will be asked to restart before your OS gets the chance to install every update. Do so as instructed until you bring your Windows 11 build to the latest.
- Once you’re finally on the latest build available, check to see if the ‘Windows license will expire soon‘ error is still popping up irregularly.
If the problem is still not resolved or this method was not applicable to your scenario, move down to the next potential fix below.
Re-Activate your VLK license
Keep in mind that in most cases, this error message occurs when a Windows user activates Windows 11 with a Volume License Key (VLK) that is only meant for businesses or organizations that activate a large number of PCs at the same time.
The way this works is, the Windows 11 PC will have to check on the organization’s server regularly to automatically re-activate the license.
If you recently activated an insider build of Windows 11 with a VLK, you can sometimes use the Slmr commands in order to re-arm the activation times and prologue the availability of the license key that you’re currently using.
There are multiple ways that will allow you to do this, but the most effective method is to use an elevated CMD prompt.
Here’s what you need to do:
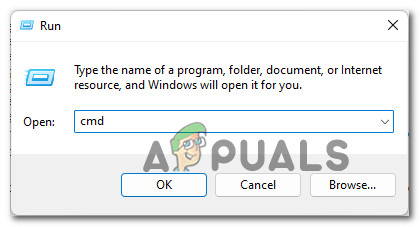
- Press Windows key + R to open up a Run dialog box. Next, type ‘cmd’ inside the text box and press Ctrl + Shift + Enter to open up an elevated Command Prompt window.
Opening up a CMD prompt - At the User Account Control prompt, click Yes to grant administrative privileges.
- Once you’re inside the elevated CMD prompt, type the following command and press Enter to deploy it:
slmgr –rearm
- After the command is processed successfully, reboot your PC and wait until the next startup is complete.
- As soon as your PC boots back up, open another elevated CMD prompt interface with admin access (by following step 1 once again).
- Once you’re back inside CMD, type the following command and press Enter to run it:
slmgr /upk
- After the command is processed successfully, reboot your PC and see if the problem is now fixed.
Important: Keep in mind that even if this method is effective, you will likely need to perform this method regularly in order to re-activate your license key whenever the error message resourfaces.
If this method was not applicable to your particular scenario, move down to the next potential fix below.
Disable WU + Windows License Manager
If you are aware that your Windows license is indeed expiring (the error message is legitimate), the best course of action would be to purchase a different license from an authorized reseller.
However, if that’s not an option, what you can do is disable the main Windows License Manager service along with the main Windows Update service.
Doing this will have the effect of ‘freezing’ the availability of the license key – as long as you keep these services disabled, your license will not expire in the eyes of Microsoft.
Important: Of course, this doesn’t come without consequences. Firstly, you do this means that you will stop receiving feature and security updates, your computer will become vulnerable to security exploits and won’t benefit from the latest features that Microsoft releases for Windows 11.
However, if you’re only looking to use this method temporarily, the instructions below can serve as a great way to ensure that your Windows 11 license doesn’t expire while you’re in the middle of an important project with no means of getting another license.
Follow the instructions below to stop the “Windows license will expire soon” error from appearing:
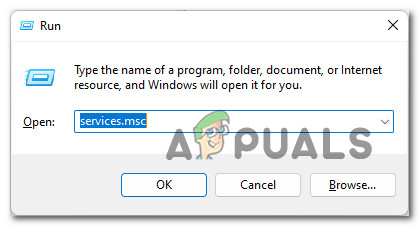
- Press Windows key + R to open up a Run dialog box. Next, type ‘services.msc’ and press Ctrl + Shift + Enter to open up the Services utility with admin access.
Opening up the Services screen - When you’re prompted by the User Account Control prompt, click Yes to grant admin access.
- Once you’re inside the Services screen, move over to the right-hand side section, then scroll down through the list of services and locate the entry named Windows License Manager.
- After you locate the entry named Windows License Manager Service, right-click on it and choose Properties from the context menu that just appeared.
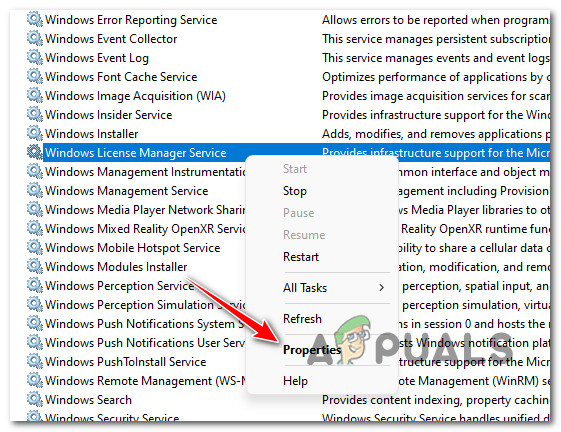
Accessing the Windows License Manager Service properties - Once you’re inside the properties screen of Windows License Manager Service, access the General tab from the ribbon menu at the top, then change the Startup type drop-down menu to Disabled.
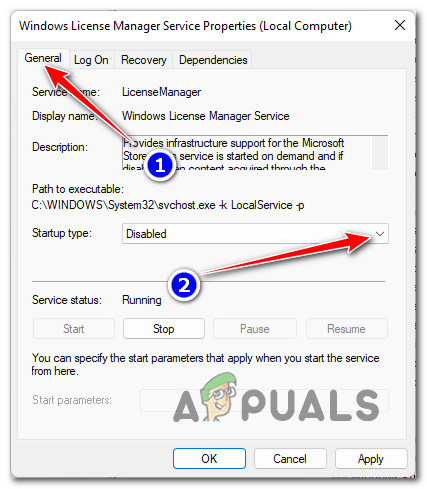
Disable the Startup type of Windows License Manager Service - Click Apply to make the changes permanent.
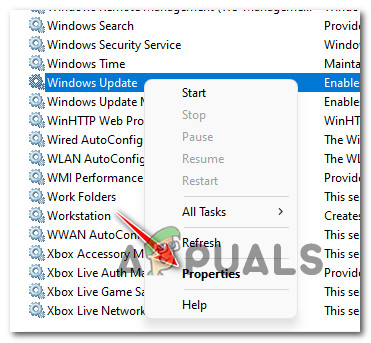
- Next, return to root directories of the Services screen, then use the list of services to locate Windows Update.
- After you locate Windows Update, right-click on the service and choose Properties from the context menu.
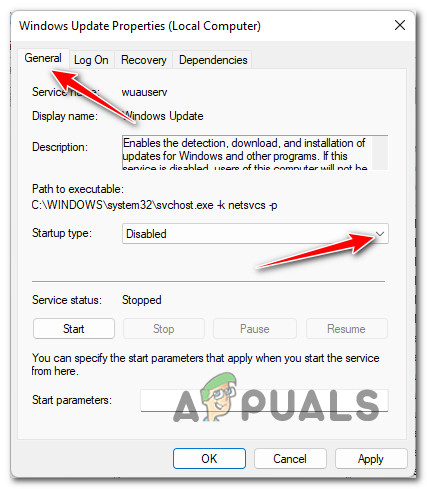
Accessing the Properties screen - Once you’re inside the Properties screen of Windows Update, access the General tab from the menu.
- Next, once you’re inside the Properties screen of Windows Update, access the General tab, then change the Startup type to Disabled, then click Apply, then save the changes.
Disable the Windows License
Once you’ve got this far, it means that both the Windows Update and the Windows License Manager services are disabled – this means that Windows 11 won’t be able to check if your license has expired or not and display the ‘Windows license will expire soon‘ error as a result.
If this method is not suitable for your particular scenario, move down to the next potential fix below.
Clean install a Public Release version
In case you come this far and none of the methods have worked for you, and you’re certain that your license is genuine, there is nothing else you can try other than moving towards a Public Release version of Windows 11.
Keep in mind that if you’re using an Insider Development Windows 11 build, you will not be able to revert to a public build (or a Beta build for that matter) without clean installing.
I know this might seem like an inconvenience, but it’s the only way. In case you find yourself in this scenario, take the time to backup your data in advance before going for a Windows 11 clean install procedure – make sure to install a Public Release to prevent this issue from occurring again in the future.


mine doesn´t have an expiration date