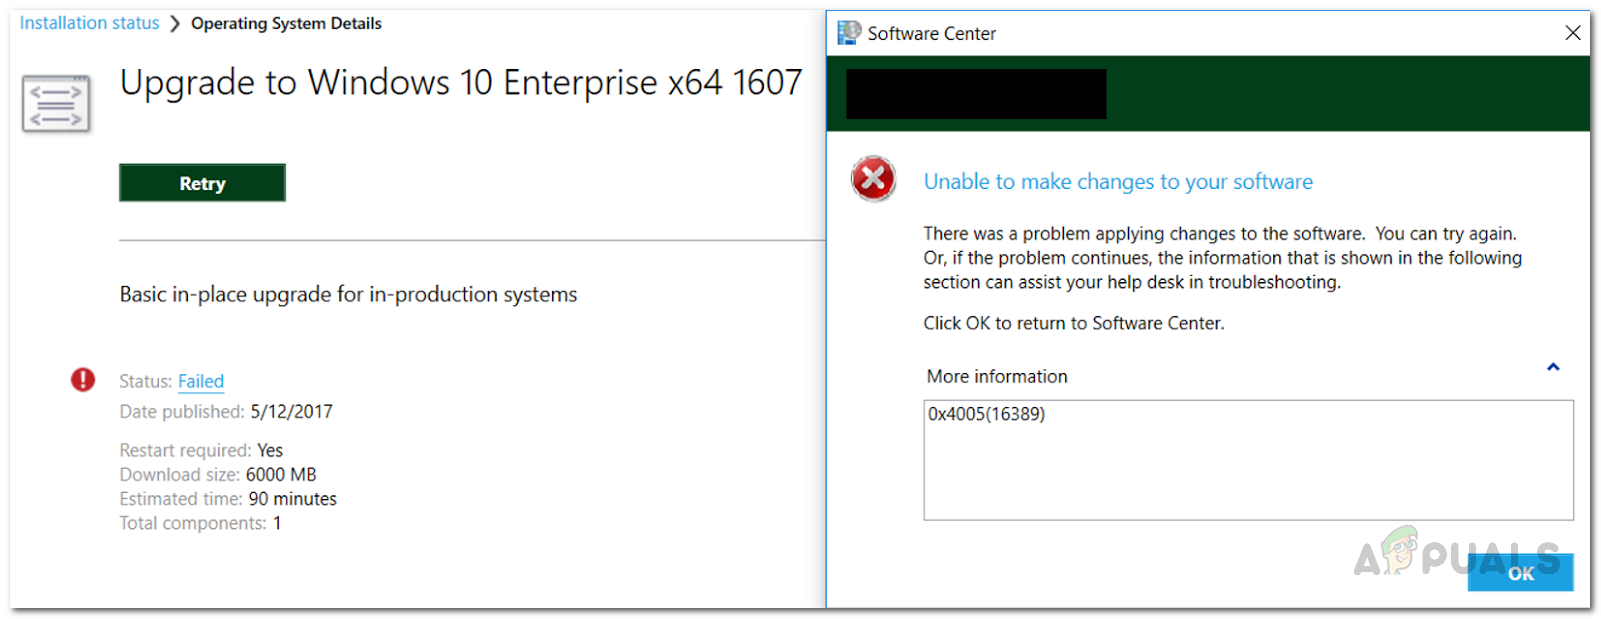
How to Fix 0x4005(16389) Error When Upgrading Windows?
While performing an in-place upgrade to Windows 10, users come across the error code 0x4005 16389 as the upgrade fails to complete. The mentioned error code appears when one or several applications are not compatible with Windows 10 and so the upgrade process fails. However, there are actually a few other reasons that may result in this error message depending on your scenario. If we are to speak generally, the problem can occur when a third-party antivirus program is preventing the upgrade. In addition to that, if you are trying to set the local computer description during the task sequence, it may result in the problem as well. Regardless, do not worry as we will be taking you through the process of resolving the error code in this article.
SCCM or System Center Configuration Manager is really helpful when you have to manage a bunch of computers together. With its remote control and operating system deployment feature, users can perform an in-place upgrade or deploy new operating systems on the machines at once. As we have mentioned, the reason that you encounter the issue can really depend on your scenario. We can only mention the general causes of the problem and what usually results in the said error code, however, in some cases, the error code may be really specific to you and in such a case, having a chat with a technical support guy may be the better route to take. With that said, let us go through the possible causes of the issue first and then we will list down ways that you can use to circumvent the problem. Let us get started.
- Insufficient Space — One of the reasons that you may encounter this problem is when you don’t have enough disk space for the upgrade. When this happens, you will have to double-check your disk space and then go ahead with the upgrade task sequence.
- Different Windows Edition — As it turns out, for some users, the problem was due to the fact that they selected a different Windows edition to upgrade to instead of choosing their current one. That can cause the error code and you will have to make sure that you select the same edition to upgrade in order to resolve the problem.
- Third-Party Antivirus — This is more of a general reason that can cause the error to arise. If you have a third-party antivirus program installed, it can prevent the upgrade from completing successfully which can result in the problem in question. Therefore, you will have to disable it or you can also opt to completely uninstall the third-party security program from your computer.
- Local Computer Description — In addition to all the above reasons, if you are setting the computer description during the task sequence, that can result in the error code if the script or command does not work. To fix this, use the command that we will provide down below and you should be good to go.
Now that we have gone through the possible causes of the problem in question here, let us get started with showing you different ways of resolving the issue. So, without further ado, let us get right into it.
Disable Third-Party Antivirus
As it turns out, the first thing that you should do when you encounter the problem in question is to make sure that you don’t have an antivirus program that is preventing the upgrade from completing. These scenarios are pretty common with third-party antivirus programs where they prevent certain actions on your computer due to a false positive. If you do have a third-party program antivirus installed on your system, you should disable the antivirus before going ahead with the in-place upgrade again. Once you do that, go through the upgrade again to see if the error still pops up.

Check Disk Space
In addition to a third-party antivirus program, the issue can also be triggered when you do not have enough disk space that is required for the upgrade. This is also pretty common with Windows updates and upgrades where the available disk space is insufficient for the upgrade to be installed. In such a scenario, you will have to make sure that you have more than enough disk space freed up before performing the deploying operating system across your computers again. If you have enough space available on your disks and are still facing the error, move on to the next solution down below.
Use Same Windows Edition
As it turns out, the error code can also be caused when you are using a different Windows edition than the one that is currently installed on your system. This has been reported by other users who were facing a similar issue and happened to fix it by choosing the same Windows media. Therefore, to prevent this from happening, you will have to make sure that you are using the same Windows media as the one that you have installed. This means that if you have Windows enterprise installed, make sure that you are using Windows Enterprise media as well while performing the upgrade to prevent the error code from appearing.
Change Local Computer Description Command
As we have mentioned earlier, if you are using a script or command to set the local computer description during the task sequence and the said script or command fails, you will be prompted with the error code mentioned above. If this case is applicable, you can easily resolve this by changing the command that you use.
As it turns out, to do this, you can use a NET CONFIG command to set the computer description. For this, you will have to add a Run Command-Line to the task sequence and use the
cmd /c net config Server /SRVCOMMENT:"%OSDComputerDescription%
Doing this will set the computer description to what was defined in the OSDComputerDescreitpion variable. To make it work for you, you can change the variable name to what you use instead.
Uninstall Program as 32-bit Process on 64-Bit Computers (for .NET Deployment only)
As it turns out, if you are coming across the said error code while trying to deploy a .NET framework across the computers, you can fix it by ticking a certain checkbox in the installer properties. Apparently, the error code appears when you have the program running as a 32-bit process on a 64-bit architecture computer. This can be easily resolved by following the instructions down below:
- First of all, open up the installer or the deployment properties for the .NET version that you are deploying.
- On the properties window, switch to the Program tab.
- Then, on the Program tab, click the Run installation and uninstall program as 32-bit process on 64-bit clients checkbox.
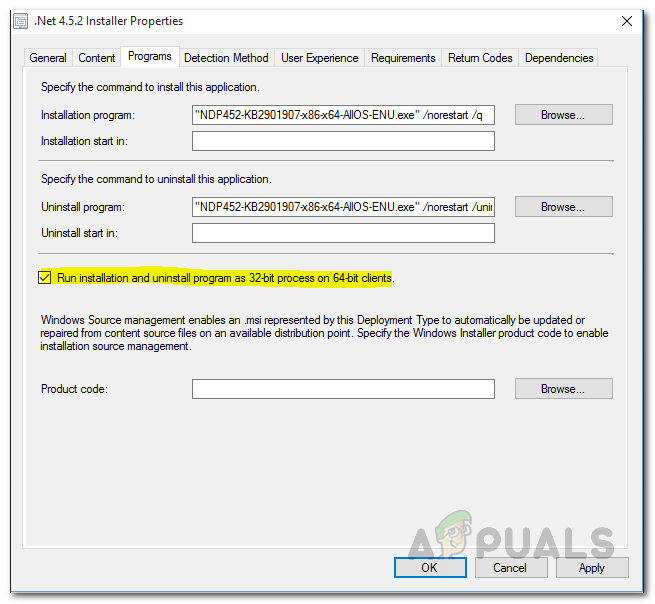
Editing .NET Installer Properties - Finally, click Apply and then hit OK. After doing that, try deploying it again to see if the problem still appears.
If none of these solutions worked out for you, we would recommend following the Windows official guide on how to perform an in-place upgrade using Configuration Manager in case you did something wrong during the process.


