Fix: Windows 10 Takes Forever to Shutdown
Shutting down your Windows may seem like a simple process. You are just turning your PC off. How hard can it be?
Yet there is a lot more to shutting down than just cutting the power supply to your computer. Windows must sequentially shut down system processes, save your data, and free up your memory of unwanted data. Usually, the shutdown process takes no more than a few seconds. However, sometimes, the complex series of steps can trip over each other, causing Windows to take a lot of time to shut down.
There can be many problems responsible for your PC not shutting down. We listed some of them so you can pinpoint where the error is originating and fix it.
Solution 1: Software Problems
Programs are the most common cause of shutdown issues. If your computer takes a lot of time at the “programs need to close” window or doesn’t go beyond that, it means you likely have a software problem at hand.
Ideally, the way Windows 10 was designed, Windows will show you the list of programs which need to be closed. Most of the time, they will be closed automatically but a conflict or a program not responding could delay the shutdown process drastically. This happens because that program needs to save data before it can close. If it isn’t able to save the data, Windows gets stuck there. You can halt the shutdown process by pressing “Cancel” and then save all your programs and close them manually.

Sometimes this trick doesn’t work. Users reported that a list similar to the one above appeared on their screen but it was empty or appeared momentarily and the shutdown process didn’t proceed. This is a sign that a program is interfering with your shutdown process. You should abort the process, head over to the task manager (Press Windows + R and type “taskmgr”), and examine the applications running. Note their memory/disk usage and determine which program is the culprit.
Fixing a program once you’ve identified it isn’t easy at all. The software may need to be uninstalled or reinstalled. It’s likely that the software wasn’t installed properly or may require some updates. Some trial and error might be required to determine the exact program causing you problems.
Solution 2: Process Problems
Windows has to close a number of processes before it can completely shut down. It packs up data to ensure that Windows boots up without problems the next time it is started. If a process hangs while shutting down, the shutdown process halts until that process is resolved. You won’t be able to pinpoint which process is causing the problem as the Windows shutdown screen provides no details.
We can change the settings in your registry to make Windows show all the processes which are shutting down and consuming time. This way, we will be able to pinpoint the problem and resolve it.
- Press Windows + R to launch the Run application. Type “regedit” in the dialogue box to launch your computer’s registry editor.
- Now navigate to the following file path using the navigation pane on the left side of the screen.
HKEY_LOCAL_MACHINE\SOFTWARE\Microsoft\Windows\CurrentVersion\Policies\System
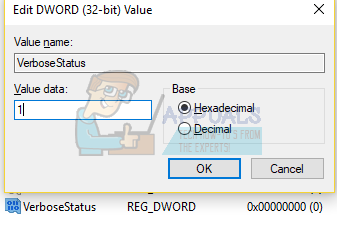
- Now, on the right side of the screen, you will see an entry named “VerboseStatus”. If you see it, right-click on it and select Modify from the list of options. Change its value to 1 and save changes.
If you don’t see the entry, we can make the entry manually and set the status to 1. Right-click on the empty white portion and select New and choose DWORD (32-bit) Value. Name the new entry “VerboseStatus” and set its status to 1. Save changes and exit.
Now you will see the list of processes that are shutting down when you are on the shutdown screen. You can then easily determine which process is causing you problems and continue with troubleshooting. The most common processes which cause problems include hardware drivers or network adapters.
Note: Windows Registry is a powerful tool. Alterations to the wrong files/values can cause your computer to become unstable and even damage it. Proceed with caution and always double-check the steps before implementing anything.
Solution 3: Operating System or Driver Problems
Many individuals turn off Windows Update to minimize CPU and disk usage when they are working on their computers. Windows Updates contain bug fixes for various issues ranging from drivers to the operating system. It is highly recommended that you keep your Windows update turned on all the time so you don’t face a problem while shutting down.
In Windows 10, the updates are enabled by default unless you change the settings. To check the status of your updates and install them (if available), follow these steps:
- Open the start menu and type Settings in the search bar. Open the first result that appears.

- Once in the Settings, click on the Update and Security option on the bottom left side of the screen.
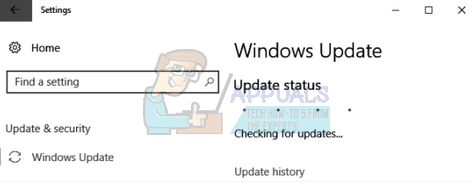
- Now click on Windows Update. Here you will see the status. You can also click Check for Updates so Windows can download any new updates (if available).
If Windows requires a restart to perform the update, it’s best to do it as soon as possible. Save all your work and restart.
Solution 4: Page File Problems
Windows has a feature named Page File. Its purpose is to work as an extension of your RAM. If your system requires more memory than what is available in the RAM, the least used portions of your RAM are transferred to your hard drive so the computer can access them whenever needed.
By default, in most computers, clearing the Page File is necessary to prevent security loopholes. The data can be retrieved by exploiters or malware. Clearing the Page File can consume time in the shutdown process. We can check if disabling it brings any improvement to our conditions.
- Press Windows + R to launch the Run application. Type “regedit” in the dialogue box to launch your computer’s registry editor.
- Once in the Registry editor, navigate to the following file path using the navigation tab on the left side of the screen.
HKEY_LOCAL_MACHINE\SYSTEM\CurrentControlSet\Control\Session Manager\Memory Management

- Now, look at the entries on the right side of the screen. Search through them until you find “ClearPageFileAtShutdown”. If its value is set to 1, it means it is enabled and might delay the shutdown process. Right-click it, select Modify, and set its value to 0. Save changes and exit.

Note: Windows Registry is a powerful tool. Alterations to the wrong files/values can cause your computer to become unstable and even damage it. Proceed with caution and always double-check the steps before implementing anything.
Solution 5: Disk Drive Problems
If your problem isn’t resolved at this stage, it means there is a problem with your Solid State Drive (SSD) or Hard Drive (HDD). A corrupt or bad sector in the drives may hang when the data is being stored, or it may even save the data in the corrupt/bad sectors, which may cause the shutdown to fail or consume a lot of time.
We can check the health of your drives by using the Windows feature “Error Checking”.
- Open “My Computer” (also called My PC).
- Here, all your hard drives will be listed accordingly. Repeat the following steps for all of your hard drives connected.
- Right-click on the drive and select Properties from the list of options available.
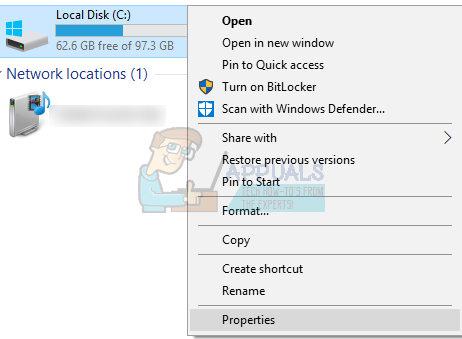
- Once in the Properties, navigate to the tab of “Tools” and click on Check present in the Error Checking section.

Now Windows will check all of your sectors one by one and determine if there is any problem with the drive. If your drive is corrupted, you can always repair it using the Error Checking utility. If it’s a minor problem, it will be fixed and the bad sectors will be isolated. However, if it is physical damage, you might have to go to your nearest repair shop and get your machine inspected.
Solution 6: Locate Services Causing Shutdown Delays
If you can’t pinpoint the services that are causing the delay while shutting down, we can navigate to Event Viewer and check the log to get an idea.
- Right-click on the Windows button on the bottom left side of the screen. Select Event Viewer from the list of options available.

Or you can even press Windows + R to launch the Run application and type “eventvwr” in the dialogue to launch it.
- Now navigate to the following path using the navigation pane on the left side of the screen.
Applications and Services Logs\Microsoft\Windows\Diagnostics-Performance\Operational
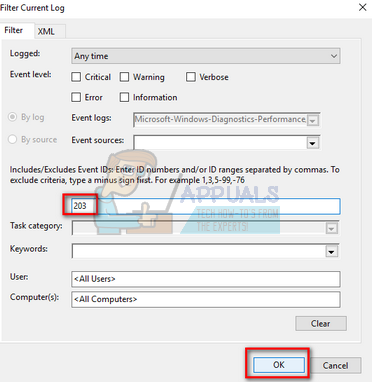
- Now right-click on Operational on the left side of the screen and select “Filter Current Log” from the list of options available.
- Type “203” in the dialogue box of Event ID and press Ok. This will filter all the logs and only show logs related to the shutdown process in Windows.
- Now, look through the list. Windows will be showing only those processes with the tag “This service caused a delay in the system shutdown process”. You will be able to see the names of services slowing down your computer’s shutdown in the General tab. Look for “File Name” and “Friendly Name” to determine the identity of the processes responsible.
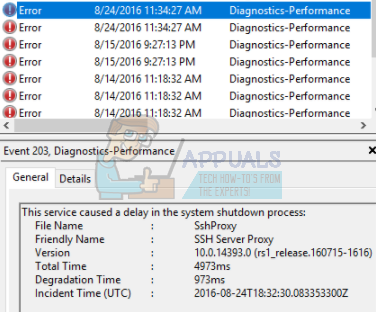
The information you extract here can easily lead you to any services causing a delay in your shutdown process. In this example, the VPN service took a lot of time to shut down and was one of the reasons your computer was stuck in the Shutting Down phase. If you have the software installed and don’t actually use it that often, it is best to disable it.
Some services might be system services which you can’t uninstall, unfortunately. But most of the time, the services conflicting with the shutdown process are user-installed. Navigate to the Control Panel, click on Uninstall Programs, and search for the program there. You can easily uninstall it by right-clicking and selecting the Uninstall option.
Solution 7: Check your WaitToKillServiceTimeoutValue
Windows has a protocol to allow the applications to shut down themselves for a period before it force closes them. This time window is called WaitToKillServiceTimeoutValue. It sends a “Windows is shutting down” message to all the services and applications so they can save their work and close themselves. It then waits for a period before it closes them itself.
By default, Windows waits 5 seconds after you click “Shut down” before it intervenes. If all the background services shut down themselves before the 5-second window, it will shut down immediately. If not, it will force them to close and then shut down.
There are a few values that manage how long your computer waits. But there is one specific value known as WaitToKillServiceTimeoutValue we should look into if your computer is taking a lot of time to close. Some applications increase this 5-second window to a much larger one when you install them as they require some extra time to close compared to others. If this value is changed, your computer will take longer than expected.
- Press Windows + R to launch the Run application. Type “regedit” in the dialogue box and hit Enter to launch the Registry Editor.
- Now navigate to the following path:
HKEY_LOCAL_MACHINE\SYSTEM\CurrentControlSet\Control
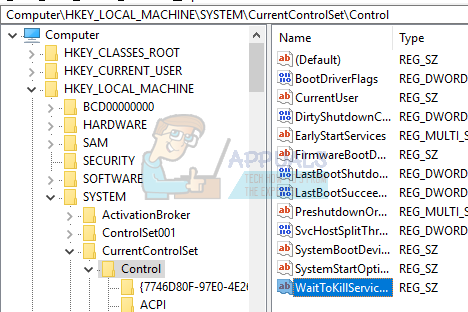
- Look at the right side of the page and select the entry labeled as “WaitToKillServiceTimeoutValue”. Double click it. The value in front of you will be the time in milliseconds which Windows waits before proceeding with the shutdown. If it is set to 5000, Windows will wait 5 seconds. If it is set to 20000, Windows will wait for 20 seconds.
- We recommend that you don’t lower this value to less than 5000 as this is the optimum time required for the applications to close down without any crashes. However, if the value is changed, you can set it back to 5000 by double-clicking the entry and setting the value to 5000.

Note: Windows Registry is a powerful tool. Alterations to the wrong files/values can cause your computer to become unstable and even damage it. Proceed with caution and always double-check the steps before implementing anything.
If your computer still doesn’t fix the problem, check for errors in your operating system and ensure it is updated to the latest version. Most of the time, Antivirus programs also become a hurdle in the process. Try uninstalling them or disabling them temporarily.
Very helpful, thank you