Fix: System Image Backup Error 0x807800A1 & 0X800423F3
Creating a backup of your system is a good way of securing your data. But sometimes you might face the errors like 0x807800A1 & 0X800423F3 while making a system image backup. The error 0x807800A1 is shown with a message “A Volume Shadow Copy Service failed. Please check “VSS” and “SPP” application event logs for more information”. You might also see a message “The writer experienced a transient error” with the error code 0X800423F3.
These errors can be shown because of a few reasons. Your Volume Shadow Copy Service might be stopped, antivirus or windows firewall might be causing the issue, and hard disk priorities can prevent from creating a backup which can also be behind this issue. Once you know what is causing this issue then the problem can easily be solved.
If you recently installed a new SSD in your computer then first try method 3 because the issue might be because of HDD priorities. If not, then start with method 1 and proceed to the next until your problem is solved.
![]()
Method 1: Check Volume Shadow Copy Service
- Hold Windows Key and press R
- Type services.msc and press Enter
- Locate Volume Shadow Copy Service and double click it
- Select Automatic from the drop down menu in Startup Type (if it’s not already set to automatic)
- Click Start if the Service Status is stopped or paused
- Click on Dependencies tab
- Check under the This service depends on the following components If you see any services then Click General tab > Click Apply > Click Ok then close this window and locate that service from the services list. Double click that service and repeat the steps from 4-5 to make sure its running.
Now check if the problem still persists.
Method 2: Starting Workstation Service
- Hold Windows Key and press R.
- Type “services.msc” and press Enter.
- Locate Workstation Service and double click it.
- Select Automatic from the drop-down menu in Startup Type (if it’s not already set to automatic).
- Click Start if the Service Status is stopped or paused.
Method 2: Disable Antivirus and Windows firewall
For Antivirus:
- Right click on your Antivirus icon (located in right bottom corner of the screen). If you can’t see any icon then click on the “arrow” to show hidden icons
- Click Disable. If there is no Disable option then double click the antivirus icon. Your antivirus window will open and you should be able to disable the antivirus from there.
For Windows Firewall:
- Hold Windows Key and press X.
- Click Control Panel
- Click System and Security
- Click Windows Firewall
- Click Turn Windows firewall on or off
- Select Turn off Windows firewall (not recommended) from Private and Public network settings
- Click Ok
This should solve the problem if the issue was because of antivirus or firewall interference.
Note: Don’t forget to turn on Windows firewall and enable your antivirus. These programs are essential for the security of your system. As soon as your problem is resolved, turn on these programs
Method 3: Check Hard Drive priorities
First of all, make sure your new SSD is on the first SATA port (0 or 1 depending on your motherboard). You can swap the cables of new SSD with the old HDD to make sure the SSD is on the first port.
- Restart your computer
- Press F2 when your manufacturer’s logo appears. The key may vary depending on your manufacturer but mostly its F2 or F10 or Del. You will also be able to see the instructions on the corner of the screen like “Press F2 to open BIOS menu” when your manufacturer’s logo appears.
Now use your arrow keys and look for the HDD priority settings. Remember, these are different from the boot priority settings. Once you are in there, make sure your new SSD is the first one.
If you are using an HDD for the backup then make sure that it is connected as the first SATA drive on the motherboard. Also, after installing another HDD, the system might automatically change the boot order especially if you have HDDs with different operating systems. Make sure that the proper HDD is on the top of boot order by going into the BIOS settings.
Method 4: Uninstalling Microsoft Office Starter 2010
The problem in backing up your system can also happen if you installed Microsoft Office Starter 2010 with “click 2 run” configurations. So if you have Microsoft Office Starter 2010 then that might be the reason. Even if you aren’t sure, uninstalling and reinstalling the Microsoft Office Starter 2010 without the “click 2 run” configuration solves the problem.
- Hold Windows Key and press R
- Type appwiz.cpl and press Enter
- Now look for the Microsoft Office Starter 2010. Once located, select it and click uninstall.
Follow the screen instructions to uninstall the Microsoft Office Starter 2010. Once the system have uninstalled the software, check if the system backup is still causing the issue or not. If the problem is solved then you can install the Microsoft Office Starter 2010 again without the “click 2 run” option.
Method 5: Checking boot priority
Dual-booting was also reported to be the cause of the error. In dual-booting, you install another operating system on your hard drive after initializing a new partition and swap size. It enables you to use two operating systems in one computer depending on the boot sequence from the BIOS.
The boot sequence determines which operating system will be booted. For example, if you have Ubuntu as boot sequence 1, and Windows as the second, the BIOS will always boot Ubuntu. In the boot sequence, it will not be written “Ubuntu” or “Windows”. Rather, it will be “Drive 0” or “Drive 1” etc.
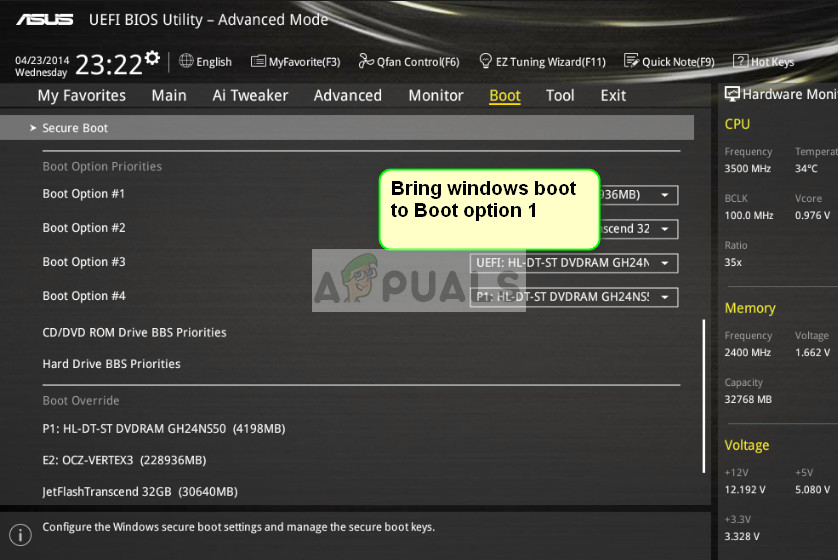
Change the boot sequence and get windows to the top of the list. You can usually enter the boot options by pressing Esc or Del/F2. Once you have Windows on the top, restart your computer and check for the error.
In addition to the above problems, you can also try:
- Removing Steam from the startup list. You can Clean boot your computer to turn it on with a minimal number of drivers.
- Checking for bad backup entries. The bad GptName shouldn’t be in any of the partitions you are trying to back up.
- Another thing you can try is disconnecting all other hard drives and putting the target system’s (windows) drive in the first SATA controller. The utility is known to return problems if it comes across another operating system.
- You can check for bad characters in some of the partition names. This usually comes after doing a backup with some third-party utility such as EaseUs. You can use the tool GPT fdisk utility found on SourceForge and use the commands to retrieve the information regarding your drives. Make sure that no bad characters (such as quotes, commas etc.) are present in the name. If there are, rename the partition and try again.
- If you own a server setup, you can enable the workstation service (you should also enable the server service).
Note: Windows has officially ended support for System restore/image mechanism and has pointed the use of third-party vendors. Ending support means that further bugs occurring with the modules will not be entertained but the module will still be present in the new releases of the OS.
None of these worked for me – instead I found and proved it was related to getting the workstation service running (and the server service may also be required). I usually leave these disabled for security purposes but apparently they’re required even though they are not listed as dependencies.