What to do if you see a bill from itunes.com/bill?
If you can’t recognize the amount charged to your account, multiple purchases might be grouped into one transaction. Sometimes, you might not get a separate email confirmation of each purchase. Also, some charges appear on your statement a couple of days after you’ve made the purchases. And, if you’ve handed your iPhone or iPad to your kids recently, there are chances that they’ve made some in-app purchases. However, here is what you should do when received an “unknown-payment” email.
What Should You Do When Received an Unknown iTunes Payment
- Review your recent purchases or check your purchase history in iTunes.
- Check your subscriptions.
- If you are an organizer of an Apple family share package, check for purchases by other members.
- Check if you see an unfamiliar App Store or iTunes Store charge on your bank account. You can also check the Apple Support website and search for this topic.
If you cannot identify the payment, you might be facing with a phishing mail (fake emails that are trying to trick you into sharing your personal information such as an Apple ID password or credit card info).
Note: Make sure you DO NOT share any personal information in these emails before ensuring their legitimacy.
If there really have been purchases that you can’t recognize and you didn’t authorize, make sure if one of your kids accidentally didn’t make some in-app purchases, without your consent. If this is the case, you can request an App store refund for kids’ accidental in-app purchases. Here is how to do that.
Find the Unknown Payment Order Number
In order to send the request, you need to find your unknown purchase order number (order ID). There are 2 ways to get it.
Via Email
- Search for “iTunes Store” in your Apple-associated email inbox. To narrow it down you can also search for Apple’s specific mail: “do_not_reply@itunes.com.”
- Sort through the search results in order to find the ones you want. As a shortcut, at the bottom of each mail, you can see a link to your Purchase History. It will take you directly to that section of the iTunes Store.
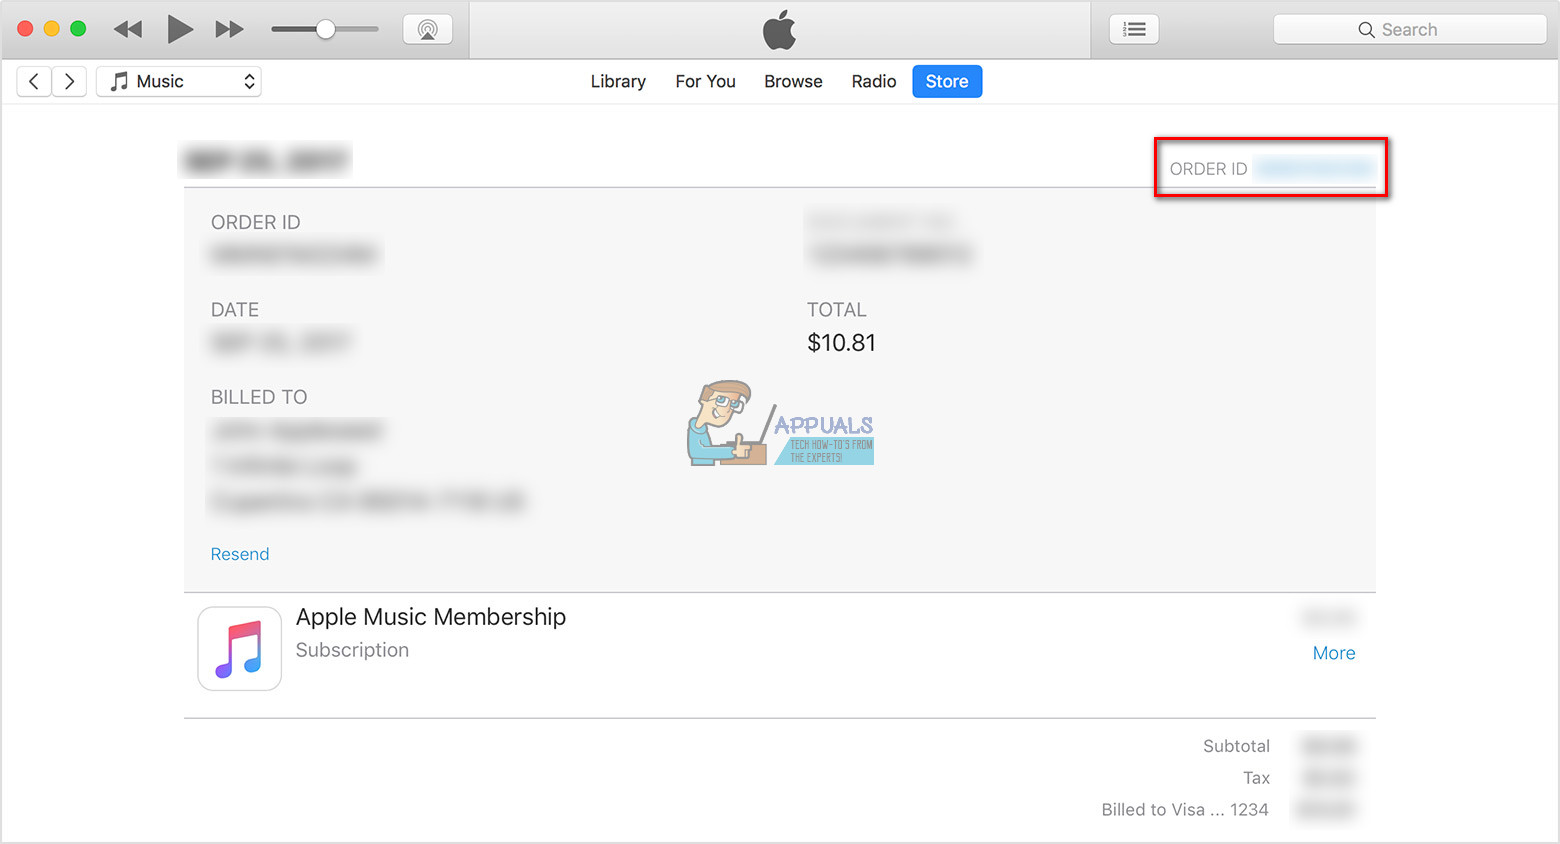
- Once you locate the received email, copy the order number. You can find it on the top right of the email (After “Order ID”). You will need that number for sending the request.
Via the iTunes Store
If you have been deleting your receipts to clean out your email, you can use the iTunes Store to access the entire purchase history you’ve made.
- Launch iTunes on your computer.
- Go to the iTunes Store and click Account the menu bar.
- From the drop-down menu choose View My Account.
- Now, enter your Apple ID password, and you will access your account page.
- Scroll down to reveal the sub-section Purchase History.
- Click on See All, located on the right to get the full list.
- Here you can not search through your history (like you can in your email inbox). However, jump to a specific month and year to find the unknown purchase.
- Once you found the unauthorized purchase, copy the order number.
 Note: If the order number is not entirely visible on the table (if it ends with an ellipsis), click the arrow to the left of the Now you can see the full order number.
Submit the Request
Once you have the unknown payment order number, you can submit the request.
- Go to Apple’s form for sending a request. (you can find it at the following link)

- When the site loads up, choose the button for Email. It will take you to a form where you can enter your contact information and specific details.
- Enter the unknown purchase order number in the relevant field (If you have more than 1 unknown purchase, you might need to complete more requests).
- In the detail section, type “Refund for In-App Purchases made by a minor.”
- Once you finish the form, submit the request.
After you’ve sent the request, you should wait for Apple’s answer. They will hopefully let you know the status of your refund pretty quick.
Prevent Future Unknown Purchases
To prevent any future unknown purchases make sure you do the following methods.
Turn off In-App Purchases
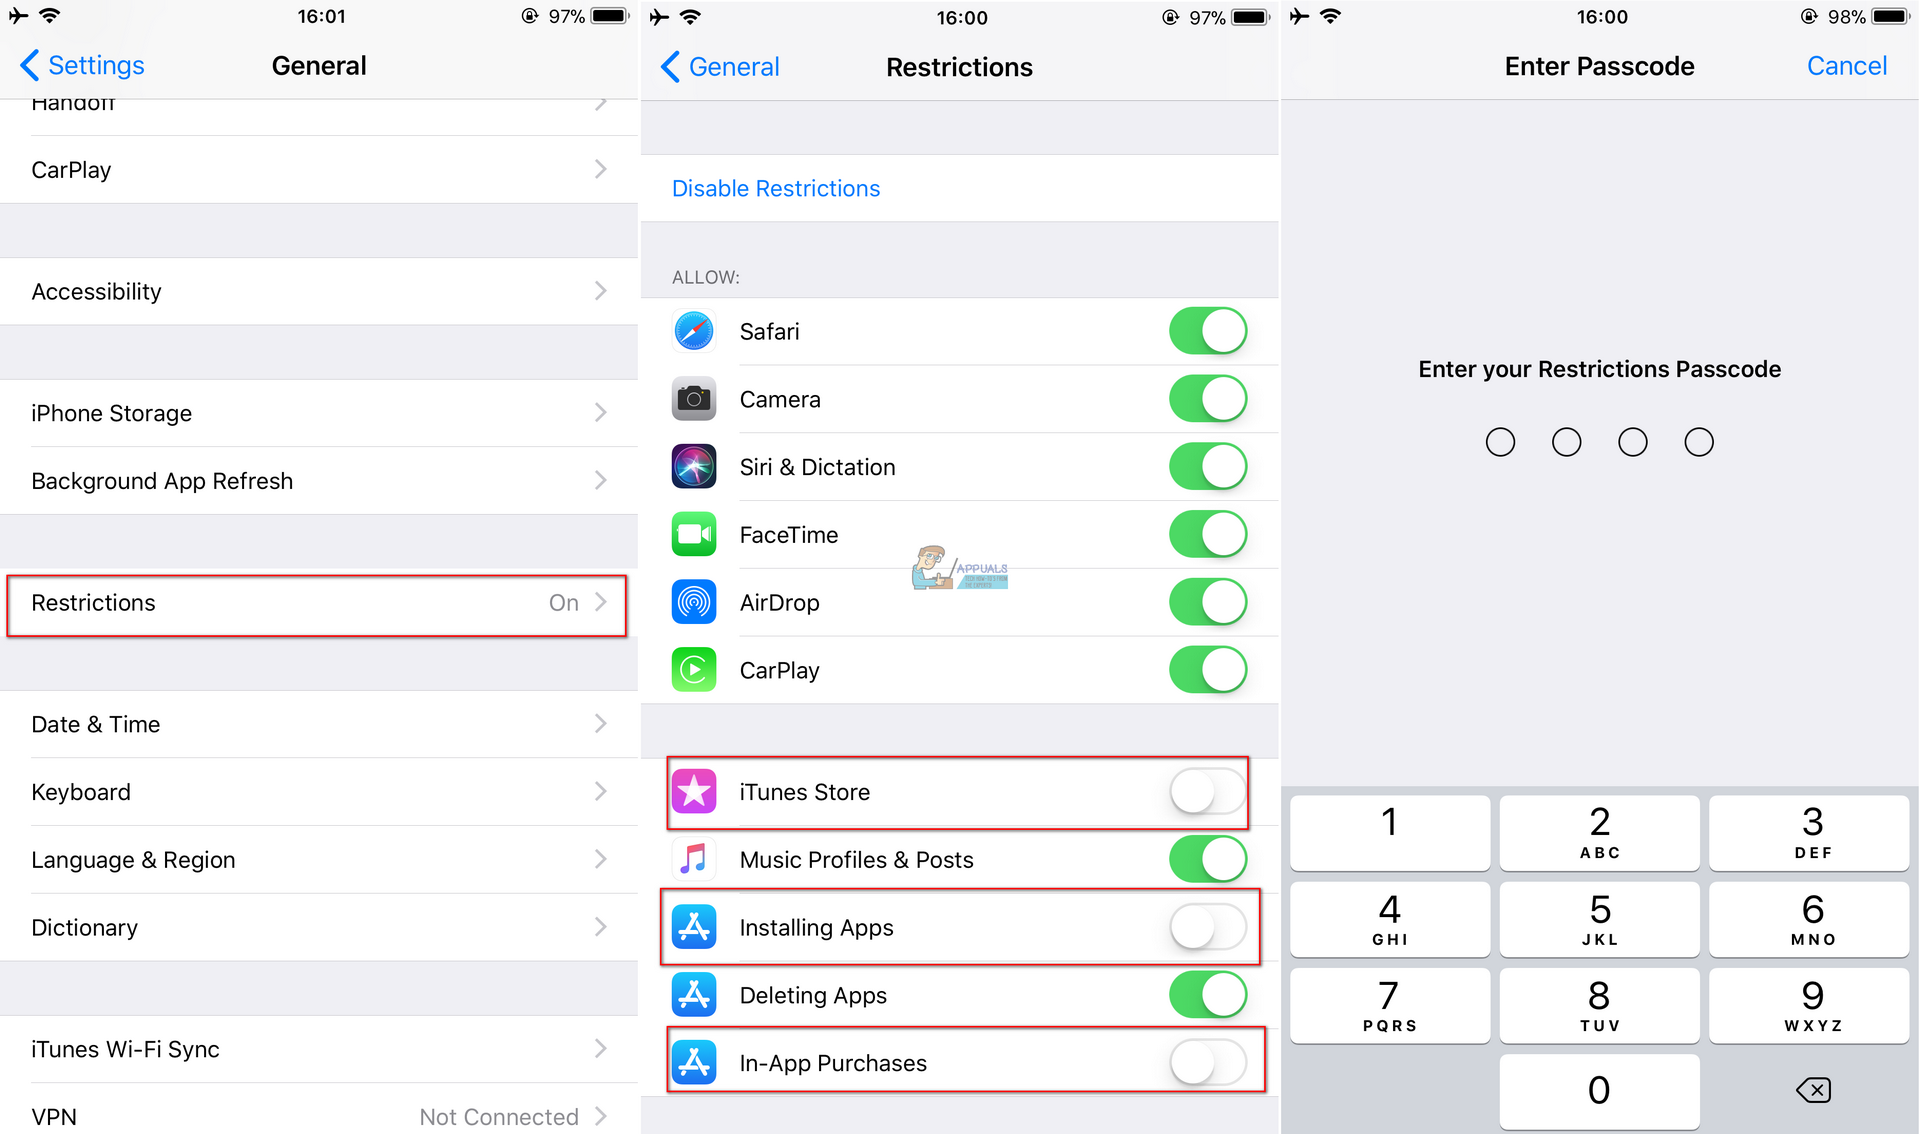
- On your iDevice, go to Settings, tap on General and choose Restrictions.
- Tap Enable Restrictions (if it isn’t already turned on).
- Create a restrictions passcode, and reenter your passcode for confirmation. Here you can choose a passcode that is different from the one you use it for unlocking your device.
Note: If you forget your passcode, you will need to erase your device and set it up as a new one. - Once you finish with the passcode, scroll down to the In-App Purchases toggle and disable it. If you do not use In-App Purchases, you can completely turn off the iTunes Store, Installing Apps, iBooks Store, and In-App Purchases.

Set a Password Requirement for Each Download
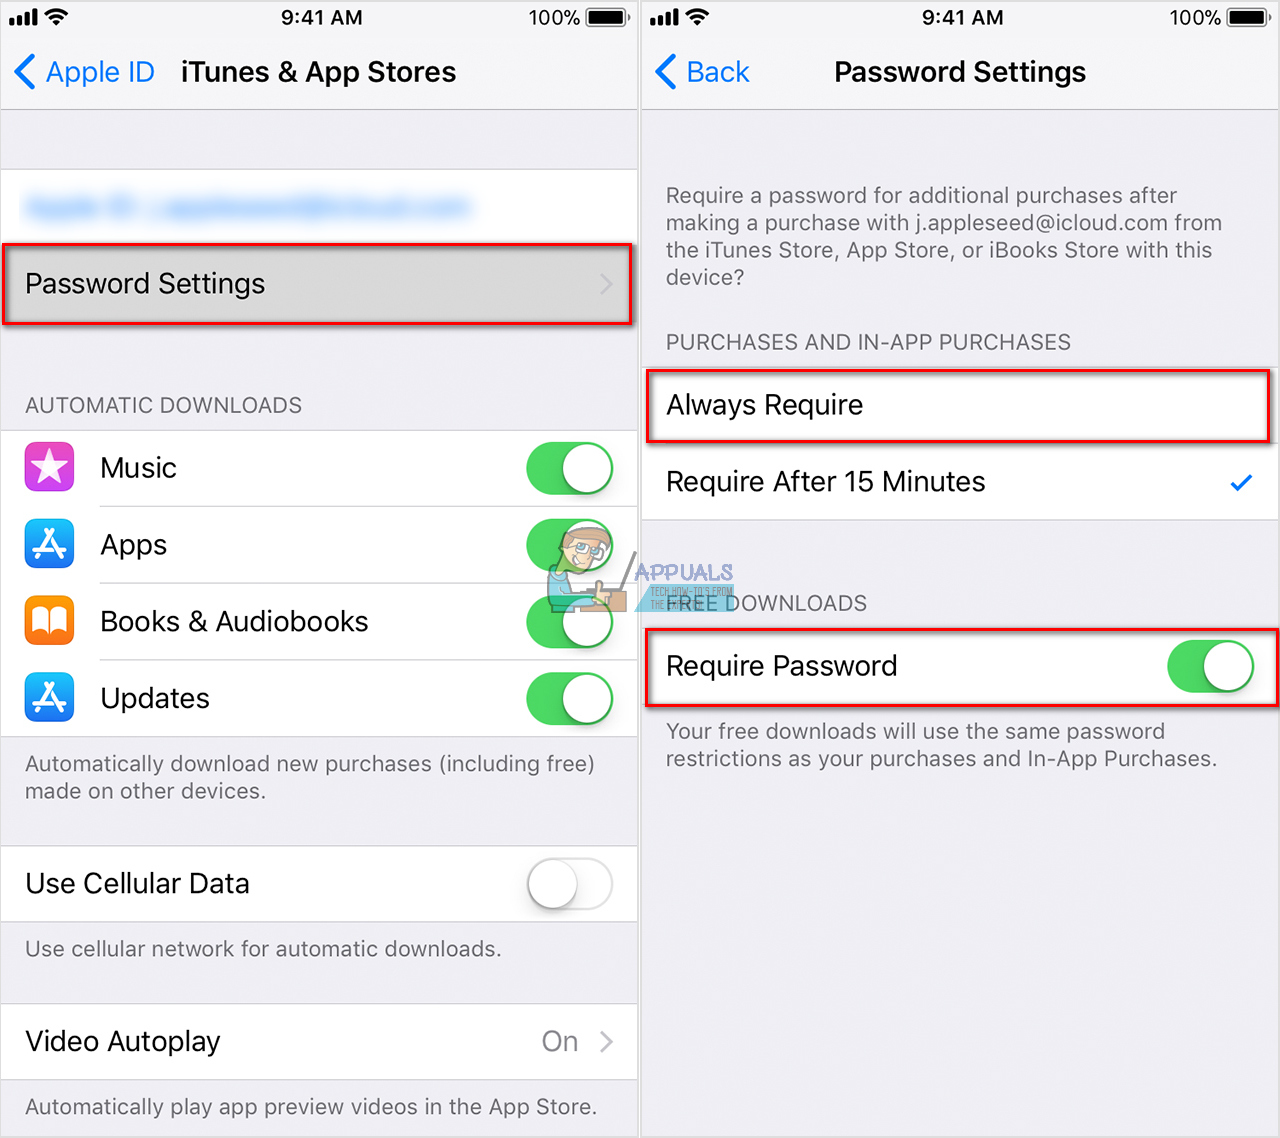
- Go to Settings, tap on your Apple ID (at the top of the settings list), and open iTunes & App Store.
- Open Password Settings (if you have Face ID or Touch ID enabled for purchases, you won’t see this menu).
- In the Purchases and In-App Purchases section choose Always Require.
- In the Free Downloads section, turn on the toggle Require Password.
- When required, enter your password and tap OK.

Now, for each app download, you will need to enter your password.
Wrap Up
If there really have been purchases that were not authorized from your devices, or you have entered your Apple ID credentials at a fake (phishing) Apple portal or site, go to Apple support and search for “Apple ID has been compromised,” or directly contact Apple. In addition to that, you can try to delete your Apple ID. Additionally, change your Apple ID password, and if possible set up Two-Factor Authentication for your Apple ID.
The best practice is always to keep your iDevices password protected. Now, make sure you let us know if this article was helpful for you in the comment section below.