[FIX] VirtualBox Error NS_ERROR_FAILURE
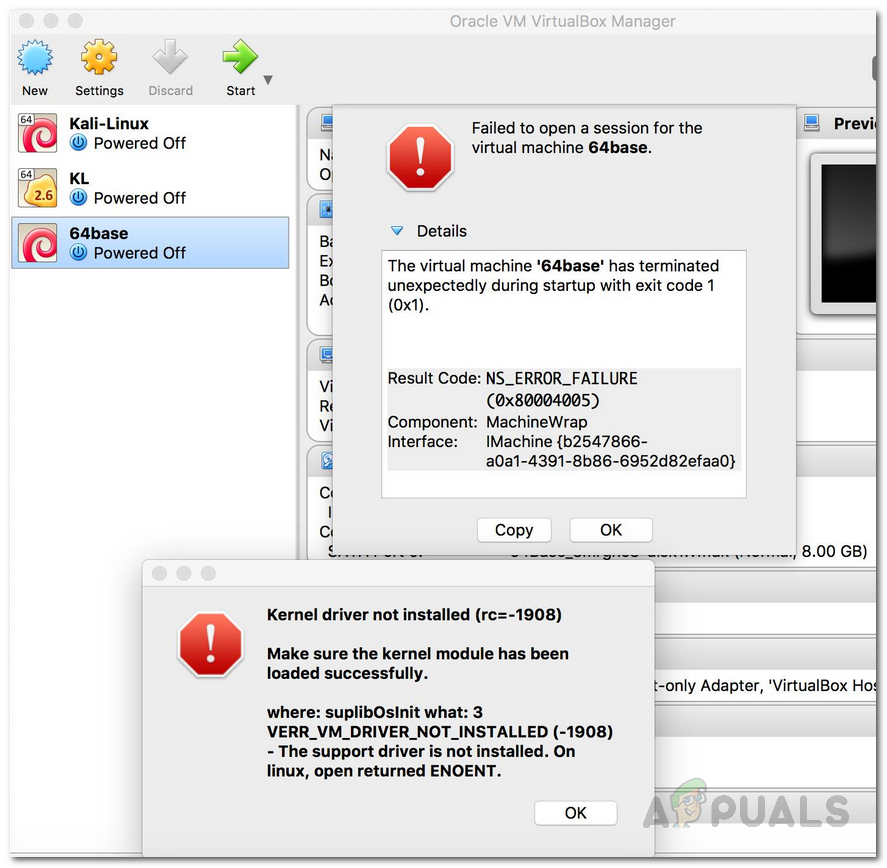
The VirtualBox error NS_ERROR_FAILURE often appears when you are trying to launch VirtualBox. The error is limited to macOS users along with some Linux users. According to the reports, sometimes the users encounter the error after either updating their system but that’s not the whole picture.
Virtual machines are an effective cost-efficient solution to using different operating systems at the same time. We’ve compiled a list of the potential causes of the issue that have been reported by various users. Some of the culprits of the said error are as follows:
- Using Duet Display — If you are using a third-party software to increase your number of displays, it can cause issues with VirtualBox even if you use it rarely. Duet Display is an application that is used to achieve the said task. If this is applicable to you, you will have to remove Duet Display to fix your issue.
- Virtual Machine Saved State — Saved state is a feature that is available in all of the virtualization providers these days. If you leave a VM in a saved state, it can often cause the NS_ERROR_FAILURE error in which case you will have to discard the culprit VM to resolve the issue.
- Corrupted Installation Files — As it turns out, in some cases the error can be caused due to corrupt files in the VirtualBox installation directory. In such a case, an easy and quick fix to the issue is reinstalling the software.
- Linux Kernel Update — For the Linux users out there, the issue often appears when they update their Linux Kernel to a more latest release that is available for grab. In such a case, you will have to either update some VirtualBox host modules.
Now that we have been through the potential causes of the said error, let us move on to the solutions that you can apply to get rid of the error. Please follow through.
Method 1: Discarding VM Saved State
As it turns out, a saved state is a feature that is a part of the various virtualization software. Basically what it does is it lets you store the current state of your virtual machine so that when you come back, you are easily able to return to that stored state quickly. If you are familiar with hibernation on laptops, think of it as the same solution but for virtual machines.
This can sometimes cause the issue that you have been facing and the fix is very easy. To fix the issue, please follow the steps below:
- First of all, open up the VirtualBox Manager.
- Once the VirtualBox Manager has launched, click on the Virtual Machine that is in the saved state. You will be able to distinguish as it says Saved under the name of the virtual machine.
- Once selected, under the menu bar, click on the Discard option which is a down arrow.
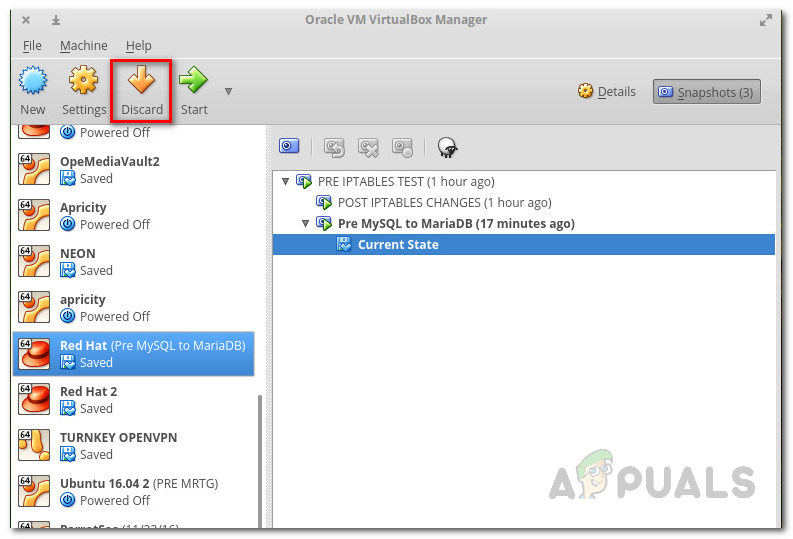
Discarding Virtual Machine - Alternatively, you can right-click on the virtual machine and select Discard Saved State from the drop-down menu.
- This shall hopefully fix the issue.
Method 2: Uninstalling Duet Display
It is obvious that having multiple displays can increase your productivity in a large manner. Duet Display is a software that can be used to turn your iPad etc. to a secondary display. This, while has its own advantages, can sometimes cause an issue with your macOS such as this one. If this case is applicable to you, what you should do is remove the software from your system.
To uninstall the software, follow the steps provided below:
- First of all, launch the Duet Display software.
- Once launched, you will be able to see the logo on the top-right corner of your screen.
- There, click on the logo and then click on the Settings icon in the bottom right corner of the drop-down box.
- After that, from the drop-down menu, click Uninstall Duet to remove the software.
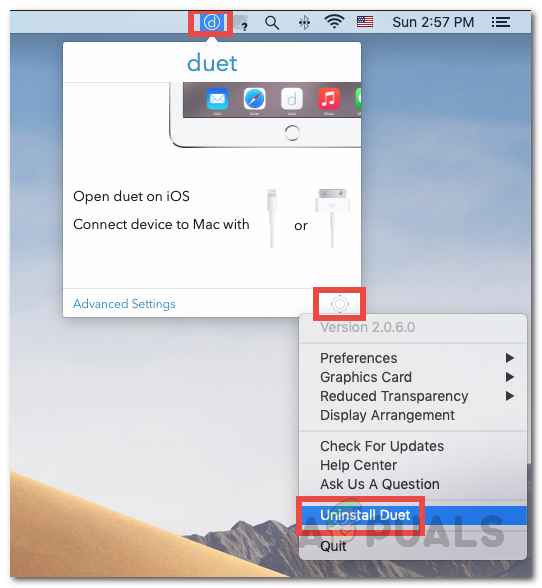
Uninstalling Duet Display - Go through any follow-up prompts to finish the removal.
- See if your issue has been fixed.
Method 3: Reinstalling VirtualBox
In some cases, the issue is caused by corrupt files that are located in the installation directory of VirtualBox. This happens when the application wasn’t installed correctly or update has messed up the files. This is not a big issue and can be easily resolved. To fix the issue, what you have to do is uninstall the VirtualBox software from your system and then install it again.
This can be done easily via the VirtualBox_uninstall.tool that comes with the package file of the software. Follow the instructions below to do this:
- First of all, you will have to download the latest VirtualBox installer that is available. To do this, head to the download section of the VirtualBox website and download the OSX installer.
- Once the download has completed, you will have to mount the downloaded .dmg file.
- Then, go to the mounted installer using Finder and there, double-click on the file named VirtualBox_Uninstall.tool.
- This will open up a new terminal window where you will be asked if you wish to proceed with the uninstallation. Type Yes in the terminal window to complete the removal.
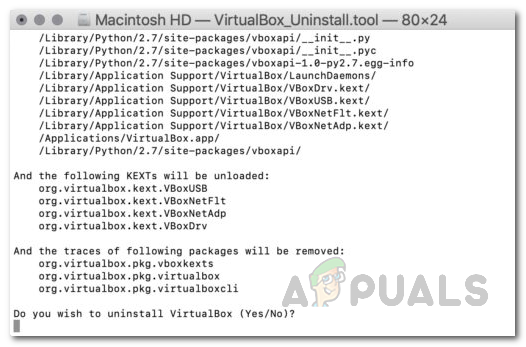
Uninstalling VirtualBox - You can close the terminal window once the uninstallation has completed successfully.
- After that, go to Finder again and install the software. If you face an error during the installation, you will have to allow access to VirtualBox through the Security and Policy window.
- To do this, make your way to System Preferences > Security and Policy.
- There, at the bottom, you will see a message that says the application was blocked. Click on the Allow button and you will be good to go.
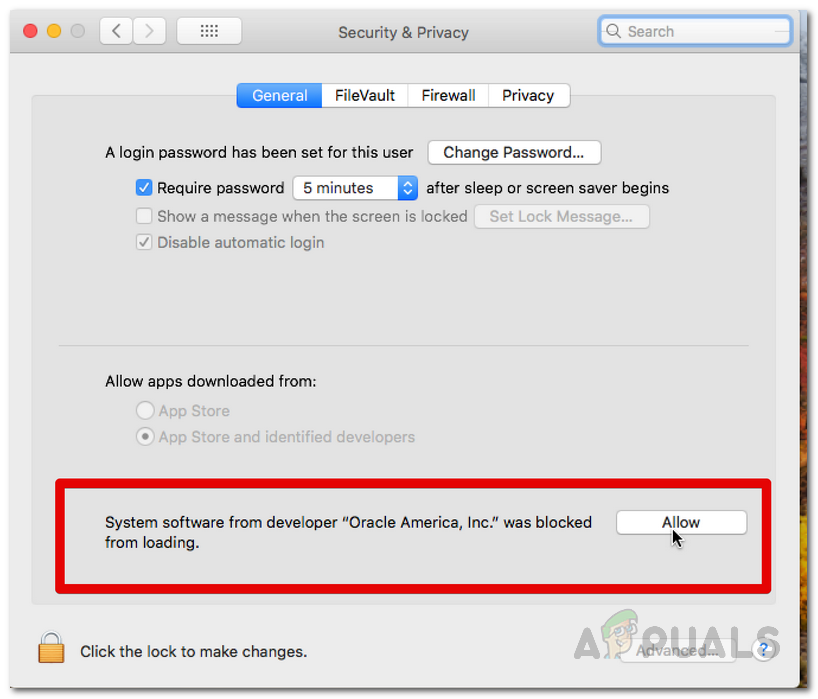
Allowing VirtualBox
Method 4: Updating VirtualBox Host Modules Package (Linux)
If you are facing the issue on a Linux distribution, it is most likely due to the outdated host modules package for VirtualBox. As it turns out, this can be easily solved just by running a few commands. This module contains the host kernel modules of VirtualBox for your Linux distribution.
To update the package, do the following:
- Open up a terminal window in your Linux distribution.
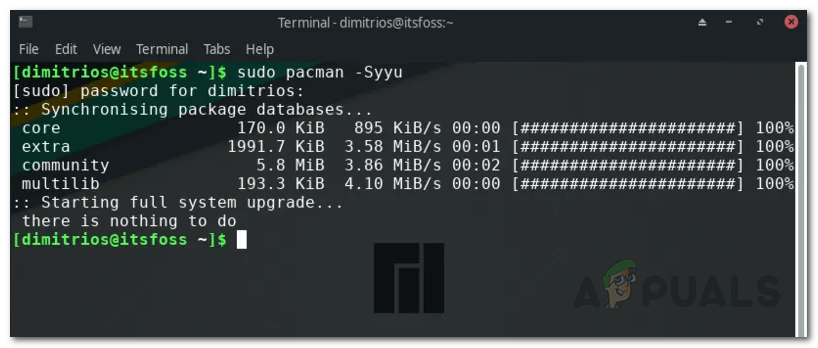
- Then, before you update the package, make sure to update the package databases. The following command is for Arch users.
sudo pacman -Syyu
- This is equivalent to the following command in Ubuntu:
sudo apt update
- After that, run the following command:
sudo /sbin/rcvboxdrv setup
- This will uninstall the old kernel modules and then recompile the new VirtualBox kernel modules.
- This should fix your issue.


