Valorant keep Updating? Try these Fixes
Recently, it turns out that some Valorant players are running into the update loop when they launch Valorant. However, it’s not a new problem for Valorant players since the latest updates are coming. Sometimes, the problem occurs whenever the user launches Valorant. Although the issue is difficult to detect, some troubleshooting techniques will aid in fixing this issue. According to our research, the Riot Client cannot read the existing files that were updated last time. Therefore it rewrites the files again.
There can be many reasons that can trigger this issue as it indicates to the update loop, Below are some causes that may include as a culprit in causing Valorant Keeps updating problem.
- Not Having Security Permissions- The authenticated users is the default security permission of the Valorant folder. However, it may cause issues as your user account is not selected. For that reason, the Riot Client may not read and overwrite the existing game files.
- Random Glitch or Bug- In most cases, the updating issue can be resolved by restarting the Riot Client because it usually indicates a random bug or glitch which can be fixed by restarting the Riot Client should fix this issue.
- Lack Of Drive Space- If you do not have enough space for the game, you may encounter the update loop problem because sometimes, if there is a lack of space in the drive, the new updates will automatically remove, and when you open the launcher it will start updating again. To avoid this, ensure you have enough space for the game to run properly.
- Interference of the Antivirus- Antivirus is usually behind issues like update stuck and download stuck. Windows Defender can block and remove the game files if the files are malicious or if they consume high usage. To ensure that, you may need to disable the antivirus temporarily to see if this fixes Valorant keep updating problem.
- Not Having Proper Administrator Privileges- If you do not have proper administrator permissions, you could run into this problem. Running a Riot client with administrator privileges may fix the issue.
Now let’s have a look at some effective solutions:-
1. Restart Riot Client
When this type of problem occurs during updating, downloading, or even launching, the first thing we recommend is to restart Riot Client. Sometimes, the problem appears due to a temporary bug that can bring this issue whenever users try to launch the Valorant. Restarting the Riot Client may fix this issue.
2. Make Sure there is Enough Space
If you run out of space, you will encounter this issue as the Riot Client needs disk space to rewrite the new update in the Valorant directory. Therefore, if restarting the Riot Client does not fix this issue, you may need to remove the temporary data to create space. The temporary files are the data rejected by the users which end up in the recycle bin.
- To remove the temporary files, launch the Explorer by pressing the Win + E on the keyboard
- Click This PC from the left sidebar and right-click on the driver where the Valorant has installed
- Select Properties from the list of options
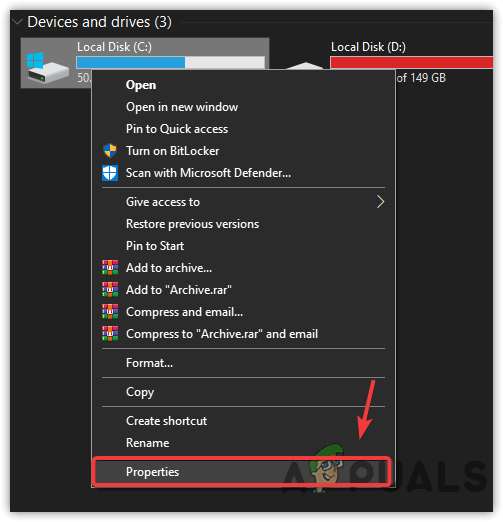
Go to Disk Properties - Click Disk Cleanup to open the disk cleanup settings
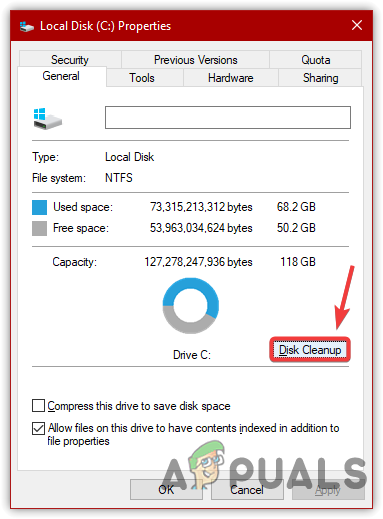
Open Disk Cleanup Settings - Tick all the files, and click OK
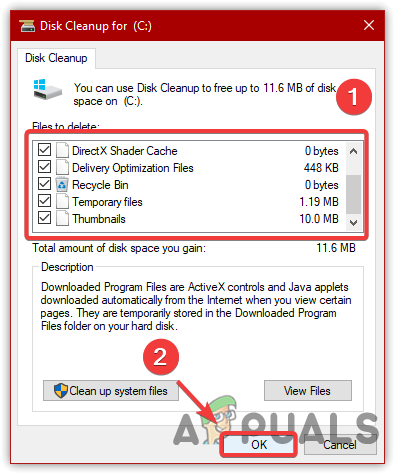
Removing Temporary Files - Click Delete Files to delete all the temporary data on your computer
- Once done, you will notice that the space in the disk is increased.
3. Allow Riot Client Through Firewall
If the issue is still there, it could most probably be due to the interference of the Antivirus. However, Windows Defender could also interfere in causing this issue. When an Antivirus interferes, the applications’ files are dangerous, or it is a blunder from the third-party Antivirus or Windows Defender. You can also check the tasks manager to see the CPU or Memory usage because the Antivirus can intercept and eliminate the files if the application consumes high memory usage. Therefore, you may need to check how much usage Riot Client consumes. If it is more than 70%, you have to restart the computer because it happens due to the corrupted data stored in the Ram. If this method does not fix this issue, try disabling the Windows Firewall.
- To allow the Valorant from the firewall, click the Start Menu and type Control Panel
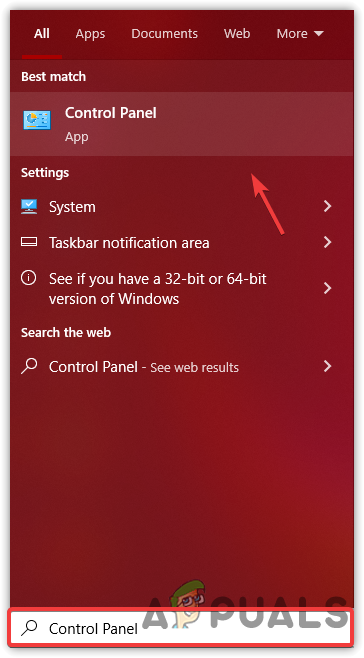
Launching Control Panel - Launch the control panel, and go to the System and Security\Windows Defender Firewall
- Click Allow An App or Feature Through Windows Defender Firewall
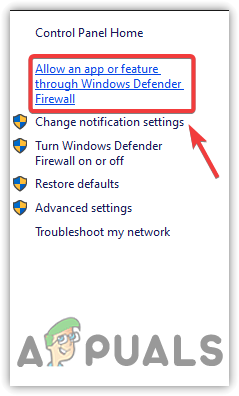
Click Allow An App or Feature through Windows Defender Firewall - Click Change Settings then click Allow Another App
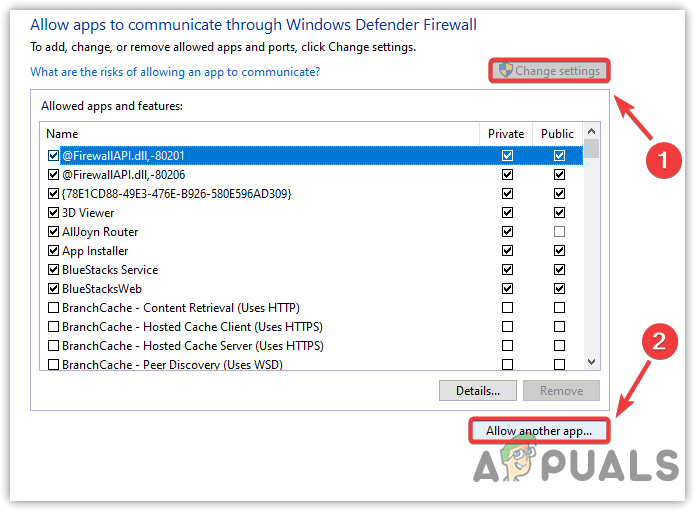
Click Allow Another App - Click Browse and navigate to the location where you have installed the Riot Client
- The default location of Riot Client is mentioned below
C:\Riot Games\Riot Client - Select the RiotClientServices.exe file and click Open then click Add
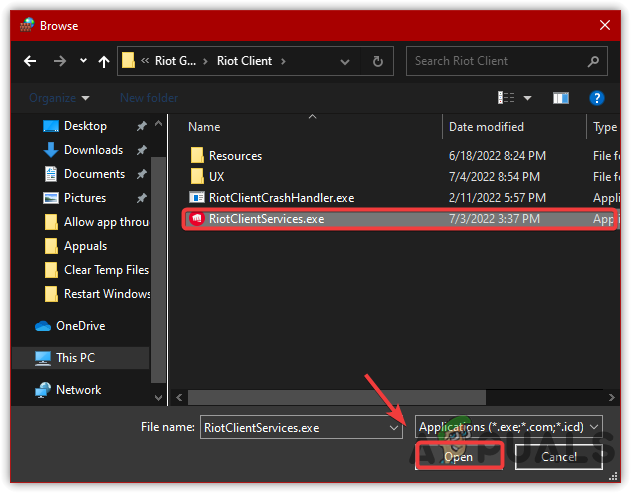
Selecting the .exe File of Riot Games - Once done, the Riot Client has been added to the firewall. Additionally, you can tick the boxes under Private and Public
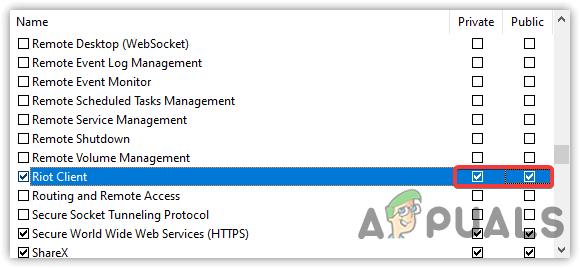
Allowing Private and Public Network - Once done, click OK and launch the Riot Client. The game will update first then again relaunch the riot client and see if this fixes Valorant keeps updating. If it does not, then follow the below method as both are required to solve this issue.
3.1. Give Permissions to Valorant Folder
There may be a chance that the folder where the Valorant has been installed might not have some permissions which aid to read and copy the files. This solution may fix this issue because, occasionally, the folder permissions change automatically and cause problems while installing and updating. Follow the methods to take full control of the Valorant directory:-
- Open Windows Explorer by pressing the Win + E simultaneously
- Navigate to the Riot Games directory
C:\Riot Games
Note: If you have installed it in another destination, navigate to it - Right-click on Valorant folder and select Properties
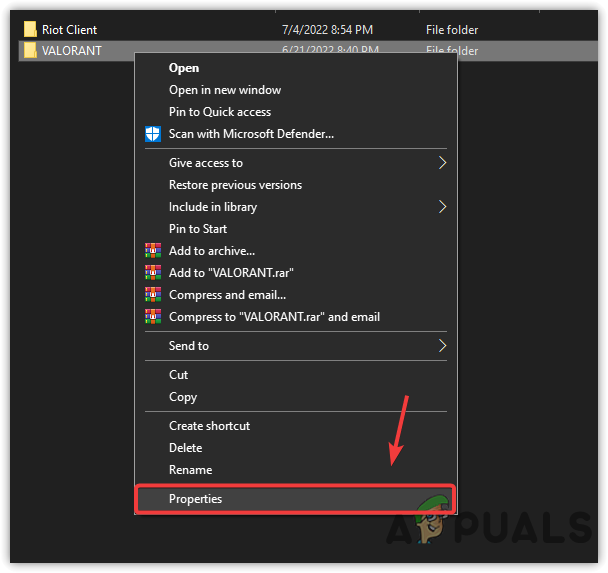
Go to Folder Properties - Go to Security from the top, then click Advanced
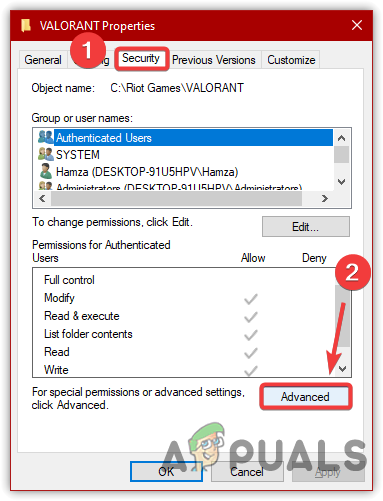
Go to Advanced - Now click Change and type your local account Username then click Check Names
Note: It will automatically set the username with your desktop name.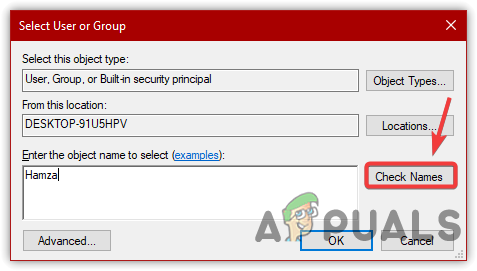
Adding Account Name with the Desktop Name - In case, it cannot find the username, then click Advanced
- Click Find Now and choose your account.
- Once done click OK
- Again click OK to close the Window
- Click Apply then click Add
- Click Select A Principal, and type the username then click Check Names
- Tick all the options and click OK
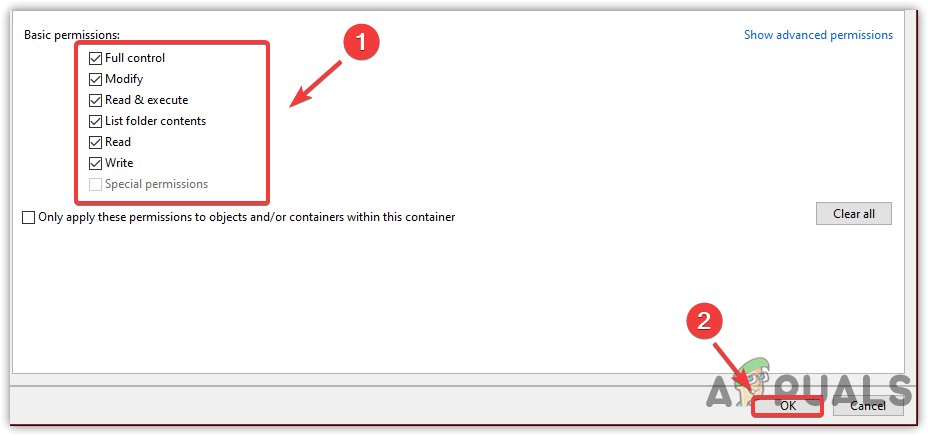
Taking Full Control of the Folder - Once done, click Apply and press OK to save the changes
4. Run the Riot client as Administrator
Not having administrator privileges can be one of the main reasons Valorant keeps updating because when the application does not have administrator privileges, it cannot make specific changes to the system. Although the Riot Client has permission to copy the game files into the C directory, occasionally, the permission automatically changes; that’s why either running the program in administrator mode will fix the issue, or you need to give permission to a Valorant folder as mentioned above.
- To run Riot Client as administrator, right-click on the Riot Client and select Properties
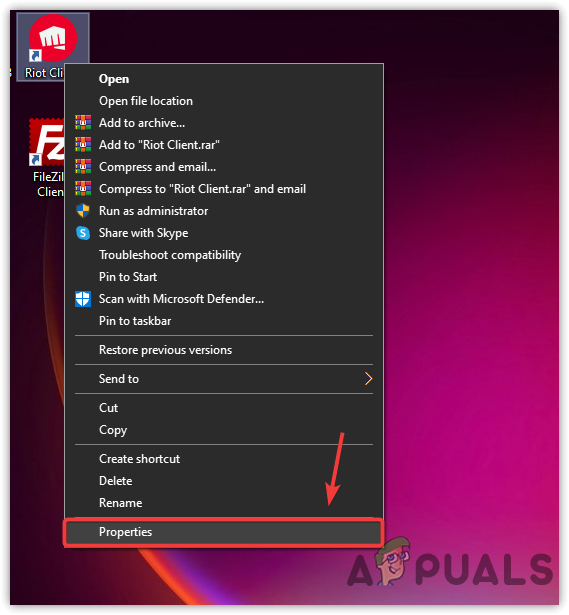
Navigating to Riot Client Launcher Properties - Go to the Compatibility tab, and tick the option Run this Program As An Administrator
- Once done, click Apply and click OK
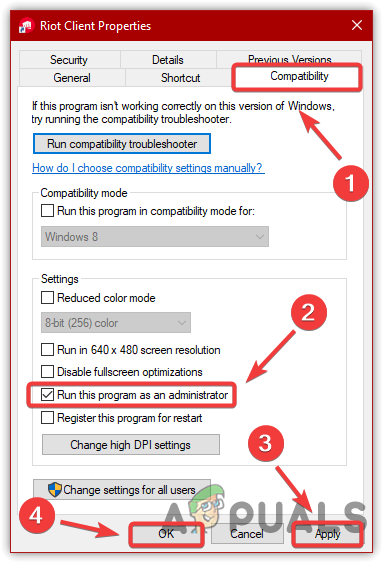
Modifying Compatibility Settings - Now launch the Riot Client and update the game. Once you update relaunch Riot and see if this fixes the Valorant keeps updating problem.
5. Turn Off Windows Defender/Antivirus
The third-party Antivirus or Windows defender could interfere with the Riot Client, and it may prevent the application from copying the new files to a Valorant directory. Temporarily disabling the Windows Defender may help fix this issue. If you use third-party Antivirus software, make sure to disable it.
- To turn off the antivirus, go to Settings by pressing the Win + I at the same time
- Navigate to Update & Security and click Windows Security from the left pane
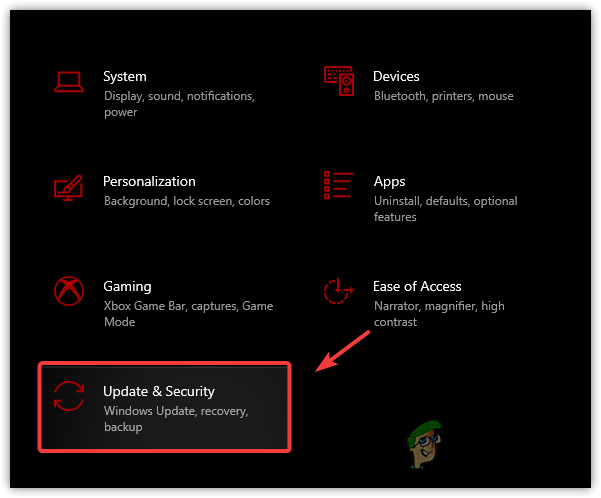
Go to Windows Update Security - Click Virus & Threat Protection then click Manage Settings
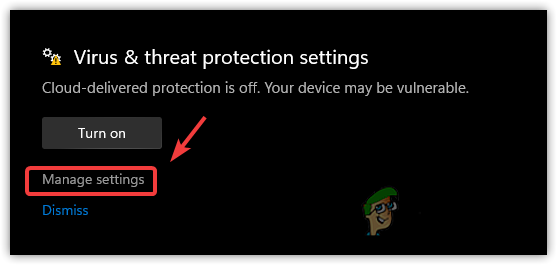
Click Manage Settings to view Further Options - Now turn off the Real-Time Protection by clicking on the toggle button
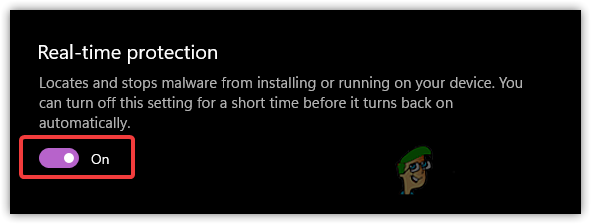
Turn Off Real-Time Protection - Once done, launch the Valorant and check if the issue persists.
6. Repair/Reinstall Valorant
If you applied all the solutions and none of these worked, the issue is probably due to the corrupted files, which can be repaired from the Riot Client. If this method does not fix the issue, either try reinstalling or verifying the game.
- To repair the Valorant, launch the Riot Client and navigate to the Settings by clicking on the profile from the top right
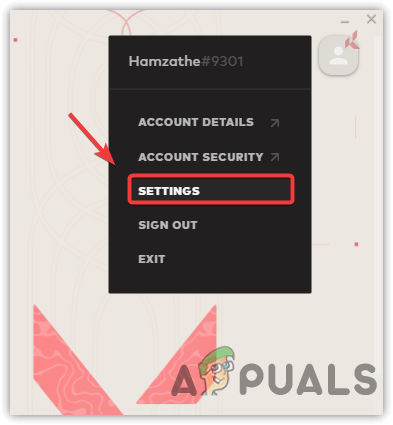
Navigating to Valorant Settings - Select Valorant from the left pane, and click the Repair option
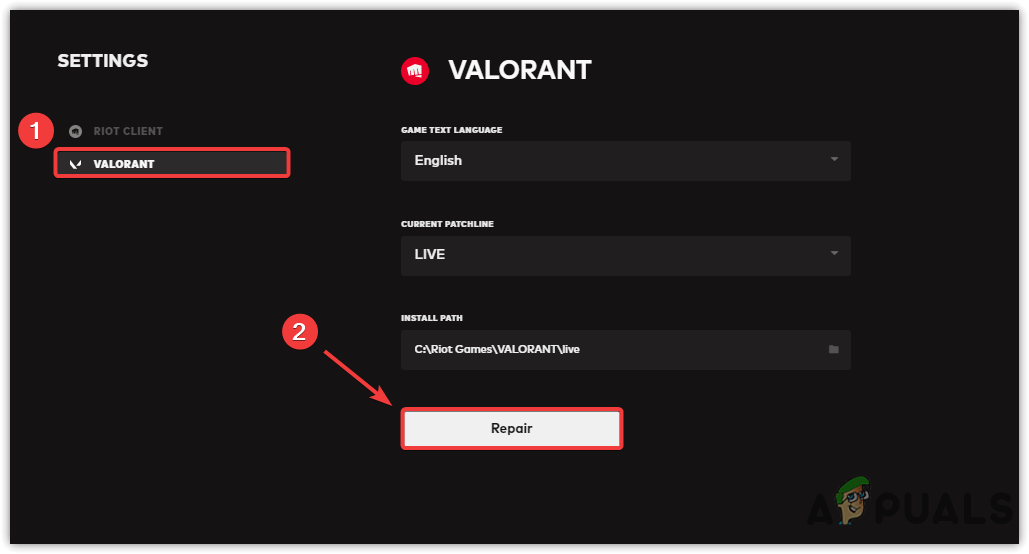
Repairing Valorant Note: If there is any corruption in Valorant game files, it will automatically repair it.
- Once done, check if the issue persists.
7. Submit a ticket
If all else fails to fix this issue, the last option is to submit the ticket to a Riot Client. When you submit a ticket, they will ask some questions about the issue, you have to describe them, and they will guide you on how you can fix this issue.
- To submit a ticket, go to the official Valorant website
- First, you need to Sign-In to your Valorant account
- Hover the mouse on Support from the top and click Support
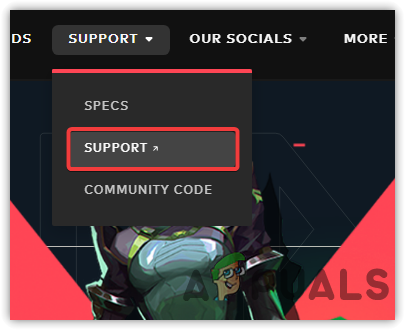
Navigating to Riot Support - Scroll down to the bottom and click Submit A ticket

Click Submit A Ticket - In the request type, choose Technical Issues, Install, Patch, Lag, or Crashes
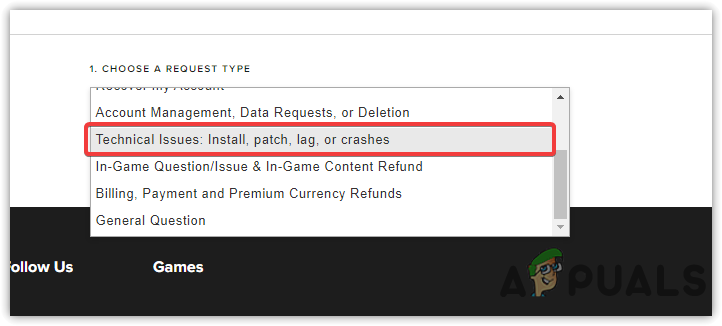
Select A Request Type - Fill out the form, according to the issue, you are facing
- Once done, click on Submit and wait for the response. While waiting, you can apply the methods composed in this article How to Fix Valorant Downloading stuck on 0.1KB/s.


