Fix: Uploading to iCloud Paused Message on iPhone
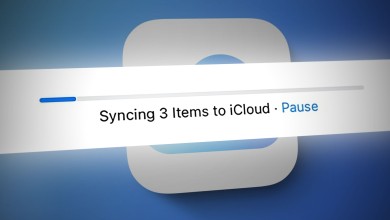
If you see an ‘uploading to iCloud paused’ message on your iPhone while uploading your data, it means that there is an error in the iCloud uploading process. This message prevents you from uploading any data to your iCloud Drive.

There can be various reasons why your device is facing delays in data uploading. For instance, there may be a syncing issue in iCloud.
However, there are a few requirements that your device must meet in order to upload data to the drive, such as needing to be connected to both power and Wi-Fi. Additionally, your device should be at least 50% charged.
In addition, if your device is engaged in another task, such as downloading apps, it will delay the syncing process. Thus, you must wait for it.
In this article, we will discuss seven methods that will help you resolve the issue of uploading data to iCloud. Let’s discuss them one by one.
1. Restart your iPhone.
Restarting your iPhone should be the first troubleshooting step whenever you face any issues with your device. It helps your device to resolve any glitches or bugs while giving it a fresh start by closing all the apps. Also, it addresses all software-related issues. As a result, all the device’s functions will work properly.
Furthermore, the syncing/uploading issue can also be a network-related problem. Therefore, when you restart your device, the network connections will also be reset. As a result, your iPhone will work more smoothly than before, since all the temporary data will be cleared. Here’s how you can restart your iPhone:
iPhone SE (1st generation), iPhone 5, or earlier models:
- Press the top button and hold it until the power-off slider appears on the screen.

Press the top button and hold it till the power-off slider appears - After this, drag the slider and wait for approximately 30 seconds for your iPhone to turn off completely.
- Lastly, press the top button and hold it until you see the Apple logo to turn on your device.
iPhone SE (2nd or 3rd Generation), 6, 7, or 8:
- Press the side button and hold it until the power-off slider appears on your iPhone.

Press the side button and hold it until the power-off slider shows up - Drag the slider to turn it off, and wait for approximately 30 seconds.
- Lastly, turn on your device by pressing the side button and holding it until the Apple logo appears on the screen.
iPhone X or later versions:
- Press the volume up or down button, along with the side button, until the power-off slider appears on the screen.

Press the volume button and power button to switch off iPhone - Next, drag the slider to turn off your iPhone and wait for approximately 30 seconds.
- Press the side button until the Apple logo appears on your screen to turn it on.
2. Disable and Re-enable iCloud Syncing.
You need to disable the syncing and then re-enable it. Doing this will help provide a fresh start for the syncing, allowing you to upload the data immediately. Here’s how you can do it:
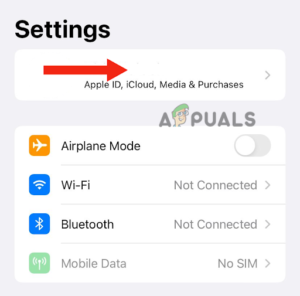
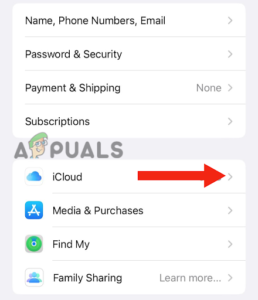
- First, go to Settings and tap on your Apple Profile.
Tap on your Apple Profile - After this, tap on iCloud.
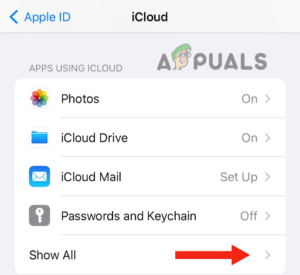
Go to iCloud - Next, tap on Show All under the Apps Using iCloud section.
Tap on Show All - Scroll down and find the app that you want to sync.
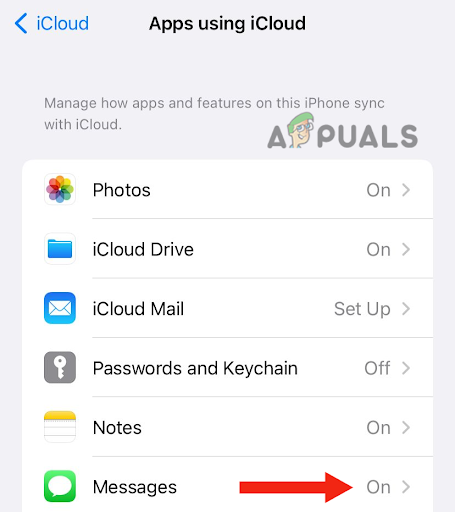
Find the app which you want to sync - Next, turn off the toggle and turn it on again.
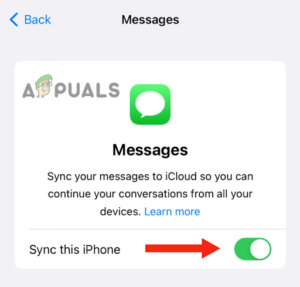
Turn off the toggle and turn it on again - After completing this step, restart your device (by following Method 1) and check if this method has resolved the issue.
3. Clear iPhone storage.
If you do not have sufficient storage or have larger files on your device, the uploading process may take some time, or it could pause completely. For this reason, you need to clear out your iPhone storage. Large files can sometimes cause glitches, due to which the ‘paused’ message appears on your iPhone.
Here’s how you can check for large files in iMessage:
- Go to Settings and tap on General.
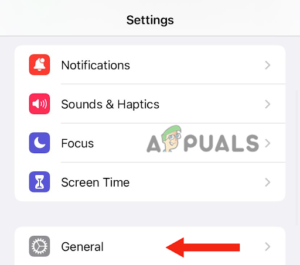
Tap on General - Tap on iPhone Storage.
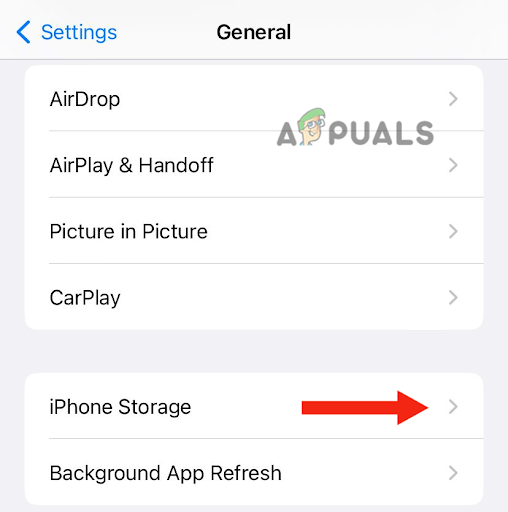
Select iPhone Storage - Next, tap on Messages > Videos. After this, delete videos that are over 1GB. By doing this, you will see that you can sync the data easily without any paused messages.

Tap on Messages
4. Sign out of iCloud.
Another fix that you can try to solve the uploading problem is to sign out of iCloud and sign back in. Doing this will help you resync the data that has been paused due to an error. Apart from this, it serves as a restart for the account, which will solve any glitches.
It will also help clear out the iCloud cache and temporary data, which can be one of the reasons why syncing is getting delayed. Here’s a step-by-step method to sign out of your iCloud account:
- Go to Settings and click on your Apple Profile.
- After this, scroll down and tap on Sign Out.

Hit the Sign Out button - Then, enter your account password to log out of iCloud.

Enter your account password - Next, you need to restart your device by following Method 1.
- Lastly, sign in to your iCloud account. After this, start the syncing process again to see if the method has worked.
5. Turn off Low Power Mode.
If you have enabled Low Power Mode, the content will not be uploaded because when Low Power Mode is enabled, all background activities are paused to save power. Since syncing occurs in the background, it will also be delayed until you turn off the mode.
Follow the mentioned method to turn off Low Power mode:
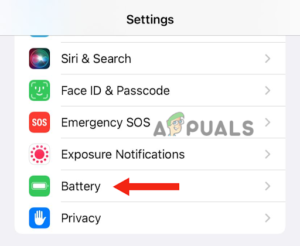
- First, go to Settings, scroll down, and tap on Battery.

Choose the Battery option from the list - Then, turn off the toggle in front of Low Power Mode.
Turn off the toggle
6. Update your iPhone to the latest version.
Updating your iPhone to the newest version is essential if you want it to run smoothly. Many users who did not update their devices to the latest version experienced issues with the iCloud uploading process. For this reason, updating your iPhone becomes a must.
Apart from this, there are various other benefits to updating. For instance, your device will have new features, improved performance, and extended battery life. Here’s a step-by-step guide to updating your iPhone to the latest version:
- Back up your iPhone using a PC.
- Connect it to the charger, and then connect your iPhone to the Wi-Fi.
- Go to Settings and tap on General.
- After this, go to the Software Update.
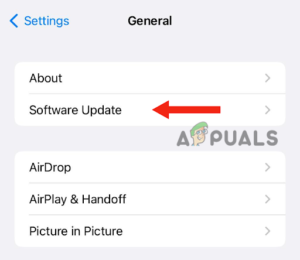
Go to Software Update - If there are two or more updates, select your preferred one. Then, tap on Install Now. However, if there is an option for Download and Install, choose to download the update.
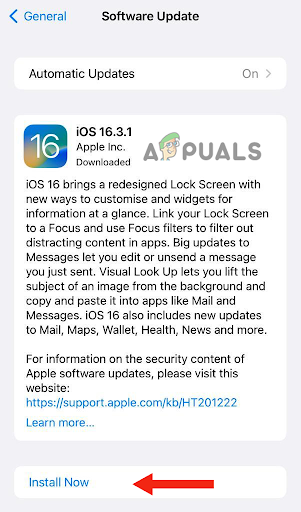
Tap on Install Now - After the download is complete, enter the passcode you use to unlock your device.
- Lastly, click on Install Now.
7. Restore Backup from iCloud.
Before trying this fix, ensure that you save all your data, as it will delete all the data from the device. If you are unable to upload your data to iCloud due to the delay, you can save it on your PC.
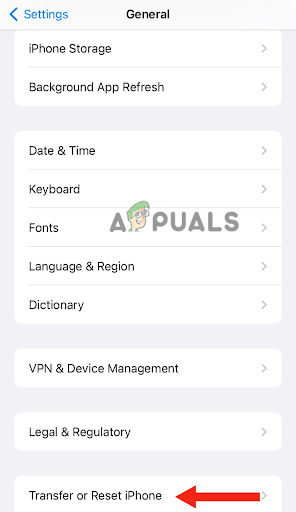
- Firstly, go to Settings and tap on General.
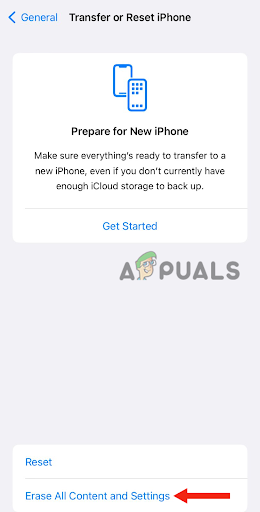
- Then, scroll down and tap on Transfer or Reset iPhone.
Select Transfer or Reset iPhone - After this, tap on Erase All Content and Settings.
Tap on Erase All Content and Settings - Enter the password you use to unlock your device. You may also have to enter your Apple ID password.
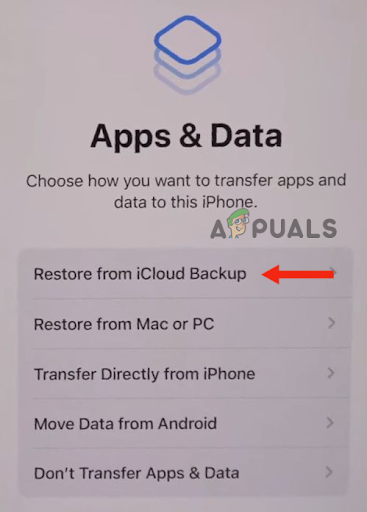
- After your device turns on, follow and complete the setup steps until you see the option for Apps & Data. After that, tap on Restore from iCloud Backup.
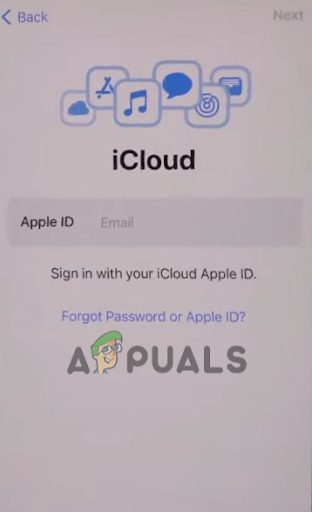
Tap on Restore from iCloud Backup - After this, sign in to iCloud using your Apple ID.
Sign in to iCloud - Choose a backup, select the latest one, and then tap on Continue. With this, the transfer will begin.
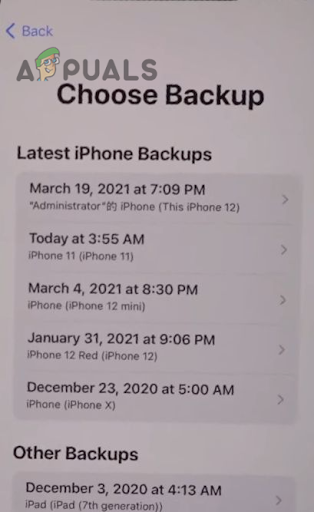
Select the latest backup, then tap on Continue
If there is a new update, you will be asked to download it. To update your device, follow the on-screen steps. Then, you need to sign in with the Apple ID you use, which will restore all your data and purchases.
During the entire process, stay connected to Wi-Fi, as it can take up to an hour to complete, depending on the backup size. If you get disconnected during the process, the restoration will be paused until you reconnect to Wi-Fi.
In this guide, we have gone through seven different methods that will help you solve the issue of iCloud syncing. Nevertheless, if the issue persists even after trying all the methods, consider contacting Apple Support, as they will explain the reason why the problem is occurring.