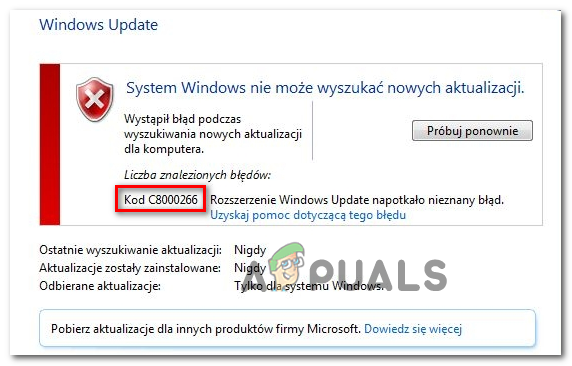
How to Fix Windows 10 Update Error C8000266?
Some Windows users are encountering the error code C8000266 whenever they try to install a new pending Windows update using the conventional channels. Most users report that the error appears on Windows 7 and Windows 8.1.
If the issue is being caused by a generic problem that Microsoft is already aware of, you should be able to fix the issue automatically just by running the Windows Update troubleshooter and applying the recommended fix based on your particular situation. If you’re comfortable with using a 3rd party alternative, Windows Repair portable is a great all-in-one tool that will resolve most issues of this kind.
Additionally, you should be able to force the failed updates to install by resetting every Windows Update component – either via an automated script or by doing it manually from an elevated Command Prompt terminal.
If the built-in WU component refuses to work, one quick workaround that will bring your computer version up to date is to use the Microsoft Update Catalog to manually download and install the pending updates – Another 3rd party utility that will also allow you to do update your machine is WSUS Offline.
However, if you’re dealing with some type of severe system file corruption, you might not get this fixed until you reset every operating system component (you can do this via a repair install or a clean install)
Running the Windows Update Troubleshooter
If you’re seeing the C8000266 error code on Windows 7 or Windows 8.1, there’s a very high chance that the issue is already covered by a repair strategy that Microsoft is capable of deploying automatically. A lot of users that we’re also seeing this error code when trying to update their computer with the latest Windows updates have confirmed that the issue was finally resolved after they ran the Windows Update Troubleshooter and applied the recommended fix.
Keep in mind that the Windows Update Troubleshooter is essentially a collection of automated repair strategies that are known to fix a variety of Windows Update errors. As soon as you launch it, it will start looking for inconsistencies and then deploy the appropriate fix automatically if the problem is already covered by one of the automated repair strategies.
Here’s how to launch the Windows Update Troubleshooter on Windows 7 or Windows 8.1 and resolve the c8000266 error code:
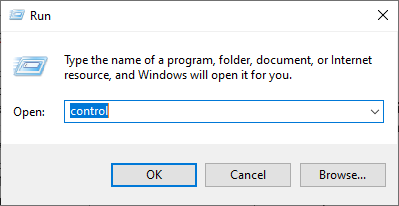
- Press Windows key + R to open up a Run dialog box. Next, type ‘control’ inside the text box and press Enter to open up the classic Control Panel interface.
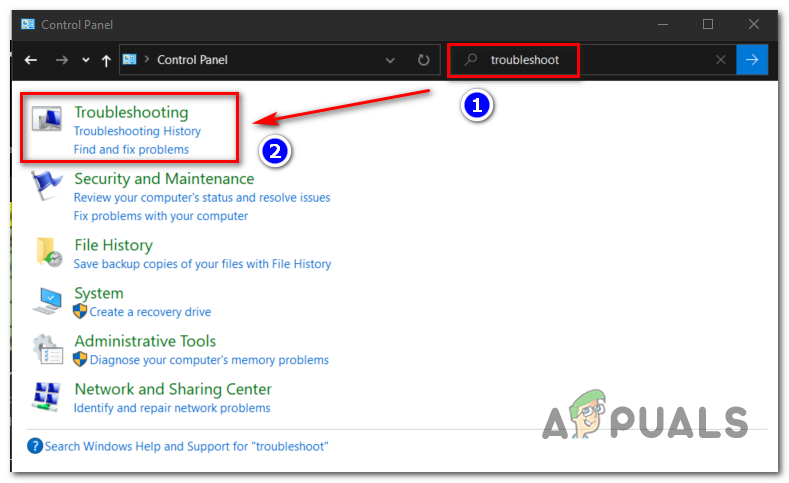
Accessing the Classic Control Panel interface - Once you manage to land inside the classic Control Panel interface, use the search function in the top-right corner of the screen to search for ‘troubleshoot’. Next, from the list of results, click on Troubleshooting to expand on the list of integrated troubleshooters.
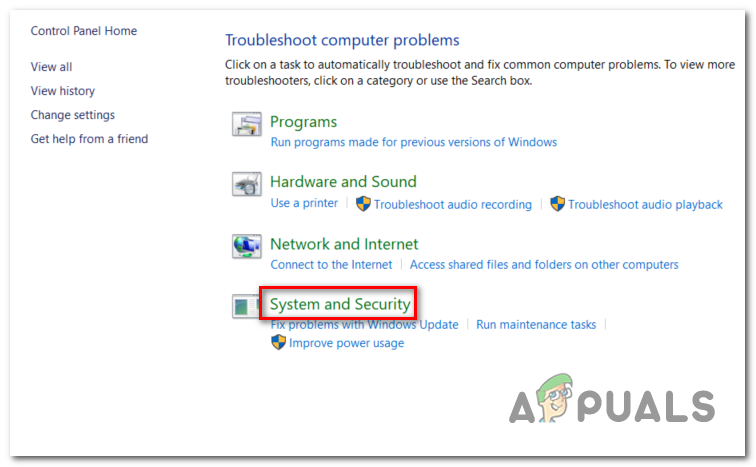
Accessing the classic troubleshooting menu - Once you’re inside the Troubleshoot window, proceed by clicking on System and Security from the list of available options.
Accessing the System and Security Troubleshooting menu - Once you’re inside the System and Security menu, click on Windows update (under the Windows category) to open the correct troubleshooter.
- After you manage to open the Windows Update troubleshooter, proceed by clicking on the Advanced hyperlink and checking the box associated with Apply repairs automatically. After you do this, click on Next to advance to the next menu.
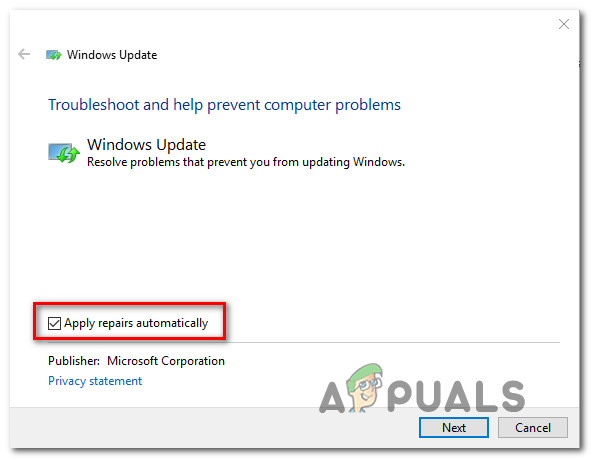
Apply repairs automatically using Windows Update - Wait for the initial scan to complete. Depending on the steps that need to be taken in order to resolve the issue, you might be prompted to click on Apply this fix and follow a series of additional steps in order to apply the appropriate fix.

Apply this fix - In case you are prompted to restart, comply and see if the problem is resolved once the next system startup is complete by attempting to install the pending updates once again.
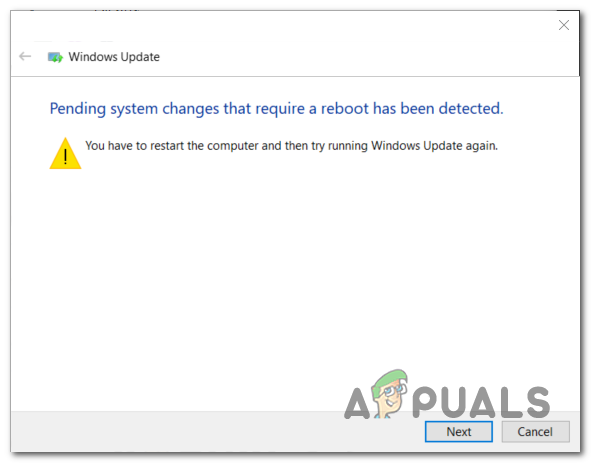
Restart after Windows Update repair strategy was enforced
If you’re still prompted by the same Error Code C8000266, move down to the next potential fix below.
Resetting every Windows Update component
If the build-in troubleshooter was not capable of resolving the issue automatically, the next logical step would be to try and reset the Windows Update yourself – you can either do this automatically (via a script) or you can take matters in your own hands and perform the Windows Update reset manually.
In most cases, this particular issue occurs due to the fact that one or more components are becoming stuck in a limbo state. If this scenario is applicable, you should be able to fix the issue by forcing a system-wide reset of all WU components involved in the updating process.
Depending on your level of technicality, follow one of the two methods below to reset every Windows Update component:
Option 1: Resetting Windows update via Automated script
- Open your default browser and visit this link (here) and download the Reset Windows Update Agent script using the Download button associated with ResetWUEng.zip.
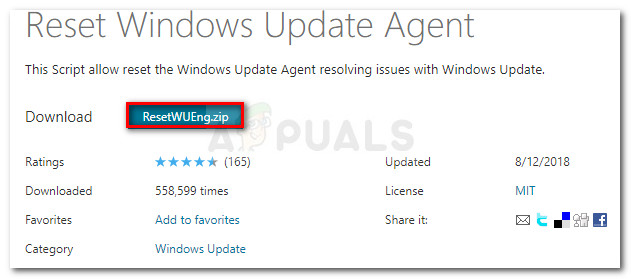
Download Windows Update Reset Agent - After the download is complete, extract the ZIP archive with a utility like WinRar, WinZip or 7Zip.
- Next, double-click on ResetWUEnG.exe and click Yes at the UAC (User Account Control) if you’re prompted to provide admin access.
- Click Yes at the confirmation prompt, then wait for the procedure to complete and restart your computer once the procedure is complete.
- At the next startup, attempt to install the update once again and see if the issue is now resolved.
Option 2: Resetting Windows update via Command Prompt
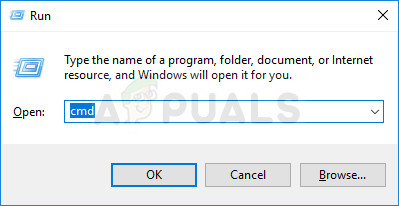
- Open up a Run dialog box by pressing Windows key + R. Next, type ‘cmd’ and press Ctrl + Shift + Enter to open up an elevated Command Prompt. When you see the UAC (User Account Control) prompt, click on Yes to grant administrative privileges.
Running Command Prompt as an administrator - Once you’re inside the elevated CMD window, type the following commands in order and press Enter after each one in order to stop all relevant Windows Update services:
net stop wuauserv
net stop cryptSvc
net stop bits
net stop msiserver
Note: These commands will stop the Windows Update, MSI Installer, Cryptographic and BITS services.
- Once every relevant service has been stopped, run the following commands in order to clear and rename the SoftwareDistribution and Catroot2 folders:
ren C:\Windows\SoftwareDistribution SoftwareDistribution.old
ren C:\Windows\System32\catroot2 Catroot2.old
Note: These two folders are tasked with holding update files and other temporary files used by the WU component. Since you can’t delete them conventionally (without making some risky permission changes), the most efficient way of forcing Windows to create new healthy equivalents is to rename the two directories.
- Once the two folders have been renamed, run the following command and press Enter after each one in order to re-enable the services that you disabled at step 2:
net start wuauserv
net start cryptSvc
net start bits
net start msiserver
- Once every relevant service has been restarted, attempt to install the update again and see if the problem is now resolved.
Installing the Windows update manually
If the other methods above haven’t allowed you to install the failing Windows Update but you don’t have time to follow other time-consuming fixes, one way to circumvent a corrupted built-in WU client is to install the update manually using the Microsoft Update Catalog.
In case you only have several pending updates that are showing the C8000266 error code whenever you try to install them conventionally, follow the steps below to do the installation directly from the Microsoft Update Catalog. It should allow you to go around the root cause of the issue.
Here’s a quick guide on doing the update manually via the Microsoft Update Catalog:
- Open your default browser and use it to visit the Microsoft Update catalog by visiting this link (here).
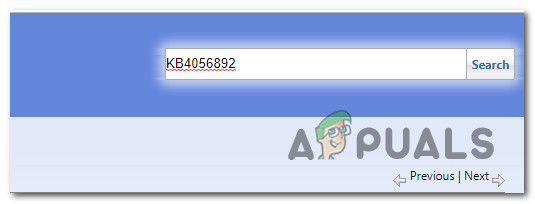
- After you get to the correct location, use the search function in the top-right corner in order to search for the name of the update that is failing with the C8000266 error code when you attempt to install it conventionally (via the built-in Windows Update component)
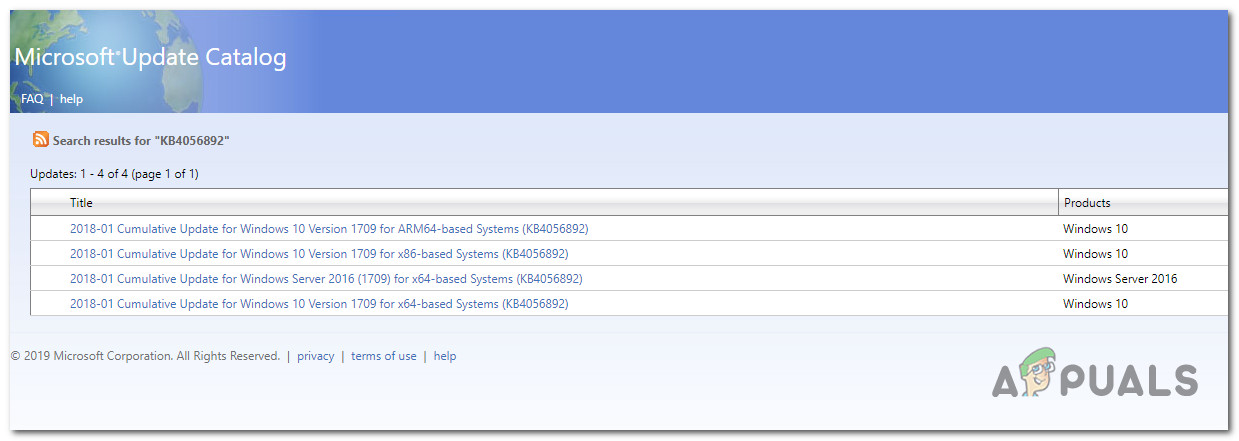
Searching for the update that you want to install manually - Once the result appears, identify the appropriate update by looking at the OS architecture and the WIndows version that it’s built for.
Choosing the right Windows Update - Once you decide on the correct update that you need to download, click on the Download button and wait for the process to complete.
- After the download is complete, open the update installed and follow the on-screen instructions to install the update manually.
- If the installation completes without issues, reboot your computer and see if the problem is resolved at the next computer startup.
Running Windows Repair Portable (3rd-party tool)
If none of the potential fixes above have allowed you to resolve the issue, you might be able to fix the issue using Windows Repair Portable. This is an all-in-one Windows Repair freeware that a lot of Windows 7 and Windows 8.1 users that encounter error codes while installing Windows updates are using to get their WU component fixed.
Important: Keep in mind that this is not a tool provided by Microsoft and it’s not designed to fix Windows server problems. If you’re not comfortable with 3rd party tools capable of fixing OS components or you’re encountering the C8000266 error on a Windows server version, skip this method entirely.
if you’ve decided to follow this potential fix, here’s a quick step-by-step guide on using Windows Repair portable in order to resolve the C8000266 error code:
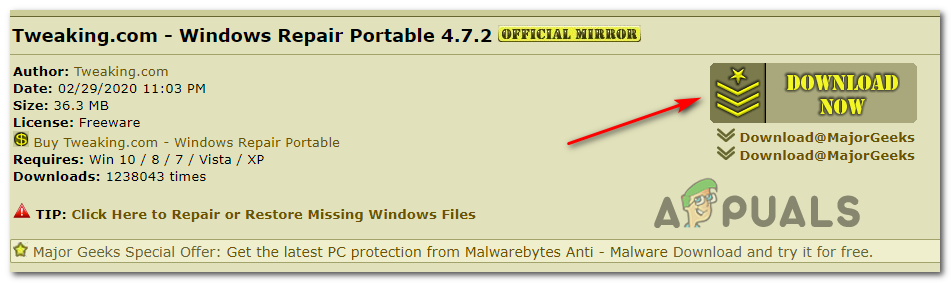
- Visit this link (here) and click the Download Now button to automatically download the archive containing the Windows Repair Portable tool.
Downloading Windows Update Portable - After the download is complete, use WinZip, WinRar, 7Zip or any other extraction utility to extract the contents of the archive that you’ve just downloaded.
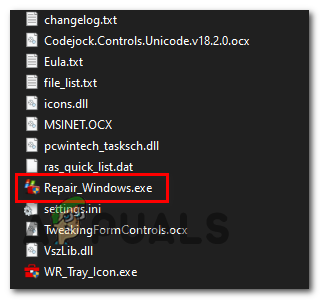
- Open the Windows Repair folder that you’ve just extracted and double-click on Repair_Windows.exe.
Opening the Repair_Windows executable Note: When you’re prompted by the UAC (User Account Control) prompt, click Yes to grant admin access.
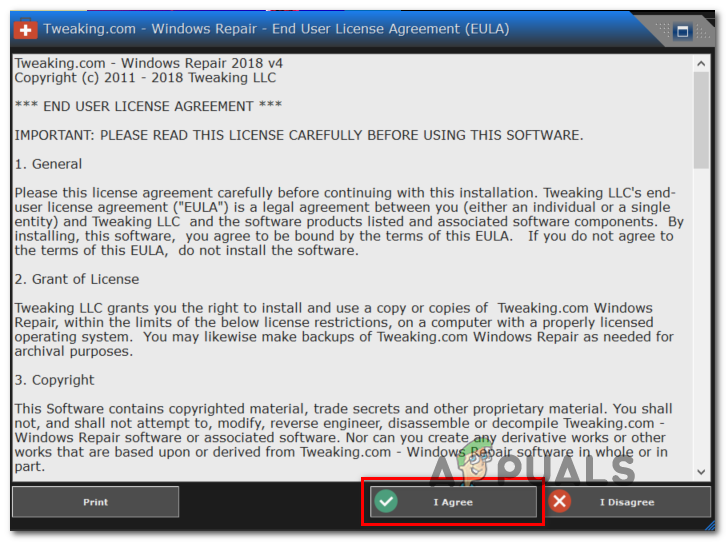
- Wait until the utility is loaded, then click I Agree at the EULA prompt.
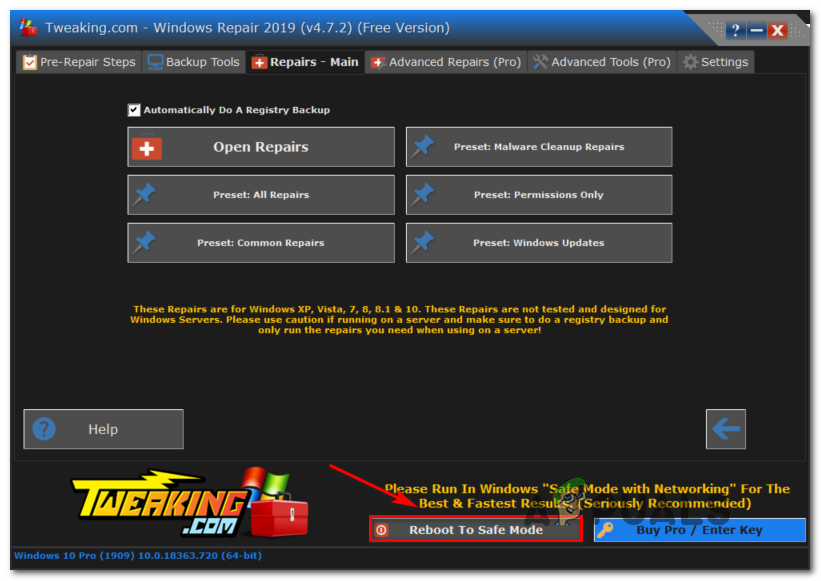
Agreeing with the Windows Repair EULA - Once the application is opened, click on the Reboot to Safe Mode button (bottom-right) corner of the window and click Yes at the prompt to ensure that you don’t have any 3rd party interferences.
Rebooting in Safe Mode - After your computer boots back up in safe mode, open the Windows Repair utility once again.
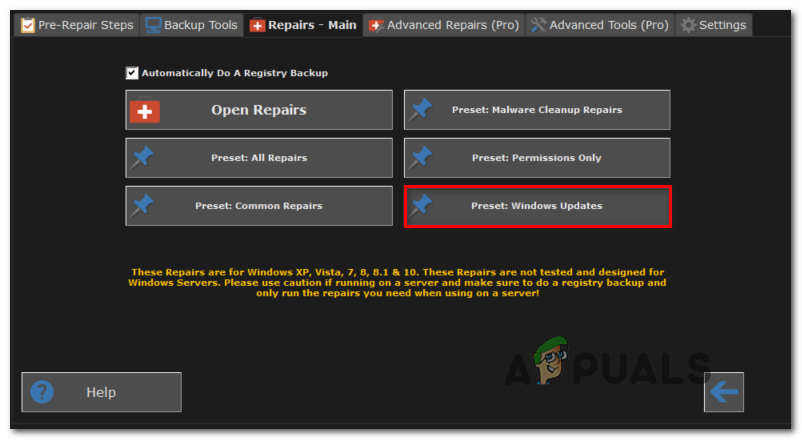
- Next, click on Repairs (Main) from the ribbon bar at the top and click on Preset: Windows Updates from the list of available options.
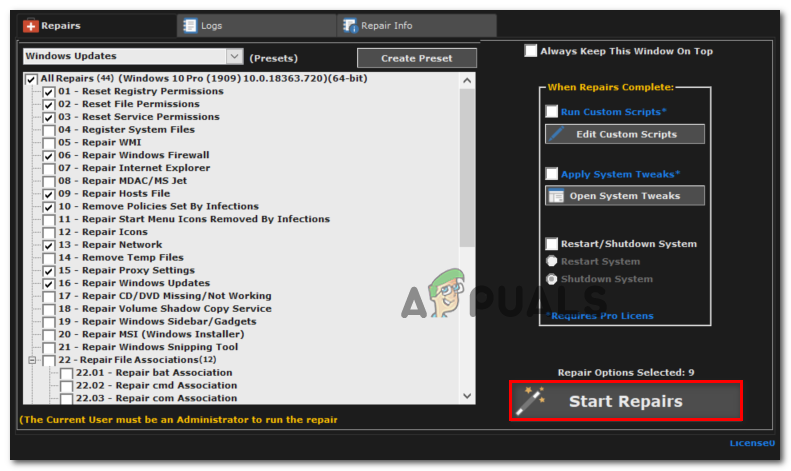
Starting the Windows Update repairing process - At the next screen, simply click on the Start Repairs button and wait for the operation to complete.
Starting the WU repair in Windows Repair - After the procedure is complete, restart your system and see if the problem is fixed at the next system startup by attempting to install the problematic update once again.
Using WSUS Offline (3rd party tool)
If none of the methods above have allowed you to fix the issue in your particular scenario, you should consider using the WSUS Offline utility to catch up with your Operating system with any Windows Updates that were not installed.
This 3rd party tool works excellently in case the installation of the update ends up being blocked by the usage of a Proxy or VPN – or if you’re connected to a restricted network.
Here’s a quick guide on using the WSUS Offline utility to install the pending Windows updates that are triggering the C8000266 error:
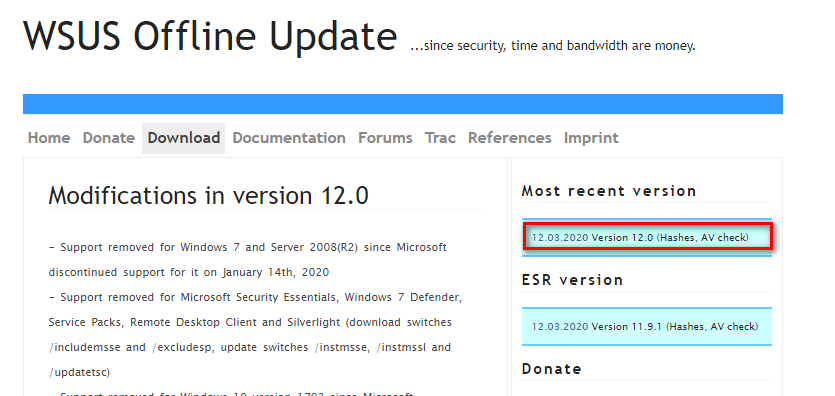
- Open your default browser, visit this link (here), select the Download tab and then click on the hyperlink located directly under Most Recent Version.
Downloading WSUS Offline - Once the download is complete, open the WSUS Offline archive and extract the directory in an accessible location where you have enough space to accommodate the download of Windows update files.
- After the extraction procedure is complete, access the location where you extracted wsuoffline and double-click on UpdateGenerator.exe.
- Inside the main interface of WSUS offline, select the Windows tab and check every box associated with the type of updates that you want to install. Once the utility is configured, click on Start to launch the utility.
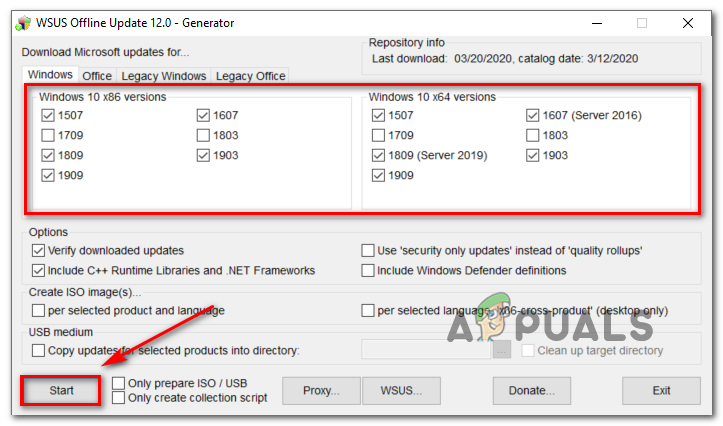
Using the WSUS Offline utility Note: Only download the latest version associated with your OS architecture.
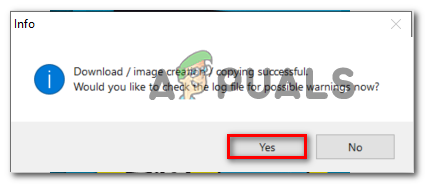
- You’ll then see a command-line tool showing you the progress of the download. At the end of this procedure, you will be prompted by an Info window asking you if you want to check the logs. Click Yes to get to that location instantly.
Getting to the location WSUS server instantly - To install the updates that you’ve just downloaded, navigate to the root folder of WSUS Offline, open the Client folder and double-click on UpdateInstaller.exe.
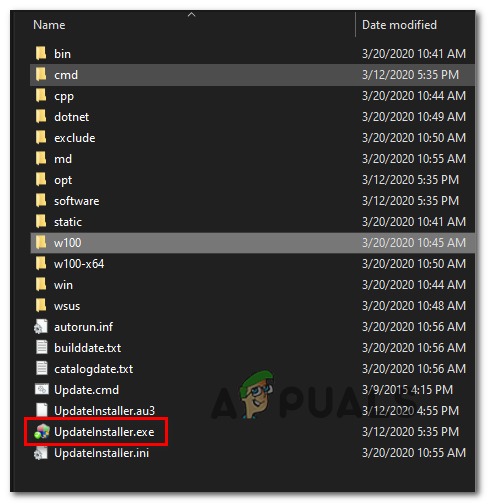
Updating the Installer Note: When prompted by the UAC (User Account Control) window, click Yes to grant administrative privileges.
- Inside the Installer window, ensure that the boxes associated with Update C++ Runtime Libraries and Update Root Certificates are checked and click Start to begin the installation of the previously downloaded Windows Updates.
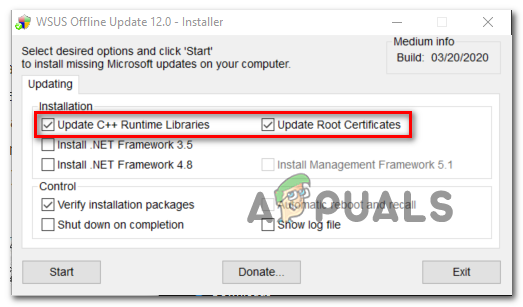
Updating the Root Certificates - Once the process is finished, you’ll see a CMD window informing you of the updates that were installed. Once you get to this point, restart your computer and see if the Windows Update error code is resolved.
Performing a repair install
If none of the potential fixes above have worked for you, it’s pretty clear that you’re encountering this issue due to some severe system file corruption that effectively broke your operating system’s ability to update.
In this case, the most effective fix you can possibly enforce is to reset every Windows component – This can either be done via a clean install or by specifically resetting every Windows component only (repair install).
Keep in mind that the main advantage of a repair install (in place-repair) is that you will be able to keep all your personal data (including photos, videos, images, applications, and games.
In case you want to go for a repair install, you can follow this article (here) for step by step instructions on completing this procedure.


