Fix: Unable to connect to Proxy Server in Windows 10
If you don’t know what a Proxy Server is, it’s a redirect via an IP to an external site, typically used for anonymous surfing. If the IP or Proxy is down, or if it is configured incorrectly, you will receive the error message “Unable to connect to Proxy Server”. There’s no need to turn on the proxy settings unless you have intentionally set it up for anonymous browsing. If that’s the case, you’ll need to check with your Proxy Provider. Otherwise, your PC or system can function without a proxy. If the proxy has been enabled for some reason, it’s likely due to a third-party program you may have installed, or because an antivirus software has restricted access to other websites while scanning your system for infections. To fix this, please proceed with the steps or methods below.
Check Internet Properties
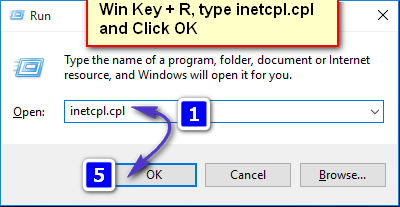
Hold the Windows Key and press R. Type ‘inetcpl.cpl’ and click OK. (This needs to be run as an administrator). Alternatively, you can also click ‘Start’ and type ‘iexplore.exe’. Right-click ‘Internet Explorer’ and choose ‘Run As Administrator’.

Go to the Connections tab and choose LAN Settings. Make sure “Use a Proxy Server for your LAN” is unchecked. If it is checked, uncheck it, click OK / Apply, and then click OK.

Once completed, reboot the PC and conduct a test. If it still does not work, proceed to the Registry Editor Method outlined below.
Change Proxy Settings via Registry Editor
It is important to back up your registry settings before changing them. Hold the Windows Key and press R. Type regedit in the run dialog and click OK. To back up your registry, after opening it, click on File -> Export, name the registry file, e.g.: backupreg, and click Save. To import or restore from the backup, open the registry editor again, click on File -> Import, and select the file you exported earlier, which is your backup. After it has been backed up, navigate to the following path:
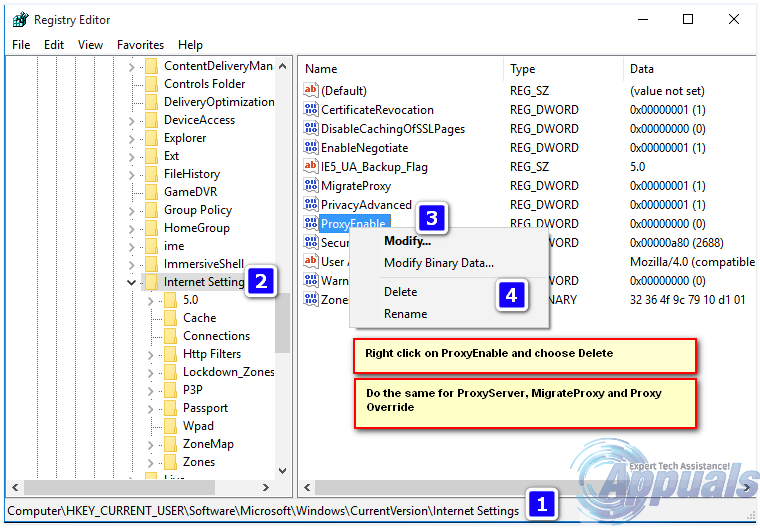
Computer\HKEY_CURRENT_USER\Software\Microsoft\Windows\CurrentVersion\Internet Settings
In the right pane, locate the ProxyEnable string. Right-click on it and choose ‘Delete’. If there are strings such as ProxyServer, Migrate Proxy, and Proxy Override, right-click on each and delete them as well.

Please reboot the PC now and proceed with the test.
Also, check out ‘Windows Could Not Automatically Detect This Network’s Proxy Settings’.