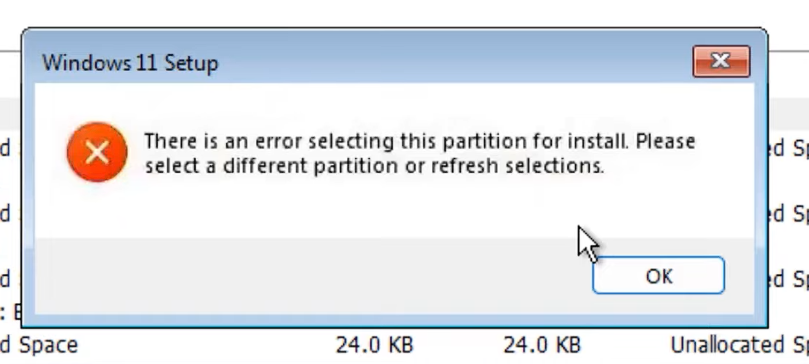
Fix: “There is an Error Selecting this Partition” When Installing Windows
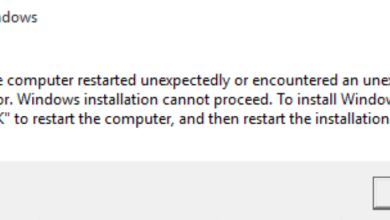
During the Windows 11 installation process, you may encounter “Error selecting partition for install” when you click a disk partition in Windows Setup. This blocks the installer from continuing because Setup can’t reliably use the selected partition.
In most cases, the issue happens due to one of these reasons:
- Partition scheme mismatch (GPT vs. MBR) with your current boot mode (UEFI vs. Legacy/CSM).
- Existing partitions/old boot data (EFI/System/Recovery) confusing Setup during selection.
- Drive configuration issues (multiple disks installed, installer choosing the wrong disk, or unstable/failed storage).
- Storage controller/driver mode issues (Intel RST/VMD/RAID enabled, missing storage driver, or controller conflicts).
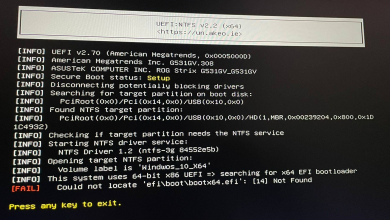
Before you proceed: Make sure you booted the installer from the USB correctly. For Windows 11, the most reliable path is UEFI boot + GPT disk. If your system offers both UEFI and Legacy/CSM, prefer UEFI and disable Legacy/CSM if possible, then boot the USB entry labeled UEFI.
Important warning: The methods below can erase data. If the disk contains anything you need, back it up first.
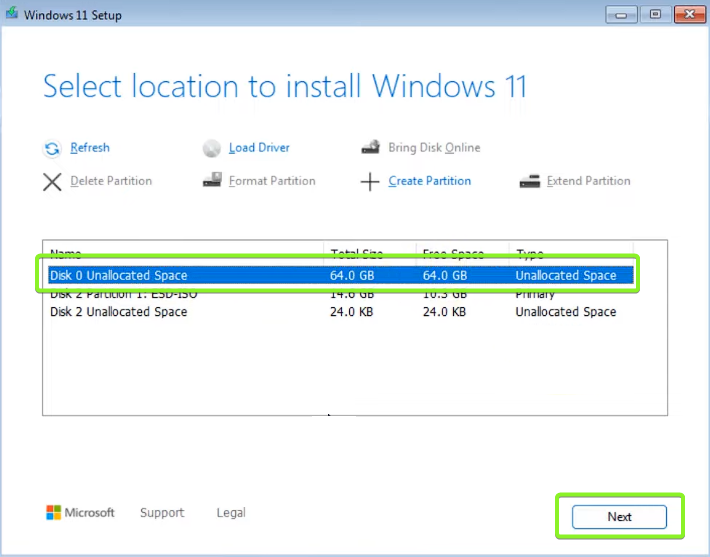
1. Manually Delete Old Partitions
Windows Setup can fail to select a target when existing system partitions (EFI/System/Recovery) or leftover partitions conflict with the new install. Deleting the partitions turns the drive into Unallocated space, allowing Setup to recreate the required partitions automatically.
Note: Deleting partitions removes the data on them. Only do this on the disk you intend to wipe and install Windows onto. To avoid wiping the wrong drive, identify the correct disk by its total size (for example, ~512 GB). If you have multiple drives, disconnect non-target drives first (see Additional Checks) or confirm the correct disk in Method 2 using detail disk.
- Select each partition on the target disk and click Delete.
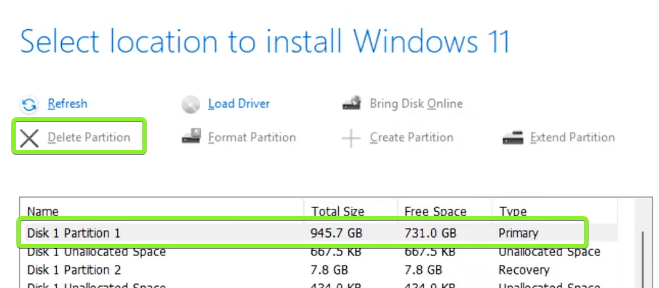
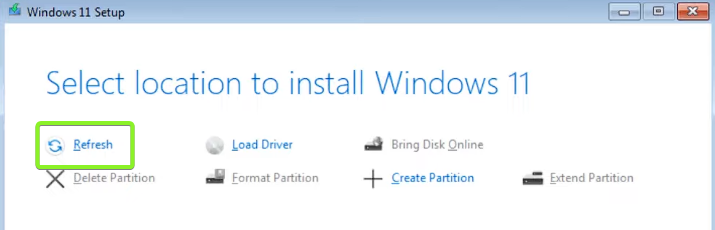
- After deleting, click Refresh at the top of the drive list.
- Repeat until the drive shows as one single block of Unallocated space (no separate EFI/MSR/Recovery entries).
- Select the unallocated space and click Next.
Expected result: Setup creates new system partitions automatically and continues installation without the partition selection error.
2. Delete Partitions and Convert the Disk to GPT Using Command Prompt
If the error is caused by a GPT/MBR mismatch, cleaning the disk and converting it to GPT often fixes partition selection immediately. This is especially relevant if you booted the USB in UEFI mode, because Windows 11 installs most reliably to a GPT disk in UEFI.
Warning: The clean command erases the selected disk completely. Double-check the disk number before running it. If you have more than one drive connected, disconnect non-target drives first to reduce the risk of selecting the wrong disk.
- On the Windows Setup screen, press Shift + F10 to open Command Prompt.
- Type the commands below exactly, pressing Enter after each line. Replace X with the correct disk number.
diskpart
list disk
select disk X
detail disk
clean
convert gpt
exit
Tip: After select disk X, use detail disk to confirm the drive (model/size) is the one you intend to wipe. If it’s not, run list disk again and select the correct disk.
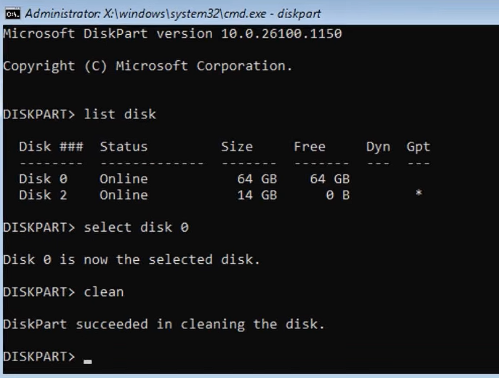
- Close Command Prompt, then click Refresh in Windows Setup.
- Select the Unallocated space on the converted disk and click Next to begin installation.
Expected result: The disk appears as a single unallocated entry, Setup creates partitions automatically, and installation proceeds.
If you still can’t proceed after these checks, contact your PC/laptop manufacturer support (for storage mode/driver guidance) or Microsoft Support with your exact error text and a photo of the disk/partition screen. In rare cases, a storage controller/driver issue requires a vendor-specific driver during Windows Setup.