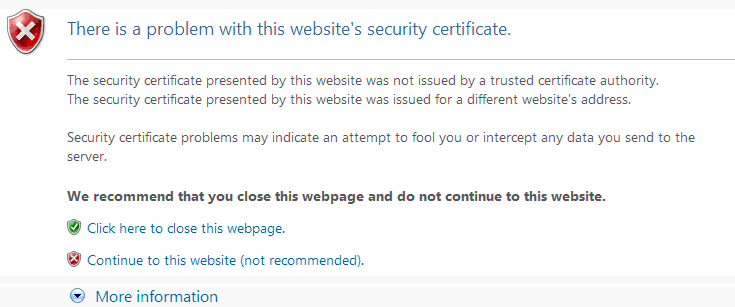
Fix: There is a problem with this website’s security certificate
Some Windows users are experiencing a weird issue where they continually get HTTPS certificate errors such as ‘There is a problem with this website’s security certificate‘ error when attempting to access high-profile sites & apps such as Twitter, Google, Facebook, etc. In most cases, affected users are reporting they get the same type of error with every browser that they try to use.
As it turns out, the most common causes that will cause these certificate errors are severely outdated date & time values. And although the error that gets shown by the browser is different, the fix is always the same – ensuring that the certificate gets validated by bringing your system date & time up to date. (Method 1)
However, if changing the date & time only proves to be a temporary fix, there’s a high chance that the issue is actually originating from a faulty CMOS battery. In this case, you can get the problem resolved by replacing your motherboard CMOS battery with a new equivalent. (Method 2)
Once you’ve made sure that your system date & time is not causing this issue, you should look to install any missing certificates that might be causing browser errors of this kind (Method 3).
And if you’re recently installed any suspicious PUPs, investigate to see if it’s not actually interrupting with your certificate’s verification (Method 4).
Method 1: Setting the correct date & time
By far, the most common situation that will lead to the apparition of this type of certificate error is an inaccurate system date & time. It’s possible that the date or type has changed without you noticing, or you might have done a hardware change that ended up interfering with your machine ability to keep track of time.
Keep in mind that if your date and time is far off, this will cause the majority of security certificates to fail – This might explain why you are getting certificate errors with multiple browsers.
If this scenario is applicable, you should be able to fix the issue by setting the correct date & time via the Date & time menu. Here’s a quick guide on how to do this:
Note: The steps below are universal and will work regardless of which Windows version you’re encountering the issue on.
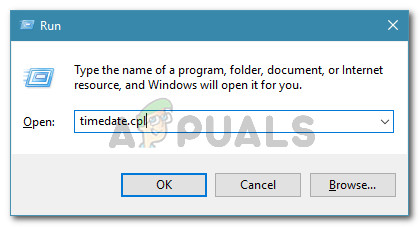
- Open up a Run dialog box by pressing Windows key + R. When you see the text box, type ‘timedate.cpl’ and press Enter to open up the Date & Time window.
Opening the Date and time window - At this point, you should land directly into the Date & Time window. Once inside, select the Date & Time tab and click on Change Date & time.
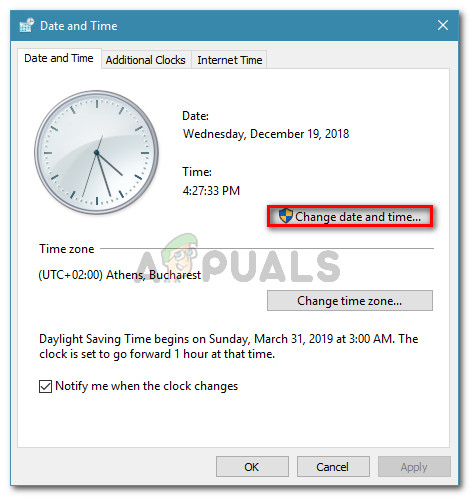
Setting the correct date and time - When you see the User Account Control (UAC) window, click Yes to grant administrative privileges.
- Once you’re inside the Date & time Settings menu, use the calendar under the Date and Time box to set the appropriate values according to the time zone that you live in.
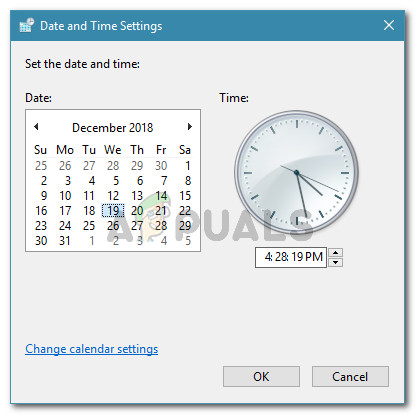
Modifying Time & date - Once the correct values are set, click Apply to save the changes and restart your computer to see if the issue has been resolved.
- After the next computer startup is finished, open a page that was previously showing a certificate error and see if the problem is now fixed.
If the same error is still showing or you have discovered that the date & time has changed again, move down to the next method below.
Method 2: Replacing the CMOS battery
If the previous method has revealed your computer’s inability to save the date & time between restarts, this can only mean one thing – You’re actually dealing with a faulty CMOS (Complementary Metal Oxide Semiconductor) battery.
Every motherboard has a CMOS battery. Its main job is to remember key information about your machine (custom BIOS preferences, system-wide time and date, critical error logs, etc.)
But just like any battery, this thing is prone to going bad eventually. If you’re encountering the issue on an old motherboard model, your best chance at resolving the issue is to simply replace the new CMOS battery with a new equivalent.
These things are very common since they are used on a variety of electronic devices, so you should be able to find one at every electric supply store – You might even have one laying around in your household.
Once you have a brand new CMOS battery in hand, here’s what you need to do to replace it with the faulty one:
- First things first, turn off your computer completely and ensure that it is unplugged from the power source.
- Equip yourself with a static wristband if you have one. These things work by grounding you to the frame of the computer, ensuring that you don’t end up damaging any components due to static electricity.

Example of a static wristband Note: This step is optional.
- Remove the cover of your computer, take a look at your motherboard, and identify the CMOS battery – It shouldn’t be that hard to spot it.
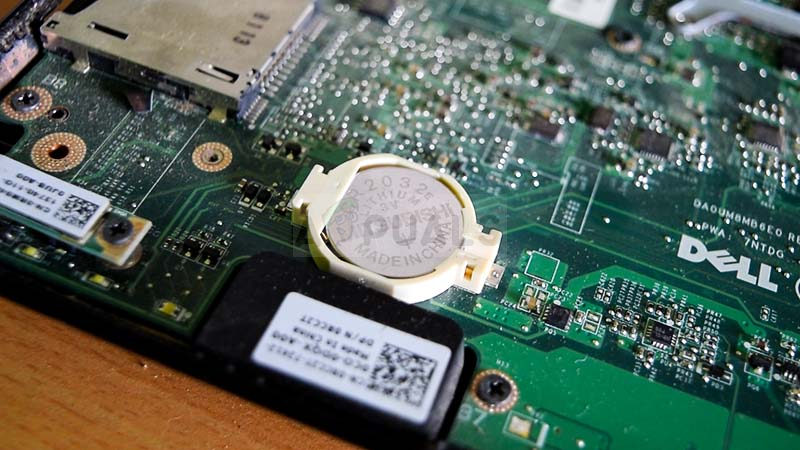
Identifying the CMOS battery - Once you see it, use your fingernail or a non-conductive screwdriver to remove the faulty battery from its slot.
- Insert the new CMOS battery and put the side cover back before plugin your computer back to a power source and starting it back up.

Removing the CMOS battery - Now that the new CMOS battery is installed, wait until the startup is complete, then follow Method 1 again to set the correct time & date values, then restart to see if your computer is now able to remember the changes.
- After you confirm that everything is working, open Internet Explorer (or Edge) and see if you still get the ‘There is a problem with this website’s security certificate‘ error when trying to access certain web-pages.
In case the same problem is still occurring, move down to the next potential fix below.
Method 3: Installing missing certificates from trusted CAs
If the first method didn’t allow you to fix the issue, it’s clear that time & date has nothing to do with this problem. At this point, the biggest possible culprit is the missing of some key root certificates from trusted CAs (Certificate Authority).
Several affected users have confirmed that they managed to get the issue fixed after they downloaded and install every third party root certificate via the Windows Root Certificate Program.
When it comes to doing this, you can either do it by using Local Security Policy and Certification Manager tools together or by installing them manually via the Management Console. Because of this, we created two separate guides. Feel free to follow whichever one you feel more comfortable with:
Option 1: Installing missing certificates via Local Security Policy and Certificate Manager
Important: You will not be able to follow this guide on Windows 10 Home since the Local Security Policy is only available on Windows 10 Pro and Windows 10 Enterprise.
- First, you need to download the missing certificates manually according to the web pages that are triggering the error. You can either use the Windows Root Certificate Program or you can go for a 3rd party alternative like GeoTrust.
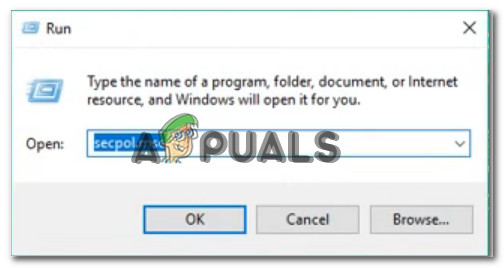
- Once you have downloaded the missing certificates, press Windows key + R to open up a Run dialog box. Next, type ‘secpol.msc’ inside the text box and press Enter to open up the Local Security Policy.
Opening the Local Security Policy editor Note: If you are prompted by the User Account Control (UAC), click Yes to grant administrative privileges.
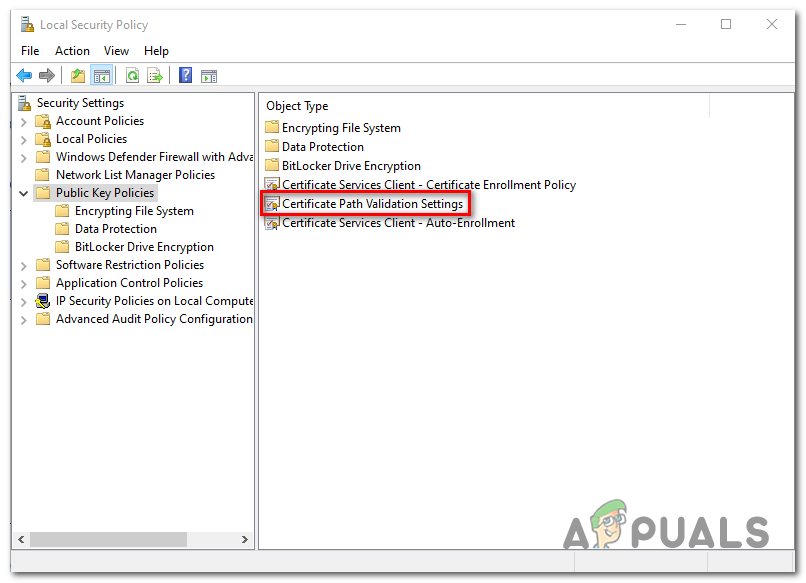
- Once you’re inside the Local Security Policy, select the Public Key Policies from the left-hand side menu. Next, move to the right-hand side section and double-click on Certificate Path Validation Settings.
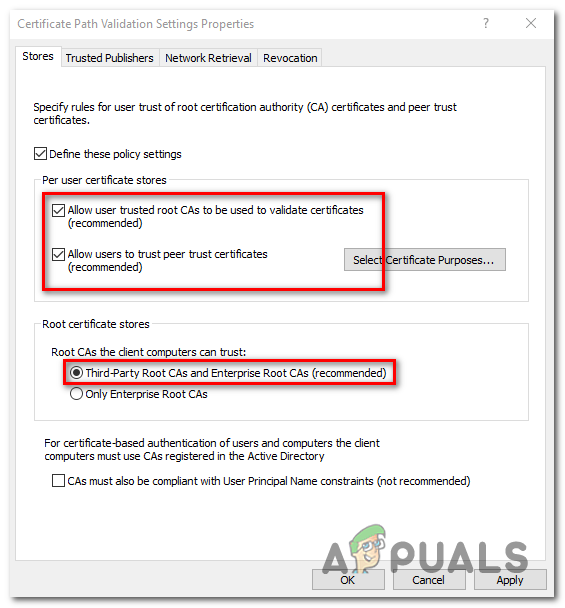
Accessing the Certificate Validation Settings menu - Inside the newly opened Properties window, select the Stores tab from the horizontal menu at the top, then start by ensuring that the box associated with Define these policy Settings is checked.
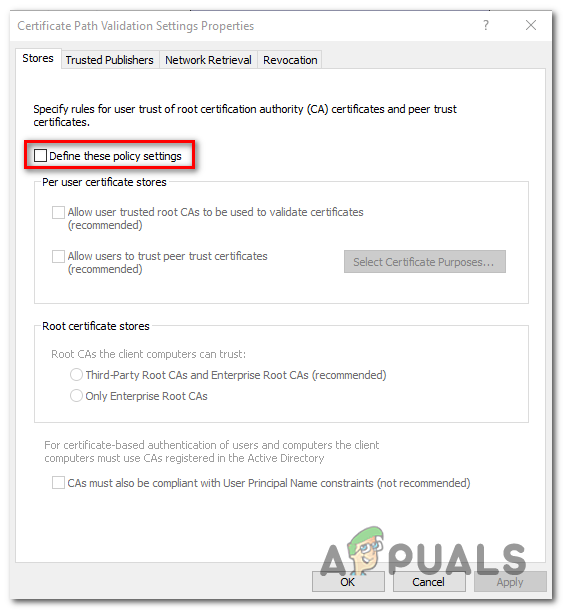
Defining these policy settings - Once the Per User certificate stores menu becomes available, go ahead and enable the boxes associated with Allow user trusted root CAs to be used to validate certificates and Allow users to trust peer trust certificates.
- Next, move down below to the Root Certificate stores menu and select the toggle associated with Third-Party Root CAs and Enterprise Root CAs (recommended).
Configuring the Certificate Validation settings - Once you’ve made sure that the Certification validation settings are correctly configured, you can safely close the Local Security Policy.
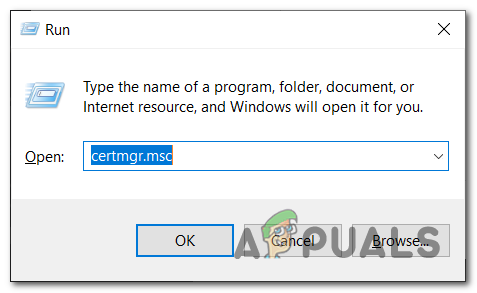
- Open another Run dialog box by pressing Windows key + R once again. This type, type ‘certmgr.msc’ and press Enter to open up the Certification Manager utility. When you are prompted by the UAC (User Account Control), click Yes to grant administrative privileges.
Opening the Certificate Manager Utility Note: This utility will list every digital certificate that you have installed and will allow you to import the missing certificates that you downloaded at step 1.
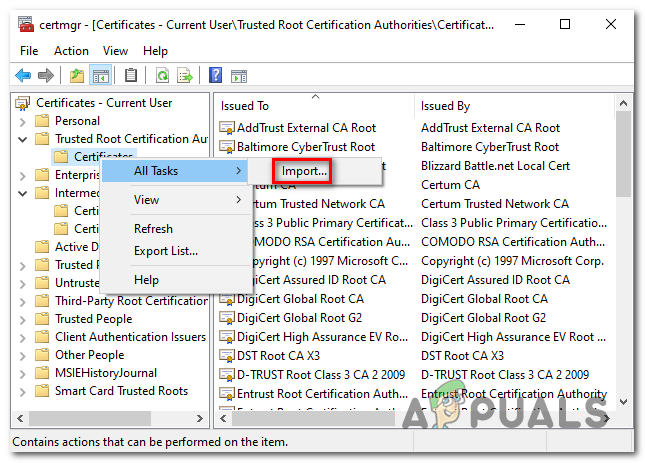
- Once you’re inside Certification Manager, use the left-hand section to select Trusted Root Certification Authority.
- Next, right-click on the Certificates submenu and choose All Tasks > Import from the newly appeared context menu.
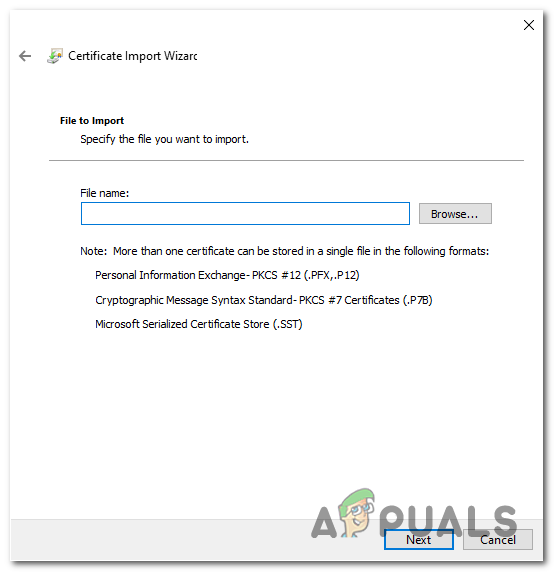
Importing the Certificates submenu - Once you manage to get inside the Certificate Import Wizard, start by clicking the Next button once. Then, once you get to the next screen, click on Browse to locate & select the root files of the certificate that you’re looking to install (at step 1).
Importing the missing CA certificates - Once every certificate is finished, click on Next then Finish before closing the utility.
- Restart your computer and see if the issue is resolved at the next computer startup.
Option 2: Installing missing certificates via Local Security Policy and Certificate Manager
- Download the missing certificates manually according to the web pages that are triggering the error. You can either use the Windows Root Certificate Program or you can go for a 3rd party alternative like GeoTrust.
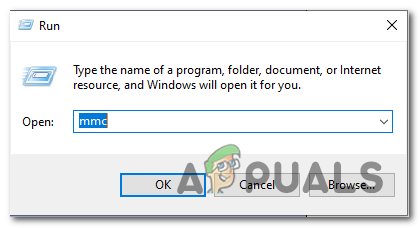
- Press Windows key + R to open up a Run dialog box. Inside the text box, type ‘mmc’ and press Enter to open up the Microsoft Management Console. When you see the UAC (User Account Prompt), click Yes to grant administrative privileges.
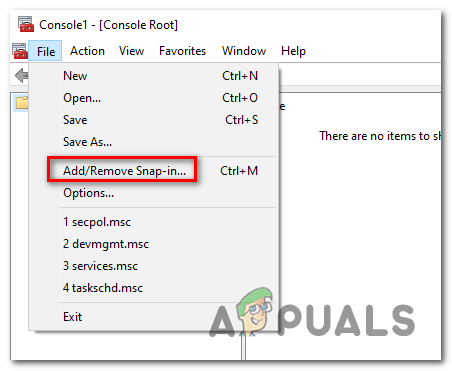
- Once you’re inside the Microsoft Management Console, click on the File menu (from the ribbon bar at the top) and click on Add / Remove Snap-ins.
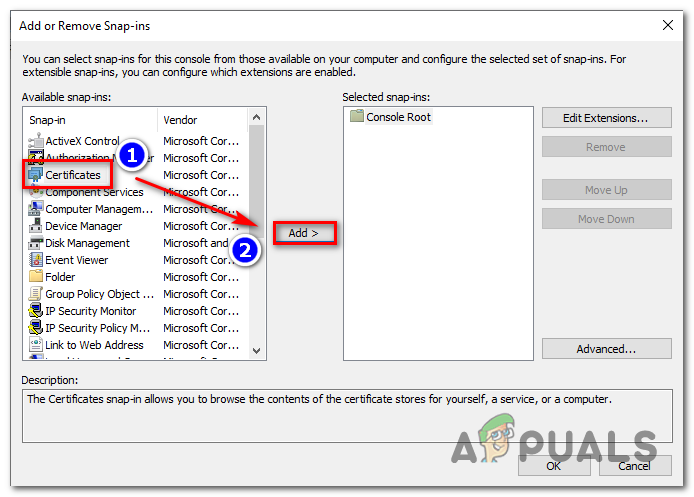
Accessing the Add or Remove Snap-ins button - Inside the Add or Remove Snap-ins menu, select Certificates from the left-hand side menu, then click on the Add button in the middle.
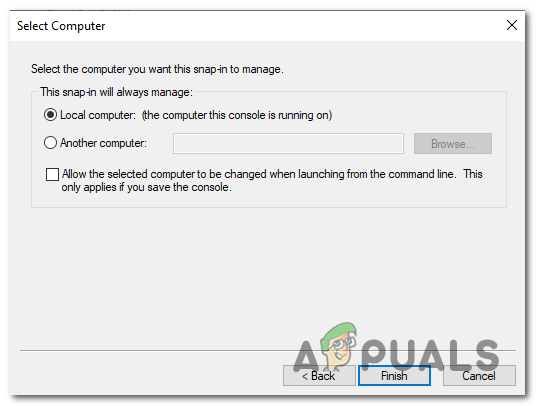
Adding the missing certificates - You’ll see a new menu opening up. Use it to select Computer account > Local Account, then press Finish to complete the procedure. Next, click Ok to Close the Add or Remove Snap-ins.
Configuring the snap to manage the local computer - Once you return to the Management Console, right-click on Certificate and use the context menu to choose All Tasks > Automatically Enroll and Retrieve Certificates.
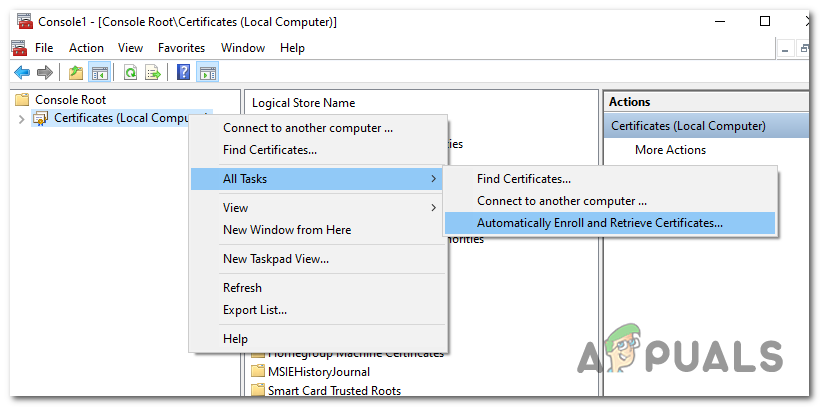
Automatically enroll and retrieve certificates - Follow the on-screen instructions to install the missing CA certificates.
- Once every missing certificate is installed, restart your computer and see if the problem is resolved at the next system startup.
Method 4: Uninstalling Browser Safeguard
As it turns out, this particular issue can also be caused by a PuP (Potentially Unwanted Program) called Browser Safeguard – there might be other similar programs that will cause this behavior.
Some users that have dealt with certificate errors on every installed browser have reported that the issue was completely resolved after they uninstalled the problematic application.
Here’s a quick guide on how to do this:
- Press Windows key + R to open up a Run dialog box. When prompted by the UAC (User Account Control), click Yes to grant administrative privileges.
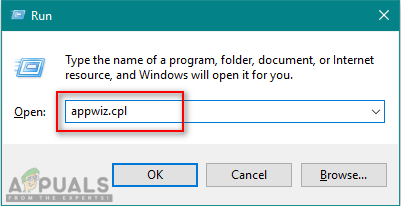
Opening Programs and Features - Once you’re inside the Programs and Features menu, scroll down through the list of installed applications and locate Browser Safeguard (or any other program that you suspect might be causing the issue).
- After you manage to identify the culprit, right-click on it and choose Uninstall from the context menu.
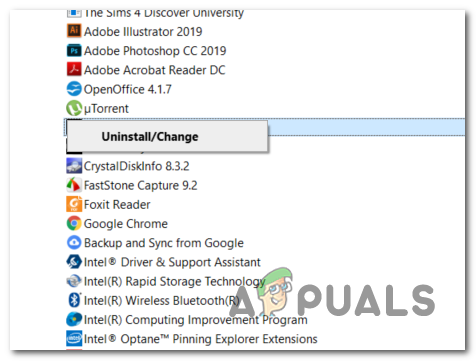
Uninstalling Browser Safeguard - Follow the on-screen prompts to complete the uninstallation, then restart your computer and see if the issue is resolved at the next system startup.


