Fix: The Handle is Invalid Error Message When Logging Into Windows 10
A pretty well-known problem in Windows 10 is one where affected users receive an error message that states “The handle is invalid” when they try to log in to their user account on their Windows 10 computer after booting it up. In most cases, this problem occurs after a significant software change gone wrong, which is most commonly a Windows update that did not install correctly or was not entirely installed. In addition, this problem is also notoriously popular for being brought on by faulty Windows updates that bring the problem on in the first place even when they are correctly and fully installed.

This error message basically means that the affected user cannot get into their user account and, by extension, their computer, and that is most definitely a significant problem. Thankfully, there exist ways that can be used to try and fix this problem. If you want to solve this issue, the following are two of the most effective methods that can be used to do so:
Solution 1: Perform Startup Repair on your computer
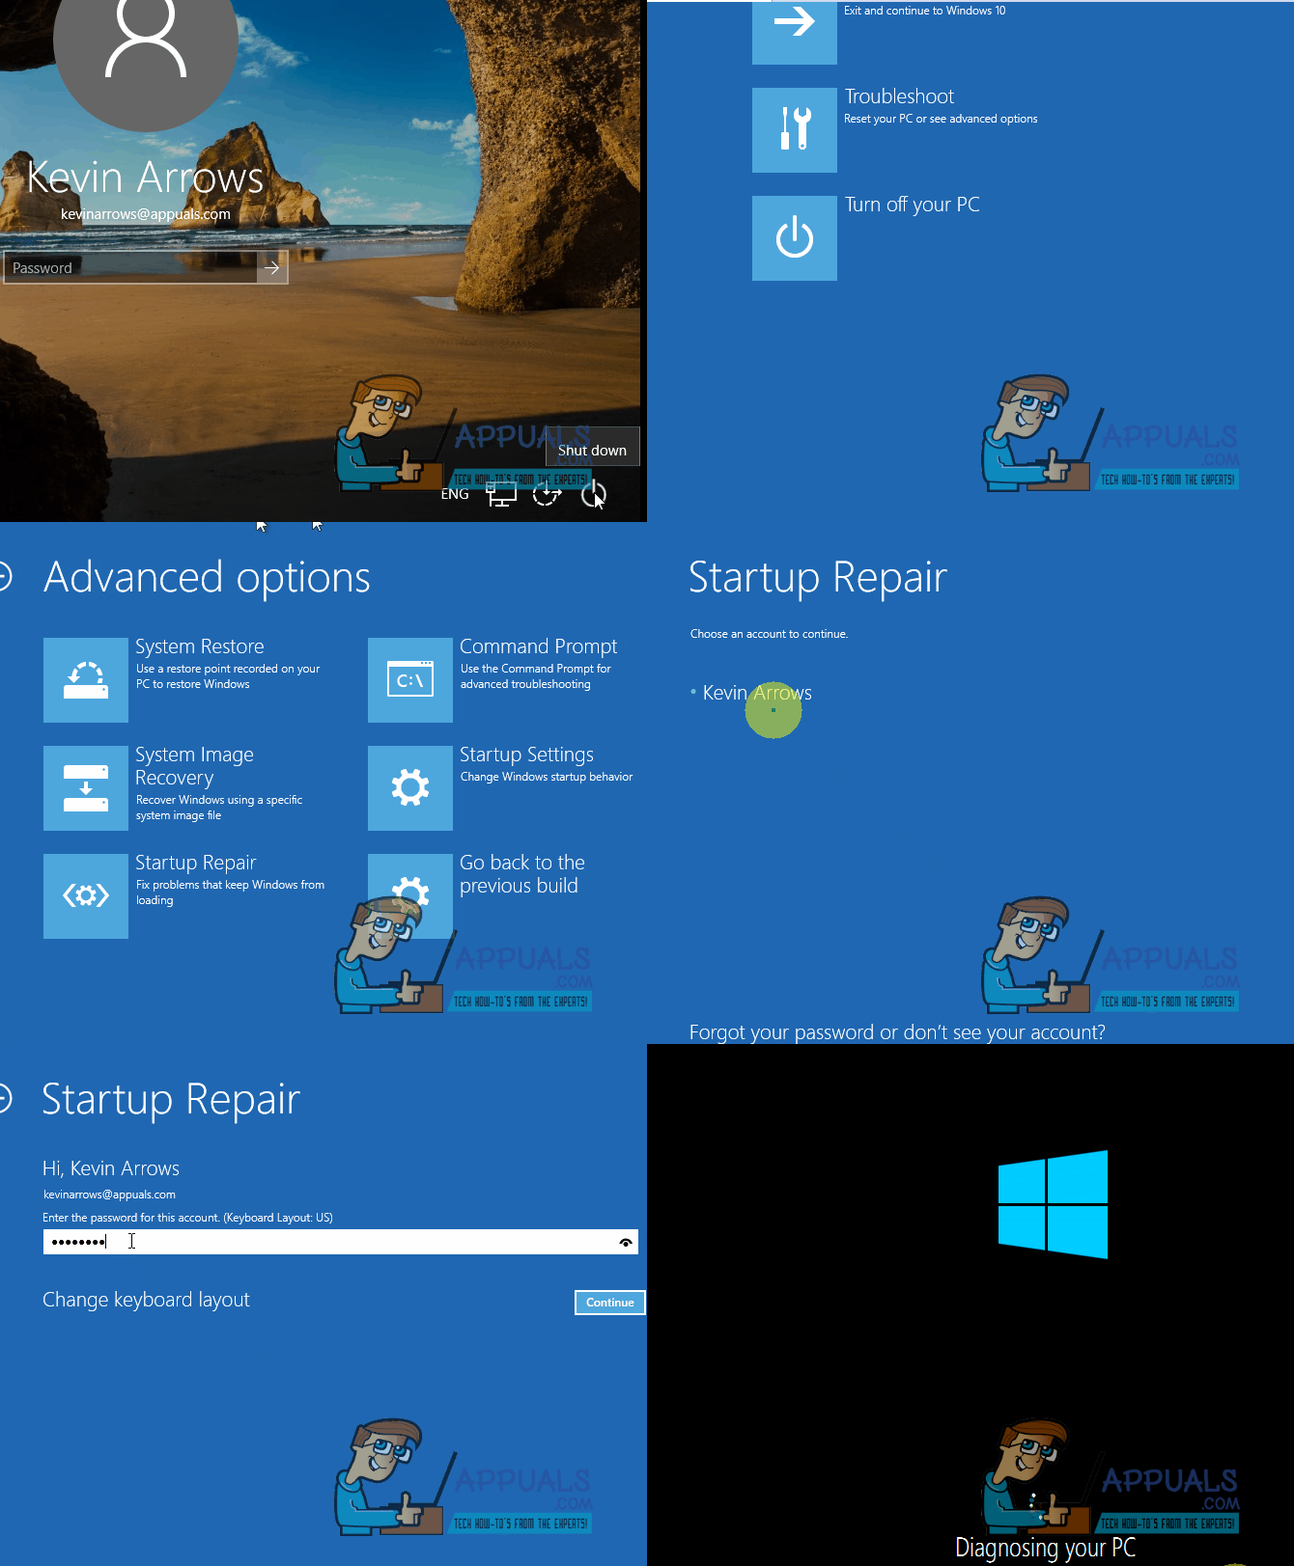
Startup Repair is an ingenious little utility that can be accessed without logging into Windows and can be used to fix all kinds of problems, including Windows updates that haven’t been installed correctly or entirely or Windows updates that are simply problematic. To perform Startup Repair on your computer to try and fix this issue, you need to:
- On the Windows 10 login screen, click on the Power button in the bottom-right corner.
- While holding down the Shift button, click on Restart.
- When your computer boots up, it will display a screen with three options. Click on Troubleshoot.
- Click on Advanced Options.
- In the Advanced Options menu, click on Startup Repair.
- Choose your target OS on the next screen.
- On the next screens, Startup Repair will diagnose and attempt to fix the issue. Once it is done, your computer will boot into Windows. Simply try to login to your account to see whether or not Startup Repair fixed the problem.

- If Startup Repair doesn’t work, you can also try a System Restore.
Solution 2: Boot into Safe Mode and Uninstall the update that caused the issue
Many users affected by this issue have had success with logging into their user accounts by booting their computers into Safe Mode, at which point they can uninstall the updates that caused the issue in the first place, fixing the problem altogether. To use this solution, you need to:
- Click on the Power button in the bottom-right corner of the login screen and then, while holding down the Shift button, click on Restart.
- When your computer boots up, click on Troubleshoot.
- Navigate to Advanced Options > Startup Settings and click on Restart.
- When your computer boots up, you will be presented with a list of options. Press the number key or Function key corresponding to the Enable Safe Mode
- Once your computer boots up in Safe Mode, try to login to your user account and see if you succeed.
- If you succeed at logging into your user account, open the Start Menu and click on Settings.
- Navigate to Update & Security > Windows Update > Advanced options > View your update history.
- Click on Uninstall updates.
- Locate and right-click on the update that caused the problem, and then click on Uninstall in the contextual menu to uninstall it. Two Windows updates that are extremely infamous for causing this problem are updates KB3124262 and KB3135174, so if you recently installed any of these two updates, quickly uninstall them. If you aren’t sure which updates to uninstall, simply uninstall the ones that were installed right before you started suffering from this issue.
- Once you are done uninstalling the offending Windows update, restart your computer – this time in normal mode – and check to see whether or not you are able to successfully log in to your user account without being met with the “The handle is invalid” error message.
Solution 3: Changing LocalAccountTokenFilterPolicy Registry Key
Another workaround that worked for several users was changing the LocalAccountTokenFilterPolicy using an administrator account which wasn’t locked out of the system yet. This change to the registry can be easily done using the command prompt in an elevated command prompt.
- Press Windows + S, type “command prompt” in the dialogue box, right-click on the application and select Run as administrator.
- Once in the command prompt, run the following code:
reg add HKLM\SOFTWARE\Microsoft\Windows\CurrentVersion\Policies\system /v LocalAccountTokenFilterPolicy /t REG_DWORD /d 1 /f
- Restart the computer and check if the problem is resolved.
Solution 4: Removing and Re-adding to Domain
If none of the above methods work, you can try asking your administrator or network personnel to remove you from the domain and then add you back. When you get removed from the domain, the changes get reflected in the current logging system. When you get added back, the entire process will be re-initialized and you will be able to log back in.
This is only possible if you are logged in to a domain instead of just using a personal computer. Make sure to restart the computer before attempting at logging in again.