How to Stop Windows from Automatically Installing Outdated Drivers
One of the Windows 10 related complaints on social media and windows forums is the mandatory delivery of universal drivers through Windows Update. In Windows 10, your device is always kept up to date to have the latest features and fixes. This is in a bid to have your computer working at optimum efficiency because most windows 10 issues are mostly caused by bad drivers. Drivers are installed automatically so that you don’t have to select which updates are needed. We already know that OS updates are obligatory for all Windows Home users and can be deferred for different periods of time for those on Windows 10 Professional & Enterprise.
Part of those supposed mandatory downloads and installs have been driver updates for the third party hardware on computer systems. While it is great that OEMs and third party hardware manufacturers are conveniently providing more of their drivers through Windows Update in Windows 10, there are several times these drivers may not be the best option for some users. However, since updates were mandatory it caused a lot of disruption/issues when the universal drivers got installed and replaced better performing drivers the user had installed on their system.
Not sure which device driver or update Windows just installed that might be causing you problems? Open the Settings app from the start menu and select “Update & security.” Under Windows Update, scroll down and select “Advanced options,” and then select “View your update history.” You’ll see a list of updates installed and the dates they were installed here.
It turns out you can actually disable the download of these universal drivers in Windows 10 and avoid this issue all together plus it is very easy to do so. Here are the solutions to the problem.
Method 1: Use the windows ‘Hide Updates’ tool
Following several complaints, Microsoft has released a tool to hide unwanted updates, which makes the process much simpler than before:
- Download the Show and Hide Update Troubleshooter from Microsoft here
- Uninstall the updated drivers from the device manager (Use steps 1 – 5 in method 3).
- Install and start the application.
- After you start the program, click Next
- Choose Hide Updates
- Choose which updates you want to hide from automatically installing by check the checkbox on the left.
- Press next and complete the set up to prevent windows from automatically updating your selected drivers.

Method 2: Use windows PowerShell to hide updates
This works in a similar way as the windows ‘hide update’ troubleshooter. Microsoft incorporated the feature of the app into PowerShell cmdlets.
- Download the Windows Update PowerShell Module from (here), and extract it to either%USERPROFILE%\Documents\WindowsPowerShell\Modules (does not require elevation) OR
%WINDIR%\System32\WindowsPowerShell\v1.0\Modules - Click on Start, type PowerShell in the search box, right click on the ‘Windows PowerShell’ result and open as administrator.
- Temporary disable Execution Policy, to allow importing unsigned scripts. From an elevated PowerShell console type. Just type this command in windows PowerShell and hit enter. Set-ExecutionPolicy Unrestricted
- Import the module by typing this command and press enter Import-Module PSWindowsUpdate
- Re-enable the Execution Policy for security reasons. Just type this command in windows PowerShell and hit enter.
Set-ExecutionPolicy Restricted
- Uninstall the unwanted update (if installed; use steps 1 – 5 in method 3), then run the following command to get a list of all available windows updates: Get-WUList
- Hide the desired update using this command Hide-WUUpdate -Title “Name of update” e.g. to hide the synaptics driver update type Hide-WUUpdate -Title “Synaptics driver*”
- The ‘H’ value in the results/status after processing indicates that is now hidden and won’t update on your system.
- You can hide all updates using the wildcard (*) like this Hide-WUUpdate -Title “*” or include part of the name along with the wildcard as shown in the synaptics driver above.
- To unhide an update simply run the same command you would use to hide it, but add the following to the end of the command: -hidestatus:$false
Method 3: Roll back drivers and Disable automatic update in the advanced system settings
If you want to disable Windows from updating any of the device drivers, disable the drivers update feature from the system settings. In rare cases, a specific driver might temporarily cause issues that affect your device. In this situation, you can prevent the problematic driver from reinstalling automatically the next time Windows Updates are installed. After rolling back drivers, you will need to block windows update from accessing it otherwise Windows Update will continue downloading and installing that specific driver over and over, overwriting your preferred driver.
- Press the Windows logo key + R to open the Run dialog box.
- Type devmgmt.msc in the Run dialog box, then press Enter. If you are prompted for an administrator password or for a confirmation, type the password, or click Allow
- In Device Manager, find the driver that you don’t want to update, and then click Uninstall or Roll back drivers. (If you choose to uninstall, you can manually install your selected drivers later)
- Allow the uninstallation or the roll back.
- Close the device manager window
- Now we will disable windows from updating your drivers again.
Right-click the start button and select ‘System”
- When System Properties opens up click/tap on Advanced system settings on the left side of the system properties window.
- Click/Tap on the Hardware tab and then click/tap Device Installation Settings
- Click/Tap on ‘No, let me choose what to do’ to expand your other options.
- There are three other options to set. The Option ‘Always install the best driver software from Windows update’ continues to download and install drivers. So select the ‘Never install driver software from windows update’ option to prevent the automatic installation of driver software.
- To further stop the ability of Windows Update to download hardware related apps and other info from Windows Update, uncheck the ‘automatically get the device app and info provided by your device manufacturer’ option.
Method 4: Disable automatic updates from the group policy:
- Press Windows Key + R to open the Run window.
- Type gpedit.msc and hit enter. This will allow you to edit the local group policy.
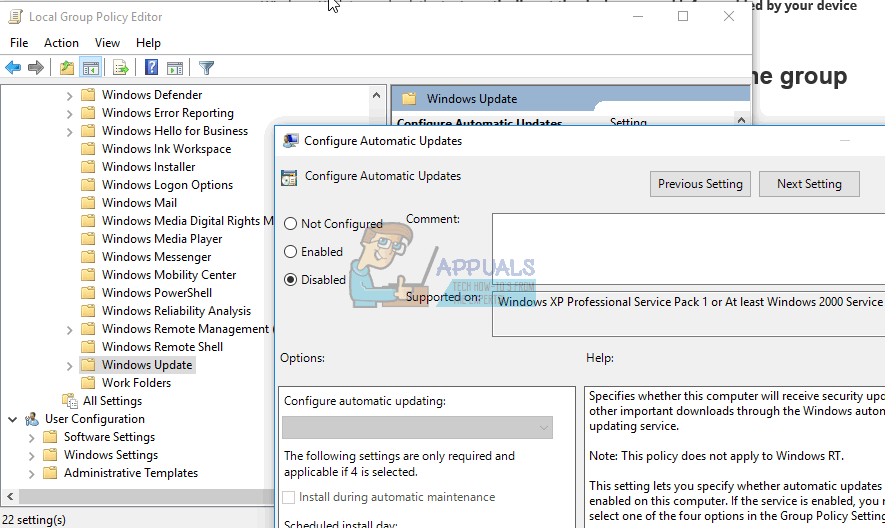
- In the group policy editor, navigate to Computer Configuration -> Administrative Templates -> Windows Components -> Windows Update
- On the right-hand pane, locate the setting called “Configure Automatic Updates” and double-click it
- Select “Disabled“, click OK
- Click Ok and close gpedit.msc. Windows should now behave as you told it to (though a reboot may be needed.)

This feature is not available on basic and home versions of Windows but you can follow this guide to configure and install GPEdit on Home Versions of Windows 10. https://appuals.com/install-gpedit-msc-on-windows-10-home-edition/
Method 5: Turn off automatic device driver update via Registry
- Press Windows Key + R to open the run window
- In the Run textbox, type regedit and hit Enter.
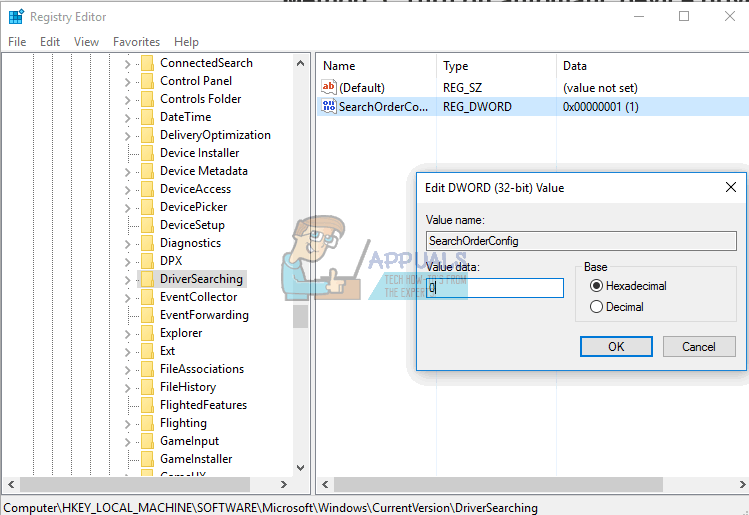
- Once the Registry Editor is launched, navigate to the following key:
HKEY_LOCAL_MACHINE\SOFTWARE\Microsoft\Windows\CurrentVersion\DriverSearching
- On the right-side, look for the entry named SearchOrderConfig, double-click on it, and change its value from the default 1 to 0 (zero) to turn off automatic updates.
- Restart your PC.
