How to Fix Steam ‘Error Code: -101’
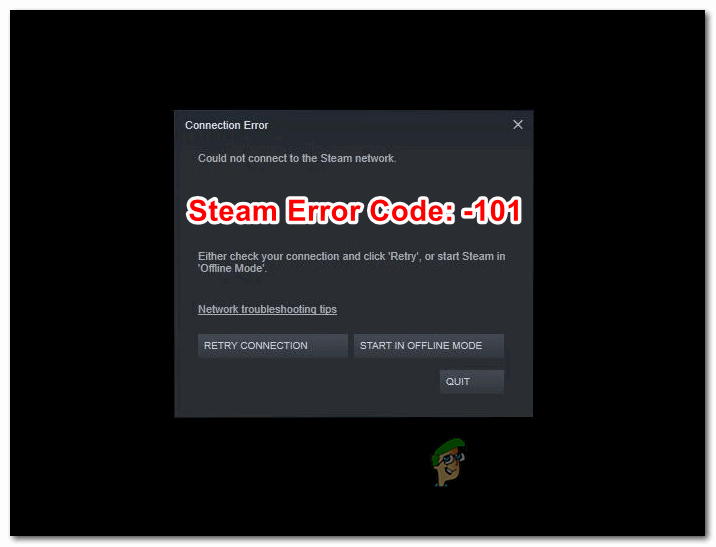
Some Windows users are reporting that every time they attempt to access the Store or the Profile page on Steam they end up encountering the Error Code: -101. Sometimes, this error is accompanied by the error message ‘Could not connect to the Steam network’.
As it turns out, there are several different scenarios that might ultimately contribute to the apparition of the Error Code -101 in Steam:
- Steam server issue – If you’re encountering this problem while connected to different networks, you might want to investigate to see if other users are also dealing with the same problem. It’s possible that you’re seeing this error code due to a widespread server issue or maintenance period that affects the Store component.
- Network inconsistency – A TCP / IP issue can also be the root cause of this error code. It’s possible that you were assigned a bad IP range or your router is currently unable to open the port used by Steam. In this case, a router reboot or reset should allow you to fix the issue.
- Bad cached data – Under certain circumstances, your Steam installation might end up caching bad data that might inhibit the Store’s ability to load new items. In this case you might expect to see this recurring problem until you clear the web browser cache on Steam (clearing the cookies is not necessary).
- Corrupted Steam installation – File corruption associated with your Steam installation can also be the root cause of this error code. Every inconsistency originating from file corruption can be resolved by clean re-installing the Steam platform.
- Firewall interference – Another scenario that will cause this error might be an overprotective AV suite that’ interrupting the connection between your local Steam installation and the platform’s server. In this case, you can fix this problem either by whitelisting Steam from your firewall settings or you can temporarily disable the real-time protection while you use the Steam platform.
- ISP or network restriction – If you’re trying to access Steam from a school or work network, keep in mind that you might be dealing with a restriction that’s either enforced at a network or ISP level. In this case, the only way to circumvent the problem is to use a system-level anonymity solution like a VPN or Proxy server to hide your IP and avoid the network roadblock.
Method 1: Checking for a Server Issue
Before trying out any of the other fixes below, you should start this troubleshooting guide by verifying if there are currently any sever issues that are affecting the Steam platform. It’s possible that the current reason why you are encountering the Error Code: -101 when trying to access Steam’s store is because of a server issue.
Fortunately, there are a couple of web tools that will allow you to verify the status of Steam’s server. Check if there are currently any server problems on SteamStat.us and DownDetector.
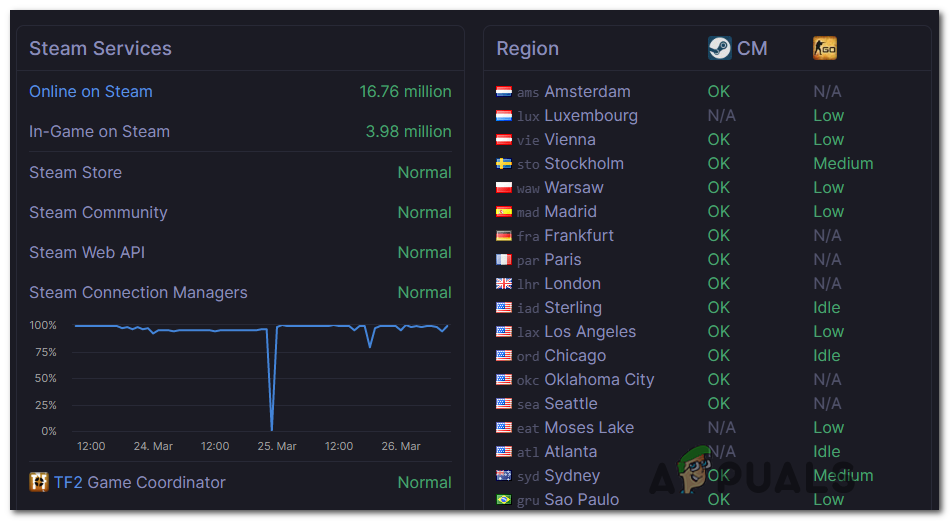
Note: If other users are reporting this problem, you should also check Steam’s Support Official Twitter account for any announcements of an outage or maintenance period that is affecting the servers.
If your investigations uncover a widespread server issue, you have little choice but to wait for Steam’s engineers to resolve the problem before you can access the Store component without encountering the Error Code: -101.
However, if you found no evidence of a widespread server issue, start following the next fix below.
Method 2: Rebooting or Resetting your Router
A network inconsistency is at the top of the culprit list when analyzing the Error Code: -101 inside Steam. If your investigations have revealed that Steam’s servers aren’t down, it’s very likely that you are actually dealing with a TCP or IP issue.
Even though the exact causes are divers, the fix is rather universal. Most affected users that were previously dealing with this error code have reported that they managed to fix the problem by either rebooting their router or performing a reset.
If you think you might also be dealing with a TCP / IP issue, our recommendation is to start with a simple router reboot – This procedure is not intrusive and will not reset custom settings or credentials. To perform a router reboot, you have two options:
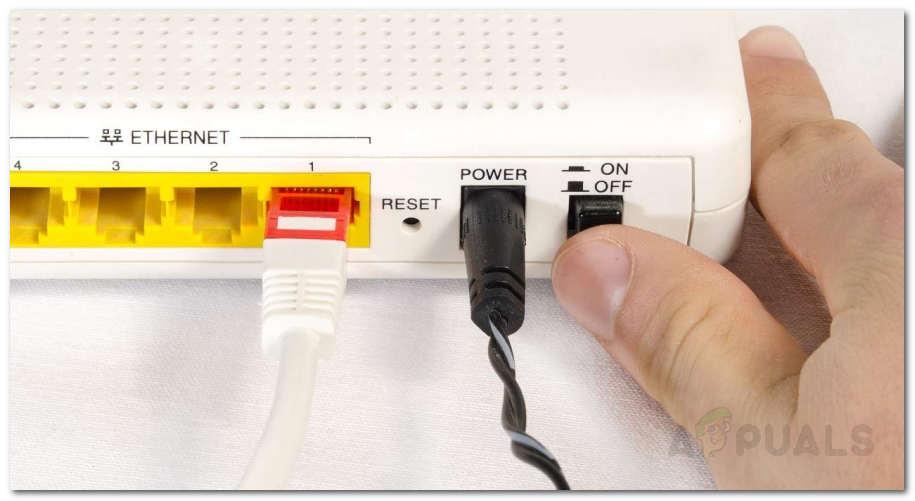
- Press the Off button on the back of your router and wait for one full minute before starting the network device once again.
- Physically unplug the power cable of your router from the power outlet and plug it back in once after one minute.
Rebooting Router Note: Some are arguing that hard rebooting (physically unplugging the power cable) is the most effective approach since it ends up draining the power capacitors which also clears firmware temporary data.
If you already did a router reboot with no success, the next logical step would be to go for a router reset. But keep in mind that this procedure will end up clearing any personalized network settings that you might have previously established – This includes manually forwarded ports, custom login credentials and security blocks or whitelists.
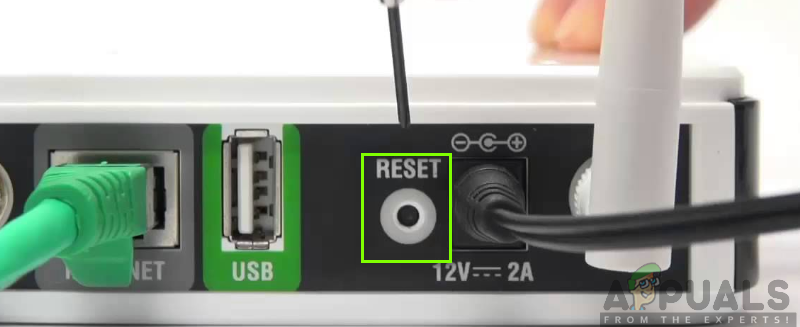
To perform a router reset, look at the rear of our router for a small Reset button. Most manufacturers prefer to make this button a little hard to access in order to avoid accidental presses. To go around this inconvenience, arm yourself with a toothpick or a similar sharp object that allows you to reach it.
Note: Keep in mind that this procedure might also reset the credentials used to connect to the Internet (provided by your ISP). Make sure you have them at the ready in case you need to re-establish the connection.
Perform a router reset by using a sharp object to press the rear RESET button of your router. After you press it, keep it pressed until you see the front LEDs flashing concurrently – Once you notice this behavior, release the button to complete the operation.
Once you manage to reset your router and re-establish the Internet connection, open Steam once again and see if you’re still encountering the Error Code: -101 when trying to open up the Store, move down to the next potential fix below.
Method 3: Cleaning the Web Browser Cache in Steam
Temporary cached data is another potential culprit that might ultimately be responsible for the apparition of the Error Code: -101. This has been confirmed by a lot of affected users that were seeing this error code when trying to access the main Store page.
If this scenario is applicable, you should be able to fix the issue by accessing your Steam’s Browser settings and deleting the browser cache in order to clear every bit of temporary data that might be causing this issue.
If you’re unsure on how to do this, follow the step-by-step instructions below:
- Open Steam and sign-in with the account that you’re encountering the issue with.
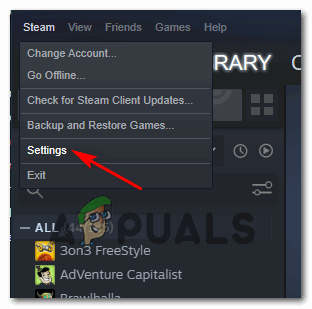
Note: Web browser cache data is tied to a particular account. If you’re encountering the issue with account A, clearing the cache data on account B will not fix the issue. - From the main dashboard of Steam, use the ribbon bar at the top to click on Steam, then click on Settings from the relevant context menu.
Accessing Steam’s Settings Menu - From the Settings menu, select the Web Browser tab from the vertical menu on the left.
- Next, move to the right section, then click on Delete Browser Cache and confirm by clicking Ok to initiate the procedure.

Clearing Steam’s web browser cache and cookies - Once the operation is complete, restart Steam and see if you are able to access the Store component after the application starts back up.
In case you’re still seeing the same error, move down to the next potential fix.
Method 4: Reinstalling Steam
According to some affected users, this issue can also occur due to some inconsistencies originating from the Steam installation folder. Several users that were previously dealing with the Error Code: -101 have confirmed that they were able to fix the issue by reinstalling Steam after removing it conventionally via the Programs and Files menu.
This operation will end up clearing any type of store corruption that might end affecting your ability to access the Profile or Store page.
If this scenario is applicable, follow the instructions below to uninstall Steam and reinstall it from the official channels:
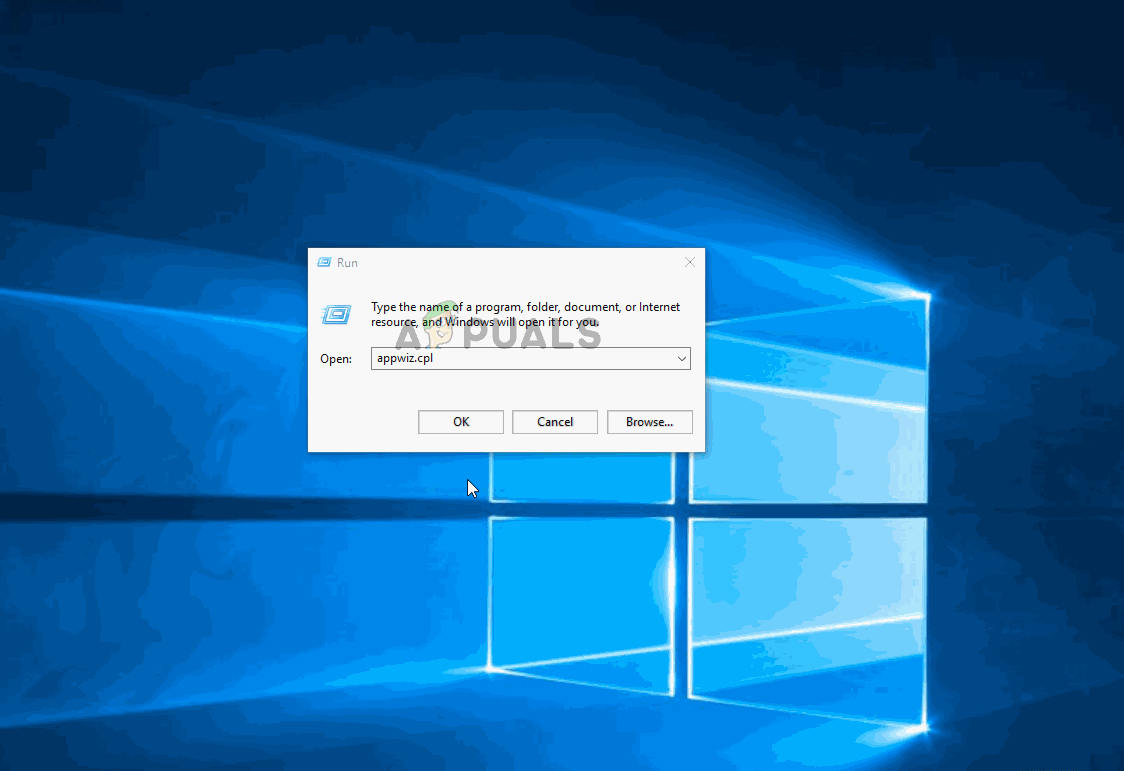
- Press Windows key + R to open up a Run dialog box. Next, type ‘appwiz.cpl’ and press Enter to open up the Programs and Features menu.
- Once you’re inside the Programs and Features screen, scroll down through the list of installed applications and locate your Steam installation.
- Once you manage to spot it, right-click on it and choose Uninstall from the newly appeared context menu. When you are prompted by the UAC (User Account Control), click Yes to grant administrative privileges.
- Once admin rights have been given, click Uninstall, then confirm at the prompt and wait for the process to complete.
- After you successfully manage to uninstall the current Steam installation reboot your machine and wait for the next startup to complete.
- Once your computer boots back up, visit this link (here) and download the latest Steam client and click on Install Steam at the prompt.
- Next, follow the on-screen prompts to install the latest version of Steam
- After the installation is complete, open Steam, sign in with your account access to the store, and see if you’re still encountering the same ‘-101 Error Code’.
In case the same error is still occurring even after you reinstall the entire Steam client, move down to the next potential fix below.
Method 5: Preventing Firewall Interference
If none of the potential fixes above have worked for you, you need to start investigating for a scenario in which you’re actually dealing with an overprotective firewall that’s interrupting the connection with Steam’s settings.
In the event you’re using a 3rd party firewall like Avast Premium, Comodo or Panda Dome, you need to search online for specific steps that allow you to whitelist the main Steam executable (the steps of doing this so are specific to the firewall tool that you’re using).
However, if you’re using Windows Firewall and you have previously established a strict set of rules, you will most likely be able to fix the Error Code: -101 either by whitelisting the Steam executable or by disabling the real-time protection of your firewall while Steam is open.
We have created two separate guides to accommodate both scenarios. Follow the one applicable to the type of fix you’re trying to enforce.
A. How to Disable the real-time protection of Windows Firewall
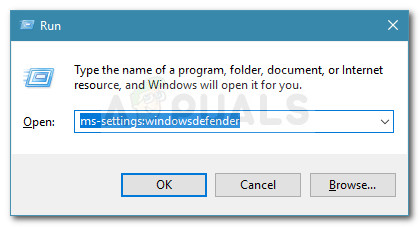
- Press Windows key + R to open up a Run dialog box. Next, type ‘ms-settings:windowsdefender’ inside the text box and press Enter to open up the Windows Defender Security Center.
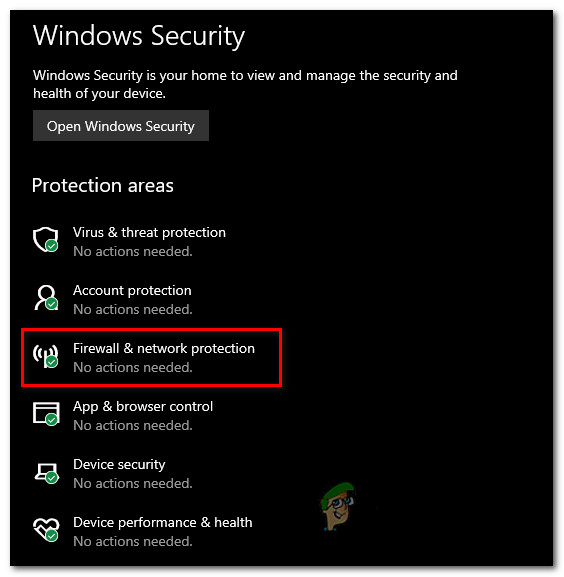
Run dialog: ms-settings:windowsdefender - Once you manage to get inside the Windows Security window, use the menu on the left to access the Firewall & network protection menu.
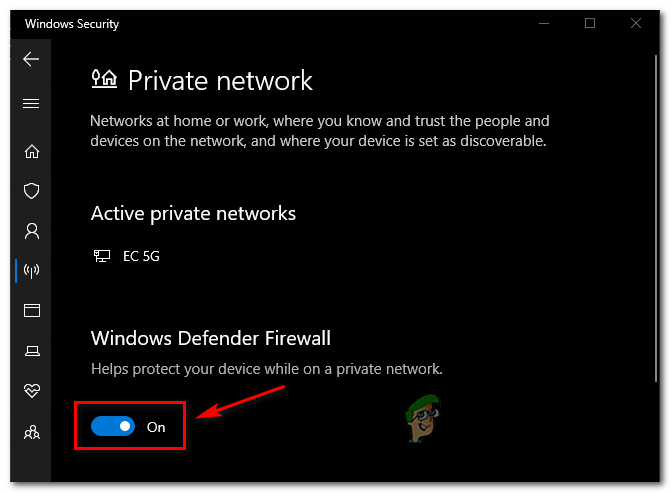
Accessing the Firewll & network protection settings - From the next menu, select the network that you’re currently using, then scroll down through the list of available items and disable the toggle associated with the Windows Defender Firewall so that it’s set to OFF.
Disabling the Firewall component of Windows Defender - Once the real-time protection of your Firewall has been disabled, open up Steam and see if you are now able to access the Store component.
B. How to Whitelist Steam in Windows Firewall
Note: The steps below are universal and will work regardless of the Windows version where you’re encountering the problem on.
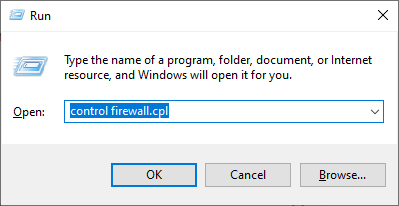
- Open up a Run dialog box by pressing Windows key + R. Next, type ‘control firewall.cpl‘ inside the text box and press Enter to open up the classic interface of the Windows firewall.
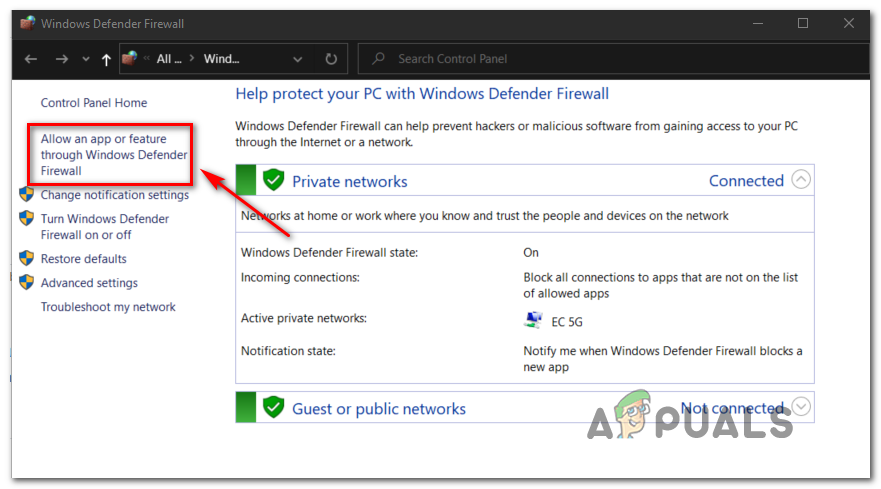
Accessing the Windows Defender Firewall - Once you’re inside the Windows Defender Firewall menu, use the menu on the left to click on Allow an app or feature through Windows Defender Firewall.
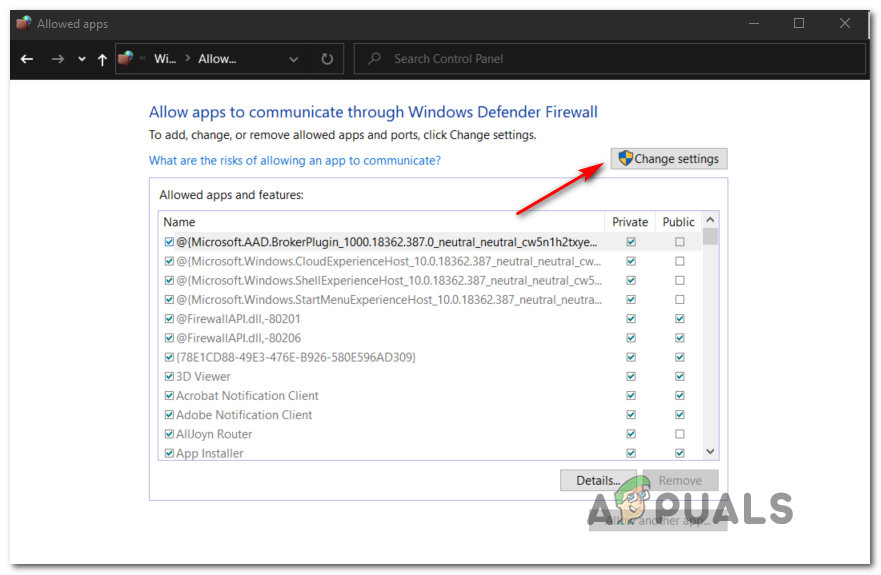
Allowing an app or feature through Windows Defender - Once you’re inside the Allowed apps menu, click on Change settings button and click Yes at the UAC (User Account Control) to grant administrative privileges.
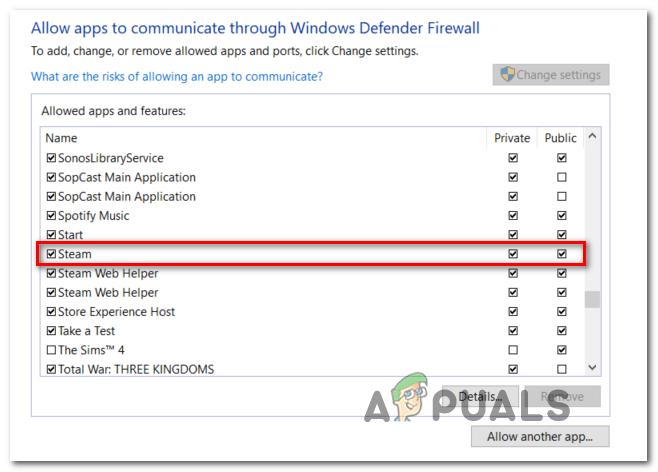
Changing the Settings of the Allowed Items in Windows Firewall - After you manage to obtain admin access, scroll down through the list of items, and locate the entry associated with Steam. Once you see it, ensure that both the Private and Public boxes are checked before clicking Ok to save the changes.
Whitelisting COD Modern Warfare + Launcher in Windows Firewall - Launch Steam once again and see if the problem is now fixed.
In case you are still encountering the Error Code: -101, move down to the next potential fix.
Method 6: Using a VPN to avoid ISP / Network Blocks
If none of the potential fixes above have worked for you, you should start considering that you might be dealing with some type of block enforced at a Network level or ISP level that ends up inhibiting communications with Steam’s server.
This is fairly common with School and Work networks that have restrictions of this kind. If you’re currently connected to a school or work network, try connecting to your home network (or create a hotspot network) to see if you’re still encountering the same Error Code: -101.
In case the problem is not occurring while you are not connected to that specific network, you’re most likely dealing with some type of server access restriction enforced at a network or ISP (Internet Service Provider) level.
If this scenario is applicable, the quickest way of resolving this problem is to install a VPN client at a system level that will hide your real IP when accessing Steam.
In case you’re looking for step by step instructions on installing a system-level VPN on your Windows computer, follow the instructions below:
- On your browser, visit this link (here) and click the Download button to initiate the download of the latest version of the Hide.me VPN client.
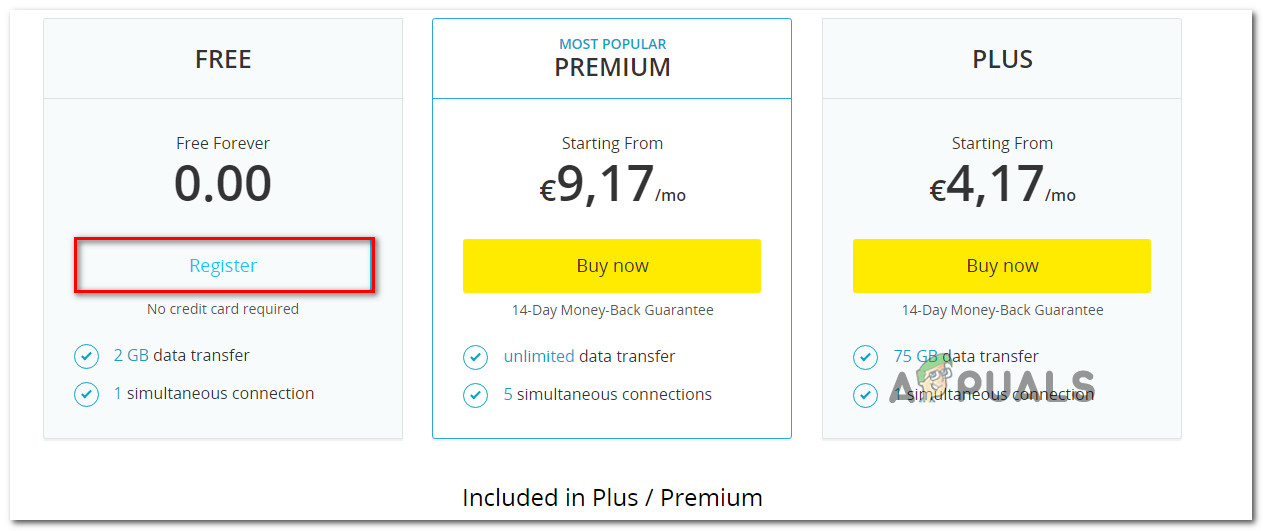
- At the next screen, click the Register button, then initiate the download of the free version of Hide.me VPN for Windows PCs.
Downloading the VPN solution - At the next screen, insert a valid email address and press Enter to begin the registration process. At this set, make sure to use a valid email address since you will be asked to verify it later down the line.

Registering for the service - Once the verification code is sent, navigate to your inbox, and complete the verification process. After you do so, you will be asked to insert a username and password for your account.
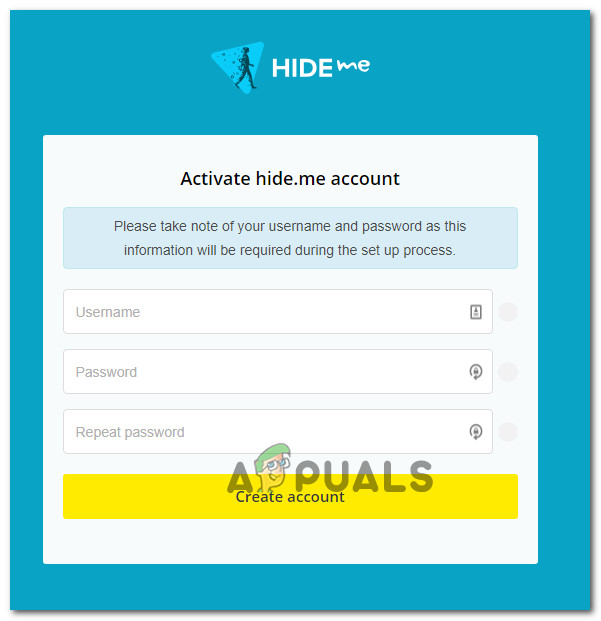
- After the username and password are correctly configured, click on Create account.
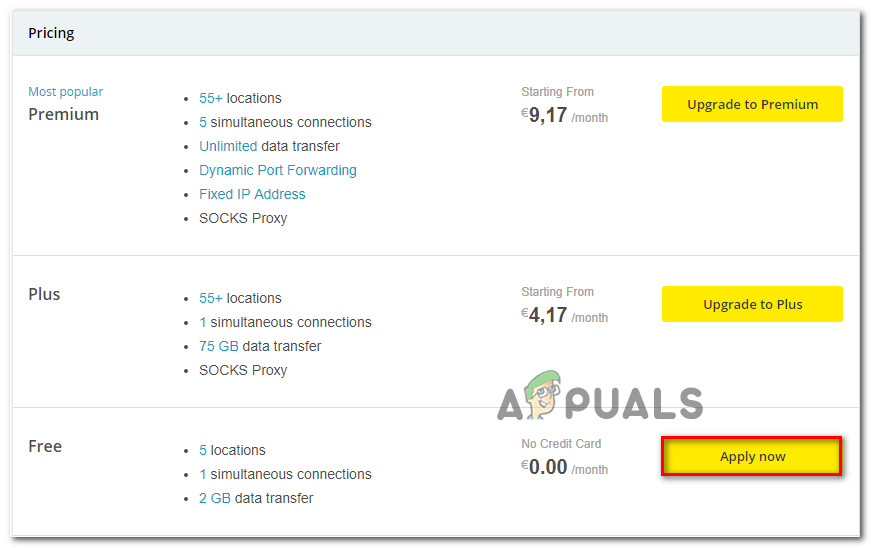
Creating an account with Hide.me - After you successfully manage to complete the sign-in procedure, go to Pricing > Free and click on Apply now to activate the free plan.
Apply for the free account - Once the free plan is successfully enabled, navigate to the Download section and click on the Download Now button that’s corresponding to your operating system version.
- After the download is complete, open the installation executable and follow the on-screen prompts to complete the installation.
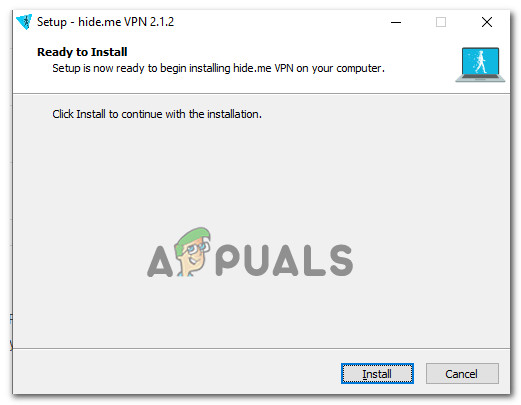
Installing the Hide.Me VPN application - After the installation is complete, claim your free trial by clicking on Start your free trial and select a location different from your real one.
- Open Steam once again and see if you are able to access the Store without encountering the Error Code: -101.