How to Fix “Sign-in option disabled” Error on Windows 10/11?
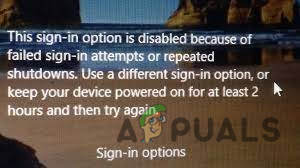
Sign-in option disabled in Windows operating system generally occurs when your Windows repeatedly shutdowns. It popups with an error message on your screen referring: “This sign-in option is disabled because of failed sign-in attempts or repeated shutdowns”. The error can also be triggered due to failed sign-in attempts.
There are multiple reasons for this error to occur we have discussed some of them below:-
- Failed sign-in attempts- If you sign in again and again with the wrong password or pin then Windows might disable your sign-in button by assuming that someone else is trying to get access to the system. Due to security reasons, they disable the sign-in button to save your data.
- Repeated shutdowns- If your computer system shutdowns repeatedly then this could count badly from the perspective of Windows. The error itself says this issue can be triggered when your Windows shutdown repeatedly due to a power cut or for other reasons.
- Corrupted Windows files- Corrupted Windows files can also lead you to this error to fix this you have to repair your Windows files by running some commands that will help you to resolve this issue.
Keep Your Windows on for a couple of hours
Frequently or repeatedly sign-in can trigger this issue because when you entered your password or a pin wrong several times then Windows block your access and assumes that someone else is trying to force the system to get the access. As the error itself says if you want to fix this problem then keep your Windows system on for a couple of hours.
But if you have some urgent business then instead of waiting you can apply the below methods to fix your disable sign-in button.
Forgot Your Password
You can also unblock your access or enable your sign-in button by forgetting your password on your Window but it requires a Microsoft account to forget a PIN. This method is the instant fix to enable the sign-in button.
Just follow the steps to fix the disabled sign-in button error:-
- Go to your system, and make sure you are connected to the internet.
- Click on the I forgot my PIN and it should start the loading wait until it asks for your Microsoft account password.
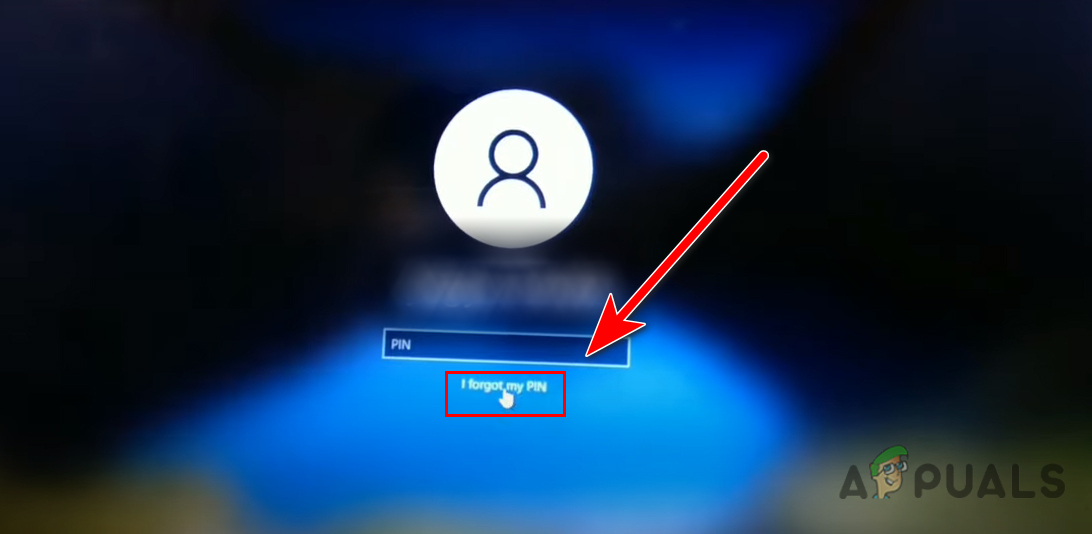
Click on I forgot my PIN - In the next Window you have to type your password and then click on the Sign-in button.
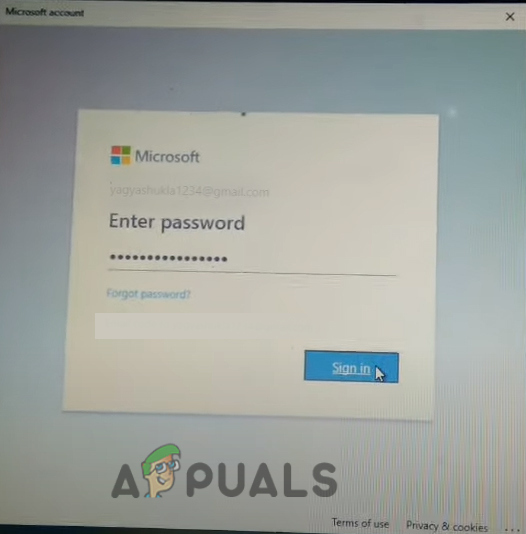
Click on the Sign-in button to login your account - After that it will ask are you sure you want to reset your pin, just click on the Continue button to reset the pin.
- Once it’s done the Windows security screen will popup and you have to put a new pin and the confirm pin.
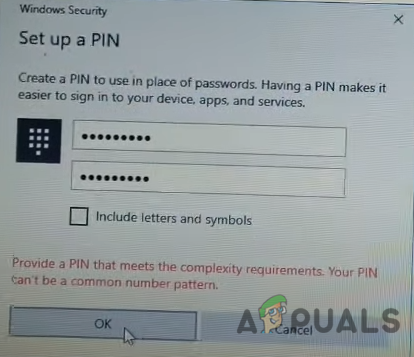
Changing PIN code - Then, click on the Ok button after that enter your new pin to get access to your system.
Make Admin account in Safe Mode
We know that plenty of people doesn’t have an Admin account or a separate local account however, you can fix this issue by applying this method or the others but these methods require a separate user account to change the policies or the settings.
Without accessing the system we have to get into safe mode to create a new admin account.
Here is how you can do this:-
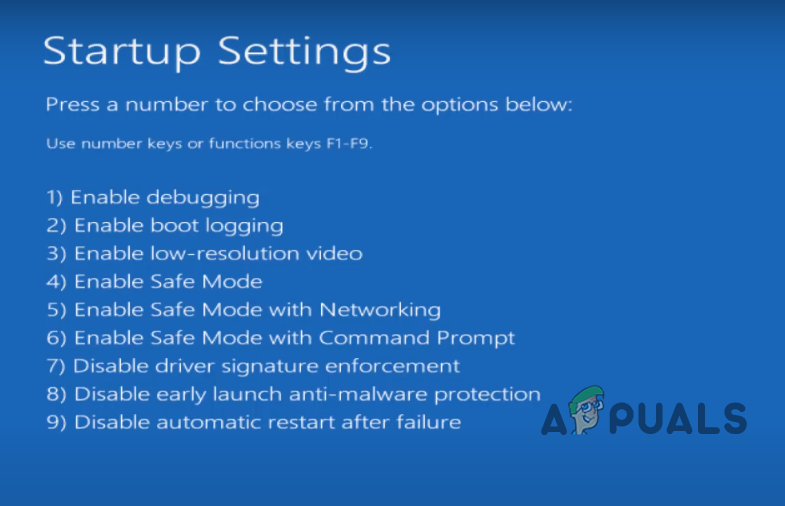
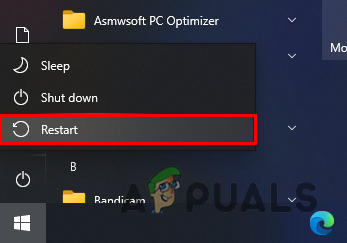
- Click on the Windows menu icon then click on the power button and hold the shift key while selecting the Restart option.
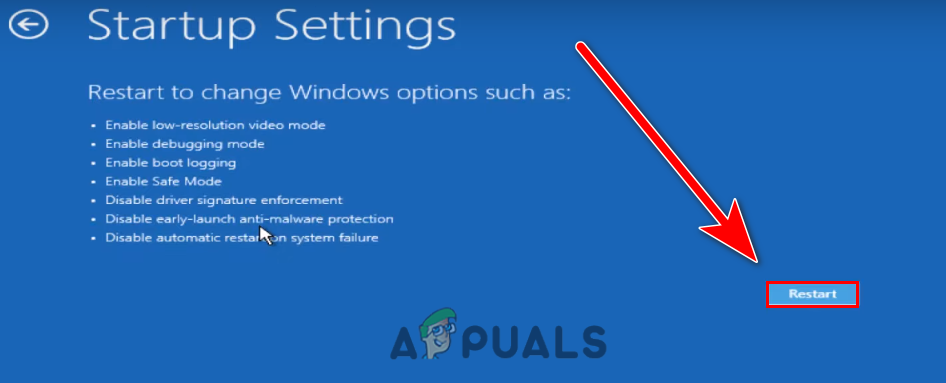
- In the next blue screen, select the Troubleshoot option then Advanced option>Startup Settings.

Click on the Startup settings - Click on the Restart button on the bottom right.

Click on the Restart button to select other Windows options - Once it’s restarted, press the F5 key to open the Windows in safe mode.
Press f5 to enable the safe mode - After enabling the safe mode, press the Windows + R keys to open the Run program.
- Type cmd in the Run program and hit enter.
- Insert the below command to create a new user
user username /add
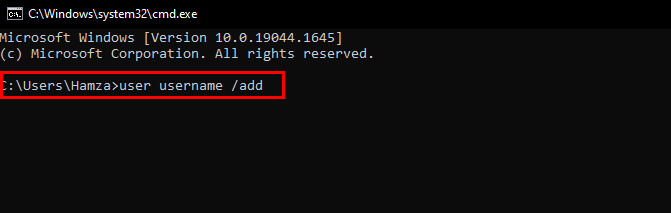
Add user via command prompt - Replace the username with your actual account name according to your preference.
- Now again insert the following command to put the user in the local group of administrators.
localgroup administrators username /add

Add user into the local group of administrators - Again replace the username with your account name.
- Once done restart your computer and check if the error persists.
Use Admin Account to Unlock Your Account
If you need to unlock your account urgently then this scenario will help to unlock your account but it requires another admin account or you can use the separate local account.
If you don’t have an admin account or a local account then create it by following the above method.
- Open your admin account, and press the Windows + R keys together.
- Type lusrmgr.msc in the Run Window and press enter.

Type gpedit.msc in the Run Window - Under the Local Users and Groups, double-click on the Users.
- Right-click on your locked account and select Properties.
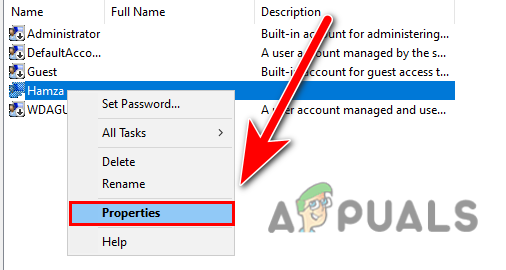
Select Properties - Now uncheck the Account is locked out option and press Ok.
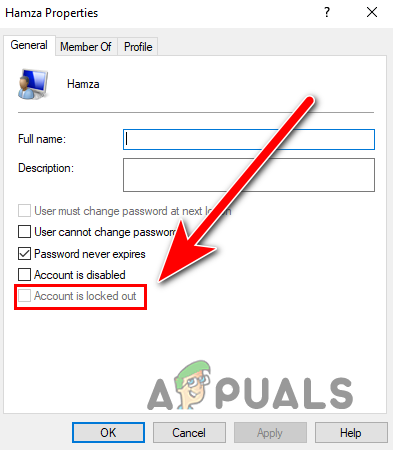
Uncheck the Account is locked out - Once done restart your computer and try to open your locked account and check if the error persists.
Change Account Lockout Policy
The lockout policy of the Windows-based operating system determines the number of sign-in attempts by the user that can cause your account to be locked. The sign-in disabled account cannot be used until the specified time lockout duration expires or until you change the lockout policy from a different admin account.
If you don’t have an admin account or a separate local account then create it with the help of the above method.
Follow the steps to change the Lockout policy:-
- Press the Window + R keys to open the Run program.
- Insert gpedit.msc in the Run Window and press enter.
Type gpedit.msc in the Run Window - Navigate to the following path to change the lockout policy
Computer Configuration\Windows Settings\Security Settings\Account Policies\Account Lockout Policy
Here you will see three lockout policies. If your account lockout threshold is more than 0 then Immediately change it to 0 to make sure your account will never block again by the lockout policy because the more threshold value means how many times you attempt to log on.
- Double-click on the Account lockout threshold and click on the down arrow button to decrease the threshold value.
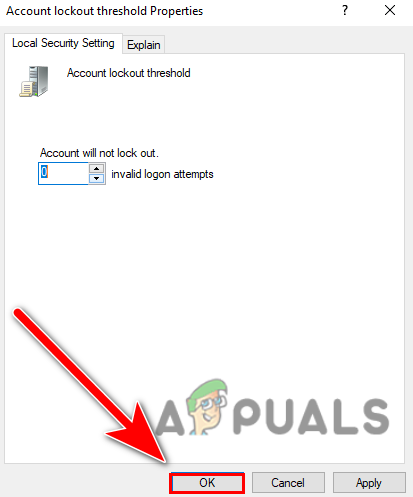
Decreasing the lockout threshold value - If you want to decrease the lockout duration then double click on the Account lockout duration and change the number of minutes to 0 minutes.
Use Repair Commands in Safe Mode
As we mentioned before, the corrupted Windows files might be the culprit for your disabled sign-in button however, the easiest way of fixing the corrupted files is by running some commands through the command prompt in safe mode.
Run SFC Scan
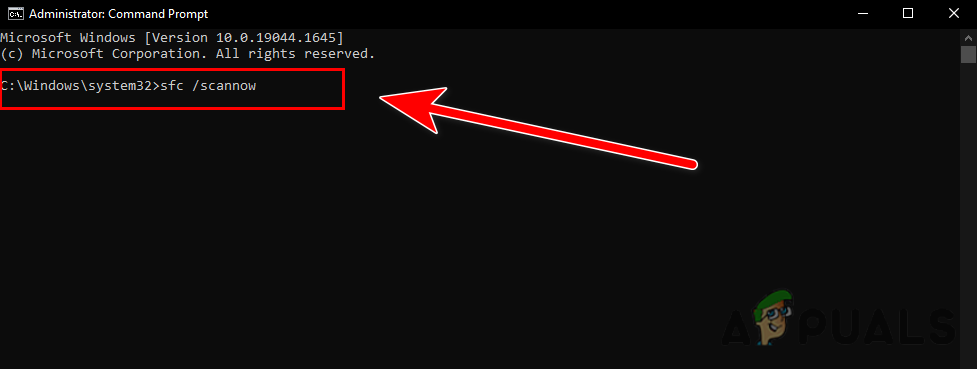
When it comes to repairing the Windows files, the first thing we should do is to run sfc/scannow in the command prompt which helps to replace the corrupted files with cached copies that save in the Windows as a backup for the future.
Run DISM Commands
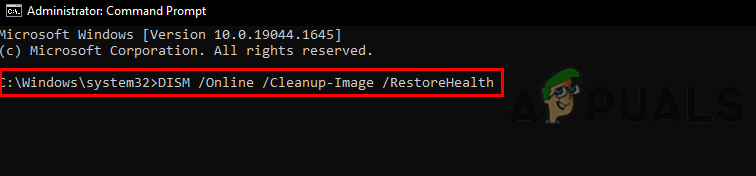
DISM commands are used to repair Windows image. The DISM tools include three commands such as scanning, repairing, and restoring the image of your Windows. We use DISM commands in the order list first we will use the CheckHealth command which will allow us to fix any corruption inside the Windows image and the second command is ScanHealth which is used to scan more efficiently than normal to find out any problem. The third command is RestoreHealth which will repair all the problems find by the other DISM commands.
Follow the steps to run the commands in safe mode:-
- Press the Windows key and click on the Power button then hold the shift key and click on the Restart option.
- Select the Troubleshoot option then Advanced option>Startup Settings.
- Click on the Restart button to open Windows in safe mode.
- After restarting, press the F5 key to open Windows in safe mode.
- Once you have entered the safe mode, press the Windows key and type the command prompt in the search bar.
- Open command prompt as administrator privilege by pressing the ctrl + shift + enter keys together.
- Insert the below command to replace the corrupted files with the cached copy then press enter to execute the command
sfc /scannow
Running the sfc /scannow command - After that, it’s time to repair the Windows image by inserting the below commands one by one in the command prompt.
DISM /Online /Cleanup-Image /CheckHealth
DISM /Online /Cleanup-Image /ScanHealth
DISM /Online /Cleanup-Image /RestoreHealth
Running the DISM commands - Once done restart your computer and check if the error persists.
Restart Windows in Safe Mode
According to the user, restarting the Windows in Safe Mode will fix the issue because it will not count in repeatedly and your Windows will remove the restriction and also unblock your access.
Here is how you can restart your Windows in safe mode:-
- Click on the Windows menu icon, select the Power button, and while pressing the shift key click on the Restart button.
- It should take you to the blue screen where you have to select some options as mentioned below.
- Select Troubleshoot>Advanced option>Startup Settings.
- Click on the Restart button which will take you to the Windows startup options.
Click on the Restart button to select other Windows options - Press the F5 key to open your Windows in safe mode.
- After getting into the safe mode, restart your computer and try to login into your account.
Modify the Startup Selection
Sometimes the credential services of the Windows-based operating system get disabled due to the selective startup selection for that reason we have to change the startup selection to normal startup from the MS configuration in the Safe Mode.
- Press the Windows key and click on the power button.
- Hold the shift key and select the Restart button.
Click on Restart button - Wait until the next screen popups, go to the following options one by one.
Troubleshoot>Advanced option>Startup Settings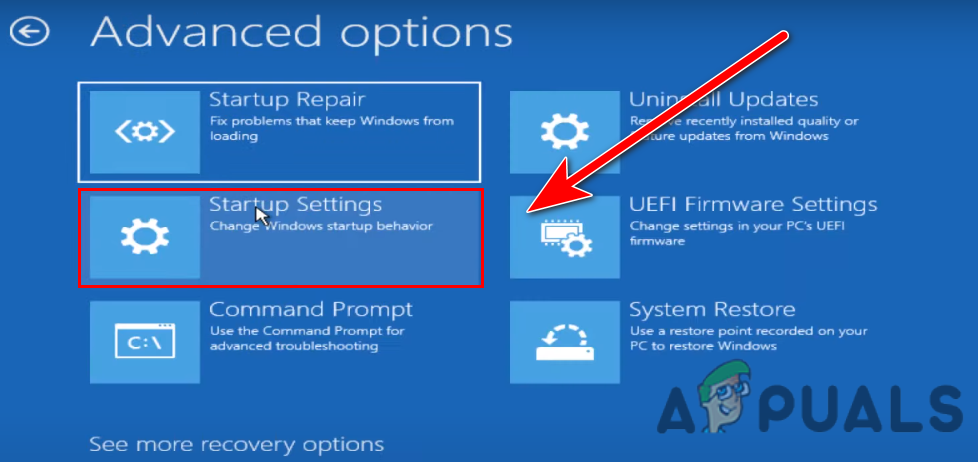
Click on the Startup settings - Click on the Restart button to view the further Windows launch options.
- Press F5 to enable the safe mode in Windows.
Press f5 to enable the safe mode - Once you get into the safe mode, press the Windows + R keys together.
- Type MSconfig and press enter.
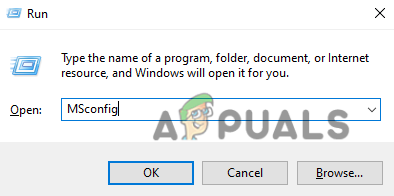
Type MSconfig in the Run program - In the next Window, select Normal Startup and click on Apply button.
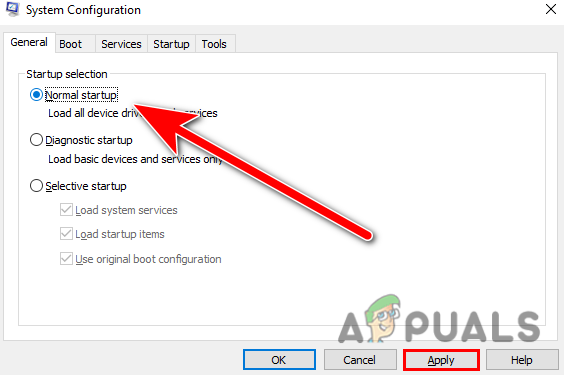
Changing startup selection to normal startup - Restart your computer and check if the error persists.
Use the Advanced Startup Repair tool
The advanced startup repair tool is one the best recovery tool, or you can say the Master tool for repairing problems that might prevent Windows from starting correctly. The advanced startup tool scans your whole system data and then tries to fix certain system problems.
You can use this Advanced Startup Repair tool to fix the disabled sign-in button. Here is how you can do this.
- Click on the Windows menu icon on the bottom left then select the power button and click on the Restart button while holding the shift key.
- A Window will come up then navigate Troubleshoot>Advanced option.
- Select the Startup Repair option and wait for Windows to diagnose and fix the problem.
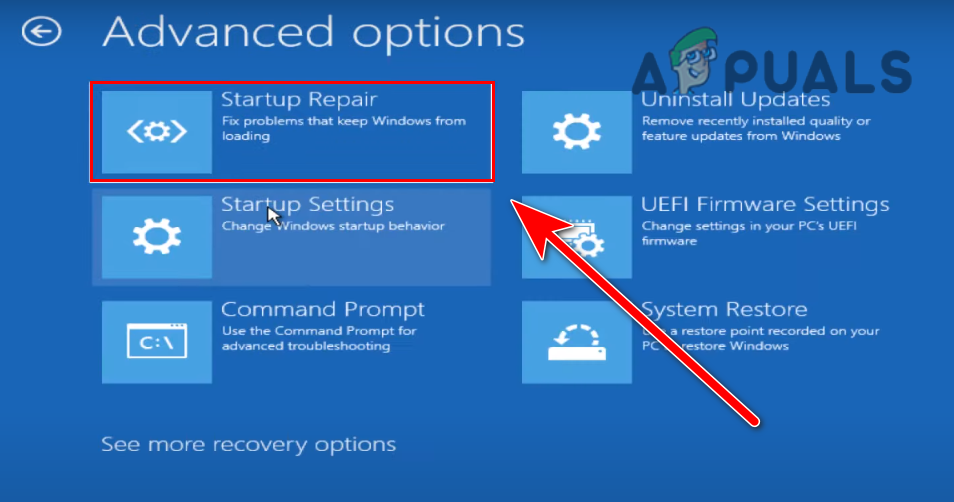
Advance repairing tool for Windows - After that, your system will automatically restart and then you have to login into your account to check if the error persists.
Reset Windows Operating System
Unfortunately, if none of the methods worked for you then you can reset your Windows. Resetting the Windows will restore all the corrupted files, and also solve the other problems.
Note- Your data will keep saved in your system if you carefully follow the below steps:-
- Press the Windows key and select the Power button then click on the Restart option while holding the shift key.
Click on the Restart button - It should take you to the blue screen and select the Reset this PC option.
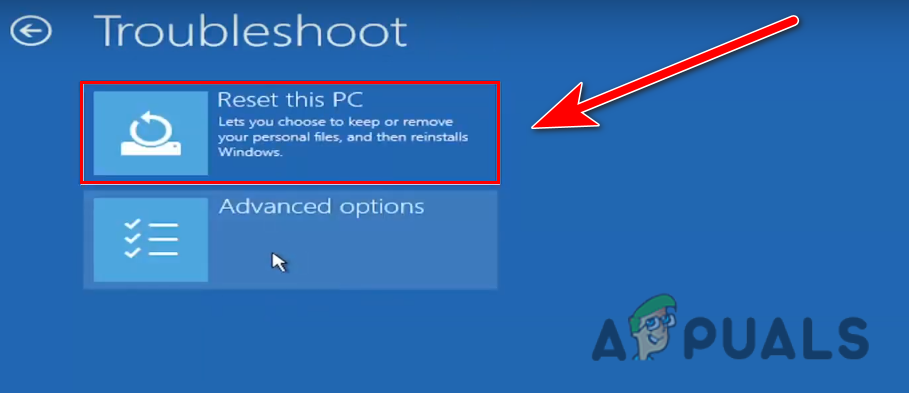
Reset this PC - In the next popup Window, select Keep my files.

Select Keep my files - Select the Local reinstall option to reinstall Windows but your data will keep on your system.

Select Local reinstall - In the end, click on the Reset button to reset your computer.
Use Restore Point (if you already have created a Restore Point)
If you have created a restore point earlier then there is an option in Windows startup called System Restore where you can easily restore previous Windows files however it can fix the disable sign-in button and also it will resolve the problems regarding Windows updates.
Follow the steps to restore the previous Windows image:-
- Hold shift and click on the Restart button to view the advanced startup settings.
Click on the Restart button - Select Troubleshoot>Advance Startup option>System Restore.
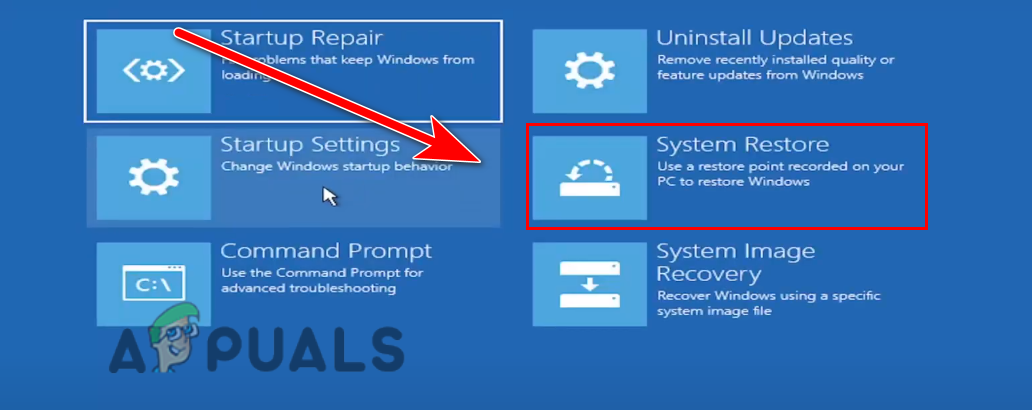
Click on System Restore - You have to wait until the restore image Window popups then click on the Next.
- After that, you will see all your created restore points. Select one of them we recommend you to select the latest one you have created then click Next.
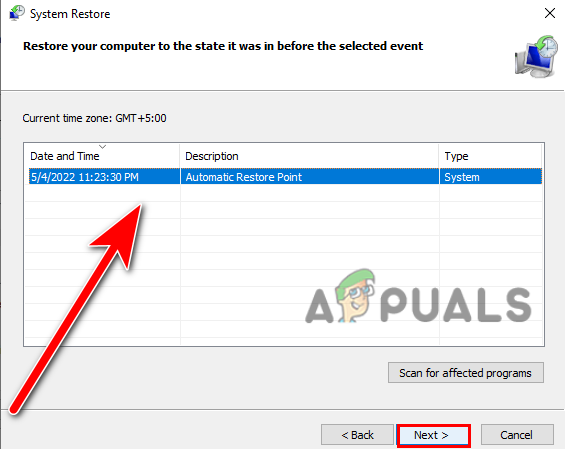
Select the restore point - Click on the Finish button to confirm and start the restore process.
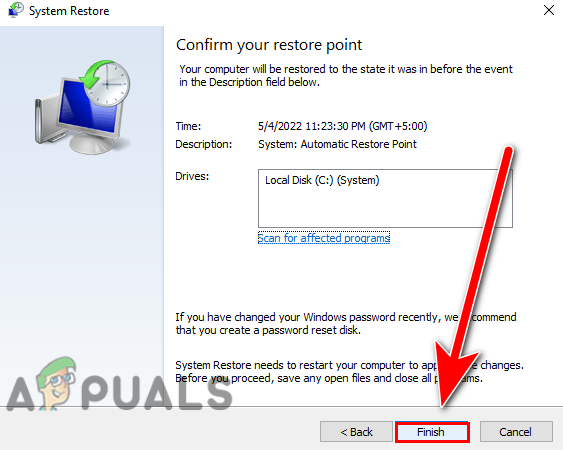
Click on the Finish button to start the restore process
We have discussed almost everything that might be included in causing the disabled sign-in error. If you are still getting the same error then we recommend you reinstall your Windows as a last option.


None of this fixed my issue. Clearing the tpm did though. You should add that