Fix: Service Registration is Missing or Corrupt on Windows 10
Windows Update is essential for every existing system to get bug fixes for the Windows operating system. If any user pauses the update for some time, they may experience security problems, performance issues and bugs hampering their daily operations. Most computers already have the default setting of the update being set to automatic.
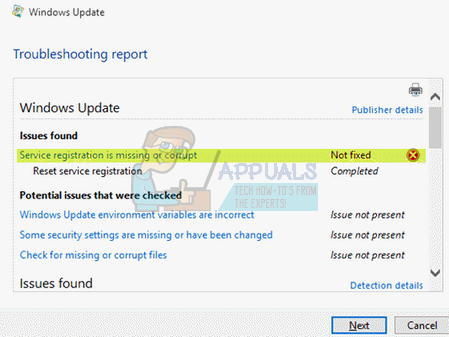
Sometimes, the system might not be able to install the required updates and go into an error state. At this point, you should run the Windows Update Troubleshooter to fix the problems automatically. However, sometimes, the troubleshooter fails to fix some problems such as the error Service Registration is missing or corrupt. This error causes the Windows operating system or the other universal applications to install the required updates whenever available. You have to fix this error message yourself manually. We have listed a number of solutions for you to try. Start from the first one and work your way down.
Solution 1: Checking if the Windows Update services are up and working
We can try checking if your Windows Update services are started and running as expected. This error can also be caused if the update services are not performing their tasks as expected which in turn causes the error message.
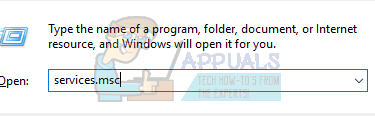
- Press Windows + R to launch the Run application. Type “services.msc” in the dialogue box and press Enter. This will launch the service’s utility which lists all the services running or available on your computer.
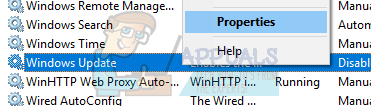
- Once the new window is opened, search the list and find “Windows Update”. Right-click on the service and select Properties.
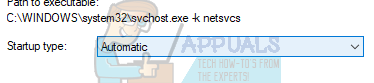
- Navigate to the General tab. Now in front of the Startup type option, click on the dropbox to list all the options available. Select Automatic and press Apply to save changes.
- In the same window, press on Start under the heading of Service status. Press Apply to save changes and exit the Properties window.
- Once you are done modifying the properties of Windows Update service, repeat the same steps for the following:
Background Intelligent Transfer Service
Cryptographic Service
You can easily find these processes in the same list where you found Windows update.
- Now restart your computer for the changes to take place and make sure you have an active internet connection. Try opening the Windows update again and check if the error message is resolved.
Solution 2: Running instructions through Command Prompt
If the above method didn’t work for you, we can try running some commands in the command prompt and check if the error gets fixed. We will try to fix the error by resetting some configurations and settings before moving on to editing the registry or restoring your Windows.
- Press Windows + X to launch the command prompt. You can also press Windows + S and type command prompt. Then right-click on the first result which comes forth and select the “Run as administrator” option.

- Once in the command prompt, type the following commands one by one. Don’t forget to press Enter after each command to execute it.
net stop wuauserv
net stop cryptSvc
net stop bits
net stop msiserver
ren C:\Windows\SoftwareDistribution SoftwareDistribution.old
ren C:\Windows\System32\catroot2 catroot2.old
net start wuauserv
net start cryptSvc
net start bits
net start msiserver
- Wait patiently for all the processes to execute successfully and complete. Now open Windows Update and check if you can successfully run it as expected.
Solution 3: Refreshing your .NET files
As we all know, .NET files are present at the core of your computer and without them, many operations do not work. We can try refreshing these .NET files manually and check if your problem gets resolved.
- Press Windows + R to launch the Run application. Type “control panel” in the dialogue box and press Enter.
- Once in the control panel, click on the subheading of Programs present at the bottom left side of the screen.
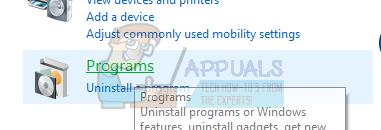
- Once you are in the menu, click on “Turn Windows features on or off” present under the subheading of Programs and Features.
- Now a list will be populated regarding all the programs and features present on your computer. This might take a while so be patient when it is populating.
- Once populated, uncheck all the boxes containing the keyword of “.NET”. This process will uninstall .NET entirely and might require some time. Press Okay to save changes.
![]()
- Now open the window again and check all the boxes which you unchecked in the earlier steps. Now your computer will attempt to install the framework. This may require some time so be patient.
- Once it is installed, restart your computer for the changes to be implemented and check if the problem gets solved.
Solution 4: Uninstalling your Antivirus
It is not new to know that your antivirus conflicts with your operating system every once in a while. Antivirus contains virus definitions that need to be updated every once in a while. It is possible that your antivirus vendor didn’t update the definitions which may be causing it to conflict with the windows update process. We can try uninstalling your antivirus or disabling it temporarily and check if Windows Update works correctly.
- Press Windows + R to launch the Run application. Type “control panel” in the dialogue box and press Enter.
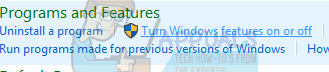
- Once in the control panel, click on the subheading of Uninstall a Program present at the bottom left side of the screen.

- Now Windows will list all the programs installed on your machine. Navigate through them until you find your antivirus.
- Right-click on it and select the option of “uninstall”. After the uninstallation, restart your computer and check if the problem at hand got solved.
Note: Uninstall your Antivirus on your own risk. We recommend not plugging any USB or downloading any executables over the internet in the period where your antivirus isn’t installed on your computer. If Windows Update still doesn’t work, you can install your antivirus back again.
Solution 5: Running System File Checker
System File Checker (SFC) is a utility present in Microsoft Windows which allows the users to scan their computers for corrupt files in their operating system. This tool has been there in Microsoft Windows since Windows 98. It is a very useful tool for diagnosing the problem and checking if any problem is due to corrupt files in windows.
We can try running SFC and see if your problem gets solved. You will get one of the three responses when running SFC.
- Windows didn’t find any integrity violations
- Windows Resource Protection found corrupt files and repaired them
- Windows Resource Protection found corrupt files but was unable to fix some (or all) of them
- Press Windows + R to launch the Run application. Type “taskmgr” in the dialogue box and hit Enter to launch your computer’s task manager.
- Now click on File option present at the top left side of the window and select “Run new task” from the list of options available.

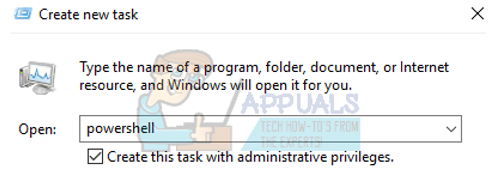
- Now type “powershell” in the dialogue box and check the option underneath which states “Create this task with administrative privileges”.
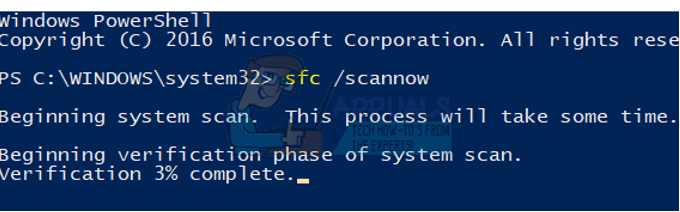
- Once in the Windows Powershell, type “sfc /scannow” and hit Enter. This process may take some time as your entire Windows files are being scanned by the computer and being checked for corrupt phases.
- If you encounter an error where Windows states that it found some error but was unable to fix them, you should type “DISM /Online /Cleanup-Image /RestoreHealth” in the PowerShell. This will download the corrupt files from the Windows update servers and replace the corrupt ones. Do note that this process can also consume some time according to your internet connection. Don’t cancel at any stage and let it run.
If an error was detected and was fixed using the above methods, restart your computer and check if the Windows Update started working normally.
Solution 6: Checking your Firewall and Antivirus
We can try disabling your Firewall and check if Windows Update operates normally. Windows Firewall monitors your incoming and outgoing internet data and packets. It also blocks some connections or some applications from installation if they don’t fulfill its criteria. If you haven’t updated Windows for a long time, it is possible that this is giving you problems. For disabling the Windows Firewall, follow the steps listed below.
- Press Windows + R button to bring up the Run application. In the dialogue box type “control”. This will open your computer’s control panel in front of you.
- In the top right there will be a dialogue box to search. Write “firewall” and click on the first option that comes as a result.
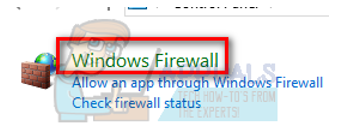
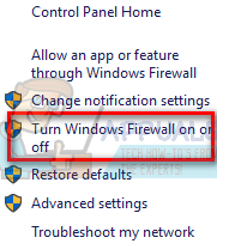
- Now on the left side, click the option which says “Turn Windows Firewall on or off”. Through this, you can turn your firewall off easily.
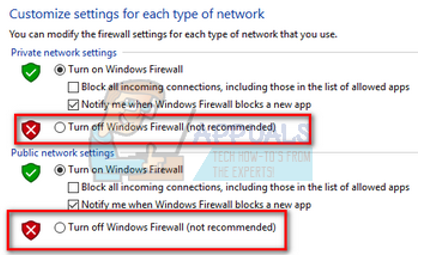
- Select the option of “Turn off Windows Firewall” on both the tabs, Public and Private Networks. Save changes and exit. Restart your computer and check if the problem gets resolved.
Solution 7: Changing some Registry Values
We can try removing certain values from your registry to fix the Windows Update error message. You should make a backup of your registry before resorting to this method. Do note that Windows Registry Editor is a powerful tool and requires extra care when carrying out operations or changes. Follow the guide carefully and don’t change values that you don’t know about.
- Press Windows + R to launch the Run application. Type “regedit” in the dialogue box and press Enter. This will launch the Registry Editor.
- Now navigate to the following file path using the left navigation pane:
HKEY_LOCAL_MACHINE\SOFTWARE\Microsoft\WindowsSelfHost\Applicability

- Now locate ThresholdOptedIn value on the right side of the screen. Right-click it and select Delete. Restart your computer and check if the problem got solved.
Some users reported that they had a Recovery From folder present inside the Applicability folder. After deleting the Recovery From the folder, the matter was resolved instantly.
In another case, it is possible that the Applicability key doesn’t have any other value besides the Default value. In this case, follow the method listed below to add some keys so our error message goes away.
- Navigate to the following file path using the left navigation pane:
HKEY_LOCAL_MACHINE\SOFTWARE\Microsoft\WindowsSelfHost\Applicability
- Right-click on the empty space at the right side of the screen and select New > String

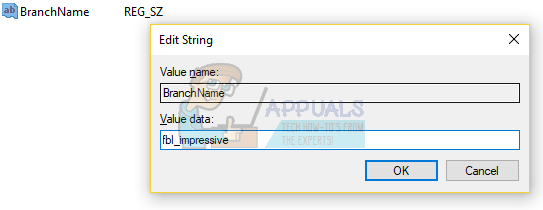
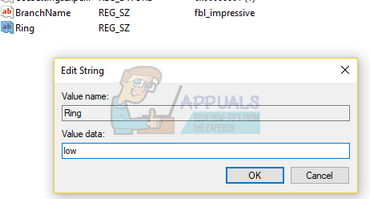
- Set the name of the new string as “BranchName”. After the new string is created, double-click it and type “fbl_impressive” in the Value data box. Press Ok to save changes.
- Now create a new string just like we did above and name that new string as “Ring” and set the Value data as “low”. Press Ok to save changes.
- Exit the Registry Editor and restart your computer so all the changes can be implemented. Check if the problem gets solved.
If the above changes to the registry don’t work, we can try a workaround.
- Navigate to the same file path we were working on in the steps above.
- Double click on the “Ring” string we just created and change its value from “low” to “WIF”.
- Now create a new string just like we did above and name that new string as “ThresholdRiskLevel” and set the Value data to “low”. Press Ok to save changes.

- Exit the Registry Editor and restart your computer so all the changes can be implemented. Check if the problem gets solved.
Solution 8: Creating a Local Account
It is possible that the problem you are facing is because of some error in your profile or the administrator hasn’t granted you access. If you are the owner of this computer and still couldn’t access the Windows Update properly, we can try making a new local account and checking if this fixes anything.
- Open an administrator account. Type Settings in the start menu dialogue box and click on Accounts.

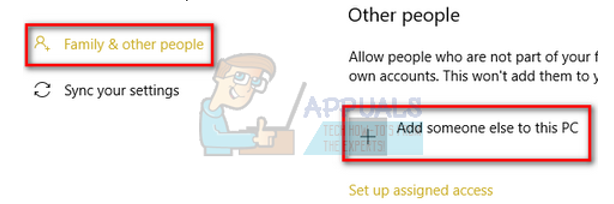
- Now click “Family and other users” options present at the left side of the window.
- Once inside select the menu, select “Add someone else to this PC”.
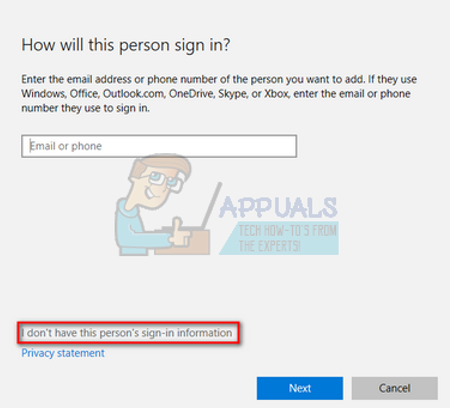
- Now Windows will guide you through its wizard on how to create a new account. When the new window comes forth, click “I don’t have this person’s sign-in information”.
- Now select the option “Add a user without Microsoft”. Windows will now prompt you to make a new Microsoft account and display a window like this.
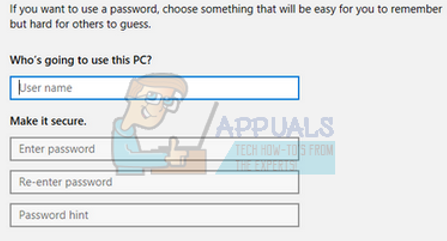
- Enter all the details and choose an easy password which you can remember.
- Now navigate to Settings > Accounts > Your Account.
- At the space beneath your account picture, you will see an option that says “Sign in with local account instead”.
- Enter your current password when the prompt comes and click on Next.
- Now enter username and password for your local account and click on “Sign out and finish”.
- Now you can easily switch to a new local account, and move all your personal files to it without any barriers.
- Now navigate to Settings > Accounts > Your Account and select the option “Sign in with a Microsoft Account instead”.
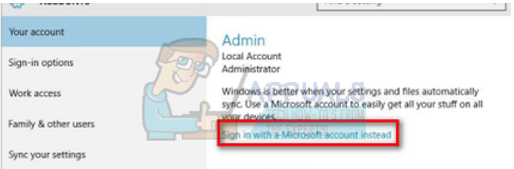
- Enter your username and password and click Sign in.

- Check if the error message goes away and Windows Update is working on this account. If it is, you can safely delete the older account and continue using this one.
Solution 9: Problems with Wireless Connectivity
Microsoft has publically acknowledged that there is a slow WiFi issue in its new products. Many users were reported that the web-pages didn’t load as expected and the browsing was very slow. If you are experiencing these problems, it means that your connectivity is the culprit in popping the error message.
We can try altering some Registry values as stated by Microsoft to fix the issue and check if your problem gets fixed. Do note that Windows Registry Editor is a powerful tool and requires extra care when carrying out operations or changes. Follow the guide carefully and don’t change values that you don’t know about.
- Press Windows + R to launch the Run application. Type “regedit” in the dialogue box and press Enter. This will launch the Registry Editor.

Running the Registry Editor - Now navigate to the following file path using the left navigation pane:
HKEY_LOCAL_MACHINE\SYSTEM\ControlSet001\Services\mrvlpcie8897
- Locate the item named “TXAMSDU” at the right side of the screen. Double-click it to change its value from “1” to “0”.
- Press Ok to save changes and exit. Restart your computer so all the changes can take effect. Check if the problem got solved.
Solution 10: Resetting Windows Update using Reset Tool
Now we will focus on how we can reset your Windows Update using different methods. One of these methods includes using the Reset Tool for Windows Update. This .exe file must be run as administrator. It has a script that checks certain factors of your Windows Update and configures them accordingly.
- Download the Reset Tool and save it in an accessible file location. The file will be in .zip format.
- Access the file and unzip it to an accessible location.
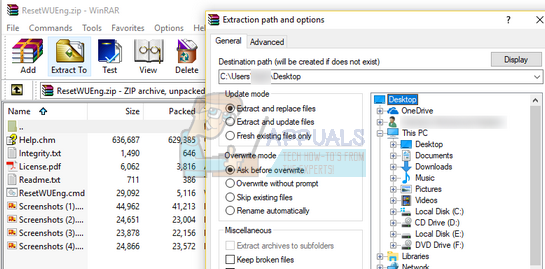
- Once you have unzipped the contents, run the “cmd” file by right-clicking it and selecting Run as administrator.
- After the process has executed, restart your computer for the changes to take place and check if the problem has been solved.
Solution 11: Resetting Windows Update using a batch file
We can try resetting the Windows Update using a batch file which contains all the instructions. It is similar to the application we used in solution 10. However, if solution 10 didn’t work for you, you try your luck with this one.
- Download the batch file and save it in an accessible location.
- Right-click it and select “Run as administrator”.
- After the commands have successfully executed, restart your computer and check if the error message went away.
Solution 12: Restoring your system
If all the above methods don’t work, we can try restoring your system to the last system restore point. Save all your work correctly and back up any important data. Do note that all the changes to your system configurations after the last restore point will be removed.
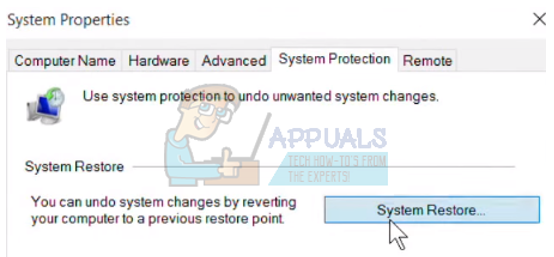
- Press Windows + S to launch the start menu’s search bar. Type “restore” in the dialogue box and select the first program which comes in the result.

- One in the restore settings, press System Restore present at the beginning of the window under the tab of System Protection.
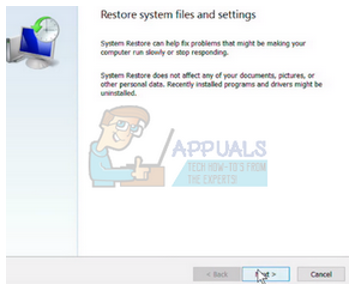
- Now a wizard will open navigating you through all the steps to restore your system. Press Next and proceed with all the further instructions.
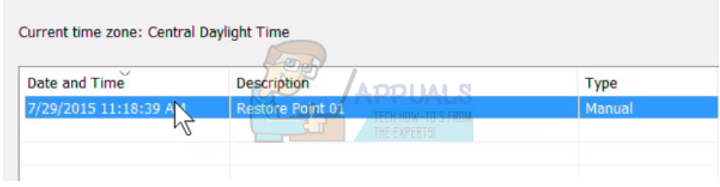
- Now select the restore point from the list of options available. If you have more than one system restore points, they will be listed here.
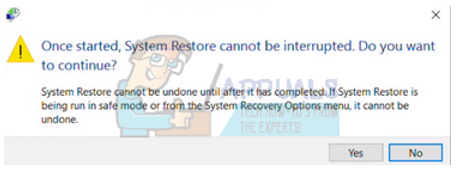
- Now windows will confirm your actions for the last time before it starts the system restore process. Save all your work and backup important files just in case and proceed with the process.
You can learn more about the system restore to gain more knowledge about what it does and what are the processes involved.