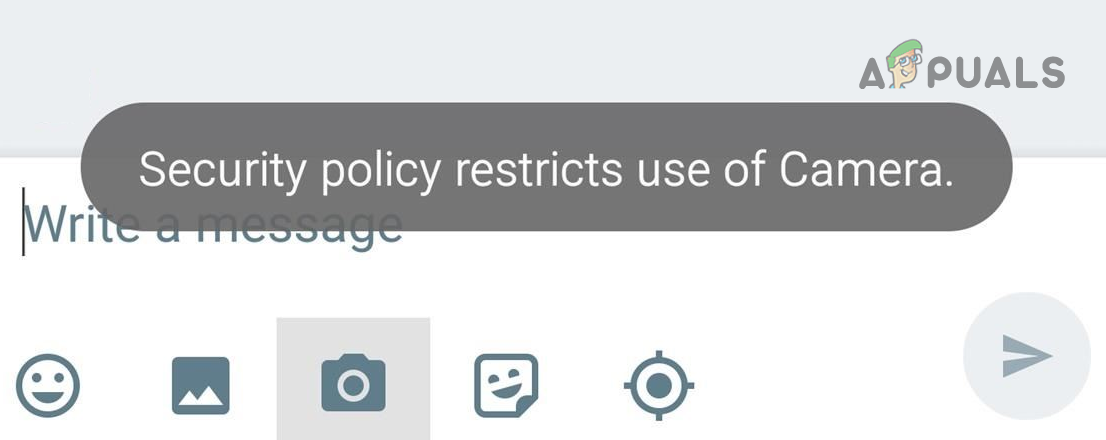
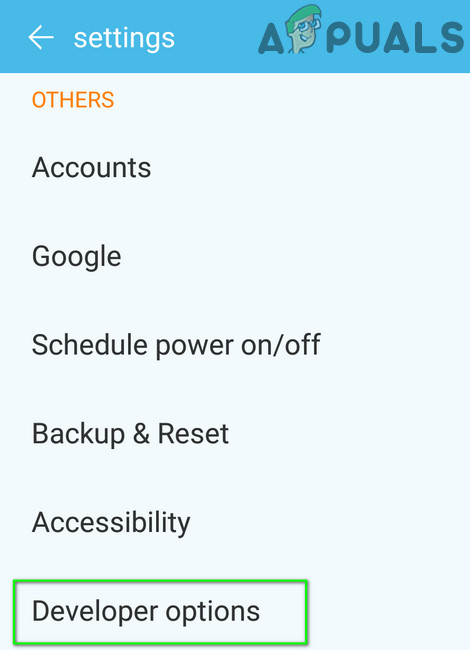
Fix: Security Policy Restricts Use of Camera on Android
Many mobile users start noticing (usually, after an OS update) a security policy that restricts the use of camera messages while launching the camera. The issue is mainly reported on Samsung mobiles.
The camera may show the security policy pop up due to many factors but the following can be marked as the main:
- Corrupt Cache/Data of the Camera or camera-related Apps: If the cache or data of the camera app or apps related to the camera are corrupt, then you may encounter the security policy pop-up.
- Disabled Phone’s Sensors: If the phone’s sensors are disabled, then the phone might show the security policy warning as the camera is also a sensor.
- Improper Configuration of the Camera or Phone’s Settings: If the camera’s settings or phone’s settings are misconfigured, then it may cause the camera issue at hand.
- Interference from a 3rd Party App: If a 3rd party app (like Microsoft Authenticator app) on the phone is interfering with the camera’s operation, then the camera may fail to launch with the security policy pop up.
Restart the Phone Without SIM and SD Card
The camera issue could be a result of a temporary glitch of camera-related phone modules e.g., a corrupt directory on the SD card where the camera is configured to save the images, and restarting the phone without SIM/SD Card may solve the camera problem.
- Power off the phone and remove the SIM/SD card from the phone.
- Now put the phone on charging and let it fully charge.
- Once fully charged, power on the phone (without SIM/SD card) and check if the camera is working fine.
- If not, check if powering off the phone, only re-inserting the SIM (not the SD card), and powering on the phone solves the problem.
Update the OS of the Phone to the Latest Build
Incompatibility between the outdated phone’s OS and other modules may cause the camera security issue at hand. In this context, updating the phone’s OS to the latest build may solve the camera issue.
- Launch the Phone’s Settings and open the System.
- Then open About Phone and select Software Update.
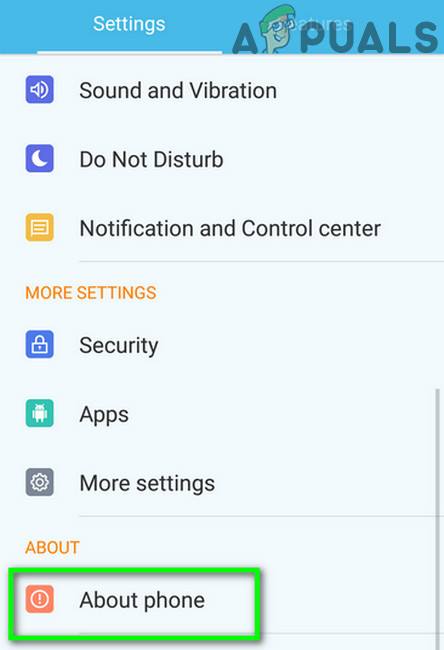
Tap on About Phone in Settings - Now tap on Check for Updates and if an update of the phone’s OS is available, download and install it.

Check for Updates in the Android Settings - Then restart your phone and upon restart, check if the phone is clear of the camera’s security policy problem.
Clear Cache and Data
The camera’s security policy issue could be a result of the corrupt cache and data of the camera app, phone app, or security device, and clearing the same may solve the problem.
Clear the Cache and Data of the Camera & Phone App
- Launch the phone’s Settings and open Applications, Apps, or Application Manager.
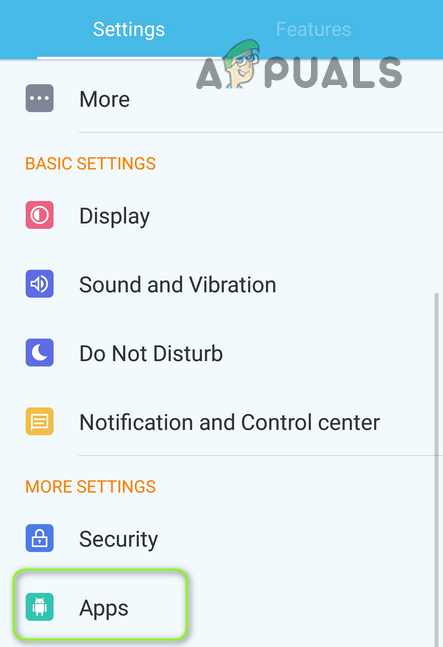
Open Apps in the Android Phone’s Settings - Now scroll down and select the Camera app.
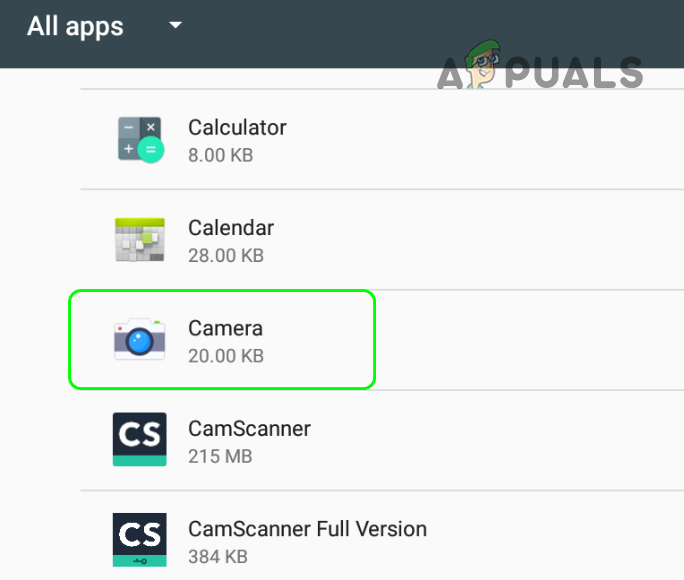
Open Camera in Android Apps - Then tap on the Force Stop button to force stop the Camera and afterward, confirm to stop the camera app.
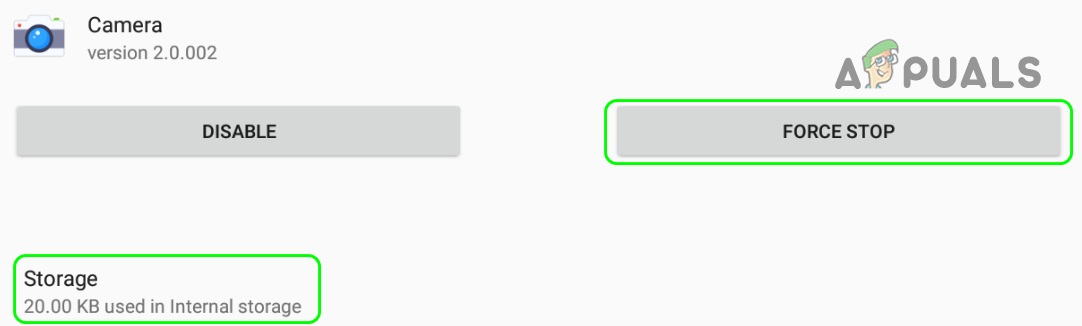
Force Stop the Camera App and Open its Storage Settings - Now open Storage and tap on the camera’s Clear Cache button.
- Then tap on the Clear Data button of the Camera app and afterward, confirm to clear the camera’s app data.
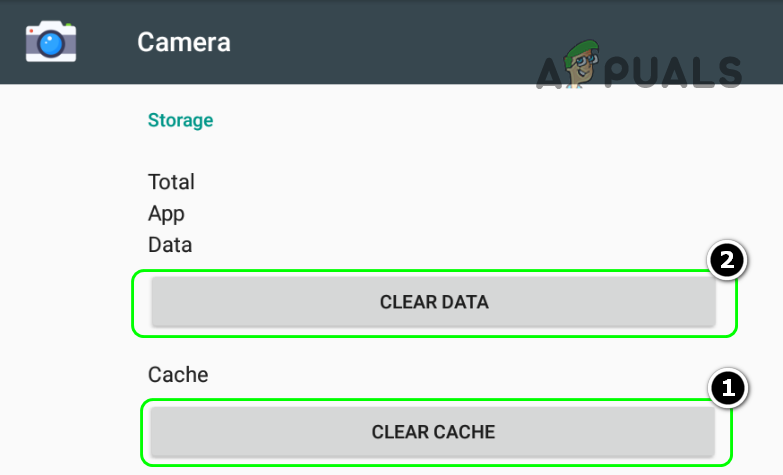
Clear Cache and Data of the Camera App - Then, relaunch the camera app and check if it is clear of the security policy error.
- If that did not work, clear the cache/data of Camera and open Settings > Apps > Camera.
- Now disable the Camera and restart your phone.
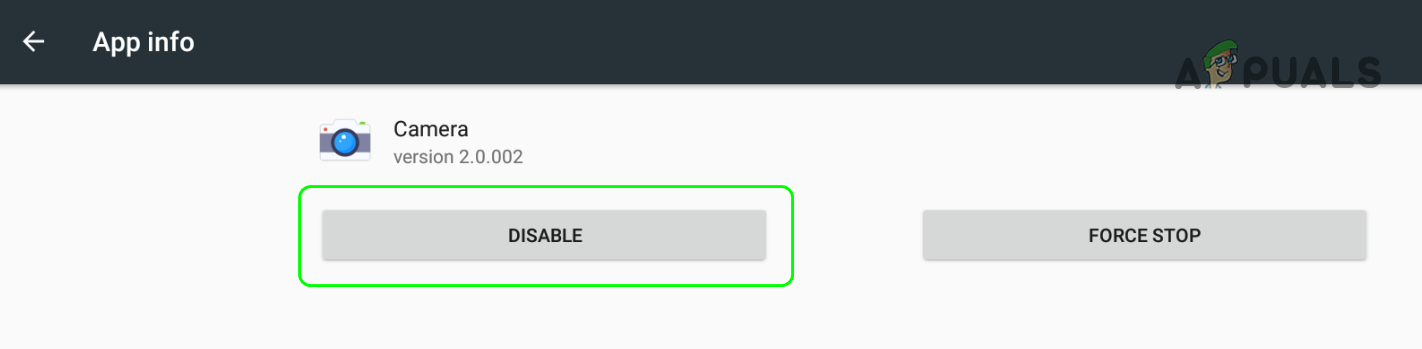
Disable Camera in the Phone’s Settings - Upon restart, enable the Camera and check if the security policy issue is resolved.
- If the issue persists, check if clearing the cache and data of the Phone app solves the problem.
Clear the Cache and Data of the Device Security
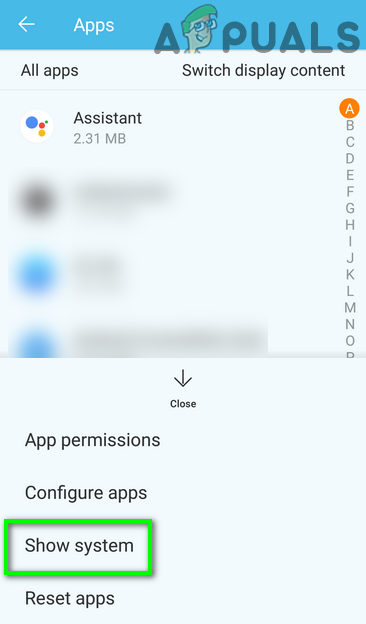
- Open the phone’s Settings and tap on 3 vertical ellipses (near the top right or bottom of the screen).
- Now select Show System and scroll down till the Device Security is found.
Show System in Apps Settings - Then, open Device Security and open its Storage.

Open Device Security in the Phone’s System Apps - Now tap on the Clear Cache button of the Device Security and then tap on Clear Data.
- Now confirm to clear the data of the Device Security and afterward, check if the camera is working fine.
Disable the Camera App in the Secure Wi-Fi Feature
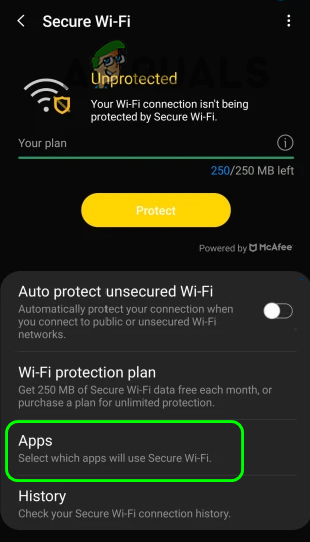
Secure Wi-Fi lets you filter out the unsecured traffic on an unsecured network and if the Camera app or any of the camera-related apps (like Snapbridge) is configured to use the secure Wi-Fi feature, then the camera might fail to launch with a security policy pop-up. In this context, disabling the Camera app in the Secure Wi-Fi feature may solve the problem.
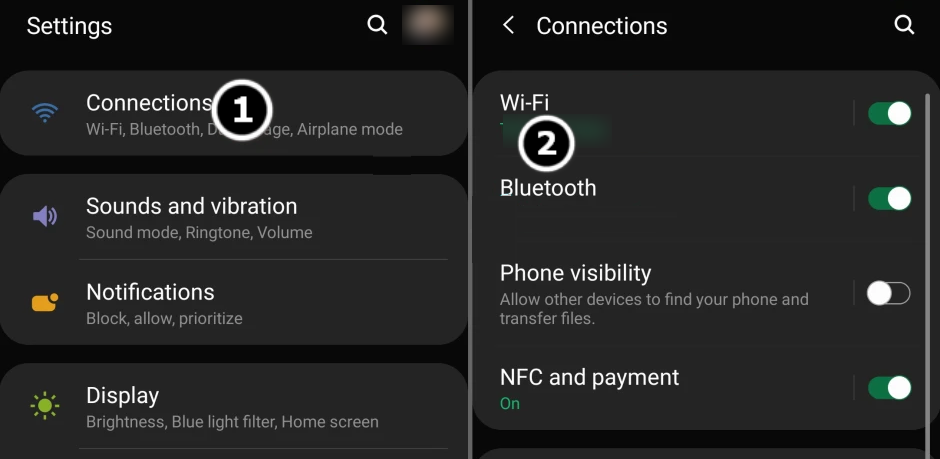
- Launch the phone’s Settings and open Connections.
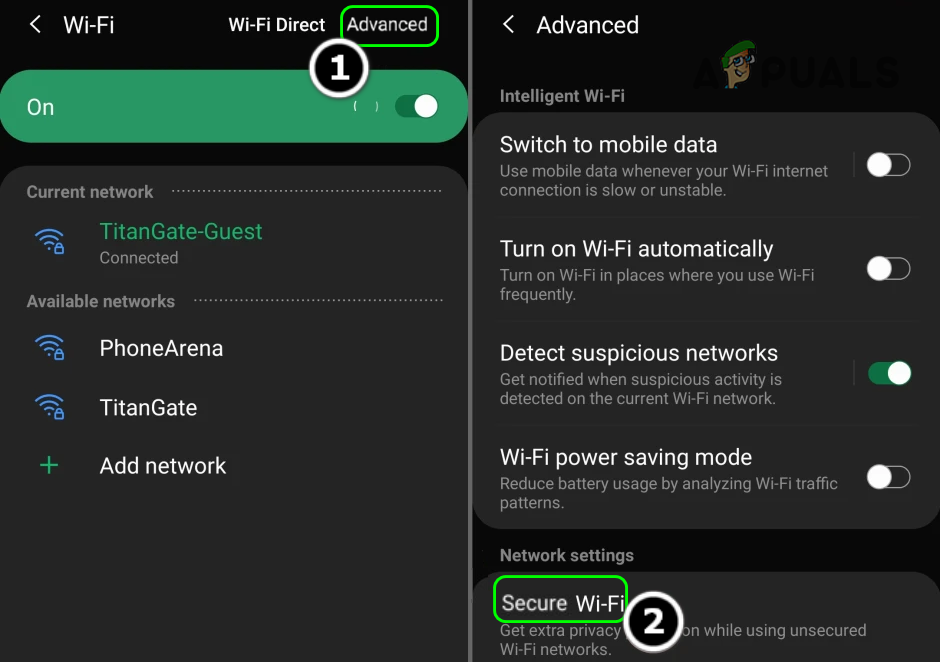
- Now select the Wi-Fi connection and tap on Advanced.
Open WiFi Settings in the Connections Menu - Now open Secure Wi-Fi and select Apps.
Open Secure Wi-Fi in the Advanced Settings of Wi-Fi - Then uncheck the Camera or Camera-related apps and then restart your phone.
Open Apps in the Secure Wi-Fi Settings - Upon restart, check if the Camera is clear of the security policy error.
Enable or Disable the Phone’s Sensors
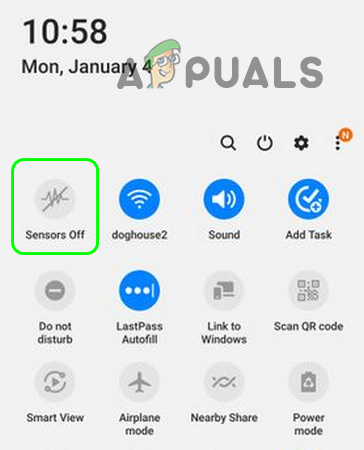
The camera might show the security policy issue if the phone’s sensors are not properly configured e.g. if the sensors are disabled in the phone’s developer options, then the camera might not work as the phone “thinks” the camera as a sensor.
- Swipe down (or up) on the phone’s screen to open the Quick Settings menu and check if the Sensors Off option is shown.
- If so, check if disabling or enabling Sensors Off solves the Camera problem. For some phone models, a user might have to rearrange the button order of the Quick Settings menu to enable viewing of Sensors Off.
Disable Sensors Off in the Phone’s Quick Settings Menu - If the sensors option is not shown in the Quick Settings menu, enable the developer options on the phone and launch the phone’s Settings.
- Now select Developer Options and open Quick Settings Developer Tiles.
Open Developer Options - Then enable the Sensors Off option and restart your phone.
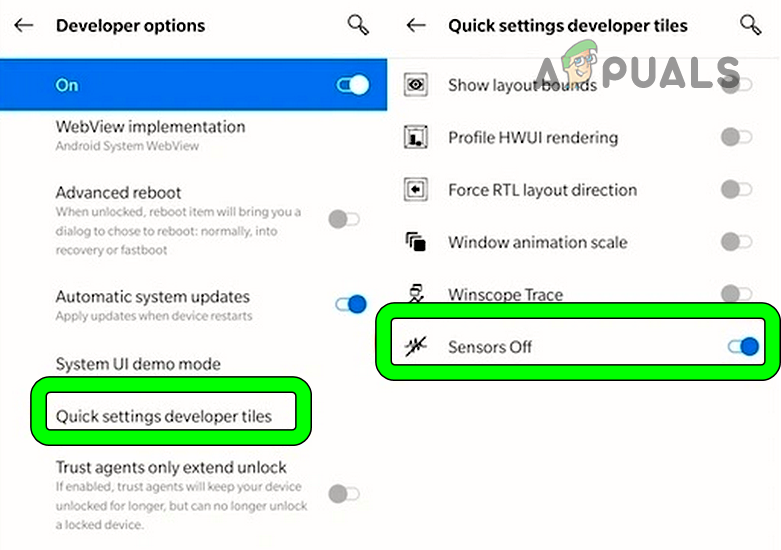
Enable Sensors Off in the Quick Settings Developer Tiles of Developer Options - Upon restart, check if disabling or enabling Sensors Off (repeat, steps 1 and 2) solves the problem.
Reset Camera Settings to Default
The security policy issue at hand could be a result of a misconfiguration of the camera settings and resetting the same to the factory defaults may solve the problem.
- Launch the Camera application and open its Settings.
- Now, scroll down to the bottom of the menu and tap on Reset Settings.
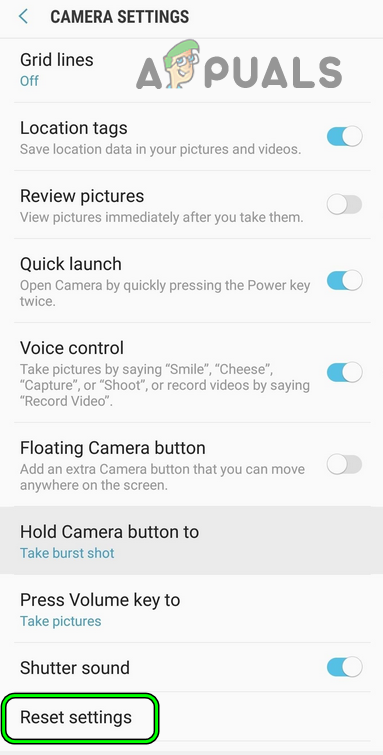
Open Reset Settings of Camera - Then confirm to reset the camera settings and afterward, relaunch the camera to check if the security policy problem is solved.
This method may not be possible for users who even fail to launch the Camera application. In such a case, doing the same through the phone’s settings menu may solve the problem.
Reset the Phone’s Settings to the Defaults
A mere misconfiguration of the phone’s settings may lead to the issue of security policy restricting the use of the camera. In such a case, resetting the phone’s settings to the defaults may solve the problem. Keep in mind you may lose many of the customizations made to the settings.
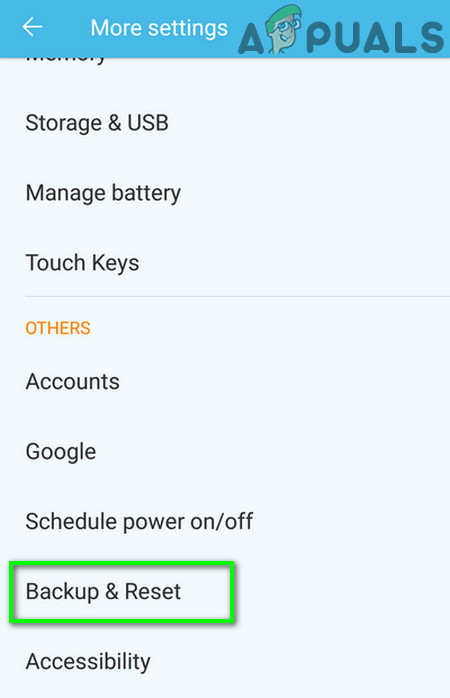
- Launch the phone’s Settings and open Back-Up & Reset.
- Now select Reset Settings and then confirm to Reset Settings.
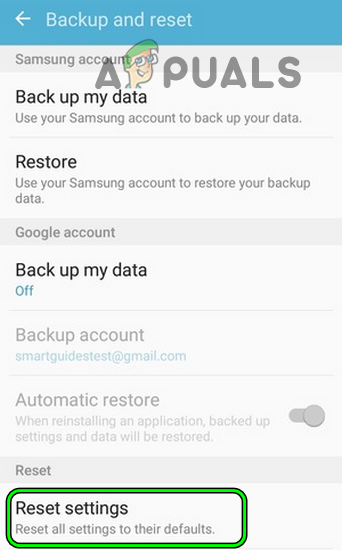
Reset All Phone’s Settings to Defaults - Then tap on Reset to reset the phone’s settings to the defaults and afterward, check if the camera’s security policy issue is resolved.
Test the Phone’s Camera in Safe Mode
The restriction of the camera by a security policy could be a result of a phone’s customization (like a non-stock launcher) that is interfering with the phone’s camera modules. In such a case, testing the phone in safe mode may solve the problem as it reset some of the phone’s customization to the defaults.
- Press/hold the phone’s power button and when the power menu appears, press/hold the power icon till the Safe Mode pop-up is shown.
- Then confirm to restart the phone in the safe mode and once in the Safe Mode (you may notice Safe Mode written on a corner of the phone’s screen), check if the camera is working fine.
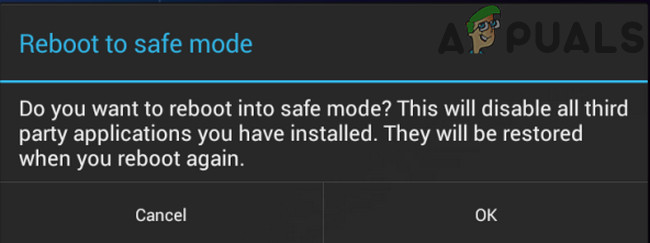
Reboot in Safe Mode - If so, reboot the phone into the normal mode and check if its camera issue is resolved.
- If not, swipe down (or up) on the phone’s screen and check if disabling or enabling the Sensors Off (as discussed earlier) option solves the problem.
- If not, then try to identify and uninstall the app causing the issue (problematic apps are discussed later in the article).
Uninstall the Conflicting 3rd Party App
The camera might show the restricted policy issue if a 3rd party app is restricting a user’s access to the phone’s camera. In this scenario, you can fix the security policy that restricts the use of a camera by uninstalling the conflicting 3rd party apps.
- Launch the phone’s Settings and open Biometrics and Security.
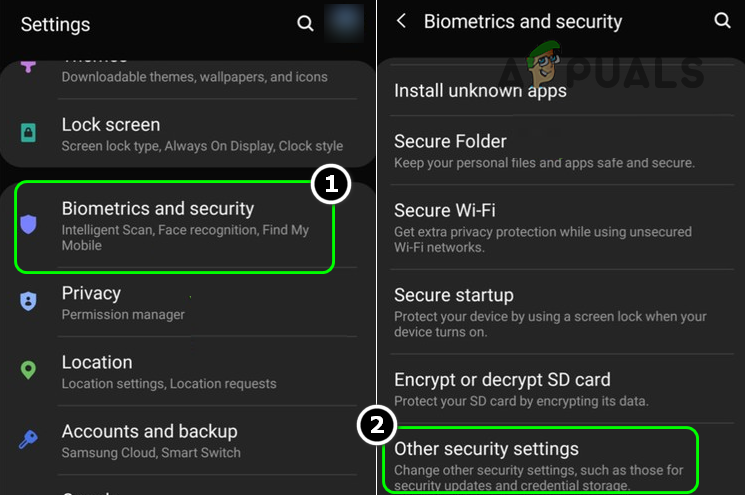
Open Other Security Settings in Biometrics & Security - Then select Other Security Settings and open Device Admin Apps.
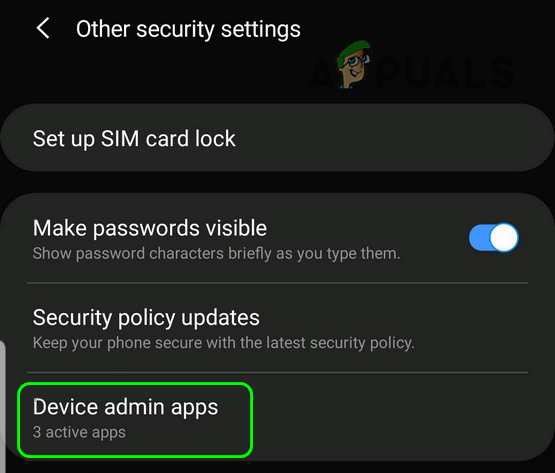
Open Device Admin Apps in Phone’s Security Settings - Now check if any of these apps is causing the issue. The following are reported by users to cause the Camera security issue:
Microsoft Authenticator app

Nikon Snapbridge app

Camera Guide

Check the Device Admin Apps - If any of these apps are present on the phone, check if unlinking or relinking the camera in the app’s settings solves the problem.
- If not, check if clearing the cache and data of the problematic app (like Snapbridge) solves the problem.
- If the issue persists, check if uninstalling these apps (one by one till the conflicting one is found) solves the problem.
- If that did not trick, check if uninstalling the phone’s apps in the reverse installation order (till the problematic one is found) solves the problem.
If the issue is still there, check if installing another camera app on the phone solves the problem.
Reset Phone to Factory Defaults
If the above did not work, then a user may have been left with no other option but to perform a factory reset of the phone.
- Firstly, create a backup of the phone’s data and applications.
- Now, launch the phone’s Settings and open Backup & Reset.
Tap on Backup and Reset - Then select Factory Data Reset and open on Reset Device.

Open Factory Data Reset in the Phone’s Settings - Now tap on the Erase Everything button and wait till the reset process is complete.
- Once done, hopefully, the phone is clear of the camera security policy issue.
- If the issue persists even after the factory reset, create another Gmail account on a PC (not on the phone) that is not linked to the current email ID.
- Again, perform a factory reset on the phone, and once completed, while setting up the phone, use the newly created Gmail ID to check if the camera issue is resolved. If so, then the previously used Gmail ID is linked to a business, corporate, or G-suite network that restricts the use of a camera onto the phone.
If none of the above did the trick for you, check if the phone is a corporate device. If so, then contact the IT department of the corporate organization to check if the issue can be resolved.
If the device is not a corporate device but was purchased as a used device, then check if it has an application starting with MDM (mobile device management). If so, you may contact the reseller to remove the MDM application. Keep in mind many corporations use MDM applications to control the user’s access to different device features. If an MDM application is present on the phone and the reseller cannot be contacted, then you may root the device (at your own risk) and check if deleting the files in the \efs\security directory (you may use Root Explorer) solves the problem.


I’m not exactly sure what part of this finally fixed my camera but I was nearly through the whole list when I checked camera again and was amazed it was back! I’ve tried many videos and ways since Sat. Thank you!