How to Fix Schedule 1 Not Launching Issue?
When Schedule 1 won’t launch, Steam may show Failed to launch, the game may close right after “Running”, do nothing when you click Play, or briefly show a black screen then exit.
This usually means the game fails during startup initialization because something it depends on (files, permissions, drivers, or runtimes) is missing, blocked, or conflicting.
Most common causes are corrupted game files, a Steam client glitch, antivirus/security blocking, overlay/monitoring tools interfering at launch, GPU driver issues, or broken/missing Visual C++ or DirectX components.
This often starts after a game update, interrupted download, Windows update, driver change, or an antivirus update.
1. Verify & Repair Game Files (Steam)
If an update or download left files missing or damaged, the game can exit immediately because it cannot load required startup files. Verifying game files makes Steam compare your install to the official version and re-download anything incorrect.
- Open Steam.
- Go to Library.
- Right-click Schedule 1 → Properties.
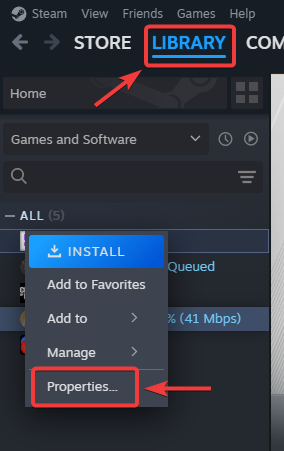
- Open Installed Files.
- Click Verify integrity of game files.

- When it finishes, restart Steam and try again.
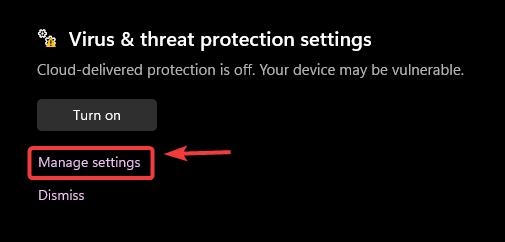
2. Check Windows Security Blocks
Security tools can quarantine game files or block launch behavior. Before disabling protection, check if Windows Security already blocked something and allow it (only if it is clearly from the game/Steam path). Also check your third-party antivirus quarantine/history if you use one.
- Open Windows Security.
- Go to Virus & threat protection.
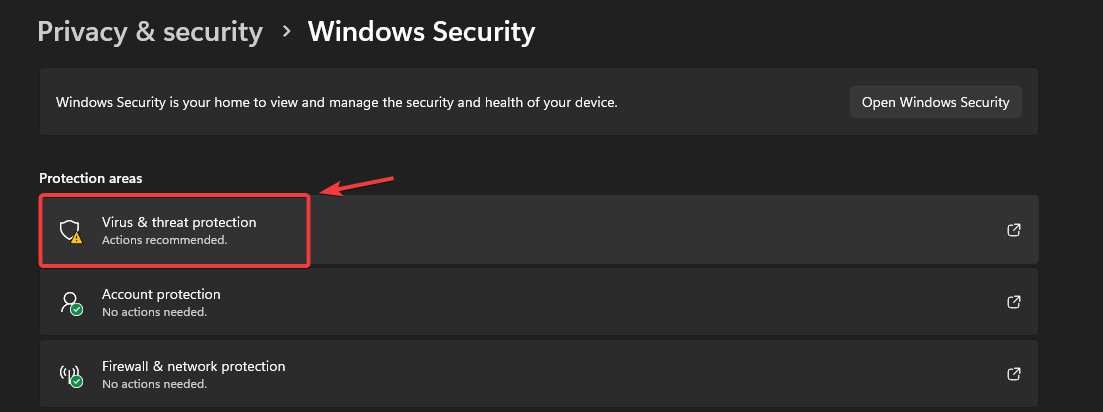
- Open Protection history and look for items related to Steam or the game.
- If you find one from the game install path, choose Allow on device.
- Click Manage settings.
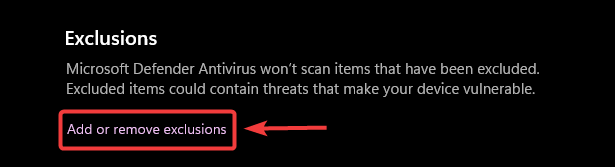
- Under Exclusions → Add or remove exclusions, add:
- Your Steam Library folder
- The Schedule 1 game folder
- Launch the game again.
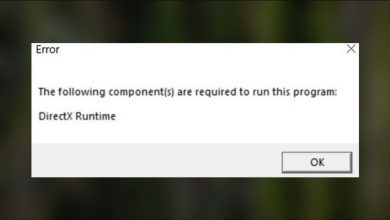
3. Repair/Install DirectX Runtime Components
Some games still use older DirectX components that may not be installed by default. If the game exits silently, installing the included DirectX runtime can restore missing modules.
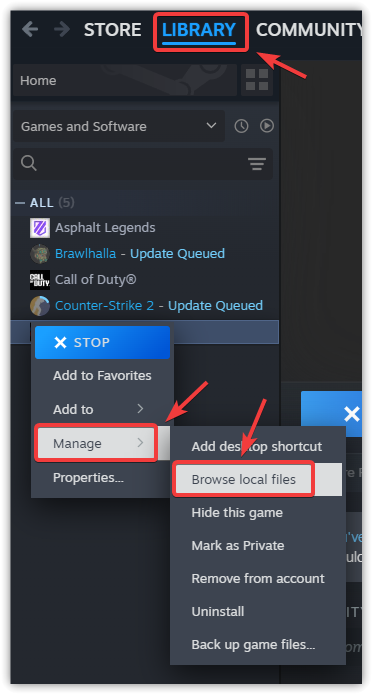
- Steam → right-click Schedule 1 → Manage → Browse local files.
- Look for _CommonRedist → DirectX, then run the DirectX installer inside.
- Restart the PC and try again.
4. Run the Game as Administrator
If the game cannot write files, access folders, or initialize under restricted permissions, admin mode can confirm a permissions issue.
- Steam → right-click Schedule 1 → Manage → Browse local files.
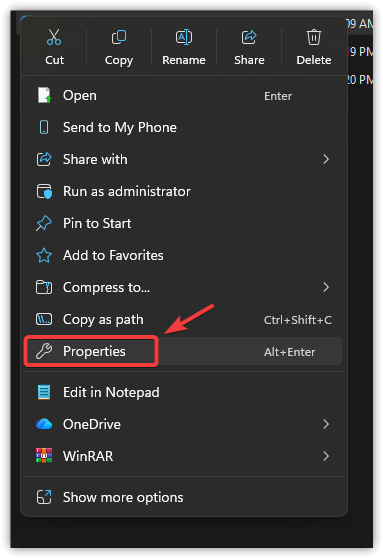
- Right-click the game .exe → Properties → Compatibility.
- Enable Run this program as an administrator → Apply → OK.
- Launch the game.
5. Run Compatibility Mode
This can help on some PCs if a Windows feature conflicts with launch. Use only if earlier steps fail.
- Steam → Manage → Browse local files.
- Right-click the game .exe → Properties.
- Open Compatibility.
- Enable Run this program in compatibility mode and select Windows 8 (try Windows 7 only if Windows 8 fails).
- Click Apply → OK.
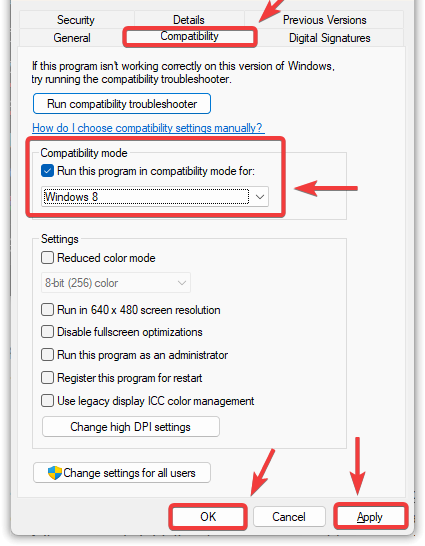
- Launch the game and test.
6. Reinstall Steam (Without Losing Games)
If Steam’s core files are damaged, it may fail to initialize the game correctly. Rebuilding Steam can fix launch issues without deleting installed games, as long as you keep the steamapps folder.
- Close Steam (also end it in Task Manager).
- Open the Steam install folder (usually C:\Program Files (x86)\Steam).
- Delete everything except:
- steamapps (installed games)
- userdata (user data, recommended)
- steam.exe
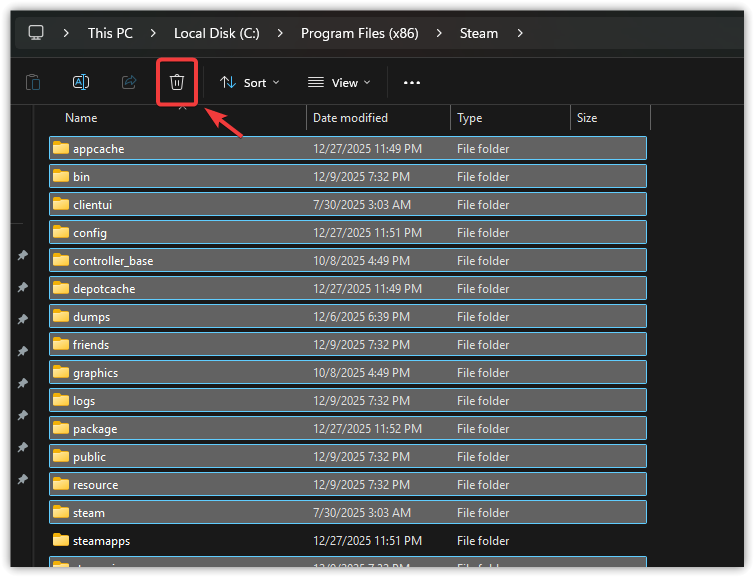
- Run steam.exe to rebuild Steam.
- After Steam updates, verify game files again (Step 1) and test.
7. Reinstall the Game
If the install is too broken to repair, reinstalling replaces all game data with a clean copy.
- Steam → Library → right-click Schedule 1 → Uninstall.

- Restart the PC.
- Install the game again.
- Launch after install to test.