How to Restore your Mac to Previous Date?
You can restore your macOS to a previous working date easily through several applications. The restore can only be done when a backup was conducted successfully by the operating system in the past. When you restore your macOS, any applications installed after the date will be removed.
Prerequisites of Restoring a Mac to a Previous Date
Some pre-requisites must be fulfilled before you can restore your Mac to a previous version:
- Presence of a backup (either auto or manual): If there is no backing-up mechanism on your Mac, then you may fail to restore your Mac to a previous date.
If you are restoring your Mac to recover deleted files but there is no backup, you may recover the deleted files using data recovery software. - Reinstall macOS: Before restoring your Mac from a Time Machine backup, you must reinstall macOS on the Mac.
Select Reinstall macOS in the Mac Recovery - Repair or Replace the Startup Disk: If the Mac is being restored due to issues with the startup disk, then make sure to replace or repair the disk before moving on with the restoring process.
Backup the Mac
To restore your Mac to an earlier date, you need a backup. Moreover, the process of restoring (a full restore or selective restore) mainly depends upon the method used to back up. Many utilities can be used to back up a Mac but Mac’s built-in free tool “Time Machine” is the main dominator in this niche.
Additionally, before restoring the Mac to a previous date, it will be a good idea to create a backup of your Mac in its current state, so that if things do not go to plan, you can revert the Mac to the current backup.
Using Time Machine
You can use Mac’s built-in utility Time Machine to restore the Mac to an earlier date. Every Mac is shipped with this utility. You must use a separate storage device (either an external or network drive) to back up the data using the Time Machine.
This application backs up everything on your Mac. It can create hourly, daily, weekly, or monthly backups. Also, you can use it to create snapshots that can be used upon starting your Mac. To back up your Mac by using Time Machine:
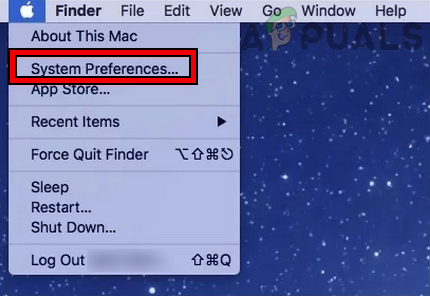
- Expand the Apple menu and open System Preferences.
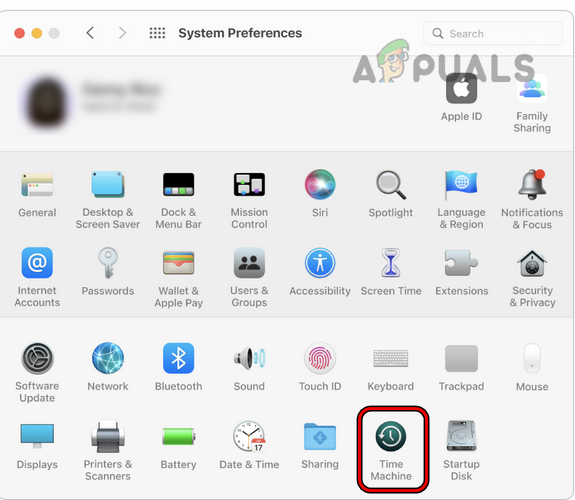
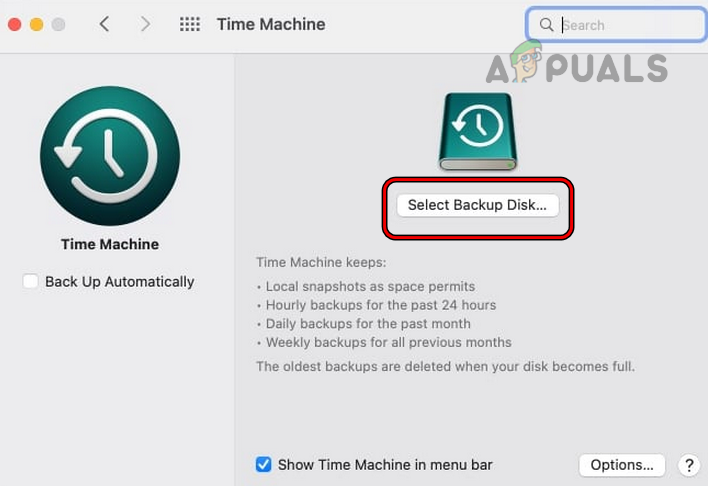
Open System Preferences on Your Mac - Now select Time Machine and click on Select Backup Disks.
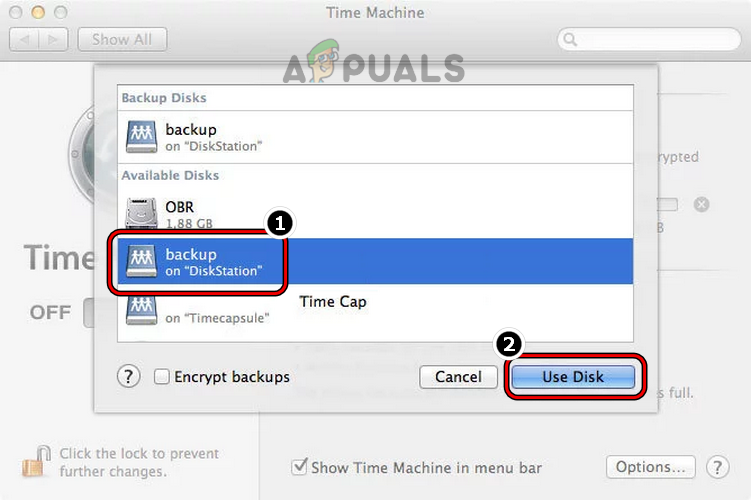
Open Time Machine in Mac’s System Preferences - Then select the disk that you want to hold the Time Machine backup and click Use Disk. Make sure the disk has enough free space available. Another point to remember is that the older backups will be deleted and newer ones will be created if the disk runs out of space.
Click on Select Backup Disk in the Time Machine Menu - Now, checkmark the option of Back Up Automatically (if you are willing to use automatic backups) and then start the backup process.
Select the Disk and Click on Use Disk - Then wait till the process completes. This may take time for the first backup depending upon the data to be backed up but every subsequent backup will not take so much time.
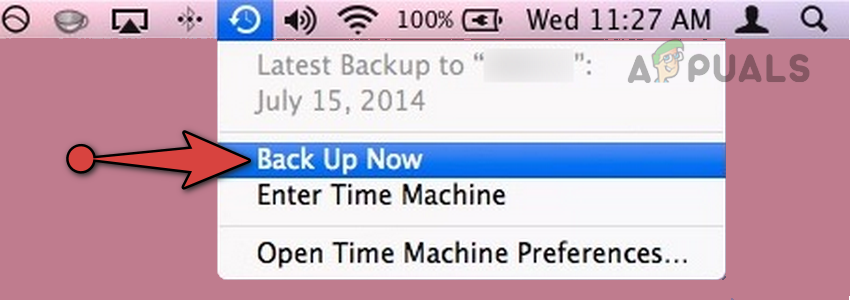
Click on Back Up Now in the Time Machine Menu - Once done, then you are safe and can restore to this backup (even on a new Mac) whenever required.
If you do not want to include some files in your Time Machine backup, you can exclude them in the Time Machine Options.
Restore your Mac to a Previous Date
You can restore your Mac by using the tool that created the backup. There are many tools in this category, but we will go with Time Machine.
Using Time Machine
As mentioned earlier, the Time Machine is a dominant utility in this niche. We will cover the steps to recover the Mac by using the Time Machine. The process is slightly different for M1 Macs and Intel-based Macs.
If you are going to restore through an external disk, do not forget to connect the disk to the Mac. If the data to be backed up is on a network location, make sure the Mac is on the same network as the backup. Also, make sure to Reinstall macOS before moving on with the restore process.
Restore an M1 Mac using Time Machine
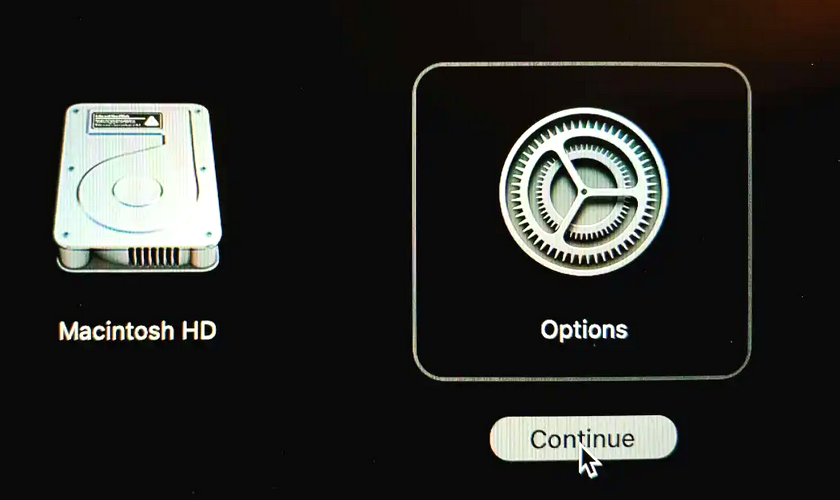
- Power off your Mac and press/hold Mac’s power button till the Loading Startup Options screen is shown.
- Now, under Options, click on Continue and select your user account.
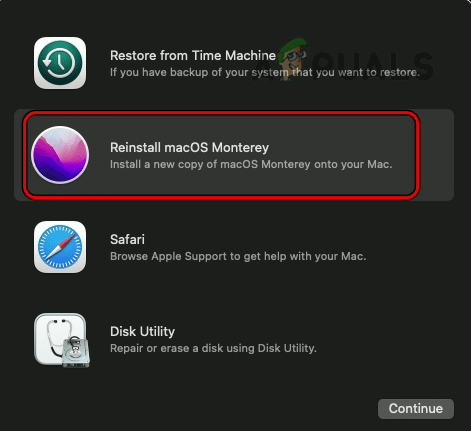
Select Options on the Loading Screen of the M1 Mac - Then enter your account’s password and in the macOS Utilities, click on Restore from Time Machine Backup.
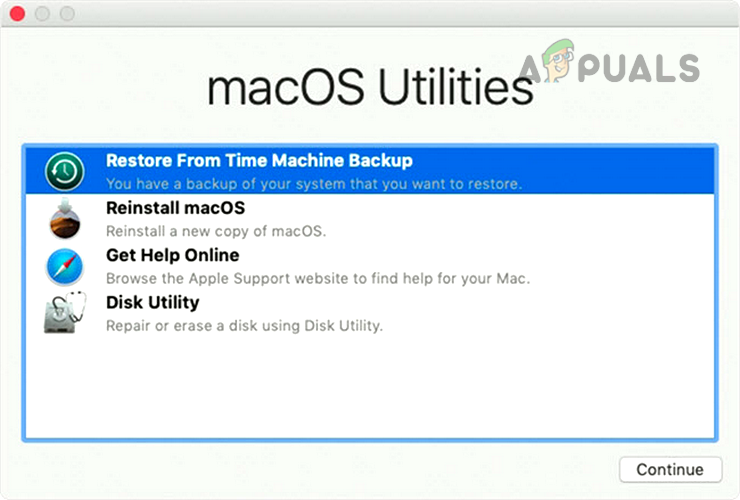
Select Restore from Time Machine Backup - Now select the date you want to restore to and afterward, follow the prompts on your screen to complete the process.
Restore an Intel-Based Mac by Using the Time Machine
- Power off your Mac and then press the power button.
- Now immediately press and hold the Command + R keys of the Mac until the spinning globe is shown on the screen.

Press Command + R Keys on the MacBook - Once the spinning globe is shown, release the keys and when asked to, type in your username/password.
- Now click on the Restore from Time Machine Backup option and afterward, select the date/time where you want to restore the Mac.
- Then follow the prompts on your screen to complete the process.
Restore a Time Machine Backup to a New Mac
There can be times when you may want to restore a Time Machine backup to a new Mac. Apple has made it easy to do this. Another interesting fact to remember is that you can restore a backup from an M1 Mac to an Intel one or vice versa but you may see some app crashes.
- Firstly, connect the device containing the Time Machine backup to the Mac where you want to restore the backup.
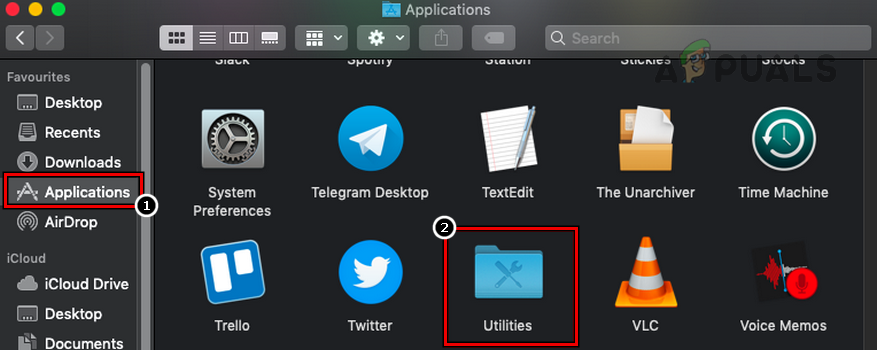
- Now power on the new Mac (if powered off) and head to its Applications folder.
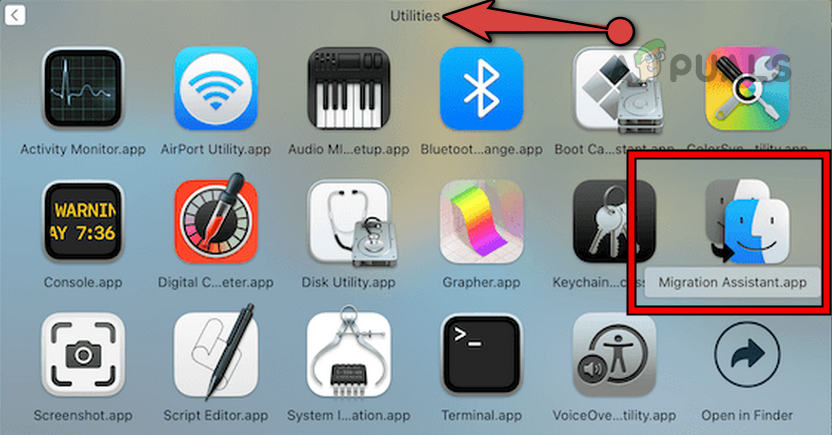
- Then open Utilities and click on Migration Assistant. If asked to, enter the administrative credentials to proceed with the process.
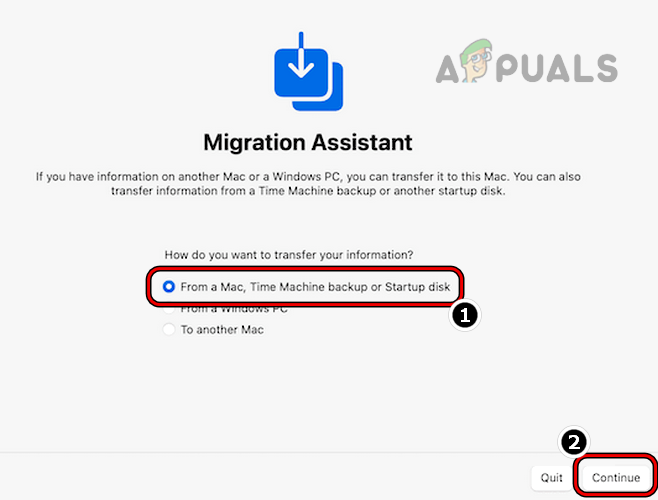
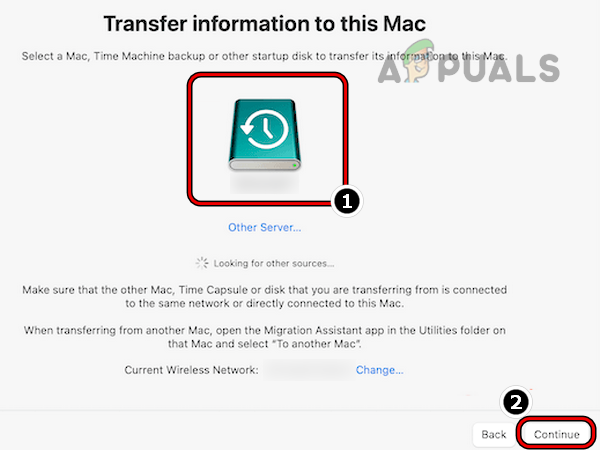
Open Utilities in the Mac’s Applications - Now click on Continue and select From a Mac, Time Machine Backup, or Startup Disk.
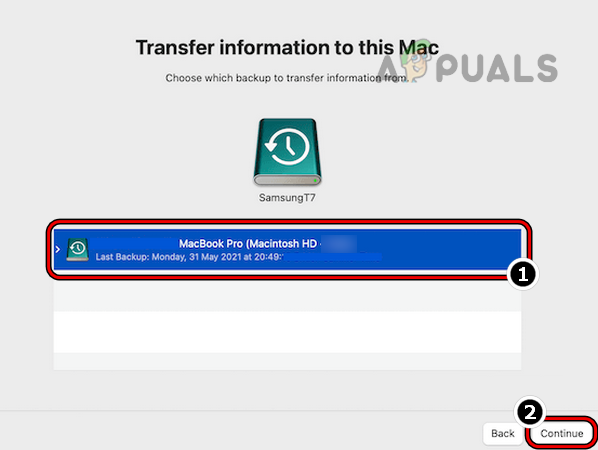
Open Migration Assistant in the Mac’s Utilities - Then select the disk where the Time Machine backup is located and click on Continue.
Select From a Mac, Time Machine Backup, or Startup Disk in Mac’s Migration Assistant - Now select the date and then select items that you want to recover like system settings, user accounts, files/folders, applications, etc.
Select the Disk Holding the Mac’s Backup and Click on Continue - Then wait till the process completes.
Select the Backup Required and Click on Continue - If the backup has the same user name as the current one or any other conflicts, you can resolve these during the restore process.
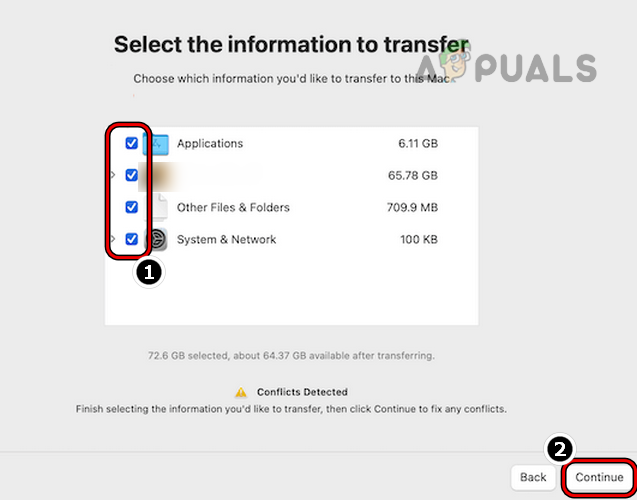
Select the Information to Be Restored by Mac’s Migration Assistant
Restore Through the Local Snapshots or Use a Selective Restore
If you have Time Machine enabled on your Mac but no external drive connected, then the Time Machine creates local snapshots of the Mac over the last 24 hours given that the internal drive has enough storage. If you do not have a backup on an external drive but want to restore the device, then you can use the last 24-hours snapshot. To do so:
- Click on the Time Machine icon and select Enter Time Machine. You need to navigate to the problematic directory (like Documents).
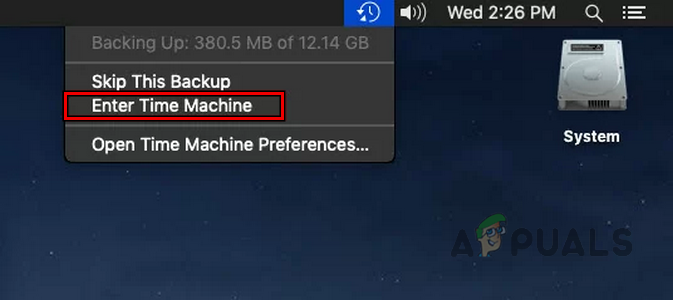
Head to the Folder from Where the Files Were Deleted, Expand the Time Machine App, and Select Enter Time Machine - Now, on the right side of the right pane, use arrows to navigate through different snapshots. You may need to select Mac’s internal drive. You can also select only the required items to be restored (selective restore).
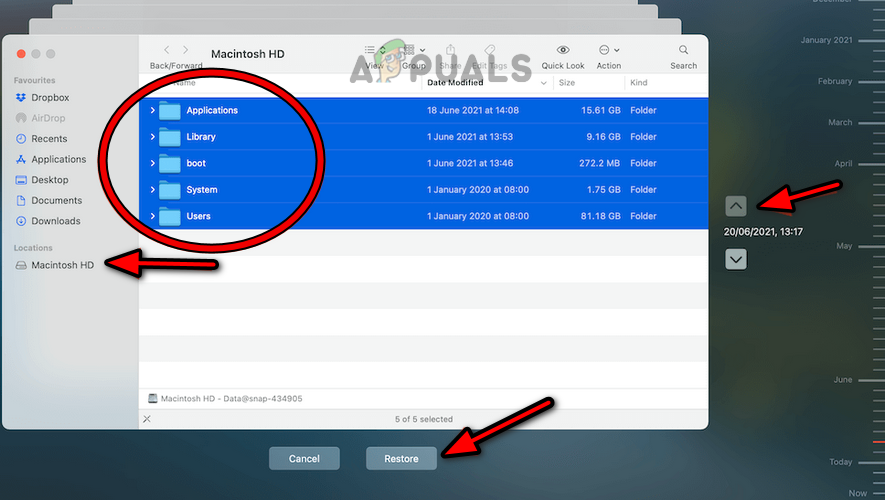
Use Local Snapshot to the Time Machine to Restore the Mac to a Previous Date - Once the required snapshot is selected, click on Restore and wait till the process completes.
Restore a Mac Without Time Machine
If you do not want to use the Time Machine or do not have a backup, then you can restore the Mac through another backup tool if a backup was created using that tool. If there was no backup (either Time Machine or 3rd party), then either you can use the iCloud backup .iCloud backups are not system backups, they may contain your data but not the system settings, etc. Either this or, use the data recovery applications (like Disk Drill) to restore the deleted data.
Expectations After the Restore
Once your Mac is restored, you will have the same system as on that particular date but there may be some exceptions like cloud services logins like iCloud, Google Drive, Mac App Store, etc. You may need to re-log into these cloud services. If the backup was encrypted, you may need to enter your encryption password to use the restored system. If the restored Mac does not work as per your expectation, you can restore to the most recent backup created before starting the restore process.
So, that is it, dear readers. Have any queries or suggestions? You are welcome in the comments section.


