How to Remove Defaultuser0 Password on Windows?
The Defaultuser0 account is a temporary Windows 10 profile used to complete the Windows installation. This profile is usually deleted when the first user profile is created after a successful Windows installation.
If due to any reason, this profile could not be deleted and the user was not able to create his profile after the Windows installation (e.g. due to sudden power failure), then he may be shown a defauluser0 profile on the next system launch. This profile is a Windows-based profile and not for the use of PC users.

Also, this account does not have any associated password with it and no password can be used to log into the system, thus the user gets locked out of the system if he sees this as the only profile after either updating or installing Windows.
How to Remove Defaultuser0 Profile and get Access to a Profile?
The defaultuser0 password issue is usually caused by an unfinished Windows setup due to an unexpected system shut down during the process. This can occur after the new installation of the OS, during resetting of the PC, or updating it.
Use the Boot Menu Key to Re-Initiate the Installation Setup
Defaultuser0 password is created when the Windows installation is not finalized and using the boot menu key (like F2 or F12 on an Asus machine) may trigger the completion of the pending installation, thus solve the problem.
- Firstly, power off your machine.
- Now power on the machine and immediately start pressing the boot menu key like F2 or F12 key on an Acer machine.
- Then check if the first-time startup menu is shown where a user creates his login ID.
- If so, then use that to complete your login set up, and afterward, check if the defaultuser0 issue is resolved.
Revert the System to the Previous Build of Windows
If you are seeing the defaultuser0 password issue after a Windows update, then most probably the update could not be properly applied to your system or the update is not compatible with your system. In such a case, reverting to the previous Windows 10 build may solve the problem.
- Hold the left Shift key on the login screen and click on the Power icon in the bottom right of the screen.
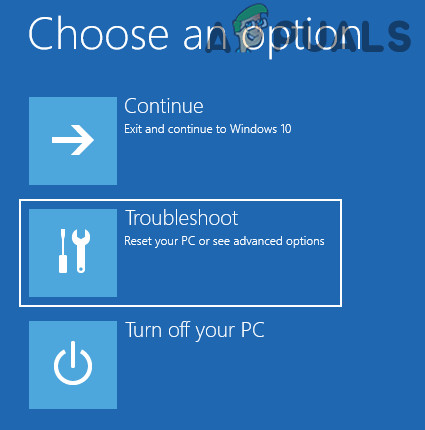
- Now click on Restart and keep holding the Shift key until you reach Windows Recovery Environment. Now choose Troubleshoot.

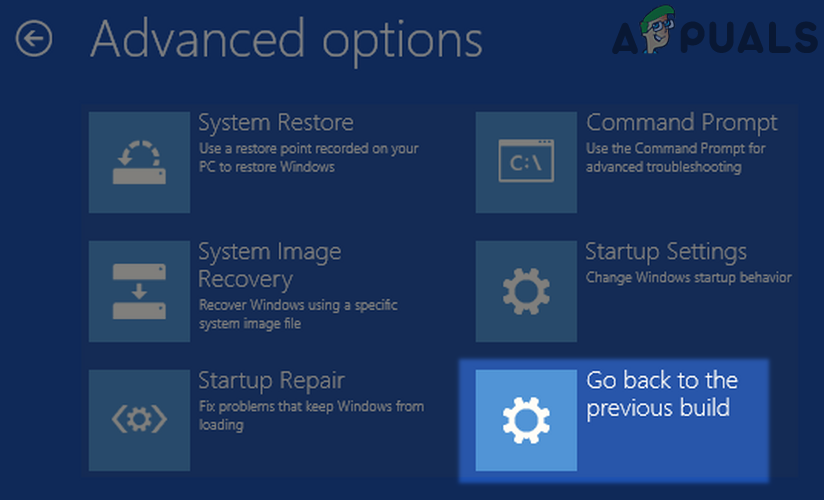
Open Troubleshoot in Advanced Startup Menu - Then open Advanced Options and select Go Back to the Previous Build.

Open Advanced Options in the Startup Menu - Now follow the prompts to complete the revert process and afterward, check if the defaultuser0 password issue is cleared.
Go Back to the Previous Build of Windows 10
Set Password on the Defaultuser0 Account in the Safe Mode of Your System
As the defaultuser0 does not have a password associated with it, setting a password on the said account and using that to log in into the system may solve the problem. But this option will only be available to some of the lucky users.
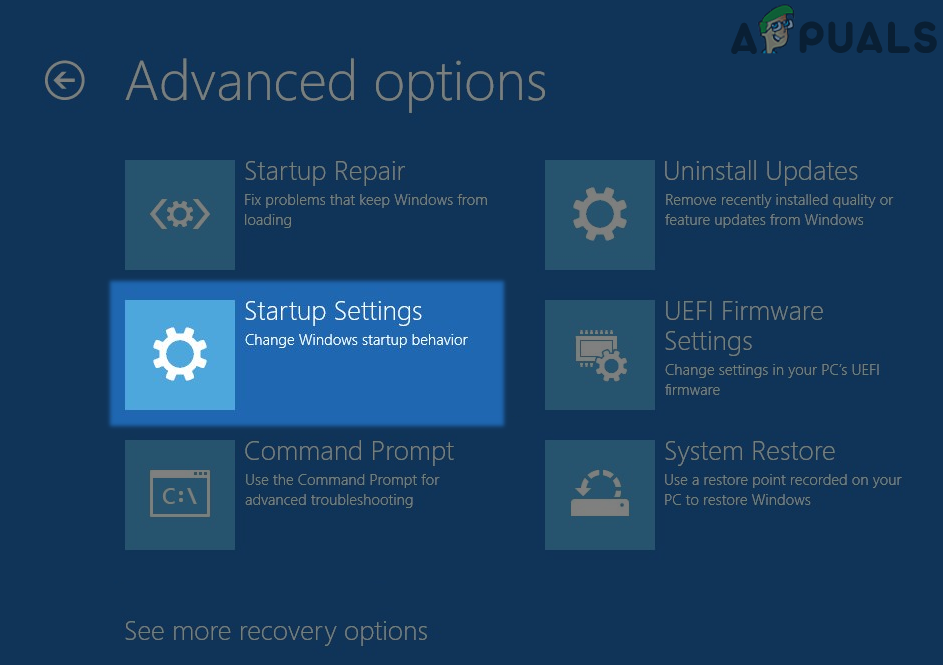
- Boot your system into the Windows Recovery Environment (as discussed above) and navigate to the Troubleshoot > Advanced Options > Startup Settings and click on the Restart button.
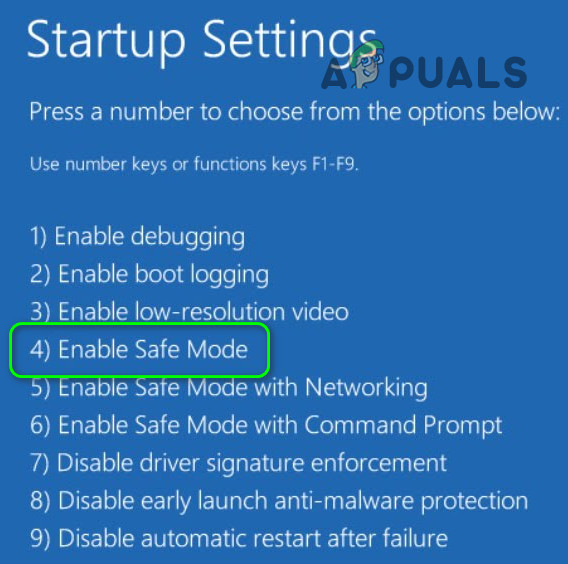
Open Startup Settings in the Advanced Options - Now, in the Startup Settings window, press the 4 key to boot the system into the Safe Mode.
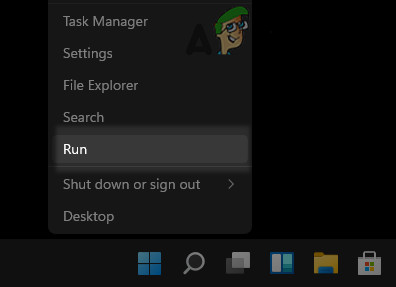
Boot Your System into Safe Mode - Once in the Safe Mode, right-click on Windows and select Run.
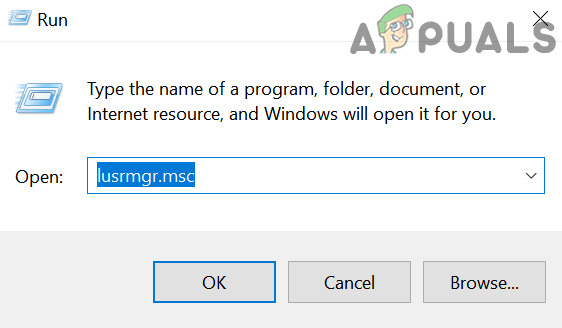
Open the Run Command Box from the Quick Access Menu - Then execute the following in Run:
lusrmgr.msc
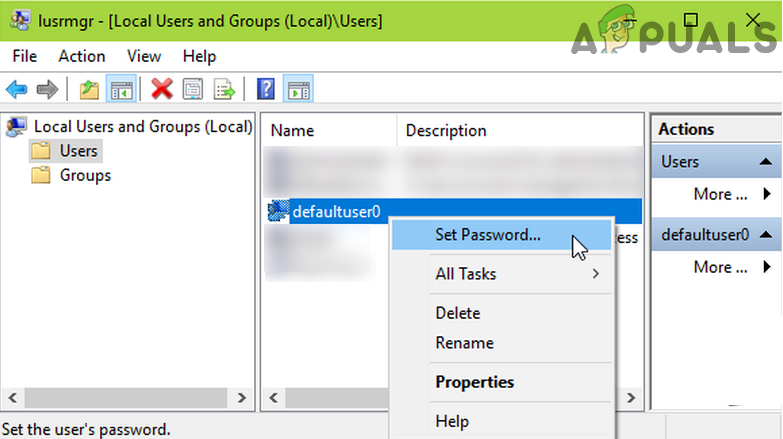
Open Local User & Groups Manager from the Run Box - Now, in the left pane of the Local Users and Groups window, head to the Users folder, and afterward, in the right pane of the window, right-click on the Defaultuser0.
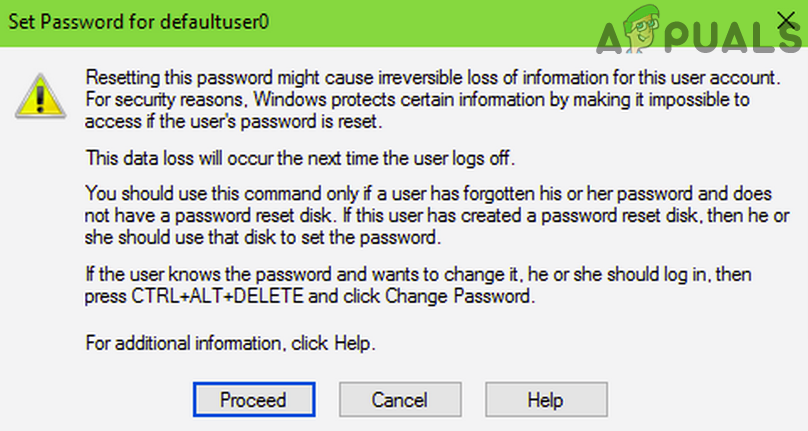
Set Password on the Defaultuser0 Account - Then select Set Password and in the warning box, click on Proceed.
Click on Proceed to Set a Password on the Defauluser0 Profile - Now type in your new password and then confirm the entered password.
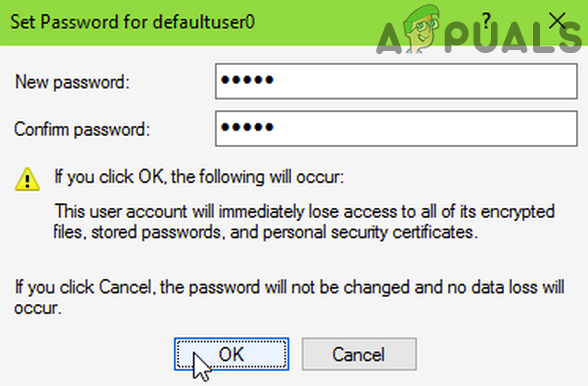
Enter and Confirm a New Password for the Defaultuser0 Profile - Once the password reset confirmation message is received, boot your system into the normal mode and check if you can log in using the newly entered password.
Use the Command Prompt to Enable the Built-in Administrator Account or Remove the Defaultuser0 Profile
As you cannot bypass the login screen of the PC, using the Command Prompt to create another user or activating the built-in administrator account may solve the problem.
Use Safe Mode to Enable the Built-in Administrator Account
- On the login screen of your system, click on the Power icon.
- Now hold the left Shift key and click on Restart while keep holding the Shift key until you see the Windows Recovery Environment.

Hold the Shift Key and Click on Restart - Then select Troubleshoot and open Advanced Options.
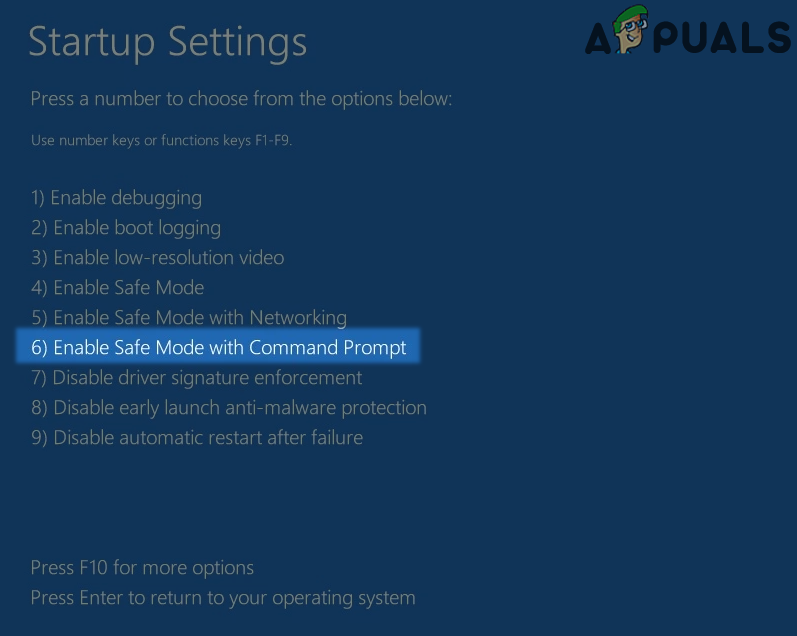
- Now select Startup Settings and click on the Restart button.
- Then the system will reboot and upon reboot, on the screen of Startup Settings, press 6 to start your system in the Safe Mode with Command Prompt.
Boot Your System into the Safe Mode With Networking - Once the Command Prompt window is shown, execute the following two commands one by one:
net user Administrator passwordofyourchoice

net user Administrator /active:yes

Activate Local Administrator from the Command Prompt - Now exit the Command Prompt and boot your system into the normal mode.
- Once on the login screen, log in using your built-in administrator account with the password you chose and check if that resolves the issue.
Remove the Defaultuser0 Profile by Using the Bootable Media
If the safe mode method does not work, then you may use a bootable device media to remove the Defaultuser0 profile.
- Firstly, create a bootable Windows 10 USB on another system or use a Windows 10 DVD.
- Now boot your system through that bootable media.
- Then select the correct keyboard layout and date/ time.
- Now, on the next screen, click on Repair Your Computer in the bottom left corner.
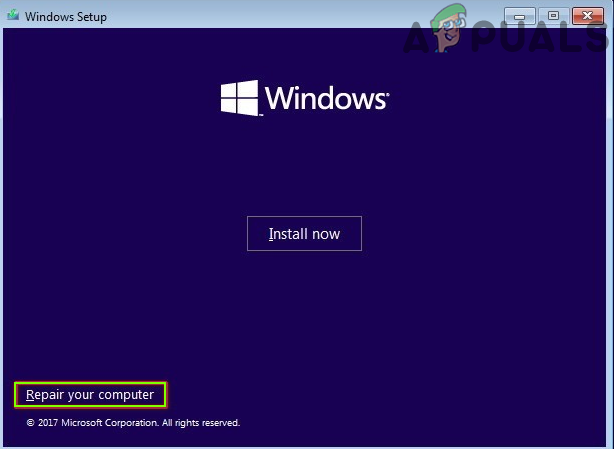
Click on Repair Your Computer - Then select the Troubleshoot option and open Advanced Options.
- Now select Command Prompt and execute the following one by one (where C is your system drive, you may have to find the letter for your system drive):
C:

Dir

CD Users

Ren defaultuser0 dummyuser
- Then exit the Command Prompt and restart your computer.
- Upon restart, boot your system through the internal drive (not the bootable disc or USB), and upon boot, check if the defaultuser0 login issue is resolved.
Use a Bootable Device Media to Enable the Built-in Administrator Account or Create Another Account
If the safe mode method does not work, then you may use a bootable device media to enable the built-in administrator or create another user account.
- Follow steps 1 to 6 of the above method to open the Command Prompt from a Bootable device.
- Then, in the Command Prompt, execute the following:
net user administrator /active:yes
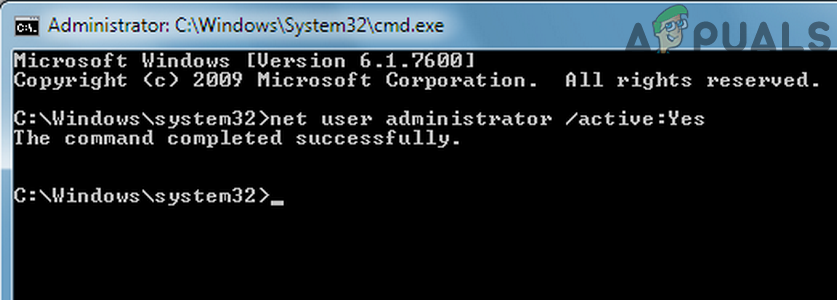
Activate Local Administrator from the Command Prompt - Then exit the Command Prompt and restart your computer.
- Upon restart, boot your system through the internal drive (not the bootable disc or USB), and upon boot, check if you can bypass the defaultuser0 login by logging into the built-in administrator. If so, then you may create another administrator account and disable the built-in administrator. If you want to, you may remove the defaultuser0 profile.
- If you cannot access the Command Prompt at step 2, then boot your system from the bootable media and navigate to the Advanced Options screen.
- Now, without powering off your system or clicking on any button, simply disconnect the bootable media device.
- Then, on the Advanced Options screen, click on Command Prompt and when the Command Prompt shows, reconnect the bootable device and execute the following:
net users (NewUserName) (password: optional) /add
- Now exit the Command Prompt and restart your system
- Upon restart, check if you can log into the system by using the newly created account. If so, then you may remove the defaultuser0 profile.
Rename the Command Prompt as Ease of Access to Show on the Login Screen
If none of the above did the trick for you, then you may use a nifty trick to rename the Command Prompt as Ease of Access (utilman.exe), so that it shows on the login screen and you can use it to set the password on the defaultuser0 account.
- Boot your system through the USB boot media or DVD drive and follow the prompts till you are on the installation screen (where you click Install to start the installation of Windows).

Press Shift+F10 Keys to Open Command Prompt on the Installation Screen of Windows - Now press the Shift + F10 keys to open the Command Prompt and when the Command Prompt window is shown, you may execute the following one by one (where C is the system drive, you may have to find the letter for your system drive):
C:

dir windows\system32

ren utilman.exe utilman1.exe

ren cmd.exe utilman.exe
- Now close the Command Prompt and reboot your system through the internal drive (not the external boot device).
- Upon reboot, when you are at the login screen, click on the Ease of Access icon at the right bottom.
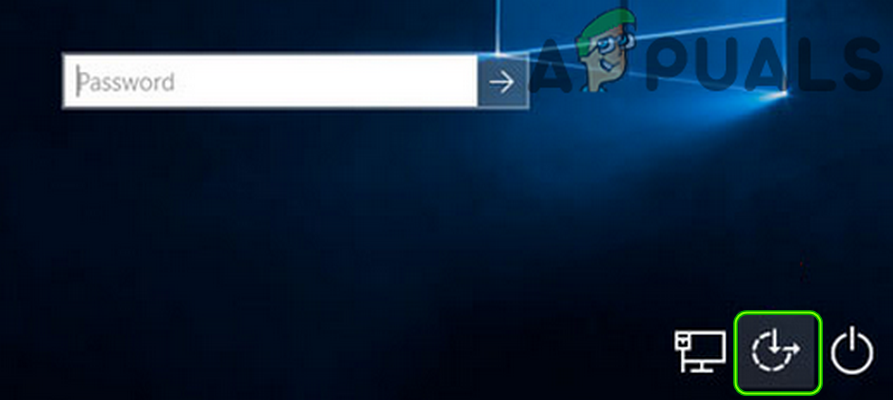
Click on the Ease of Access Button on the Login Screen - Now, when the Command Prompt window is shown, type the following and hit Enter:
net user - Then check how the defaultuser0 is shown there.
- Then type the following with the noted defaultuser0 profile name followed by your password (e.g., password123), do not worry, if your input is not shown on the screen:
net user defaultuser0 password123
- Then verify the password (if asked to) and exit the Command Prompt.
- Now login to the defauluser0 profile with the newly created password and check if the issue is resolved. If so, then you may rename back the utilman.exe and cmd.exe to their originals.
Reset Your PC to the Defaults
As the above-mentioned methods did not work for you, then you may have to reset your PC to the defaults after backing up your data (if essential) to solve the problem.
Use the System’s Windows Recovery Environment
- Firstly, backup your data from the system. You can connect your system’s drive to another system or use a live bootable USB of Ubuntu on the system to back up its data.
- Once the data is backed up, boot up your system into Windows and when you are at the login screen, click on the Power icon.
- Now hold the Shift key and click on Restart.
- Then keep holding the Shift key until the Windows Recovery Environment is shown and select Troubleshoot.
- Now click on Reset This PC and select Remove Everything (make sure you fully clean the drive).
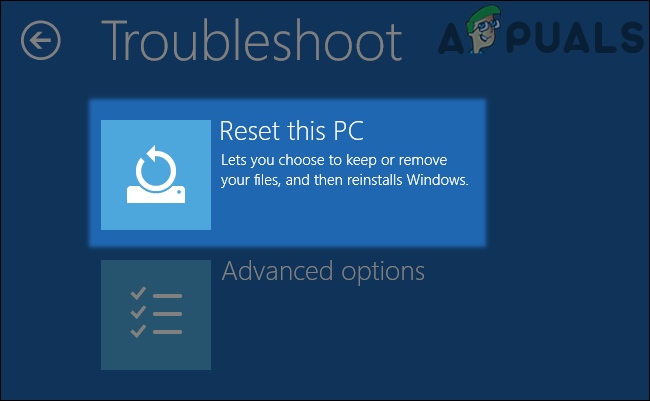
Click on Reset This PC - Then follow the prompts to complete the Reset process and afterward, check if the defaultuser0 password issue is resolved.
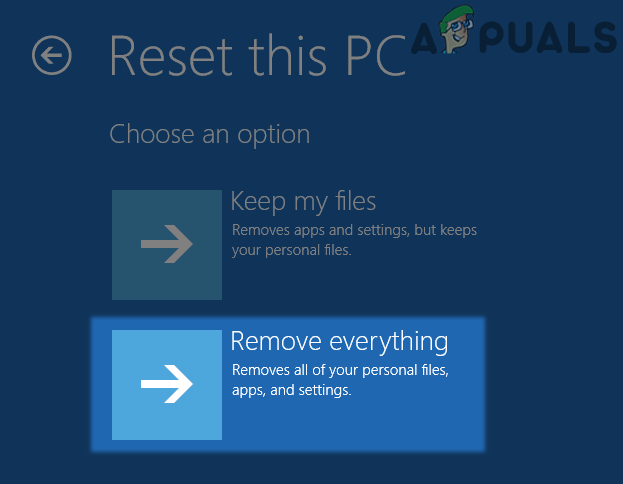
Select Remove Everything on the Reset This PC Screen
Use the Windows Recovery Environment from a Bootable Device
If you cannot use the system’s Recovery Environment, then doing the same from a bootable media may do the trick.
- Boot your system through a bootable device (as discussed in the earlier solutions).
- Now select the correct date, time, and keyboard layout.
- Then, on the next window, select Repair Your Computer (near the bottom left of the screen) and on the next screen, choose Troubleshoot.
- Now select Refresh Your PC or Reset Your PC.
Open Troubleshoot in Advanced Startup Menu - Then follow the prompts to complete the process and afterward, check if the defaultuser0 password issue is resolved.
If none of the above did the trick for you, then you may use a Linux Live USB to reset the password on the defaultuser0 account (how? Internet is your best friend) or perform a clean installation of Windows. But before doing the reinstallation, make sure for the following, otherwise, you may encounter the defaultuser0 issue again:
- If your laptop has a dead battery, please remove it from the laptop before doing the clean installation.
- Make sure that the BIOS of your system is updated to the latest build and then reset it to the factory defaults.
- Check if the time in the BIOS is correct. Also, do not forget to replace the CMOS battery, if the system time and date become incorrect after a system shut down.


