Ready or Not Crashing? Try these methods
Players have been experiencing issues while trying to play the early access of Ready or Not. As it turns out, the game crashes randomly at different spots which ruins the overall gameplay. A game crash can be caused due to a number of reasons which usually include the third party software that is running in the background, the display drivers that are installed on your system or in some cases, any overclocking that you might have done. Regardless of the cause, in this article, we will take you through the process of resolving the issue mentioned in question so just follow through.

As it turns out, Ready or Not is a new game that falls into the realistic genre which has different gamers excited. The game is currently in early access which means it is not complete and there are going to be issues lurking around. As most of you know by now, one of the main advantages of having an early access phase is that it allows the developers to thoroughly test the game and fix any major bugs that might still be present. Like we have mentioned, if your game is crashing, there are multiple factors to it and before we begin, we would like to go through them so that you can establish a better understanding of what’s happening. With that said, let us get into the different causes right away.
Now that we have gone through the possible list of causes of the problem in question, let us get started with the different methods that you can use to circumvent the issue. So, without further ado, let us get right into it.
Run Ready or Not as an Admin
As it turns out, the first thing that you should do when your game keeps on crashing is to run it as an administrator. Running the application with administrative privileges will give it all the permissions that it needs to run in the background successfully without stumbling upon any related problems. This can, in some cases, also help when a third party application may be interfering with the game process due to which it was not able to work properly. To do this, follow the instructions given down below:
- First of all, open up the Steam client on your system.
- After that, make your way to the Steam Library.

Navigating to Steam Library - On the left hand side, right click on Ready or Not and from the drop down menu, choose Manage > Browse local files.

Browsing Game Local Files - This will take you to the installation directory of the game. Locate the .exe executable file and right click on it. From the drop down menu, choose the Run as administrator option provided.
- See if that resolves the issue for you.
Disable Overlays
In game overlays are becoming pretty common these days. Some of the apps that we use on a daily basis come with an in game overlay now, for example Discord and more. These in game overlays, while helpful, can cause some issues with newer games and cause them to crash. In such a scenario, what you will have to do is to disable these overlays and then see if the issue has been resolved. We will be showing you how to do it for Discord here as that’s a widely used app at this point. If you have other apps that have an in game overlay as well, you should disable them too.
- First of all, open up the Discord client on your computer.
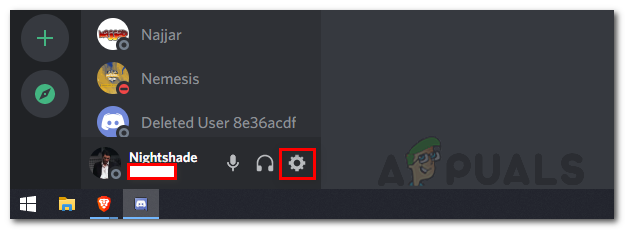
- Next to the username, click on the gear icon provided.

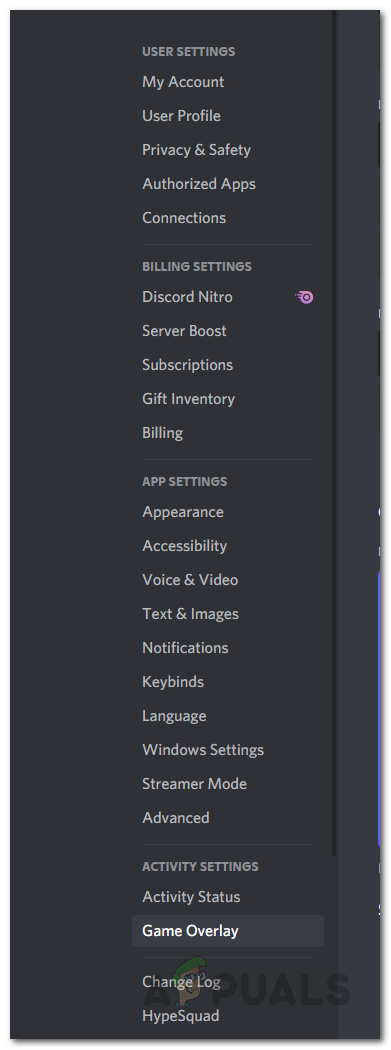
Accessing Discord Settings - On the left hand side, click on the Game Overlay option at the bottom.

Navigating to Game Overlay Tab - Once you are there, click on the Enable in-game overlay slider to turn it off.

Disabling In Game Overlay - Make sure to disable overlays of any other apps that you might use. After doing that, see if your game still crashes.
Verify Integrity of Game Files
Like we have mentioned earlier, one of the reasons that the problem in question may appear is when your game installation is either missing game files or they are damaged. In such a scenario, performing game files verification can help. Doing so will scan your game files and download any missing or corrupted files. To do this, follow the instructions given down below:
- First of all, open up the Steam client and then navigate to the Steam Library.

Navigating to Steam Library - Right click on Ready or Not from the left hand side and then choose Properties.

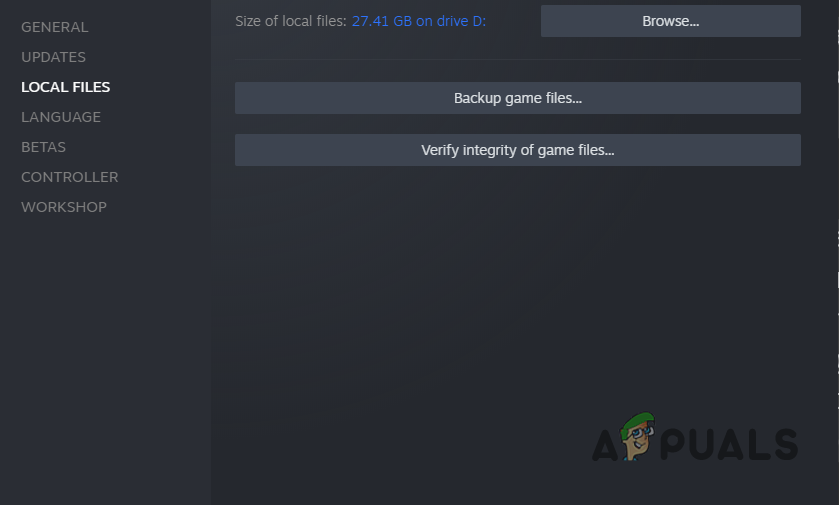
Navigating to Game Properties - On the Properties window, switch to the Local Files tab.
- There, click the Verify integrity of game files option provided.

Verifying Integrity of Game Files - Wait for the verification to complete.
- After that, see if the game is still crashing.
Update Display Drivers
Another reason that your game might be crashing is when the display drivers installed on your system are not up to date. This happens every now and then especially with newer games. Display drivers are important as they are used to communicate with the graphics card that is installed in your system, a component that games use a lot.
If this case is applicable to you, you can resolve the problem by simply updating the display drivers on your system. To do this, follow the instructions that are given down below:
- To start off, open up the Device Manager by searching for it in the Start Menu.

Opening up Device Manager - On the Device Manager window, expand the Display adapters list.

Device Manager - From the list, right click on your display drivers and choose Uninstall device.

Uninstalling Graphics Drivers - After that, head to your graphics card’s manufacturer’s website and download the latest drivers available.
- Install these drivers and then restart your system.
- After your PC boots up, see if the problem is still there.
Remove Overclocking
Overclocking allows users to get more performance out of their hardware such as the CPU and GPU by increasing the boost clock along with many other things. While overclocking can get you better results free of cost, they do have some side effects. One of them being crashes on certain games. This is not something new and many users who overclocked their hardware have encountered this.
In such a scenario, what you will have to do is remove the overclocking from the hardware, especially the GPU and CPU. Once you have done that, see if the game is still crashing for you.
Perform a Clean Boot
Finally, if none of the above workarounds resolve the problem for you, then it is very likely that the issue is being caused, like we have mentioned, by the third party software that might be running in the background. In such a scenario, performing a clean boot is usually helpful as it starts your system with only the required services running. This means that all of the third party apps that are installed on your system are disabled at startup.
If the issue goes away in clean boot, then it is evident that a third party software is the culprit. If this case is applicable, you can find out the app that is causing the issue by enabling the services one by one. To perform a clean boot, follow the instructions that are given down below:
- First of all, press Windows key + R on your keyboard to bring up the Run dialog box.
- In the Run dialog box, type in msconfig and then hit the Enter key.

Opening up System Configuration - On the System Configuration window that opens up, switch to the Services tab.
- There, tick the Hide all Microsoft services checkbox.

Hiding all Microsoft Services - Then, follow it up by clicking the Disable all button and then hit the Apply button.

Disabling Third Party Services - After that, switch to the Startup tab and click the Open Task Manager option.

System Configuration Startup - On the Task Manager window, select the apps one by one and hit the Disable button.

Disabling Third Party on Startup - Once you have done that, go ahead and restart your system.
- After your PC boots up, see if the game is still crashing.


