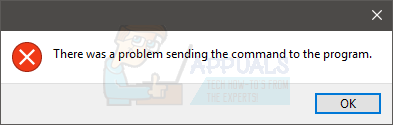
Fix: Problem Sending the Command to the Program
Windows is full of surprises when you encounter error messages such as, “There was a problem sending a command to the program.” This message usually indicates that a window has failed to connect with MS Office Applications (such as Excel, Word, or an Access database, etc.) during the process of sending DDE (Dynamic Data Exchange) commands to these applications. As a result, you are unable to run MS Office Applications.
Sometimes, this error can correct itself, as the error message only pops up once and the applications run on the second or third attempt. However, this does not mean it should be left untreated. Therefore, it needs to be fixed manually, as it may recur.
If you have Microsoft’s Compatibility Viewer, then uninstall it and try to open the Excel file. If it doesn’t work, then repair Microsoft Office from the Programs and Features window, and then check.
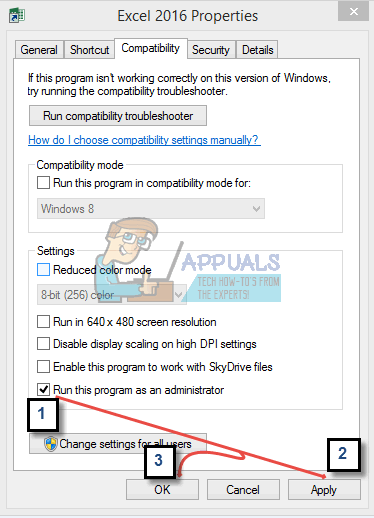
Method 1: Disabling the ‘Run program as administrator’ option.
Select ‘Properties’ by right-clicking on the shortcut to the application that is displaying the error message, then choose the ‘Compatibility’ tab.
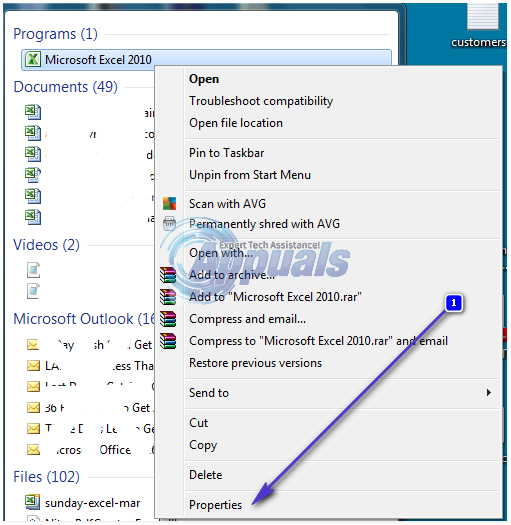
Uncheck the ‘Run program as administrator’ box if it’s checked or enabled.
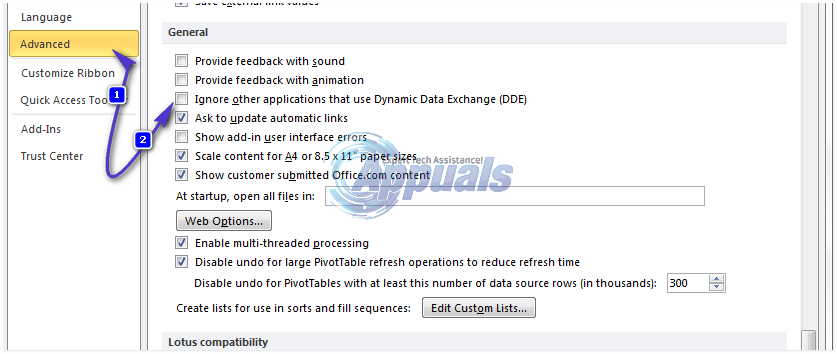
Method 2: Checking the DDE Option in Excel.
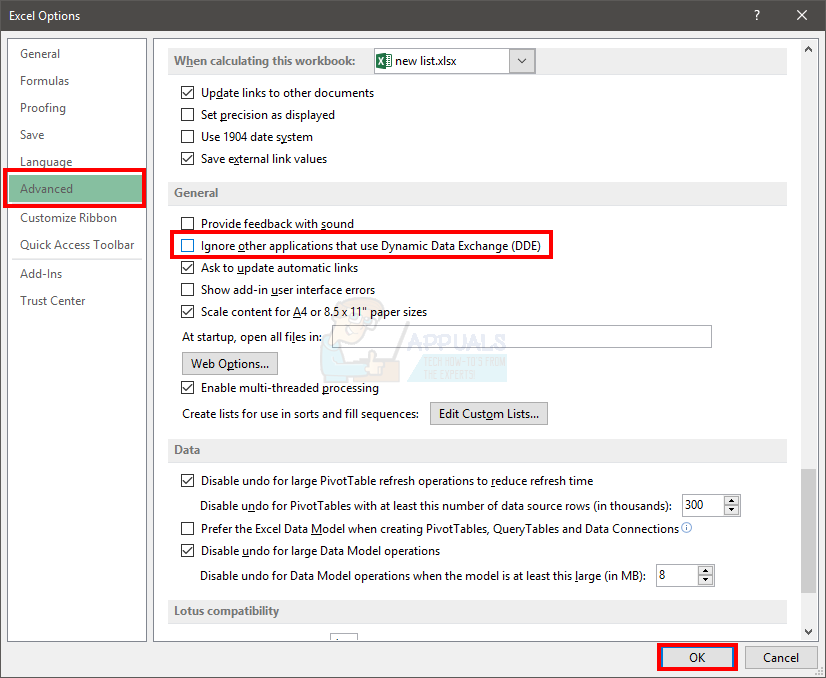
Open MS Office Excel and access the Excel Options box from the Office Menu. You can do this by clicking on the Office icon located in the top left corner of the application, and then selecting ‘Advanced’.
Locate and uncheck or disable the option titled ‘Ignore other applications that use Dynamic Data Exchange (DDE)’ under General Options. After applying these changes, please restart the office application.
If the ‘Ignore other applications that use Dynamic Data Exchange (DDE)’ option is unchecked or disabled, enable the option using the checkbox, then restart the office application. After restart, again uncheck the option and then restart the office application.
Method 3: Change Excel Settings
There are a few settings that you can change to see if it helps. There are a lot of options that you can change but you don’t have to change all of these settings. You can change the settings one-by-one and keep checking if the problem is resolved.
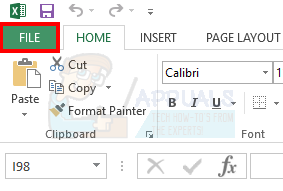
- Open Microsoft Excel,
- Click File

- Please select options.

- Select Advanced from the left pane
- Uncheck the ‘Ignore other applications that use Dynamic Data Exchange (DDE)’ option. This option should be under ‘General’.
- Click ‘Ok’ and check if the problem still persists. If so, continue.
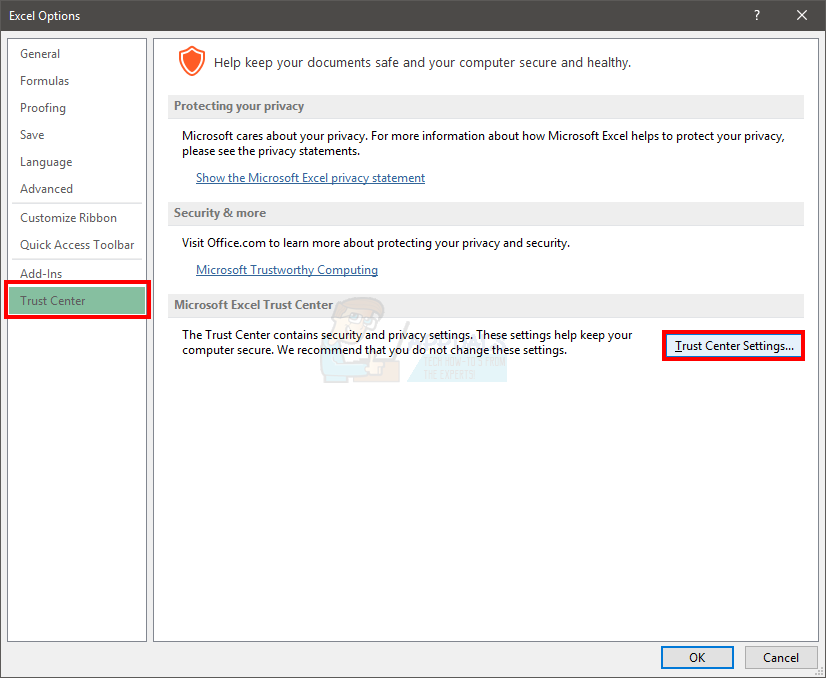
- Select Trust Center
- Please click on ‘Trust Center Settings.‘
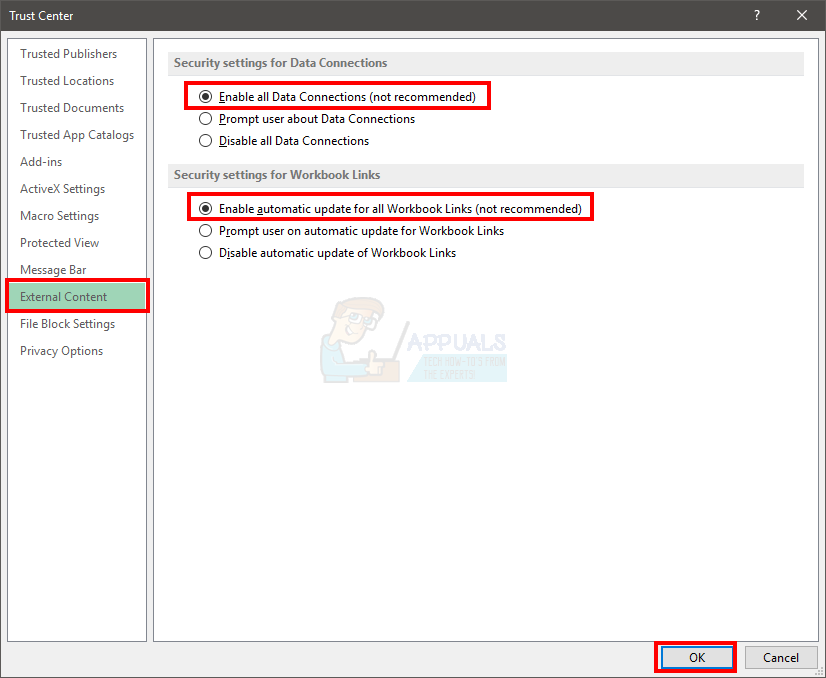
- Select External Content.
- Enable both Security settings for Data Connections and Security settings for Workbook Links.
- Click OK and check if the problem is solved. If not, then continue
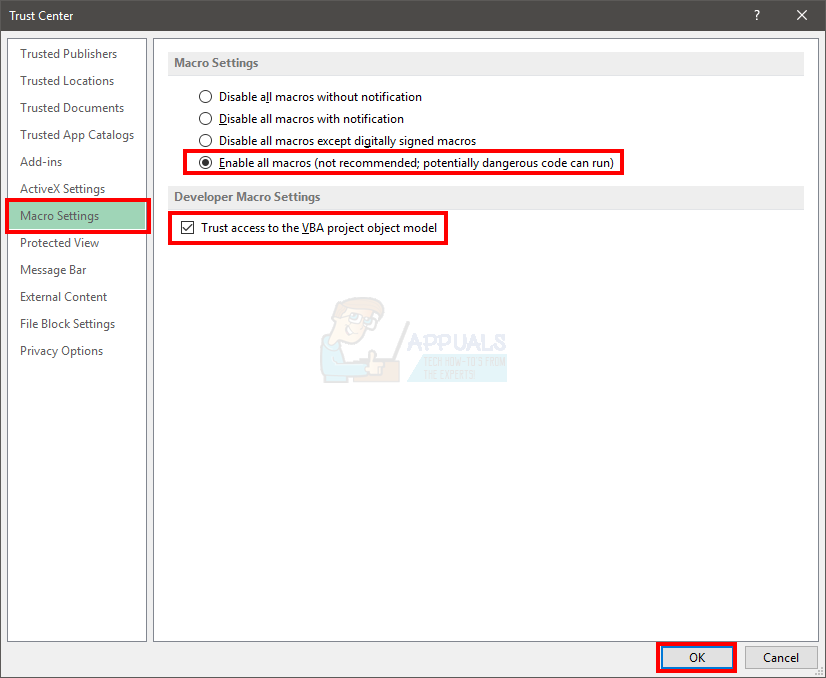
- Select Trust Center
- Please click on the ‘Trust Center Settings’
- Select Macro Settings
- Select the option Enable all macros (not recommended; potentially dangerous code can run)
- Please check the ‘Trust Access to the VBA Project Object Model’ option.
- Click ‘Ok’ and check to see if the problem is resolved. If not, then continue.
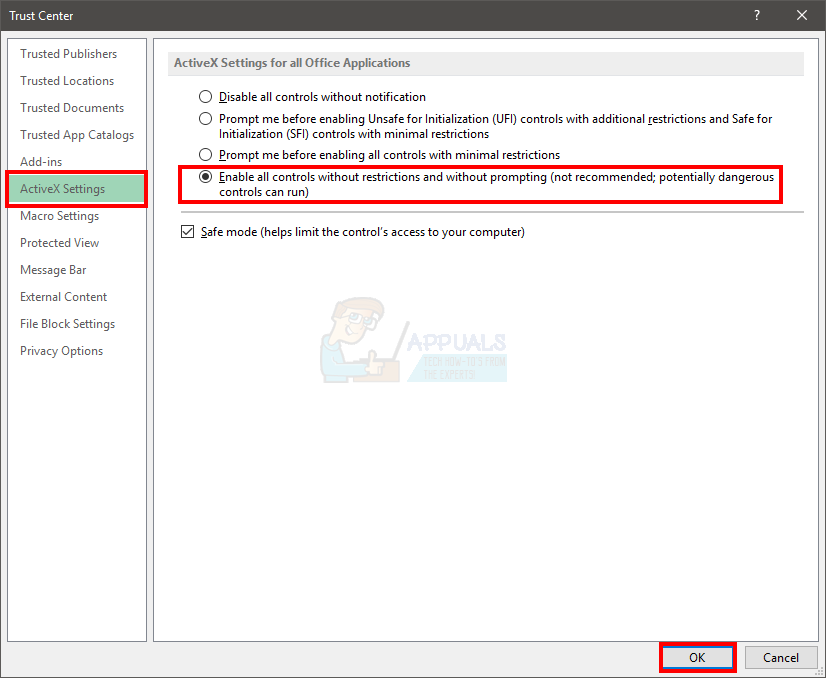
- Select Trust Center
- Click Trust Center Settings
- Select ActiveX Settings,
- Select the option ‘Enable all controls without restrictions and without prompting’. (Not recommended; potentially dangerous code can run)
- Click ‘OK’ and verify whether the problem is resolved. If it is not, please continue.
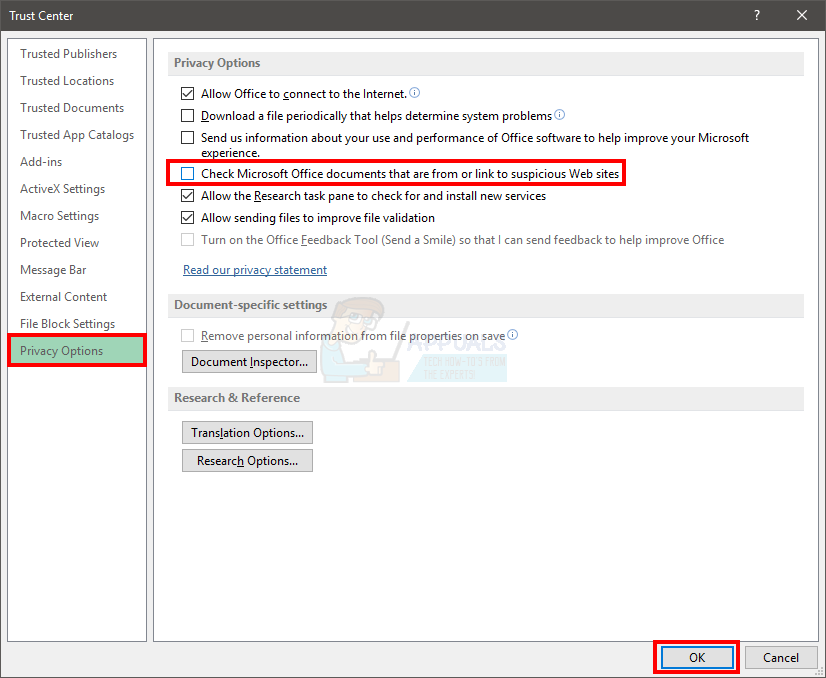
- Select Trust Center
- Click Trust Center Settings,
- Select Privacy Options
- Uncheck the option ‘Check Microsoft Office Documents’ that are from or link to suspicious websites.
- Click Ok and check if the problem is solved.
Method 4: Fixing the Registry.
Even if Method 1 didn’t work for you, there is still hope. There is a registry fix that has helped many users. Follow the steps below to address the issue through the registry.
Note: Messing up registry keys can cause serious issues. So, it is advised to make a backup of your registry keys in case something goes wrong. Click here for a step-by-step guide on how to backup and restore your registry.
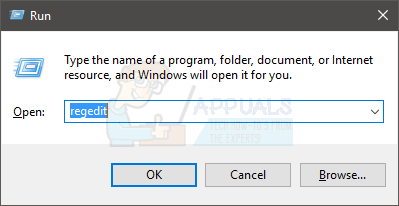
- Open the Run dialog box by pressing Windows + R
- Type ‘regedit’ into the box, and then either press ‘Enter’ or click ‘OK’.
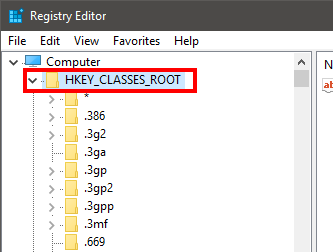
- Now, navigate to this address: HKEY_CLASSES_ROOT\Excel.Sheet.8\shell\Open. If you’re unsure how to navigate to this path, please follow the steps provided below.
- Locate and double-click HKEY_CLASSES_ROOT from the left pane.
- Locate and double-click ‘Excel.Sheet.8’ from the left pane.
- Locate the shell in the left pane, and double click it.
- Locate ‘Open’ from the left pane and double-click on it.
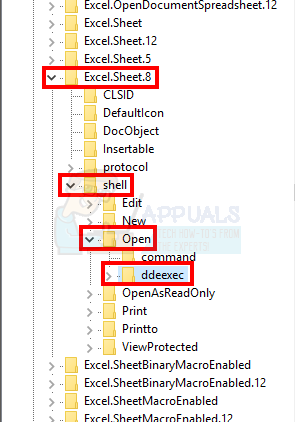
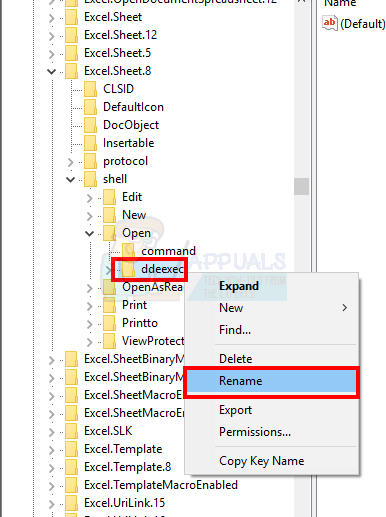
- Right-click the ddeexec folder/key (it should be under ‘Open’) and select ‘Delete’. You can also just rename the ddeexec folder/key if you aren’t comfortable. Simply right-click it, select ‘Rename’, and give it any name you want.
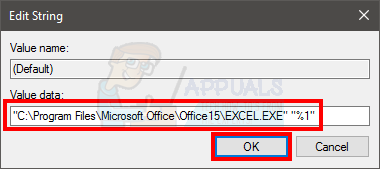
- Now, select the command folder or key by left-clicking it once. It should be located under ‘Open.’
- Double-click the default string in the right pane.
- Replace the /e or /dde part of the value with “%1”. Note: Include the quotes as well.
- The Default string’s value should look like this “C:\Program Files (x86)\Microsoft Office\Office15\EXCEL.EXE” “%1”
- Click Ok
- Double click the command string from the right pane.
- Replace the /e or /dde part of the value with “%1”. Note: Include the quotes as well.
- The Command string’s value should look like this yh1BV5!!!!4!!!!MKKSkEXCELFiles>Of1RD?I9b9j[2hL]KhO& “%1”
- Click ‘OK’.


- Now, scroll up just a little bit in the pane and double click Excel.Sheet.12
- Repeat steps from 4-13 for Excel.Sheet.12
Once done, check if the issue is resolved or not.
Method 5: Check and Disable Excel Add-ins
Sometimes Excel add-ins may cause this issue. If you recently installed an add-in, or even if it was around the time when this problem started, that could be a possible cause. Even if you don’t recall installing any new add-ins, disabling or uninstalling them from your Excel is worth a try.
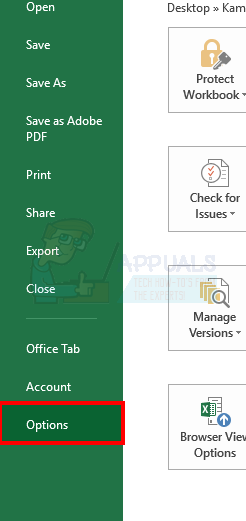
- Open Excel
- Click File
- Select Options.
- Select the Add-ins from the left pane
- Select the Add-in from the list.
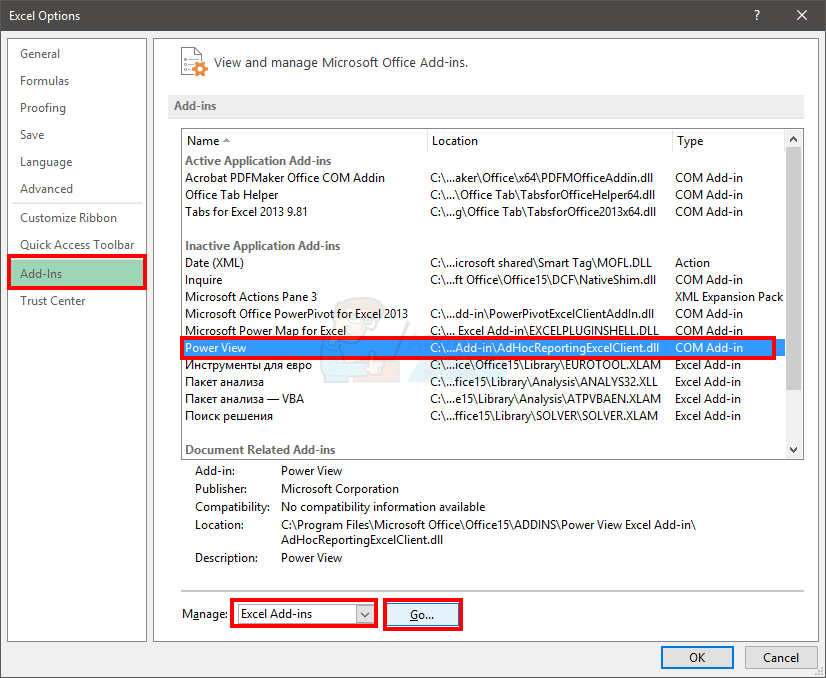
- In the Manage box, click Excel Add-ins, and then click Go…
- In the ‘Add-Ins Available’ box, uncheck the option next to the add-in that you wish to disable. We recommend disabling all the add-ins temporarily to determine whether or not they are the cause of the problem.
- Once you’re done, click OK.
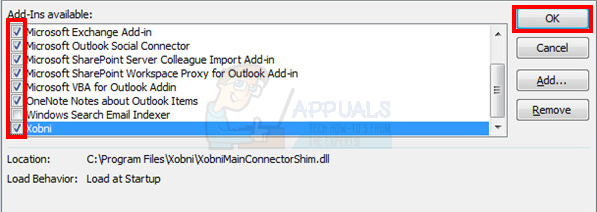
- Please click OK again.
This should do the job for you. If the problem is resolved then it’s clear that an add-in was causing the issue. You can now follow the above given steps and enable the add-ins one-by-one to determine which add-in was the root of the problem.
Method 6: Disable Dell Data Protection Security Authentication Service,
Note: This method is for Dell users. If you aren’t using a Dell computer then skip this method.
If you have a Dell machine, the issue might be tied to the Dell Data Protection Security Authentication Service. This service, installed via Dell’s Digital Delivery service, primarily provides a security solution and authentication support. The cause behind the issues related to this service is currently unknown. However, many Dell users have resolved their problems by either disabling or uninstalling this service.
The steps to disable the Dell Data Protection Security Authentication Service are given below.
- Hold Windows key and press R
- Type services.msc and press Enter

- Locate the Dell Data Protection Security Authentication Service and double-click on it.
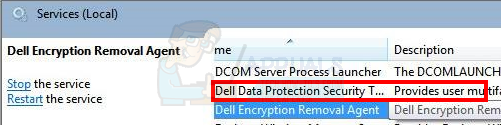
- Select ‘Disabled’ from the drop-down menu.
- Ensure that the service status is stopped. If it isn’t, then proceed by clicking the ‘Stop’ button in the ‘Service Status’ section.
- Click ‘Apply’, then select ‘Ok’.
Check if the issue is resolved. If the problem is gone then you know the culprit behind the issue. You can keep this service disabled without facing any major issues. You can also uninstall this service from the Programs and Features window if you really don’t want the service. On the other hand, if the problem still persists then you can simply turn on the service back again. Just follow the steps from 1-6 above but select the Automatic option in step 4.
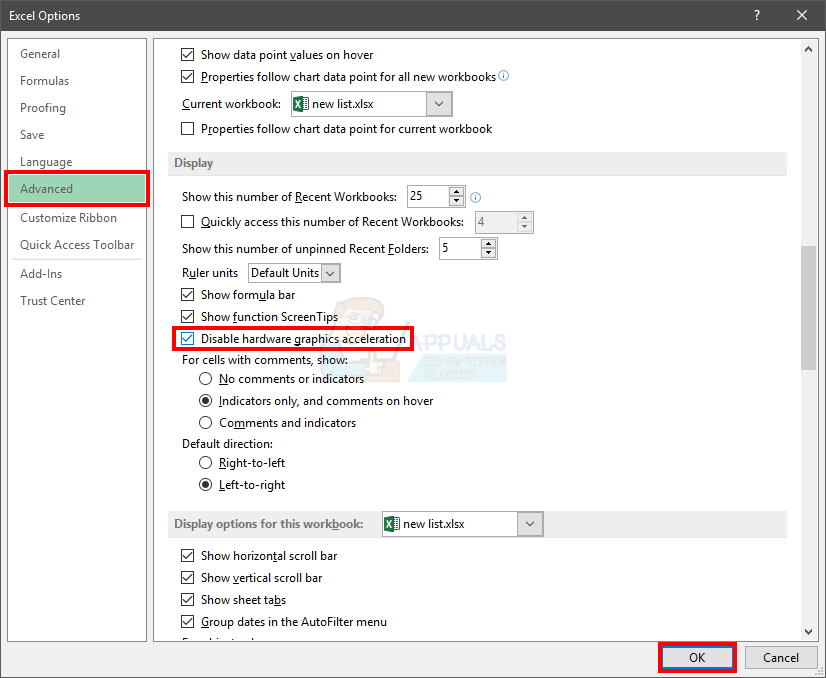
Method 7: Disable Hardware Acceleration
The problem might also be caused by your video card. So, disabling this option solves the issue. This isn’t a solution but more of a workaround. So, keep checking for the latest updates from your video card manufacturer because there’s a high likelihood that your card manufacturer will release an update for this issue.
- Open Excel
- Click on the ‘File’ button.

- Select Options

- Select Advanced from the left pane
- Check the option Disable Hardware Acceleration. This option should be under the Display section
- Click ‘OK’.
Once done, this should solve the issue. Keep this option enabled until you see a new update from your video card manufacturer. Then, you should disable this option after updating the video card. If this method does not solve the issue, then there’s no need to keep this option enabled. Simply follow the steps given above and uncheck the ‘Disable Hardware Acceleration’ option in Step 5.
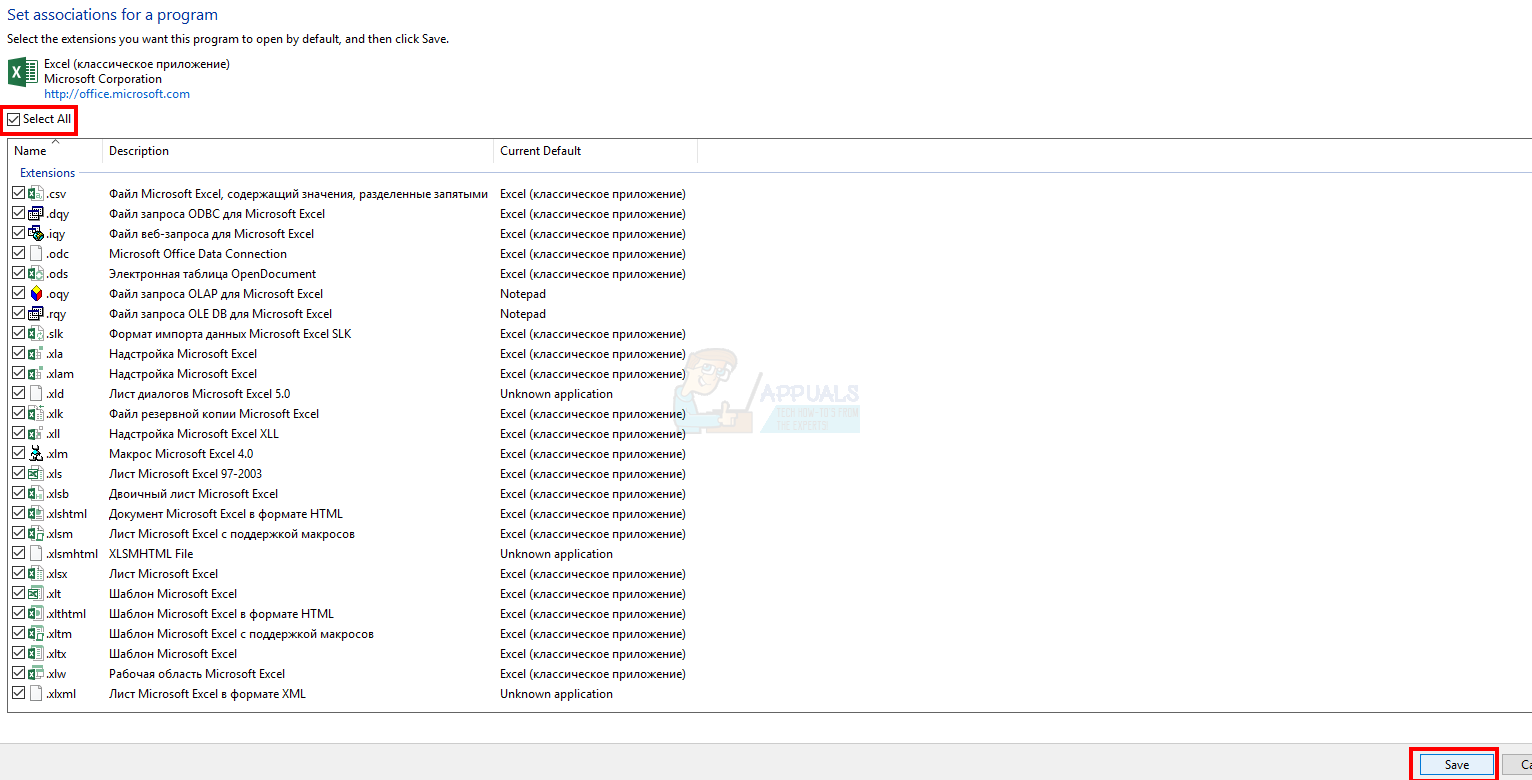
Method 8: Reset Default Programs and File Associations
Sometimes the issue can be caused when Excel isn’t set as the default program to run the .xlsx files. Simply making Excel the default program and resetting the file associations can solve this issue for us.
Follow the steps given below to reset the file associations
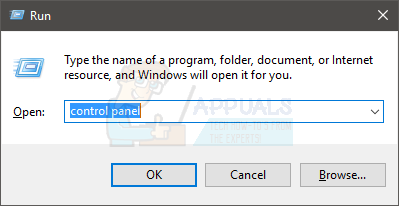
- Hold the Windows key and press R.
- Type ‘Control Panel’ and press ‘Enter’.
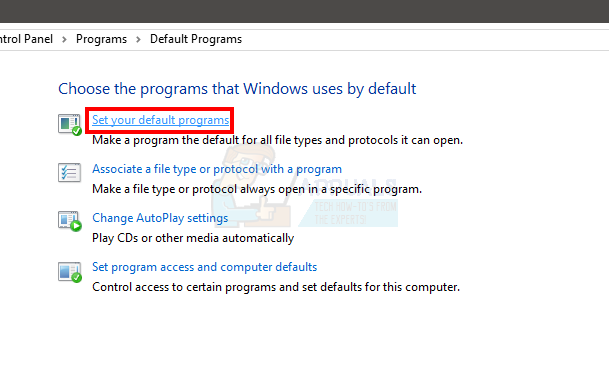
- Type ‘Default programs’ into the search bar located at the top right corner.
- Select the Default Programs option,

- Please select ‘Set your default programs’.
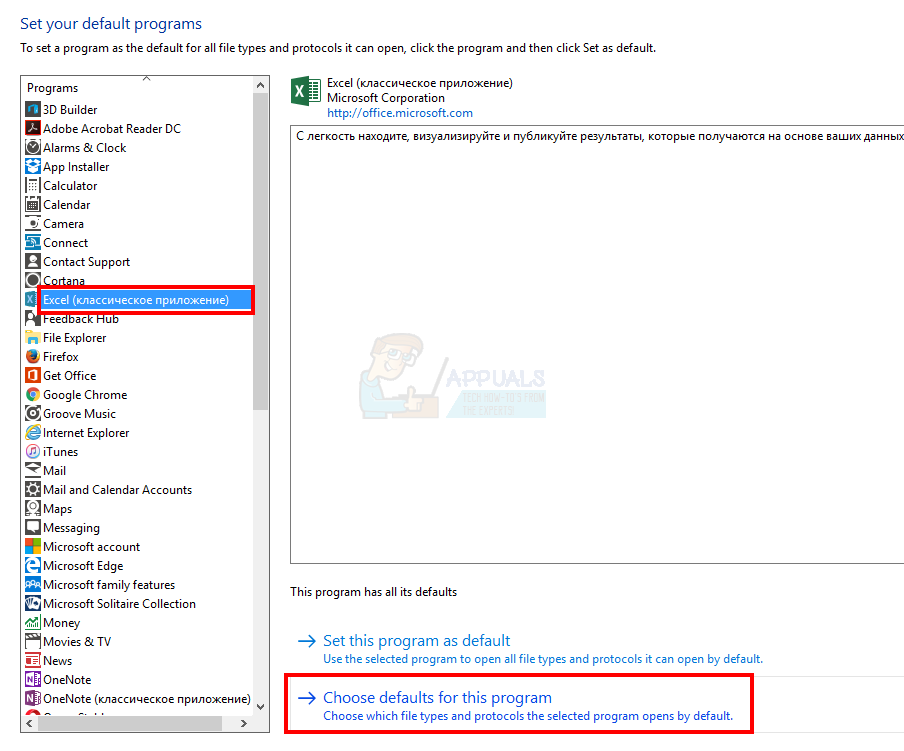
- Wait a while for the list to populate.
- Locate and select Excel.
- Please click on ‘Choose defaults for this program.’
- Check the ‘Select All’ option.
- Click Save
Method 9: Uninstalling the Additional Office Viewer.
This error message may also occur if you have installed Office Viewer in conjunction with Microsoft Office. If this is the case, uninstall it and retest.
thanks a lot 2 days looking for a solution
it was the **** dell service