Fix: Printer Offline Windows 10
Printers provide a great way of printing your important documents. But, a lot of users have complaint about seeing the Printer Offline status even especially after a Windows10 upgrade. This issue will, of course, prevent you from using the printer even if you have the proper and latest printer drivers. The problem can occur at any time but the chances are high if you recently upgraded to Windows 10. Most of the users have stated that the printer will work after a reboot but it will only work once and go back to the offline status. The printer might also just start printing randomly if there are items in the printing list.
The reason behind this is the Windows not recognizing the printer.
Tips
- Make sure the printer is properly connected to the computer
- Turn off your printer and turn it back on. Check if this solves the issue.
- Make sure there isn’t a fault in your printer. Try to connect it to another PC and see if it works. If it doesn’t work on other PCs then there’s a problem with the printer and not your computer.
- Run the Microsoft’s own printer troubleshooter. It will help you solve the issue within minutes. Go here and click Run troubleshooter.
- Make sure your printer is the default printer
- Follow these steps in the same order. This might solve your issue as well
- Turn off your Wi-Fi
- Turn off printer
- Shutdown the PC
- Start Wi-Fi. Wait for the Wi-Fi to start
- Start Printer once the Wi-Fi is up and running.
- Start PC.
- Reinstall your printer by following the steps given below
- Press Windows key once
- Select Settings
- Select Devices
- Select Printers & Scanners
- Select your printer and click Remove device (follow any additional on-screen instructions)
- Once done, click Add a printer or scanner and follow the on-screen instructions to add the printer
Method 1: Reinstall Printer Driver/Software
The first thing that you should do is to reinstall/update your Printer software especially if the problem started after you upgraded to Windows 10. This should be your priority because your drivers might not be compatible with the latest Windows 10 which might be causing the issue. You can simply uninstall the current software and download the latest one from your printer’s manufacturer’s website for Windows 10. Even if it the printer’s software wasn’t the issue, its still a good thing to have the latest printer software for your printer.
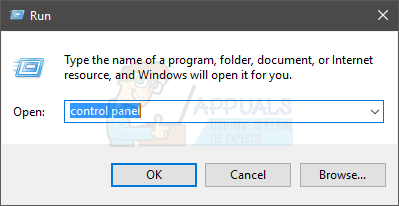
- Hold Windows key and press R
- Type control panel and press Enter

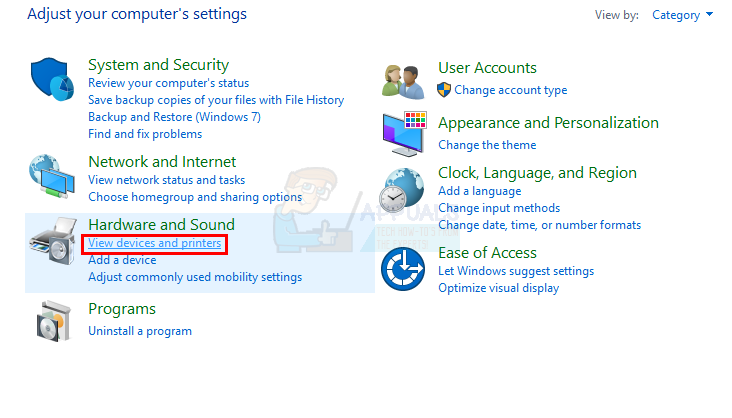
- Select Devices and Printers from the Hardware and Sound section

- Locate and right click your printer. Select Remove Device
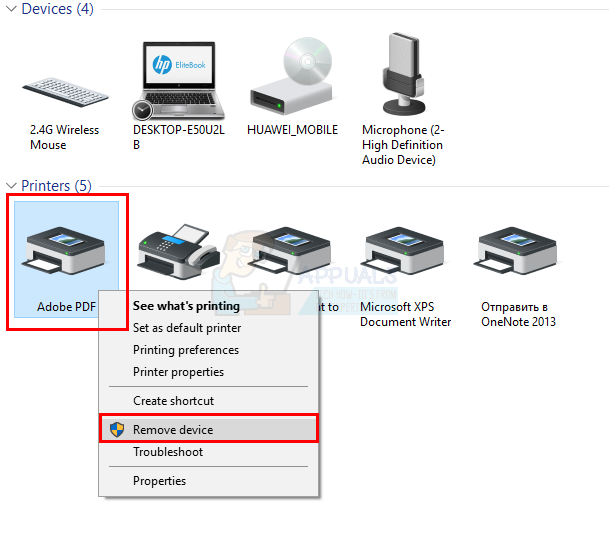
- Click ok if it asks for confirmation
Once done, go to the printer’s manufacturer website and search for the latest printer software for your device. Download and install the latest software for your printer. On the other hand, if you have a CD/DVD with the software of your device (they usually come with one), use that to install the software. Once done, you should be good to go.
Method 2: Check Printer Status
Sometimes, the printer status might simply be turned off from its options. Simply checking the settings of your printer and turning of the Use Offline option will solve the issue for you.
- Hold Windows key and press R
- Type control panel and press Enter
- Select Devices and Printers from the Hardware and Sound section
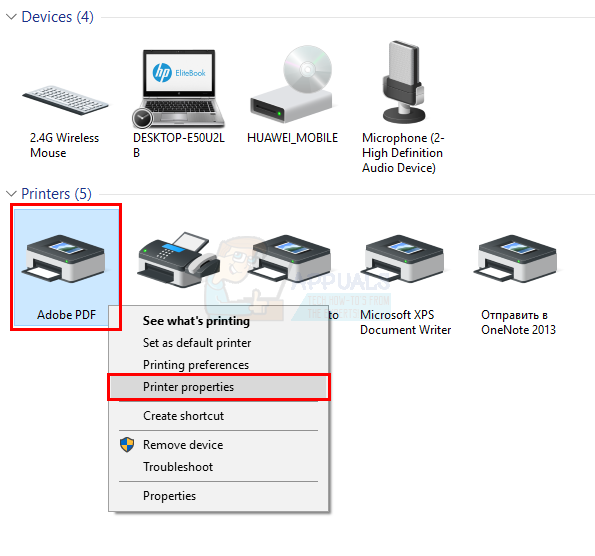
- Locate and right click your printer.
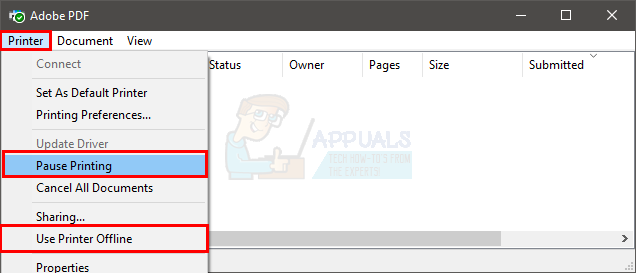
- Select See what’s printing. Note: If you don’t see this option then right click your printer (again) and select Set as default printer. Now repeat steps 5-6
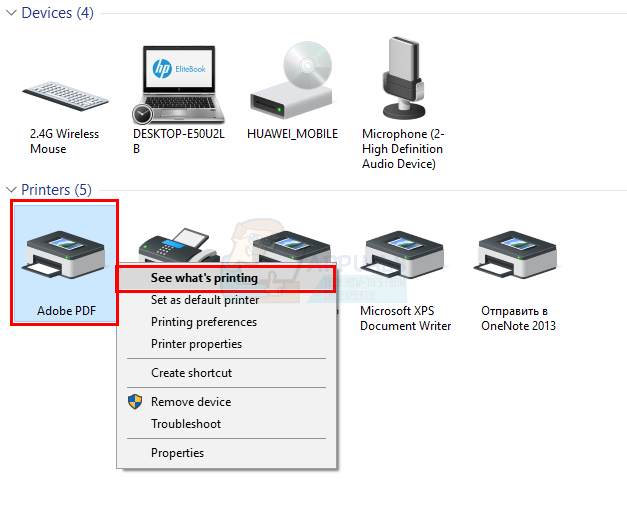
- A new window will open. Click Printer
- Check the option Pause Printing and User Printer Offline. If any one of these options have a tick beside them, remove the ticks. You can remove the ticks from these options by simply clicking on them
Once done, check if the printer status is changed.
Method 3: Restart Printer Spooler Service
Turning Printer Spooler service off and then turning it back on solves the problem or a lot of users as well. This service can cause this offline status issue. So, just restarting the service might solve the problem for you. It isn’t a permanent solution but it is a good workaround.
- Hold Windows key and press R
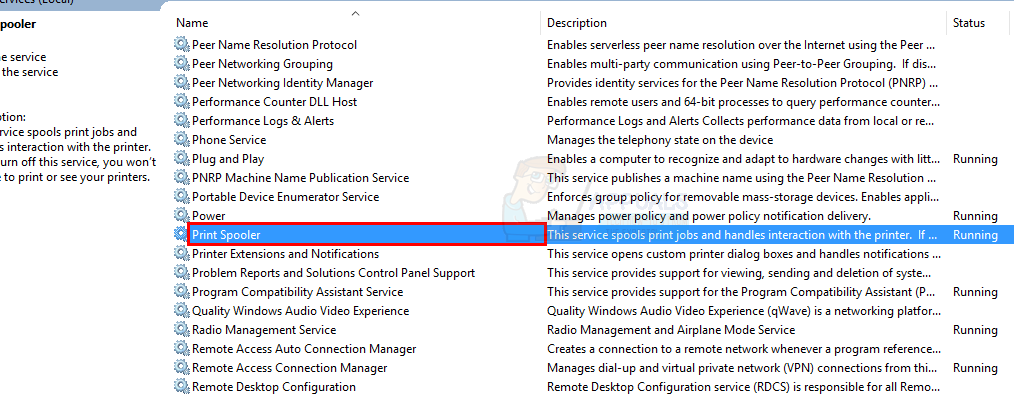
- Type services.msc and press Enter

- Locate and double click the service named Printer Spooler
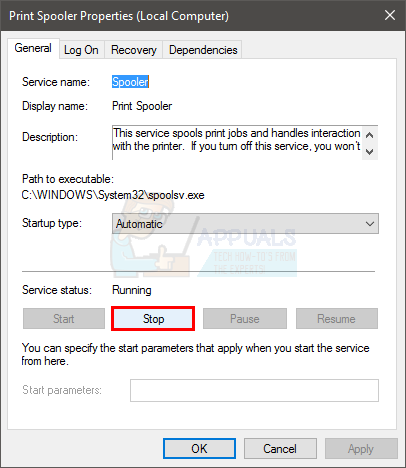
- The service status should be Running. You will be able to see the service status in the Service Status section. Click Stop to stop the service.
- Once the service is stopped, click Start to start the service again
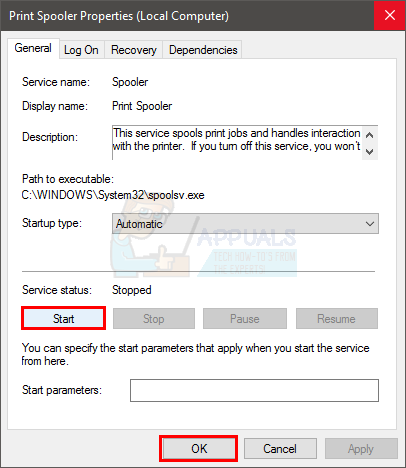
- Click Ok once the service has been successfully restarted
Check if the problem still persists.
Method 4: Adding a New Port
Adding a second printer device in the Windows has worked for more than enough users. This will only work for the networked printers so keep that in mind.
- Hold Windows key and press R
- Type control panel and press Enter

- Select Devices and Printers from the Hardware and Sound section

- Right click your printer and select Printer Properties

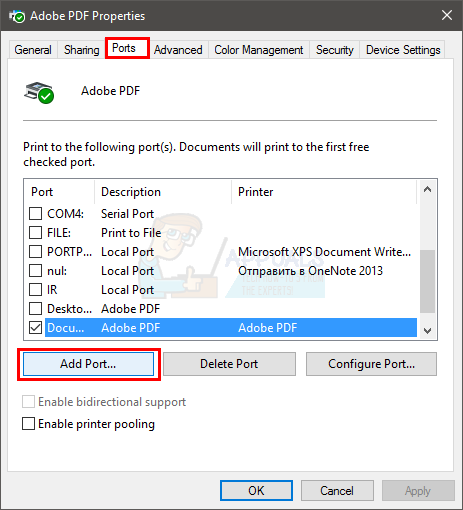
- Select the tab named Ports
- Click Add Port…

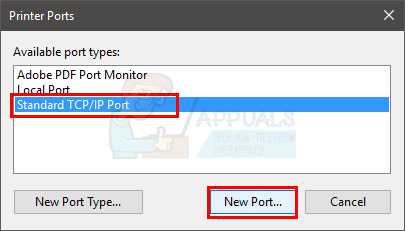
- Select Standard TCP/IP Port
- Click New Port

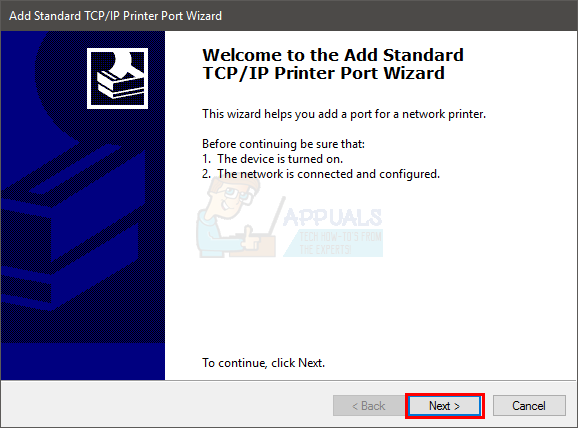
- A new wizard will start. Click Next

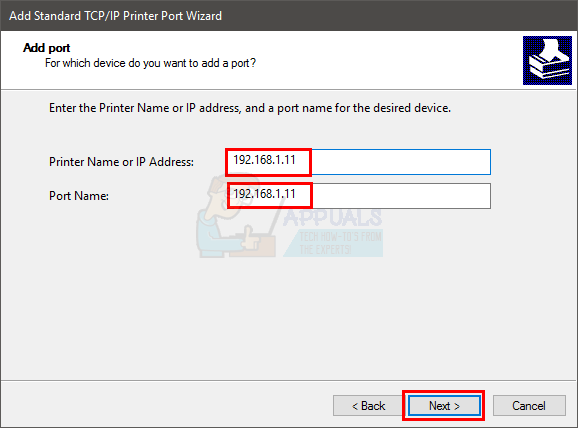
- Enter your printer’s IP Address. If you don’t know the IP Address of the printer then check the manual of your printer or go to the manufacturer’s official website. You will be able to find the manual or instruction set of your model from the official website. The IP Address should be given in that. We can’t tell you the IP Address of the printer because it varies from printer to printer so you will have to do this yourself.
- Enter the Port Name. You should enter the printer’s IP Address and it will automatically fill the Port Name for you.
- Click Next
- Wait for the wizard to do its thing
- Select the Standard TCP/IP Port from the list
- Click Next
- Click Finish
Once you are done, check if the problem is solved or not.
Method 5: Install Windows Update KB3147458
This is for Windows 10 users only. Although you should keep your Windows up to date but even if you don’t want to there are a few updates that are very important for your Windows. One of these updates is KB3147458. This update was released for Windows 10 users who were having troubles with printers. This update fixes some problems related to printer notifications. So, make sure you have this update installed. If you don’t have this then installing this update will solve the issue for you.
Follow the steps given below to check whether you have the update or not
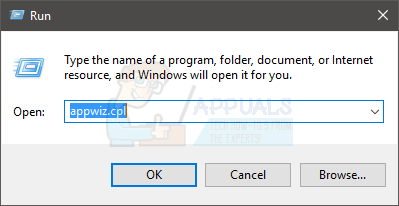
- Hold Windows key and press R
- Type appwiz.cpl and press Enter
- Click View installed updates
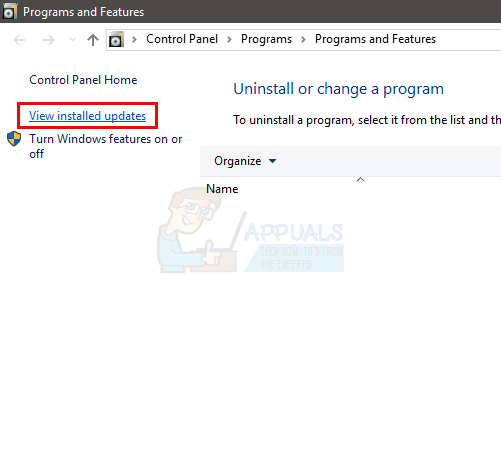
- Look through this list and check if you have the KB3147458 update installed on the system. If you don’t have this update in the list then you should install it.
- The best way to install these updates is to check for updates and install the updates your system finds. This update along with many other will be downloaded and installed to your computer. If you want to check for updates then follow the instructions given below
- Press Windows key once
- Select Settings

- Click Update & Security
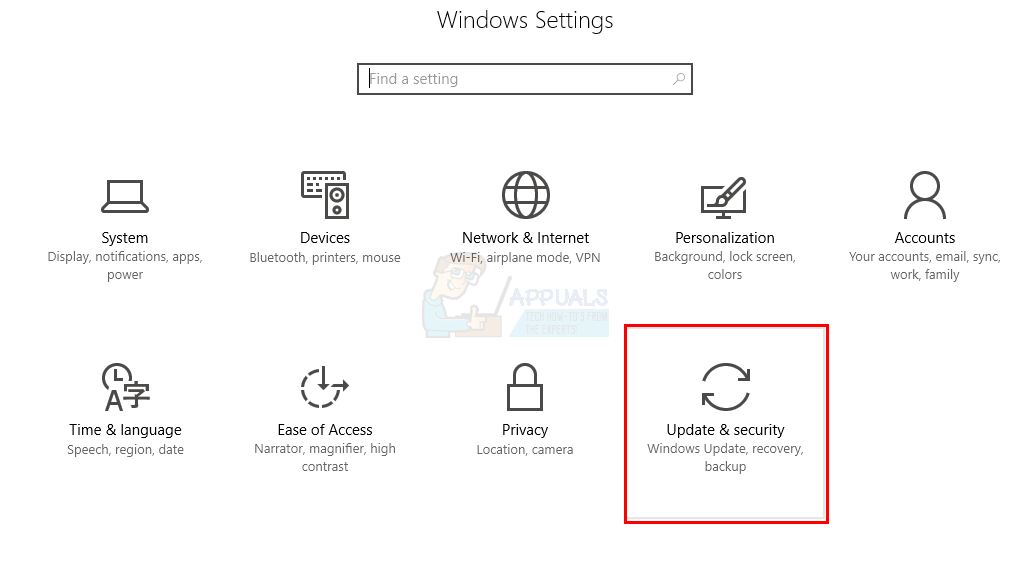
- Click Check for updates
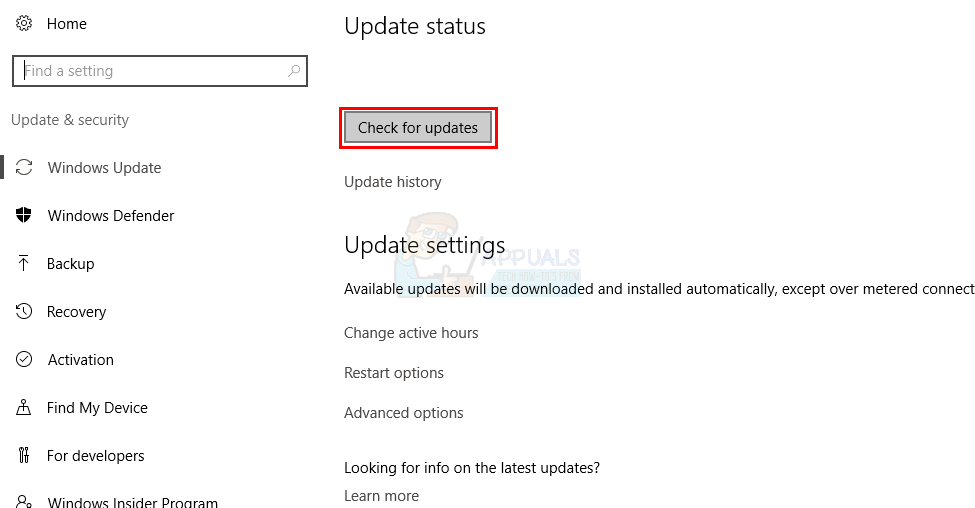
Your system will automatically search for updates and install them (depending on the settings you chose for how to install Windows updates). Once the updates are installed, your issue should be resolved.
Method 6: Change Port Settings
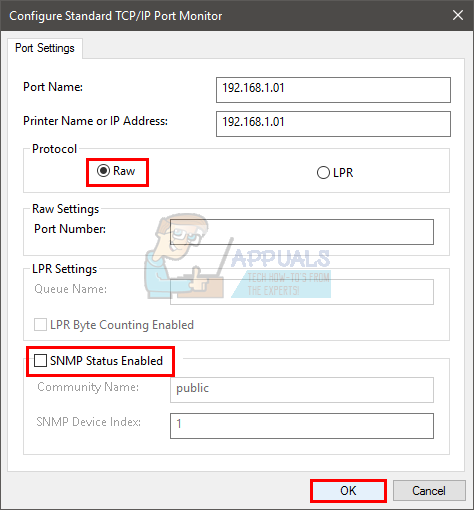
Changing port settings for your printer solves the issue as well. There is an option named SNMP Status Enabled, unchecking this options solves the issue.
- Hold Windows key and press R
- Type control panel and press Enter

- Select Devices and Printers from the Hardware and Sound section

- Right click your printer and select Printer Properties
- Select the tab named Ports
- Click Add Port…
- Select Standard TCP/IP Port
- Click New Port
- A new wizard will start. Click Next
- Enter your printer’s IP Address. If you don’t know the IP Address of the printer then check the manual of your printer or go to the manufacturer’s official website. You will be able to find the manual or instruction set of your model from the official website. The IP Address should be given in that. We can’t tell you the IP Address of the printer because it varies from printer to printer so you will have to do this yourself.
- Enter the Port Name. You can enter the printer’s IP Address and it will automatically fill the Port Name for you.
- Click Next

- Wait for the wizard to do its thing
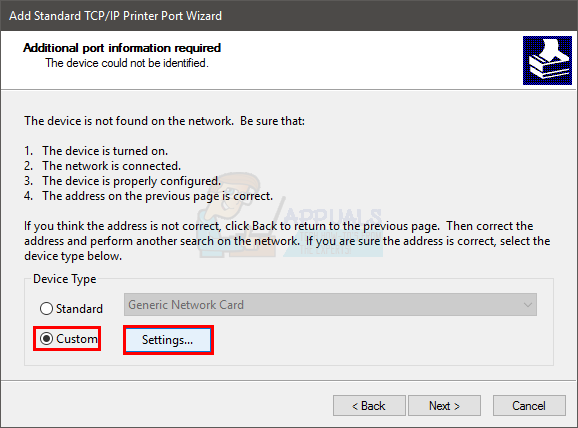
- Select Custom when it asks for additional port information
- Click Settings
- Select Raw from the Protocol Section
- Uncheck the option SNMP Status Enabled
- Click Ok
- Click Next
- Click Finish
That’s it. Once done, this should solve your problem. You can check the printer status once you are done with the above given steps. If the problem isn’t solved after doing the steps given in this method then try to restart your system and see if that solves the issue.