FIX: Printer Not Activated (Error code -20) on Quickbooks
The printer not activated – error code -20 is something that you might experience due to the fact that when you’re upgrading from Windows XP or Vista to Windows 7, the new operating system eliminates the use of the HKEY_CURRENT_CONFIG\Software key in the registry settings. This means that the entries found in that key are not updated when you’re upgrading the OS, and some applications use that exact key to store internal settings, causing them to fail after an update.
This issue will most likely appear if you’re a user who has upgraded his operating system to Windows 7 (a clean installation of Windows 7 won’t cause this), and you’re using the Quickbooks software. This is one of the applications that uses the aforementioned key to store its internal settings, and due to the fact that the registry key is not updated, the application won’t work properly.
There are two fairly simple methods that we can use to solve this method, and we will describe both in order to help you with this issue. Please note that both of these methods will require you to have Administrator access to the system, otherwise they will fail.
NOTE: Before you make changes to the Registry, make sure you take a backup of your registry hive and create a system restore point incase something else goes wrong whilst you’re performing the steps you should be able to restore the system.
Create a Registry Backup
To take a Registry Backup, Once in the Registry Editor, click Computer from the top of the folder tree in the left pane and then Click File -> Export -> And Save It.
Create a System Restore Point
To create a system restore point see steps (here). The restore guide is for Windows 10 but it works on Windows Vista / Seven and Eight as well.
Method 1: Reinstall Quickbooks
When you upgrade the operating system, the settings for the app are lost, and reinstalling it will cause it to store its settings in the appropriate registry key again, and start working again. You can download the application from here, after which the installation is a straightforward process. When you’re done, you can continue working as before.
Method 2: Manually update the registry key
Option 1: Grant Permissions via Registry Editor
If you opt for this method, please be careful to follow each step word for word, as a mistake might cause more headaches than the error itself. First of all, you need to open the Registry Editor. Press the Start button on your keyboard, and type regedit. DO NOT press Enter yet. When you get Regedit, right click on it and select Run as administrator. This will give you an administrator access to the Registry Editor. What you’re looking for here is the HKEY_CURRENT_CONFIG folder, inside of which you will find a Software folder. Right click the Software folder and select Permissions. In the window that opens, ensure that you have checked Full Control for the Users user in the table. When done, press OK to close the window, then close the Registry Editor. This will again give Quickbooks access to the key it needs to store its settings, and everything will be working properly again.
Both methods are fairly easy, and if you’re having this issue with Quickbooks or any other software that uses that key to store settings, they will help you get rid of the problem, and you can continue your work as if nothing happened.
Option 2: Use a Powershell Script to Grant Permissions (Windows 10) only
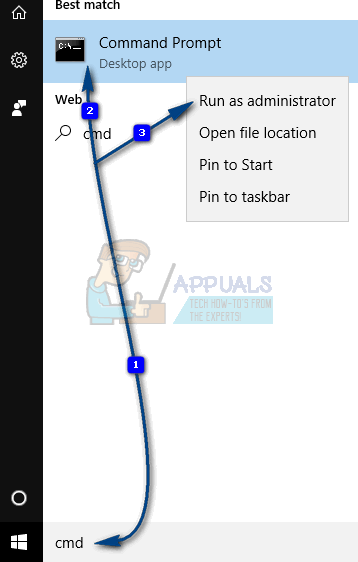
The user account that needs permissions should be logged in and should be an administrator to execute the command. Go to Start -> type cmd and right click it, then choose Run As Administrator

Once in the Command Prompt, type powershell and press ENTER.
Then, type or copy the following command as it is:
PowerShell.exe -NoProfile -NoLogo -NonInteractive -Command "$key = [Microsoft.Win32.Registry]::CurrentConfig.OpenSubKey('Software',[Microsoft.Win32.RegistryKeyPermissionCheck]::ReadWriteSubTree,[System.Security.AccessControl.RegistryRights]::ChangePermissions); $acl =$key.GetAccessControl(); $rule = New-Object System.Security.AccessControl.RegistryAccessRule ('Users','FullControl','ObjectInherit,ContainerInherit','None','Allow'); $acl.SetAccessRule($rule); $key.SetAccessControl($acl);"