How to pin and unpin all application from Windows 10
Windows PowerShell is a shell program developed by Microsoft to automate tasks and configuration management. This powerful shell is based on the .NET framework and it includes a command-line shell and a scripting language. PowerShell was made open-source and cross-platform on 18 August 2016 after initially being a Windows component only. Anyone could now develop commands to use with PowerShell.
Windows PowerShell offers two ways of executing your commands. The first is the use of cmdlets (lightweight command used in the Windows PowerShell environment command line) and the second is the use of scripts that you can save and run later or on another computer. These scripts are similar to command prompt batch scripts.
Since windows 8, Microsoft has offered a more interactive way to customize your start menu. In Windows 10, you can pin and unpin application tiles from your start menu. If you are going to do this in more than one computer, then this task is going to be overwhelming. Automation is what you will need. This article is going to show you how you can use Windows PowerShell to pin and unpin tiles from Windows 10.
Method 1: Pin and Unpin default Windows applications using PowerShell script
If you would like to automate cleaning the Windows 10’s start menu from all the default pinned apps that you are using follow these steps. Remember that this won’t remove the apps; only unpin them from the start. This will work only for apps that are installed and not links to the store. You will also need to open Windows PowerShell in its Graphical User Interface window as an administrator.
- Press the Windows key to open the start menu
- Type ‘PowerShell’ to search for the application
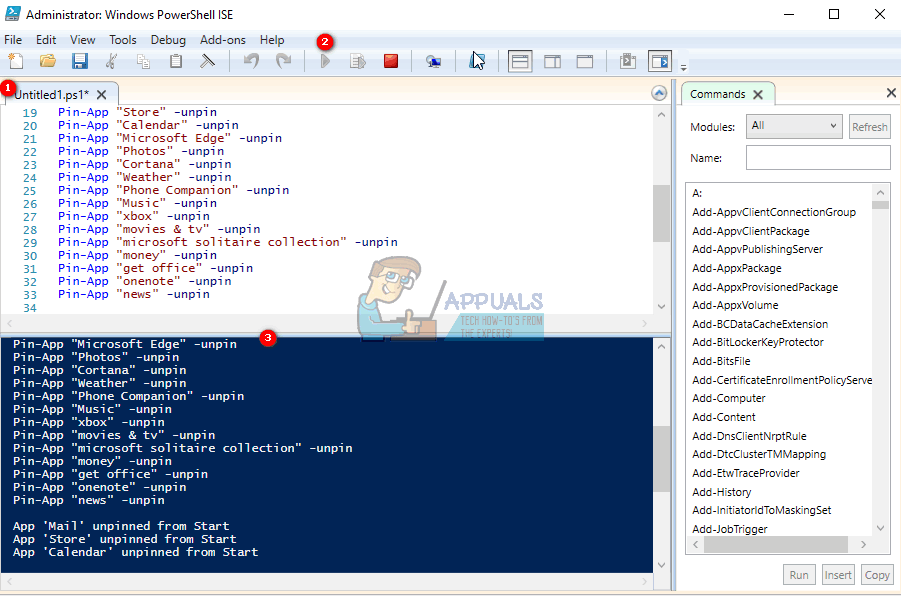
- In the list that appears, right click on ‘PowerShell ISE’ to open the PowerShell environment in a graphical interface. You will see three windows stacked on top of each other; the script window (shows the title of your new script, untitled.psm1 in this case), the prompt window (written PS C:\Windows\system32>) and the debugging window (without a title).
- Copy the script you need below and paste it into the script window (it should be the topmost window, or on the right hand side). The general syntax is ‘Pin-App “App Name” –unpin’ to unpin apps or ‘Pin-App “App Name” –pin’ to pin apps. Remove or add the apps you want to the list at the bottom.
- You can download the Script to Unpin default Apps from here. This will also unpin apps from the store.
- You can download the Script to pin default apps from here. This will also pin apps from the store.
- To run the script, click on the Run Script button (play button) on toolbar (if not available, you can set its visibility from the view menu)
- To save the script, go to file > Save As. Choose a location and type the name of your file in the window that appears. Click Save
- To run your saved script on a computer without having to reopen Windows PowerShell, right click on the script file you saved, and choose ‘Run with PowerShell’
These scripts will work for most of Windows 10 apps, but it will not work if your apps are not installed (i.e., are just links to the store) you will need to turn off consumer experience in the group policy here “Computer Configuration > Policies > Administrative Templates > Windows Components > Cloud Content > Turn off Microsoft consumer experiences.” This will be set as default for new accounts in your computer.
Method 2: Pin apps on Windows applications using PowerShell script
Method 1 offers a way to only pin apps that come with windows or are downloaded from the store. To pin apps like Microsoft Office Applications, Outlook or games using a PowerShell script, you will need to point the script to the path of the application executable. Here is what you will need to do in the Windows PowerShell Graphical User Interface window as an administrator. You will need at least version 3 of PowerShell to run these scripts.
- Press the Windows key to open the start menu
- Type ‘PowerShell’ to search for the application
- In the list that appears, right click on ‘PowerShell ISE’ to open the PowerShell environment in a graphical interface. You will see three windows stacked on top of each other; the script window (shows the title of your new script, untitled.ps1 in this case), the prompt window (written PS C:\Windows\system32>) and the debugging window (without a title).
- Copy the script you need below and paste it into the script window (it should be the topmost window, or on the right hand side). The general syntax is ‘Set-OSCPin -Path’ to pin apps; where ‘path’ is the actual path of your app. Add the apps you want to the list at the bottom.
- You can download the Script to pin any app you want from here
- To run the script, click on the Run Script button (play button) on toolbar (if not available, you can set its visibility from the view menu)
- To save the script, go to file > Save As. Choose a location and type the name of your file in the window that appears. Click Save
- To run your saved script on a computer without having to reopen Windows PowerShell, right click on the script file you saved, and choose ‘Run with PowerShell’
- You can also run the scripts above from the PowerShell command line environment.
- Press the Windows key to open the start menu
- Type ‘PowerShell’ to search for the application
- In the list that appears, right click on ‘PowerShell’ and run as an administrator
- In the PowerShell environment type ‘Import-module filepathofmodule’ e.g “Import-module C:\Users\User1\Downloads\PSModule.psm1”
- This will load your module, and all you will have to do is type the app you want to add or remove by using the syntaxes provided.
- Method 2 offers a help menu that you can access by typing “Get-Help Set-OSCPin –Full”.
There is a bug in your script. The condition if it was sucssefully should be $flag -eq 1 not $flag=1