How to Fix PcaSvc.dll Missing Entry PcaWallpaperAppDetect Error?
This issue has recently started occurring for users who upgraded to Windows 11 24H2. It is caused by a task in the Windows Task Scheduler that calls an entry point in PCASVC.dll, which no longer exists in the new Windows update.

It is possible that Microsoft forgot to remove the task from the Task Scheduler, which is why it continues to call the entry point, resulting in this issue. Even though it causes no issues other than displaying the error message, several users have been concerned about this error.
PCASVC.dll, also known as the Program Compatibility Assistant Service (PcaSvc), is responsible for detecting and fixing compatibility issues with old programs running on the latest Windows version. Since the PCASVC.dll is a critical file tied to the Program Compatibility Assistant Service, it should not be corrupted. Otherwise, it could lead to this error.
Apart from the mentioned causes, the error may also appear if the PcaSvc service stops running in the background. Now that we have understood the causes, we can move on to the solutions to this issue.
1. Delete the PcaWallpaperAppDetect from the Task Scheduler
As mentioned earlier, the PcaWallpaperAppDetect task in the Windows Task Scheduler keeps calling an entry point that no longer exists, resulting in this error. To fix this, we can disable the PcaWallpaperAppDetect task from the Windows Task Scheduler.
- Click the Start Menu, search for Task Scheduler, and open it on your Windows.

- Expand the Task Scheduler Library and navigate to Microsoft > Windows > Application Experience.
- In the right pane, right-click the PcaWallpaperAppDetect and select End.
- Once again, right-click the PcaWallpaperAppDetect and select Disable or Delete.

- Once done, close the Task Scheduler, and the error message should no longer appear.
2. Restart the PcaSvc Service
Another cause that could lead to this issue is the stopped PcaSvc service. This service monitors and detects compatibility issues with installed programs. Therefore, ensure this service is running.
- Open the Run Program by pressing the Win + R keys simultaneously.
- Type the services.msc command and hit Enter. This will open the services window.

- Locate the service called Program Compatibility Assistant and double-click on it to open its properties.
- Change the startup type to Manual or Automatic.
- Once done, click Apply and then OK.

- Now restart your computer, and the error should not appear.
3. Run the SFC Command
Since PCASVC.dll is tied to the Program Compatibility Assistant, which is responsible for the PCA functionality, it should not be corrupted or missing. Otherwise, it could lead to the PCASVC.dll missing entry error message.
Therefore, we can try restoring the PCASVC.dll file by running the SFC command, a command-line utility that checks for the crucial system files and replaces them with the cached copy from the compressed folder located at
%WinDir%\System32\dllcache
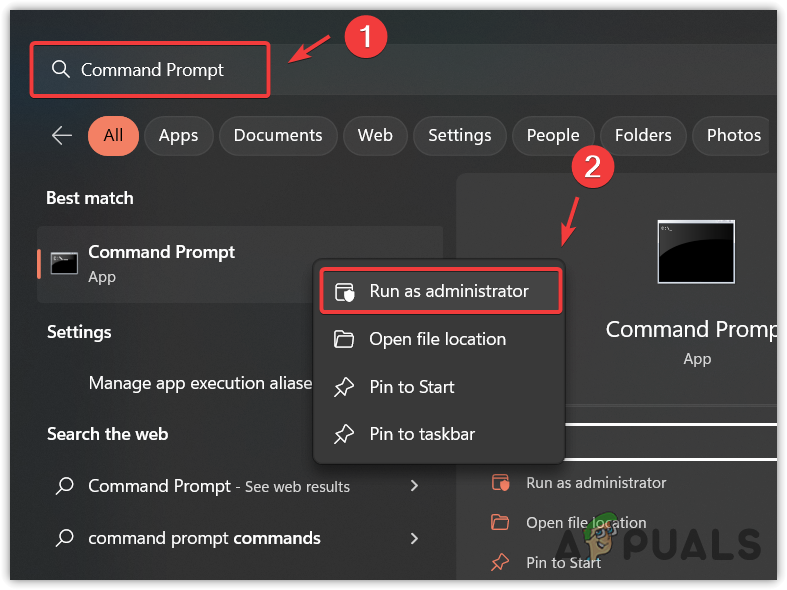
- Open the Start Menu by pressing the Win key.
- Then, type Command Prompt in the search box.
- Right-click the Command Prompt and select Run as administrator.

- Once the Command Prompt is opened in admin mode, type
sfc /scannow
and hit Enter to execute the command.

- Wait for the command to be executed. Once done, check if this resolved the issue.
In the end, if the issue persists, you can contact Microsoft Support for further guidance.


