How to Fix Orbi Router Flashing White Light?
Orbi Whole Mesh WiFi is a top-notch technology product line by Netgear. Although many customers call these devices expensive units, as per their users, devices are worth their prices. The issue at hand arises when a user starts noticing the Orbi device (either it is the router or its satellites) flashing white light.
In this state, the device loses its networking capabilities and is not usable. The issue is reported on nearly all the models of the Orbi family. Many users reported the issue after an update of the Orbi’s firmware or when factory resetting the device. In some cases, the flashing white light issue started after a sudden power failure of the Orbi device.

The Orbi flashing white light issue is either caused by a glitch in the firmware of the Orbi device or if the device’s firmware has become corrupt.
Perform a Cold Restart of the Orbi Router and Satellites
The Orbi device might show the blinking white light due to a temporary glitch of its firmware and performing a cold restart of the Orbi router/satellites may solve the problem. But before proceeding, make sure the proper power supply is plugged into the Orbi device. If the issue is occurring with a single satellite, check if using the power supply of a working satellite solves the problem.
- Power off the Orbi router and satellites. If using another modem or router, make sure to power it off as well.
- Now unplug all the devices from the power sources and leave the devices in this condition overnight.
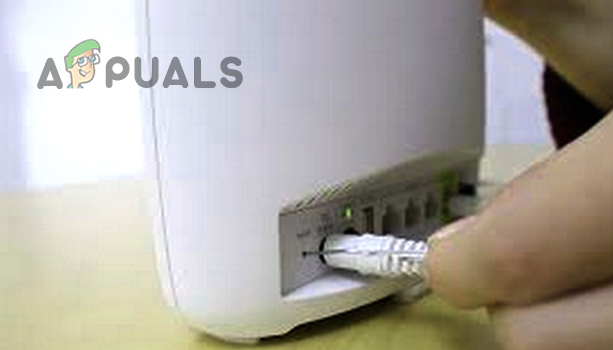
Unplug the Orbi Device - Then plug back the devices and power on the router.
- Now press the Reset button on the router until the power LED of the router start to blink in amber color.
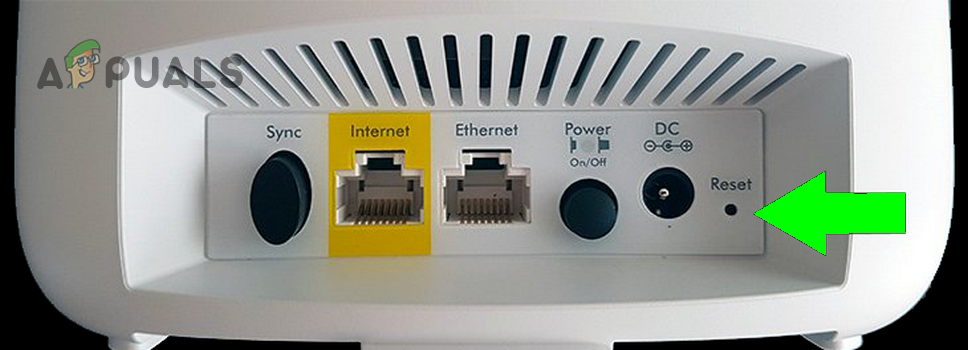
Press and hold the Reset Button of the Orbi Router - Then un-hold the Reset button and leave the router in this condition for an hour (preferably, all day).
- Afterward, power on other devices and check if the Orbi device is working fine.
If the issue is occurring only with a satellite, check if resyncing the satellite (you may have to try twice or thrice) clears out the problem. If not, check if creating a new password in (Advanced Settings > Wireless Settings > Return Network Password > Generate) solves the problem.
Factory Reset Orbi Devices and Perform Manual Update of Firmware
If the firmware of the Orbi device got corrupted either due to an upgrade or as a result of a previous factory reset attempt, then you may encounter the Orbi flashing white light issue. In such a case, performing the factory reset of the Orbi device may solve the problem.
- Bring the Orbi router and its satellites close to the modem or laptop.
- Now power off the router and satellites.
- Then unplug the ethernet from the Orbi router and power it on.
- Now wait for 5 minutes and then press the reset button of the router for at least a minute.
- Then keep the hold of the reset button until the router starts blinking in the amber color.
- Now release the reset button and wait for at least 5 minutes.
- During the above-mentioned 5 minutes, reset the satellites to the factory defaults.
- Once the mentioned 5 minutes are complete, connect the ethernet cable from the host network to the WAN port of the Orbi router.
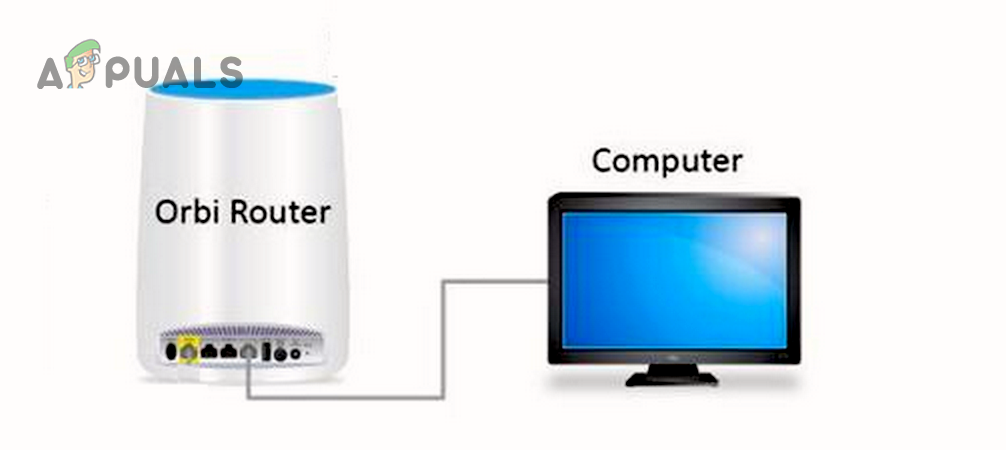
Connect the Orbi Router and PC Through an Ethernet Cable - Now, on the laptop, launch a web browser and head to the web portal of the Orbi router, usually, the following:
192.168.1.1
- Then follow the process to set up the devices as per your requirements and if asked to, cancel the firmware upgrade. You may have to cancel the upgrade of the Firmware in the Firmware Update tab.
- Now, download the latest firmware from Netgear’s website and extract it on the system’s desktop.
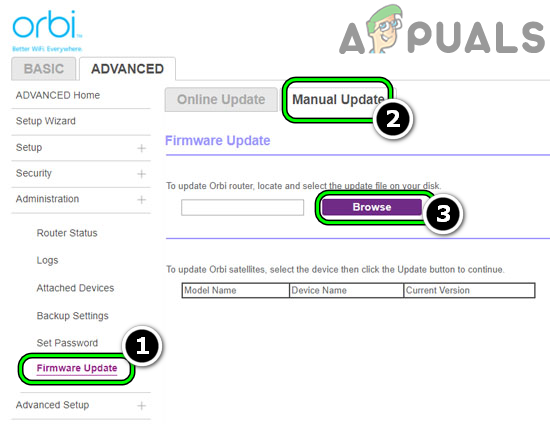
- Then, in the Web UI of the Orbi, head to the following:
Advanced>> Administration>> Firmware Update>> Manual Update.
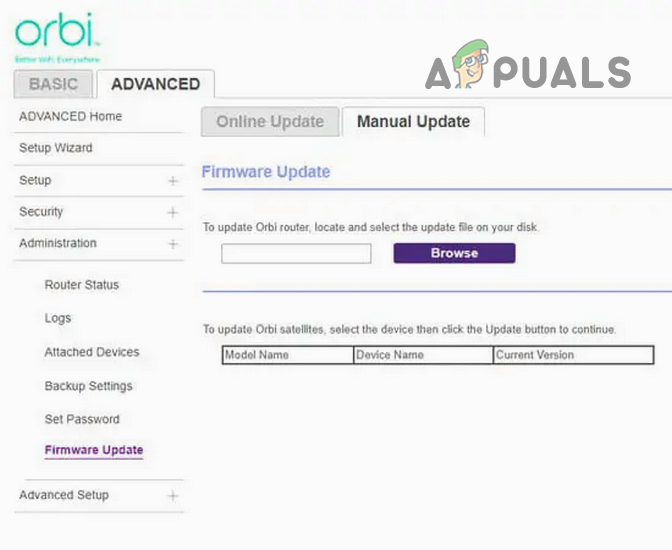
Manually Update the Orbi Device’s Firmware - Now browse for the update on the desktop and click Upgrade.
- Then wait till the upgrade process is complete and afterward, check if the Orbi flashing white light issue is resolved. You may have to press the Sync button on the Satellites to re-sync them with the router.
If that did not work and you are using another modem with the Netgear router, then check if giving the Netgear router a static IP in the modem settings and adding that IP in the modem’s DMZ (strictly not recommended) solves the Orbi problem.
Reinstall the Firmware of the Orbi Device
If none of the above did the trick for you, then the flashing white light of the Orbi device could be the result of the corrupt firmware. This corruption might have occurred due to a sudden power failure or partial installation of the latest firmware. In this scenario, reinstalling the firmware of the Orbi device may solve the problem.
Warning:
Proceed at your own risk as reinstalling firmware may brick your Orbi device or void the warranty.
The Orbi’s device firmware reinstallation is a multi-stages process as discussed below:
Download the Latest firmware of the Orbi Device
- Launch a web browser and head to the download page of the Netgear website.
- Now download the latest firmware of the Orbi device as per your requirement. Make sure the downloaded firmware matches the router/satellite firmware.

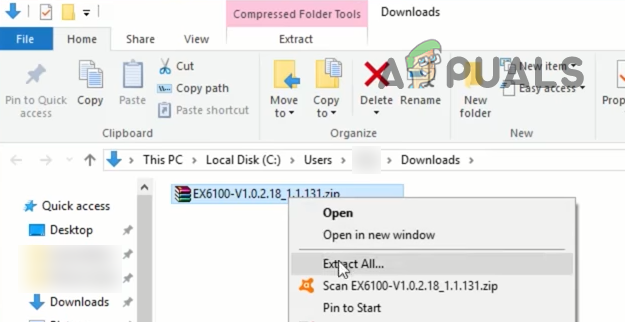
Download the Orbi Device’s Firmware from Netgear Website - Then unzip the downloaded firmware archive. The firmware is the file with the .img or .chk extension.
Extract the Downloaded Orbi Firmware
Download and Install the TFTP Client on the System
- Launch a web browser and download a TFTP client for Windows or TFTP client for Mac.

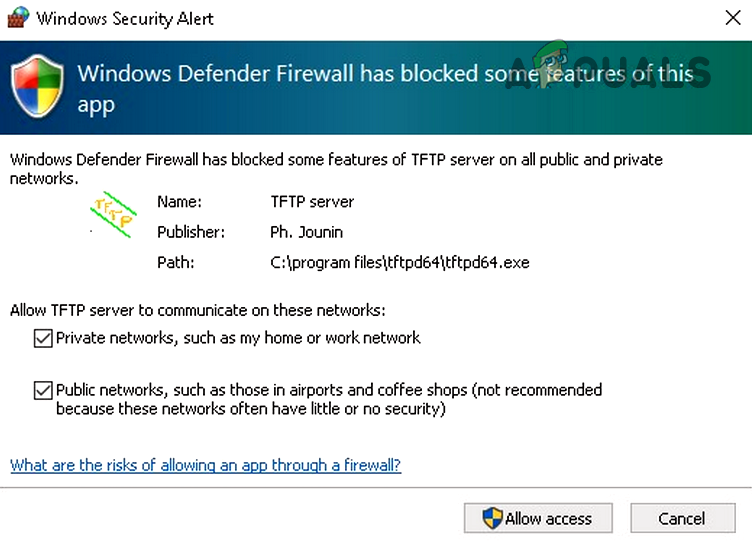
Download the TFTPd64 Client - Then install the client with administrative privileges and if asked to (either here or later on), make sure to allow the TFTP client access through the firewall for the public as well as the private networks.
Allow the TFTP Client’s Access Through the System’s Firewall
If you are easier with a command-line tool, then you may enable the Windows built-in TFTP feature and use the Command Prompt to complete the firmware installation.
Set a Static IP of the PC’s Ethernet Connection
In the case of a Windows PC, follow the undermentioned steps:
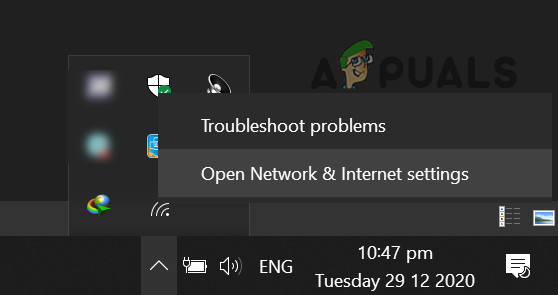
- Right-click on the network icon in the system’s tray and select Open Network & Internet Settings.
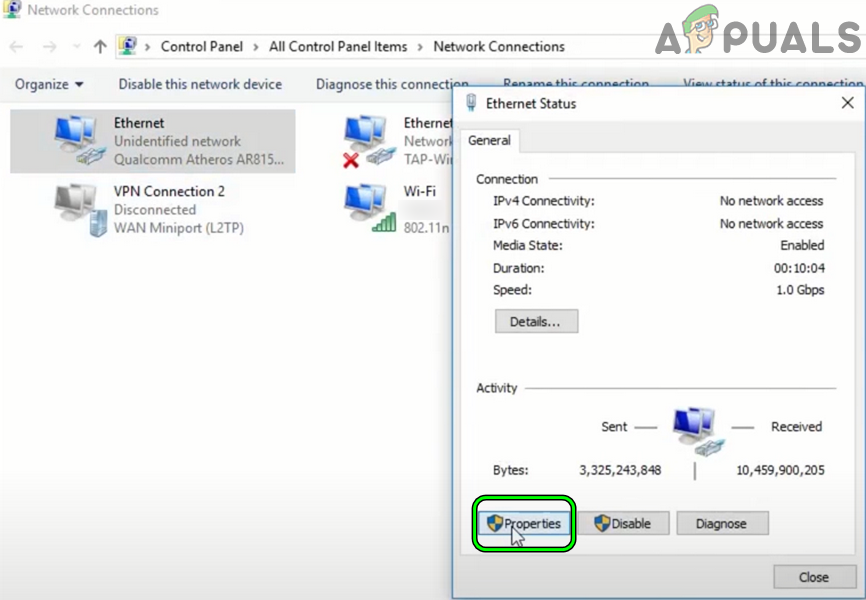
Open Network & Internet Settings - Now, right-click on the ethernet connection and select Properties.
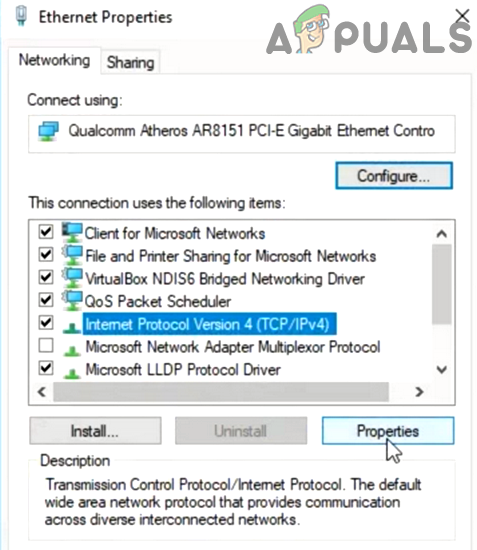
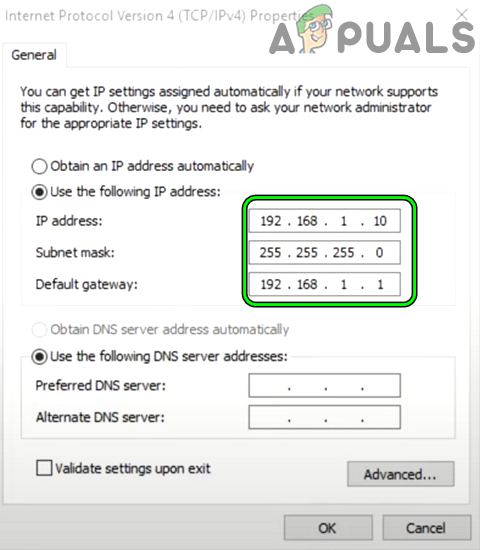
Open Properties of the Ethernet Adapter - Then double-click on Internet Protocol Version 4 (TCP/IP) and enter the following information in the relevant boxes:
IP address: 192.168.1.10 (or 192.168.0.10)

Subnet mask: 255.255.255.0

Default Gateway: 192.168.1.1
Open Ethernet’s IPv4 Protocol Properties - Afterward, apply the changes made.
Set the IPv4 Protocols Properties
In the case of a Mac system, follow the steps below:
- Launch Mac’s Preferences and open Network.
- Now, in the left pane, select Ethernet and expand the dropdown of Locations.
- Then select Edit Locations and enter a name for the connection like Statis IP.
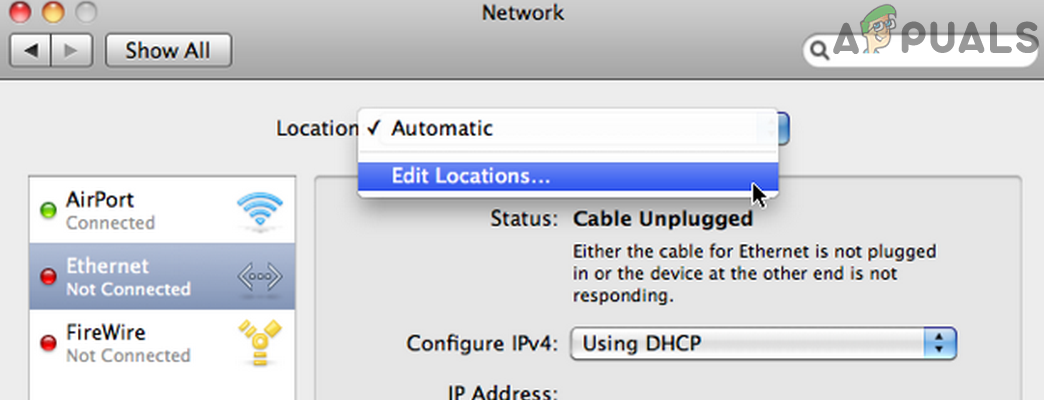
Open Edit Locations in the Mac’s Network Preferences - Now expand the dropdown of Configure IPv4 and select Manually.
IP address: 192.168.1.10

Subnet mask: 255.255.255.0

Router: 192.168.1.1

DNS: 8.8.8.8
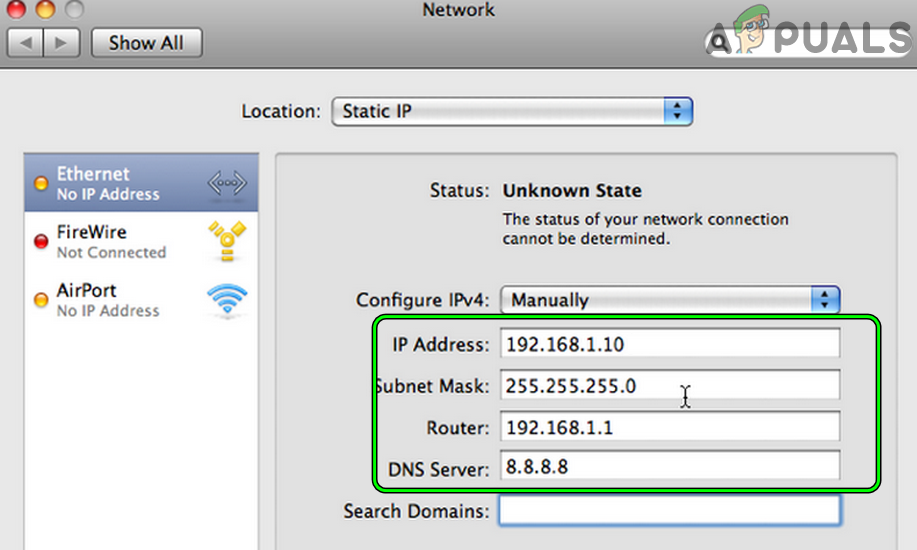
Manually Enter IPv4 Preferences in Mac - Afterward, apply the changes made.
Use the Satellite’s Web UI to Install the Manual Update of the Firmware
- Connect the Orbi satellite with an ethernet cable to a PC and press the reset button of the Orbi device for 15 seconds. Make sure no other device is connected to the PC or router.
- Then release the reset button and wait for at least 5 to 6 minutes.
- Now launch a web browser (preferably Edge or Firefox) and enter the following in the address bar of the browser or you may use the ipconfig/all in an elevated Command Prompt to know the default gateway and use that IP to log in to the Satellite’s web UI:
192.168.1.250
- Then log in using the credentials and use the Firmware Update tab of the Web UI to update the firmware of the satellite.
Manually Update the Orbi’s Firmware Through the Web UI - Afterward, factory reset the Orbi Satellite and re-sync it to the router to check if the issue is resolved. If not, then you may proceed further with the next steps.
Launch and Configure the TFTPd64 Software
- Launch the TFTPd64 application as administrator and expand the dropdown of Server Interface.
- Then select the system’s ethernet connection and enter the router’s IP in the Host File field, usually, the following:
192.168.1.1
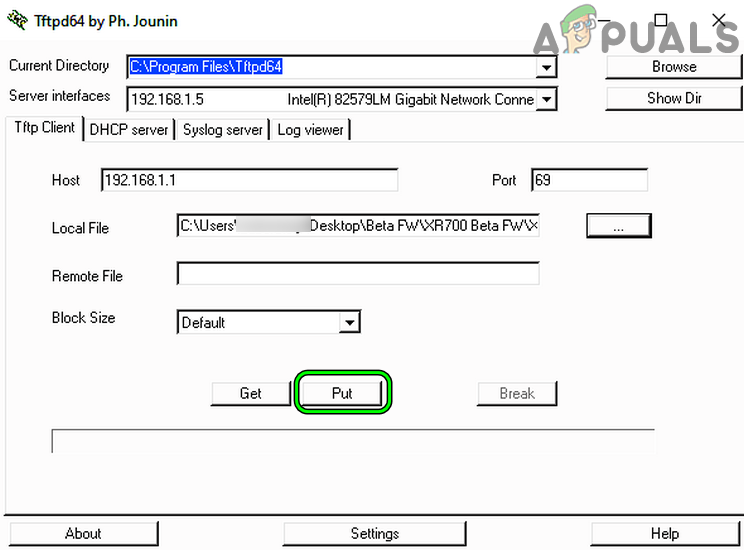
- Now set the Port field to 69 and click on the three horizontal ellipses in front of the Local File field.
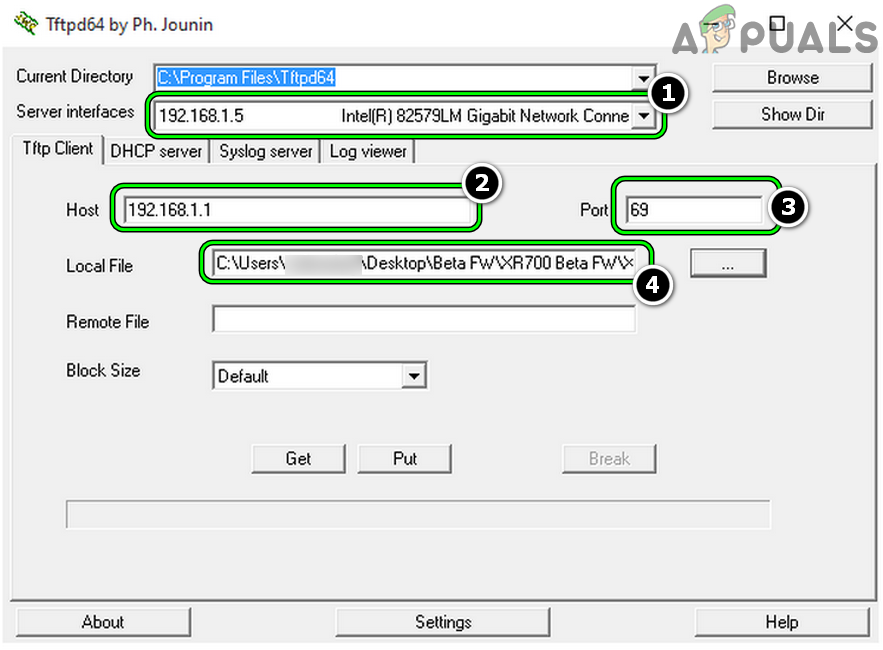
Set the TFTP Values in its Client - Then browse to the directory where the Orbi’s firmware (downloaded earlier) was extracted and select the extracted file (the file with .img or .chk extension).
Then move to the next step without clicking on Put (or any other button) in the TFTP client.
Run the Continual Ping Command in the Command Prompt
- Power off the Orbi device and head to the PC.
- Then click Windows, search for Command Prompt, right-click on it, and select Run as Administrator.
Open Command Prompt as Administrator - Now execute the following:
ping -t 192.168.1.1
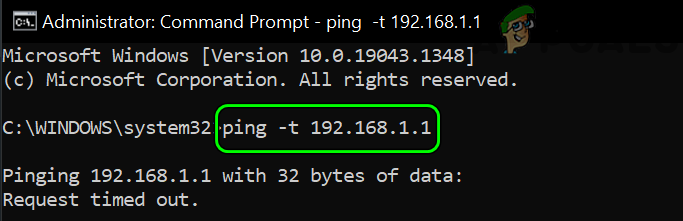
Run Continual Ping Command in the Command Prompt
You may see the destination host unreachable or request timed out but keep an eye on it after the next step.
Prepare the Router for the Firmware Installation
Now the final and the utmost step is to prepare the router/satellite for the firmware installation.
- Firstly, connect the router and PC through an ethernet cable. Make sure you are using the ethernet port of the router but not the Internet port.
- Then, make sure to unplug all port connections from the PC and router except the mutual connection.
- Now power off the router for 10 seconds and then press/hold the reset button on the back of the Orbi device by a pointy object (like a paperclip).
- Now power on the device but keep the hold of the reset button. Keep checking the Command Prompt window if it shows a successful ping.
- Then keep an eye on the power LED of the Orbi device which will be orange at first and then will start flashing.
- Wait till the power LED flashes 10 times or the Command Prompt windows shows a successful ping.
- Then release the reset button. Keep in mind that you may have to hold the reset button of the Orbi device for around 30 seconds in the complete process.
Perform the Firmware Installation
- Now head to the TFTP client window and click on the Put button. If everything was set up properly, then a pop-up of blocks retransmitted will be shown. Afterward, hopefully, the Orbi flashing white light issue would be resolved.
Click on Put in the TFTP Client - If there was no transmission, try to repeat the above process as it is very common, even for some of the experienced users, to miss the little TFTP time window the Orbi device offers before moving to the normal startup. Some users reported that they have to repeat the above process around 10 times to properly install the firmware. Afterward, make sure to remove the static IP from the PC (if not required otherwise).
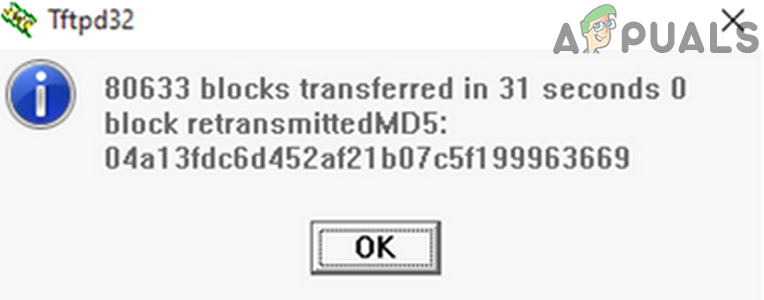
Blocks Transmitted Message in the TFTP Client
If the satellite fails to allocate an IP to the PC, then use the arp-a command in an elevated Command Prompt to find the IP address the satellite is generating. Afterward, set the system’s static IP address as per that IP and check if you can use that IP to access the Web UI of the satellite (as discussed earlier) or perform the manual installation of the firmware.
If none of the above solved the problem, then get the Orbi device checked for a hardware issue, or if under warranty, get it replaced. If that is not an option or you want to try to troubleshoot the “dead” router, then some of the advanced users may use the U Boot to boot the main board of the router (you may need a serial connection) and afterward, flash the firmware (but that method is too technical to be discussed here as it will be different for every model of the Orbi device).