Fix “Object reference not set to an instance of an object” in Microsoft Visual Studio
The Object reference not set to an instance of an object error is a common Windows issue from Microsoft Visual Studio. This error occurs when a Visual Studio object is absent, null, or inaccessible.
Interestingly, this issue isn’t exclusive to Microsoft Visual Studio and may appear in other applications relying on Visual Studio dependencies. Below are some likely causes:
- Missing Windows Update – The issue may arise from a conflict between system drivers and installed touchscreen devices. The 1803 update fixed this, so ensure it’s installed.
- Corrupted Visual Studio data – Corruption in your current Visual Studio user data may cause this. Reset the user data on your account to fix it.
- Inadequate Visual Studio permissions – This error may occur if Visual Studio lacks necessary permissions to modify files. Run the application as an administrator to resolve this.
- Conflict with Touch Keyboard and Handwriting Panel Service – For touchscreen device users, this service might cause the conflict. Temporarily disable it to test.
- Outdated Visual Studio version – This issue may occur after importing a new project. Update your Visual Studio to fix it.
- Outdated Visual Studio extensions – Ensure all your Visual Studio extensions are updated as outdated ones might cause this error.
- Missing ASP.NET or Web Tools dependency – Ensure these dependencies are installed if you experience this error while opening projects using Web Tools and ASP.NET.
- Vault Server issue – If accessing AutoDesk Vault prompts this error, check if critical Vault services are operational.
- Corrupted local Vault Client profile – Deleting your local Vault User profile might resolve this if the profile is corrupted.
- Outdated Vault version – Ensure you’re using the latest Vault deployment package to avoid this error.
- Corrupted Vault installation – Broad corruption within your local Vault installation might cause this error. Reinstall to fix it.
- Antivirus or firewall interference – Aggressive antivirus software might be blocking the Vault executable. Whitelist the executable or uninstall the interfering software to resolve this.
1. Install the 1803 Update (Windows 10 Only)
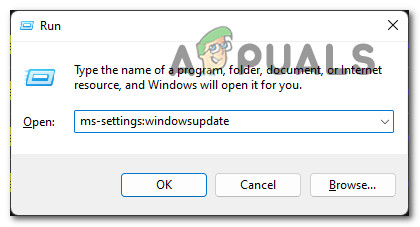
- Press Windows key + R, type “ms-settings:windowsupdate”, and press Enter to open Windows Update in the Settings menu.
Access Windows Update - Click Check for Updates.
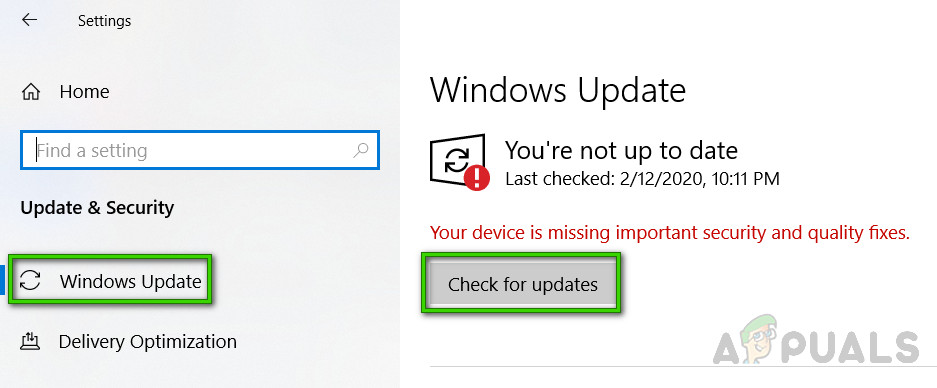
Check for Updates - Install any pending updates. Restart your computer if prompted, and return to this screen to ensure all updates are installed.
2. Disable the Touch Keyboard and Handwriting Panel Service (if applicable)
Warning: Disabling this will affect touchscreen functionality. If you rely on a touchscreen, don’t proceed.
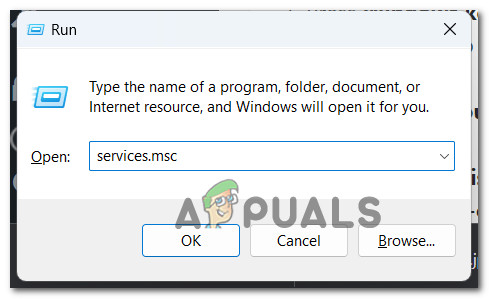
- Press Windows key + R, type ‘services.msc’, and press Ctrl + Shift + Enter to open the Services screen with administrator privileges.
Open the Services screen - At the User Account Control (UAC) prompt, click Yes to grant access.
- Find and right-click on the Touch Keyboard and Handwriting Panel service, then select Properties.
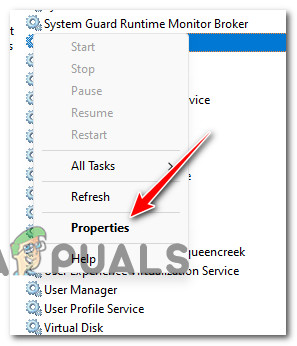
Accessing the Properties screen - In the Properties window, set Startup Type to Disabled and click Apply.
- Restart your PC and test to see if the issue persists.
3. Reset Visual Studio User Data
Note: Resetting Visual Studio will remove personalized settings like layout and linked accounts.
- Close Visual Studio completely.
- In File Explorer, navigate to:
C:\Users\%userprofile%\AppData\Local\Microsoft\VisualStudio
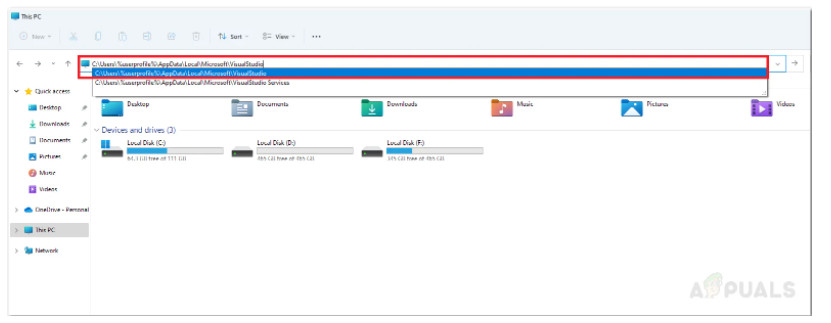
Access the Visual Studio User Profile folder - Select all items in the folder, right-click, and choose Delete.
- Restart your PC, then open Visual Studio and check if the problem is resolved.
4. Run Microsoft Visual Studio with Administrator Permissions
- Press the Windows key and type Visual Studio in the search bar.
- Right-click Visual Studio in the search results and select Open file location.
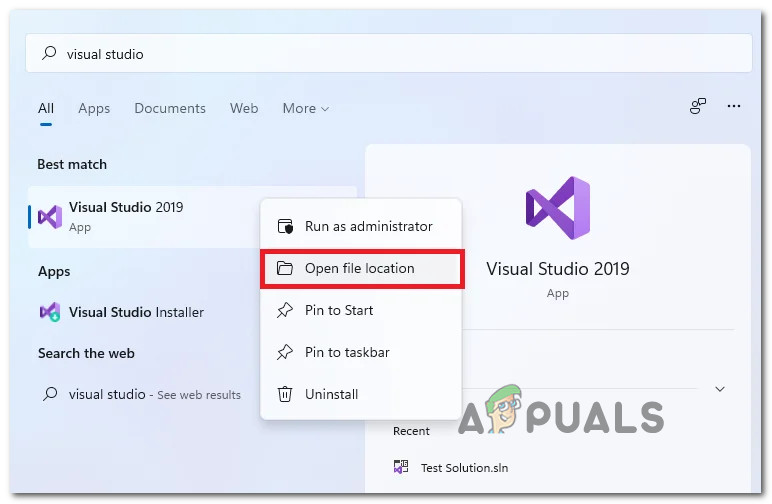
Open file location for Visual Studio - In the location window, right-click Visual Studio and choose Run as Administrator.
- Perform the action that was causing the error to confirm if it’s resolved.
5. Update Microsoft Visual Studio
- Press the Windows key and type Visual Studio Installer in the search bar.
- Click Open on the Visual Studio Installer in the search results.
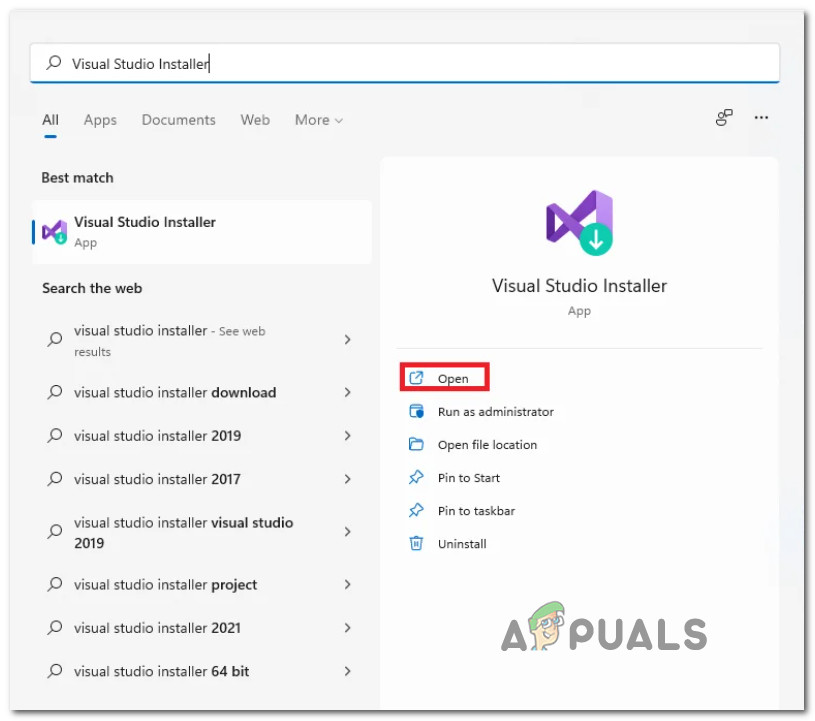
Open Visual Studio Installer - Wait for it to check for updates. If an update is available, click Update and follow the instructions.
- Restart your PC and check if the error is still occurring.
6. Update Microsoft Visual Studio Extensions
- Open the project that is experiencing issues.
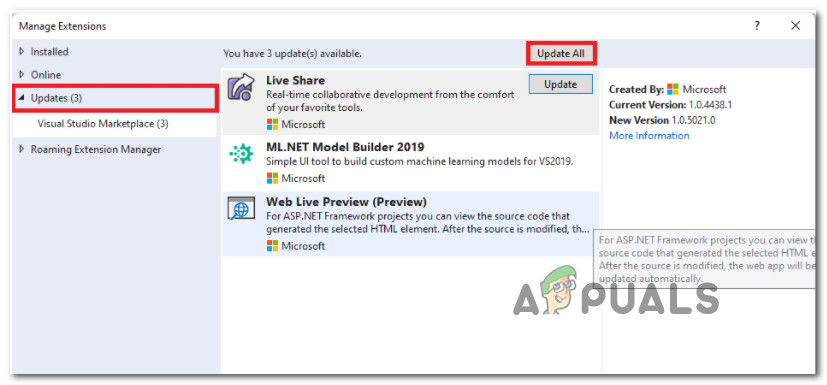
- Click Extensions on the ribbon bar, then choose Manage Extensions.

Manage Extensions - In the Extensions tab, check for available updates and click Update all if any are listed.
Update Extensions - Restart Visual Studio and check if the issue is resolved.
7. Install Microsoft ASP.NET and Web Tools
- Open Visual Studio and load the problematic project.
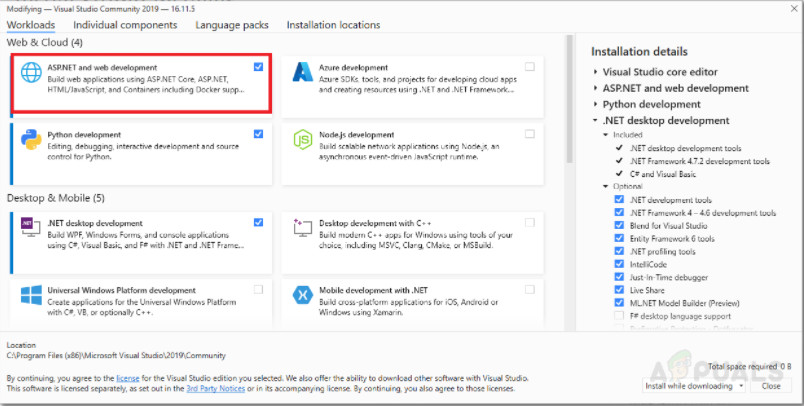
- Go to Tools > Get Tools and Features on the ribbon bar.
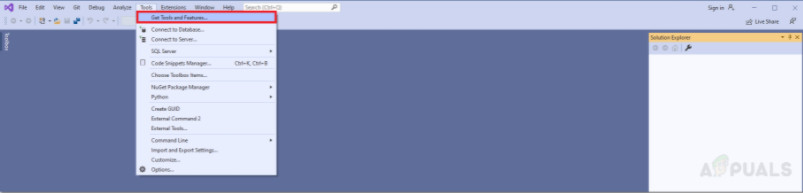
Get Tools and Features - Select ASP.NET and web development and click Install while downloading.
Install ASP.NET and Web Tools - Restart Visual Studio and verify if the issue is fixed.
8. Check for a Vault critical server issue (if applicable)
- Log into Windows on the Vault server computer and press Windows key + R to open the Run dialog box.
- Type ‘services.msc’ and press Ctrl + Shift + Enter to open the Services screen with administrative privileges.
Open up the services screen - Check if the following services are active and start them manually if they’re not:
Autodesk Data Management Job Dispatch

SQL Server (AUTODESKVAULT)

SQL Server Agent (AUTODESKVAULT)

Windows Process Activation Service

World Wide Web Publishing Service
- Restart any inactive service, then replicate the action that caused the error to see if it has been resolved.
9. Delete the Local Vault Client Profile (if applicable)
If the error persists when using Vault Servers, delete the following folders to clear the data tied to the Vault Client Profile (close the main application first):
- “%APPDATA%\Autodesk\VaultCommon”
- “%APPDATA%\Autodesk\Productstream20xx”
- “%APPDATA%\Autodesk\Vault Explorer 20xx”
- “%APPDATA%\Autodesk\AutoCAD 20xx Vault Addin”
- “%APPDATA%\Autodesk\Autodesk Vault Basic 20xx”
- “%APPDATA%\Autodesk\Autodesk Vault Workgroup 20xx”
- “%APPDATA%\Autodesk\Autodesk Vault Professional 20xx”
- “%APPDATA%\Autodesk\Autoloader”
- “%APPDATA%\Autodesk\Reference Repair Utility”
- “%APPDATA%\Autodesk\Inventor 20xx Vault Addin”
- “%APPDATA%\Autodesk\VaultManager”
Note: Deleting these folders will not affect the functionality of the Autodesk app. They will be recreated the next time the application is launched.
10. Update Vault Version (if applicable)
Ensure you’re using the latest version to avoid errors. Visit the official Vault Download page to install the latest build.
11. Uninstall and Reinstall Vault (if applicable)
Issues with Vault software may require repair, reinstall, or uninstalling Vault Server, Vault Client, or Vault integration for a CAD product.
Uninstall and Reinstall the Vault Client
If facing issues due to potential corruption within the Vault Client, follow these steps:
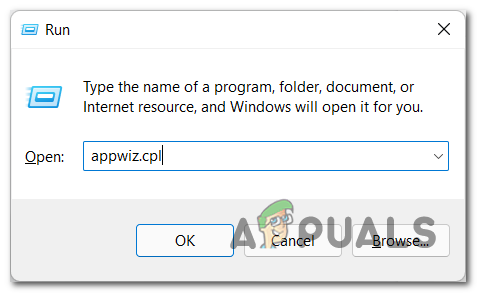
- Press Windows key + R to open the Run dialog box.
- In the Run dialog, type ‘appwiz.cpl’ and press Enter. This will open the Programs and Features menu.
Open the Programs and Features menu - Scroll throughthe list to find Vault Basic, Vault Workgroup, or Vault Professional (Client). Once located, right-click on the program and select Uninstall.

Uninstall Autodesk Vault - In the uninstallation window that appears, click Uninstall and follow the on-screen instructions to complete the process.

Starting Autodesk Vault uninstallation process - After the uninstallation finishes, navigate to the installation directory (where the software was originally installed) and delete any leftover files or folders.
- Restart your computer and reinstall the software either from the original installation media or by downloading a fresh copy.
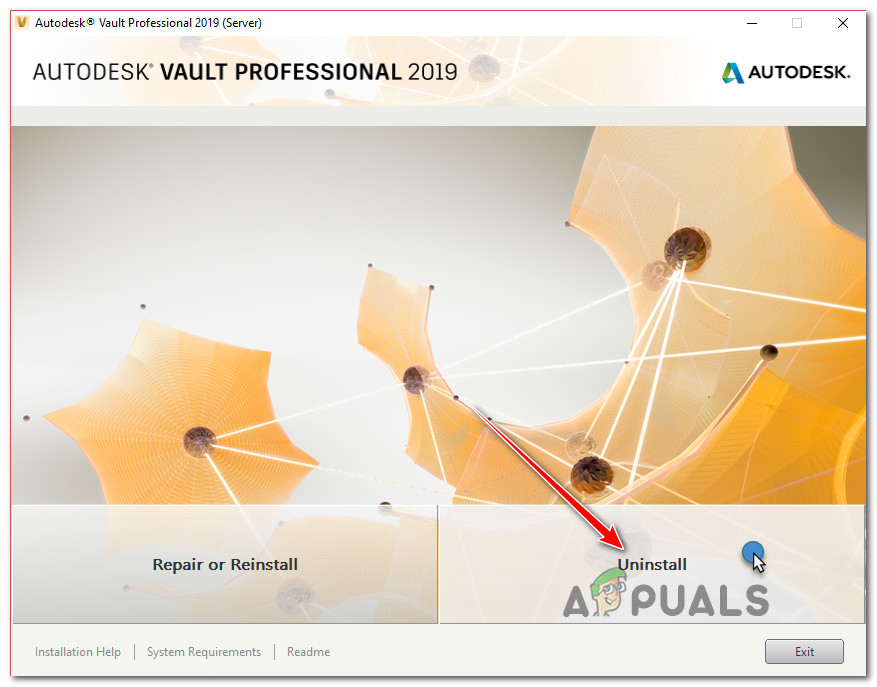
Uninstall and Reinstall the Vault Server
If corruption within Vault Server components is indicated, follow these steps:
- Press the Windows key + R on your keyboard to open the Run dialog box.
- In the Run dialog, type ‘appwiz.cpl’ and hit Enter. This will open the Programs and Features menu.
Programs and Features menu - Look for Vault Basic, Vault Workgroup, or Vault Professional (Server) in the list. Right-click on the appropriate program and select Uninstall.

Uninstall Autodesk Vault Professional Server - In the next window, click Uninstall and follow the instructions shown on your screen to complete the process.
Uninstall Autodesk Vault server - Once the uninstallation is complete, navigate to the Autodesk Vault installation folder on your computer and delete any remaining files from this directory.
- Restart your computer. After rebooting, reinstall the server software either from the original installation media or by downloading a fresh copy.
12. Prevent Antivirus Interference (if applicable)
Security software can sometimes interfere with programs like AutoDesk Vault. Disable real-time protection or uninstall the antivirus suite to resolve this issue.
- Press the Windows key + R on your keyboard to open the Run dialog box.
- In the dialog box, type ‘appwiz.cpl’ and press Enter. This will open the Programs and Features menu.
- In the list of installed programs, locate your antivirus software. Right-click on it and select Uninstall. Follow the on-screen instructions to complete the removal process.
- After the uninstallation is complete, restart your computer.
- To ensure all files related to the antivirus are completely removed, follow the steps in this detailed uninstallation guide.


