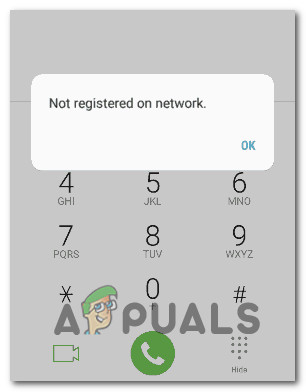
How to Fix the ‘Not Registered on Network’ Error on Android
If you’re encountering the ‘Not Registered on Network‘ Error on your Android device and you’re only able to make emergency calls, the issue is most likely caused by a locked or defective phone or a faulty SIM card.
This problem is reported to occur on every major and minor Android phone manufacturer including Samsung, OnePlus, Xiaomi and Oppo.
As it turns out, there are several different underlying causes that might trigger this error, depending on your Android manufacturer and your particular scenario. Here’s a list of underlying culprits that are likely responsible for this issue:
- SIM Toolkit app is stuck in a limbo state – More often than not, this particular issue is facilitated by some sort of issue with the SIM Toolkit app. If this critical app is hindered, your phone will be unable to facilitate the connection with your network carrier. To resolve this issue, you’ll need to reboot the SIM Toolkit app manually and clear its cache and data.
- Network Settings inconsistency – It’s also possible to encounter this particular issue due to some kind of network setting inconsistency. This problem is mostly reported with Samsung Android devices and can be fixed by going into the Settings screen and resetting the Network Settings via the Reset tab.
- The network is not set to Auto Connect – If you recently traveled abroad and you modified the default behavior of the Network mode, your phone might be unable to connect with your network carrier once you get back home. If this scenario is applicable, you should be able to fix the issue by modifying the behavior of network mode back to auto-connect.
Now that we went through every potential cause of the ‘Not Registered on Network‘ Error, here are a few fixes that other affected users have successfully used to get to the bottom of this error message and successfully fix the issue.
1. Reboot the SIM Toolkit app
As it turns out, one of the common instances that will produce the ‘Not Registered on Network‘ error is a situation in which the SIM Toolkit app is stuck in a limbo state that prevents the system from enabling the subscriber identity module and initiate action that will connect your phone to your mobile carrier.
This is especially an issue on Samsung devices, but this particular issue is reported with other Android manufacturers as well.
If this scenario is applicable, you should be able to fix the issue by restarting your Android phone without the SIM tray and clear the data and the cache before reconfirming the required permissions of the SIM Toolkit app – This will serve the purpose of allowing your phone to re-initiate the Sim Toolkit app, resolving the ‘Not Registered on Network‘ error in most cases.
If you’re looking for step by step instructions on enforcing this particular issue, follow the instructions below:
- First things first, remove your SIM card tray and take out your SIM card.
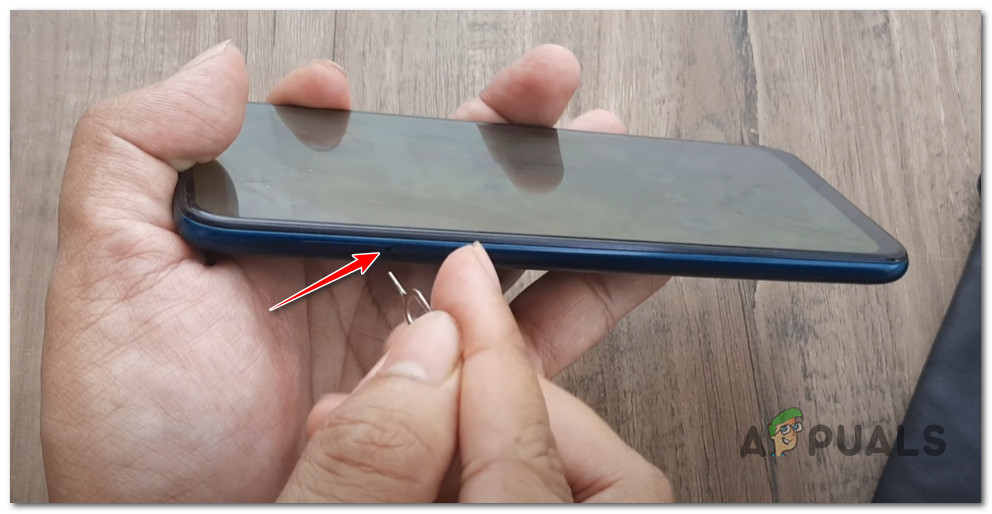
Take out the SIM card Note: Most phones ship with a SIM key that you’ll need to use to pop open the SIM card tray. If you don’t have that, a needle or a toothpick will do the job as well.
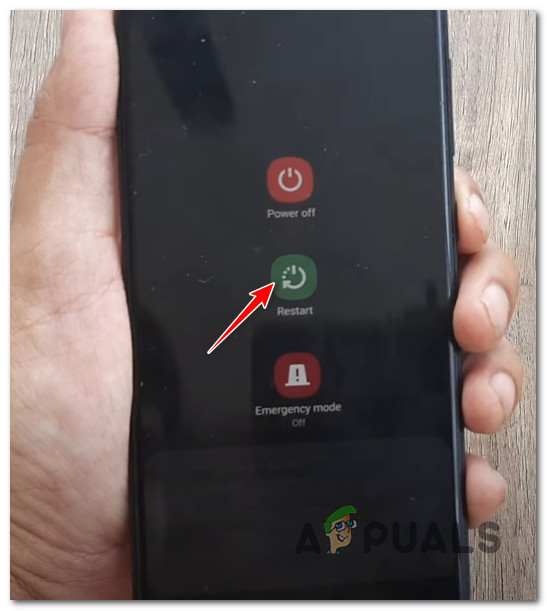
- Once the SIM card tray is opened, remove your SIM card and reboot your phone conventionally by pressing the power button and tapping on Restart when you’re prompted by the power menu.
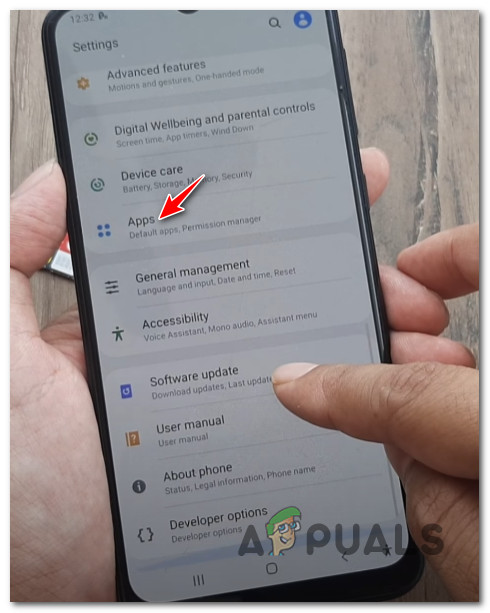
Restart the Android Phone - Once your Android phone boots back up, access the Settings menu from the home screen of your device.
- Once you’re inside the Settings screen, scroll down through the menu and tap on Apps.
Accessing the Apps menu - Inside the Apps menu, use the search function to search for ‘SIM Toolkit’ and tap on it. Additionally, you can simply scroll down through the Apps list until you find it.
- Once you’re inside the dedicated menu of SIM Toolkit, scroll down to the bottom of the screen and tap on the Force Stop icon to make sure the app is not actively running.
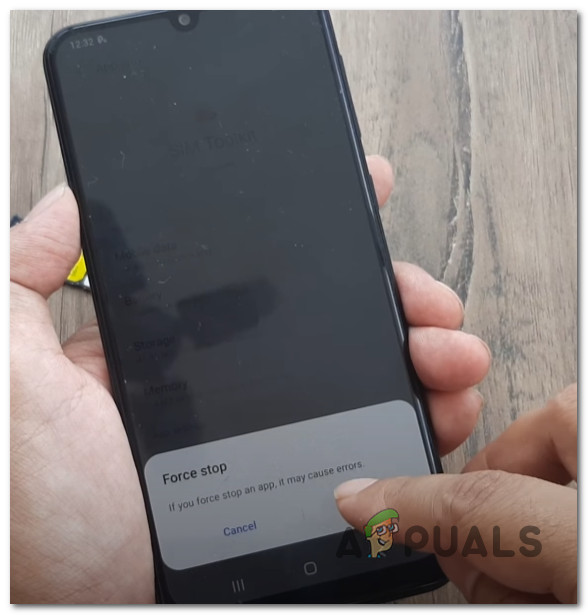
Force stop the Android device - After you’ve done this, tap on Storage (under Usage).
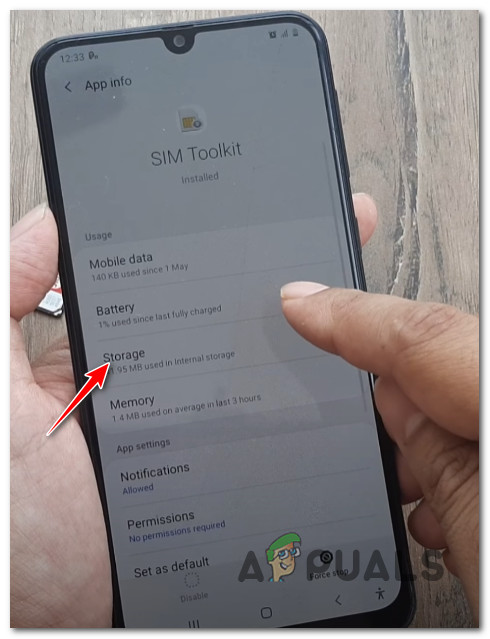
Access the Storage menu - From the Storage menu, clear both the data and the cache by utilizing the respective menus. You will be asked to confirm at a prompt for both operations.
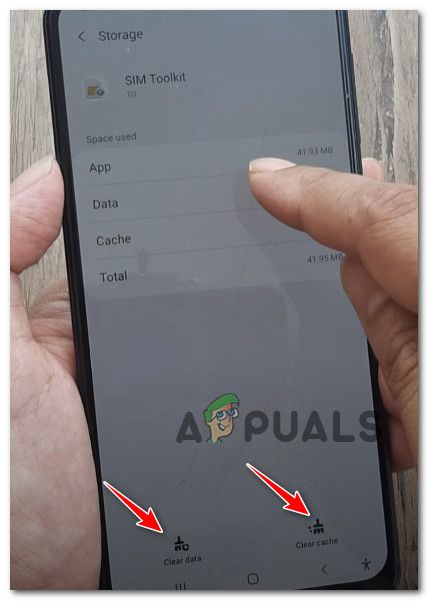
Clear the data and cache of Android of SIM Toolkit - As soon as both operations are completed, get back to the initial App info menu of SIM Toolkit and tap on Permissions.
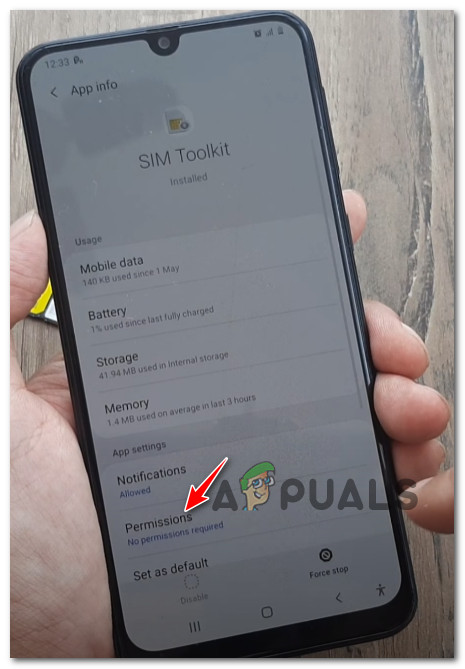
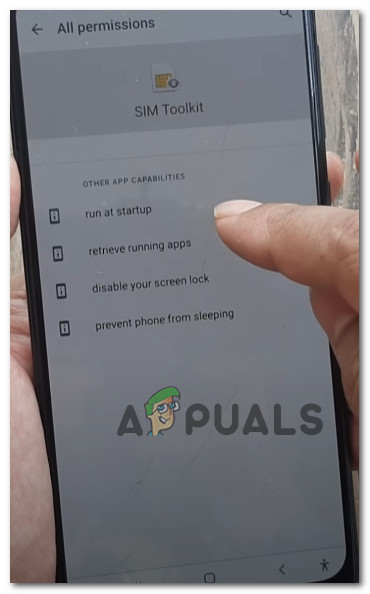
Accessing the permissions tab - Once you’re inside the permissions tab, tap the action button in the top-right corner of the screen and select All permissions to get an overview of every involved permission.
- After you made sure that every involved permission is displayed, tap on every permission individually and hit Ok at the prompt to ensure that you give the SIM Toolkit app the capabilities to bridge the mobile data connection with your carrier.
Granting the required permissions - Finally, pop open the SIM Tray once again and re-insert your SIM card to see if the ‘Not Registered on Network‘ error is now fixed.
In case the same kind of issue is still occurring, move down to the next potential fix below.
2. Reset Network Settings
Another viable reason that might cause the ‘Not Registered on Network’ error on Android phones is network inconsistency.
This can happen for a variety of different reasons, but luckily the fix is the same in most cases and across the vast majority of Android phone manufacturers – You’ll need to reset your network settings.
The exact instructions for doing this will be different from manufacturer to manufacturer, but in most cases, you should be able to do this directly from the Reset menu inside the Settings menu cluster.
For step by step instructions on how to do this, follow the instructions below:
- From the home screen of your Android device, access the Settings menu.
- Once you’re inside the Settings menu, scroll all the way down to the bottom of the list and tap on the Reset option.
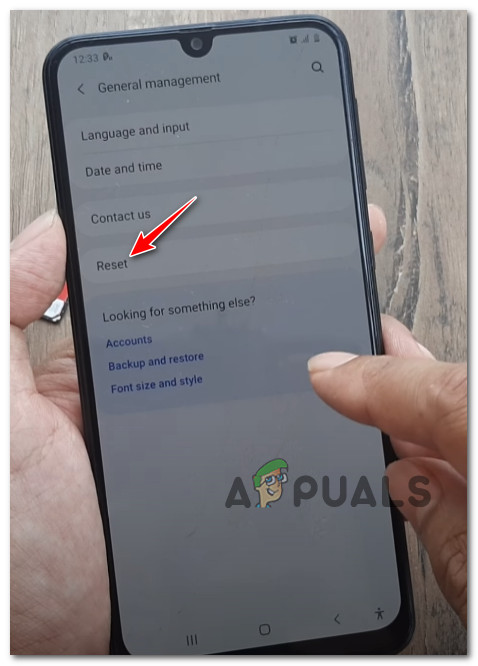
Accessing the Reset option Note: On Samsung phones, you’ll find the Reset option inside the General Management tab.
- From the Reset tab, tap on Reset Network Settings.
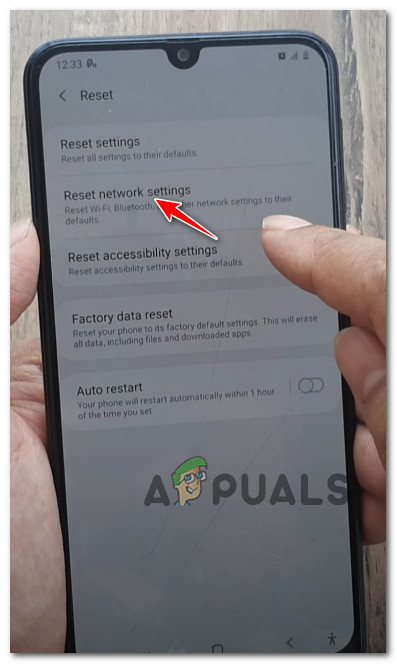
Resetting the Network settings - Inside the dedicated Reset Network Settings, tap on Reset Settings and confirm by hitting Reset once again at the confirmation prompt.
Note: Depending on the security mechanisms that you previously enforced, you might be asked to insert your PIN or draw your pattern at this point. - After you get the success message, restart your Android phone once again and see if the issue is fixed once your phone boots back up.
Restart the Android Phone If you’re still encountering the same ‘Not Registered on Network’ error even after resetting your network settings, move down to the next potential fix below.
3. Set the Network Mode to Auto-Connect (if applicable)
If you’re using a dual SIM Android phone, there’s a very high chance that this issue is occurring due to how the dual network modes are configured.
By default, they’re set to Auto-Connect, but if you’ve been traveling to a different country, you might have modified them to connect to a particular network in order to facilitate roaming – This might create an issue when you get back home as your phone is now hard-wired to connect to 2G or 3G instead of the best available option
If this is the source of the ‘Not Registered on Network’ error for you, the fix, in this case, is to access your Mobile Network settings and change the default behavior of both Network Modes so that they both Auto Connect.
For step by step instructions on how to do this, follow the guide below:
Note: The instructions below have mostly been reported to be effective for Samsung devices.
- From the home screen of your Android device, tap on the Settings menu.
- Once you’re inside the Settings menu, access the Connection tab, then tap on Mobile Networks.
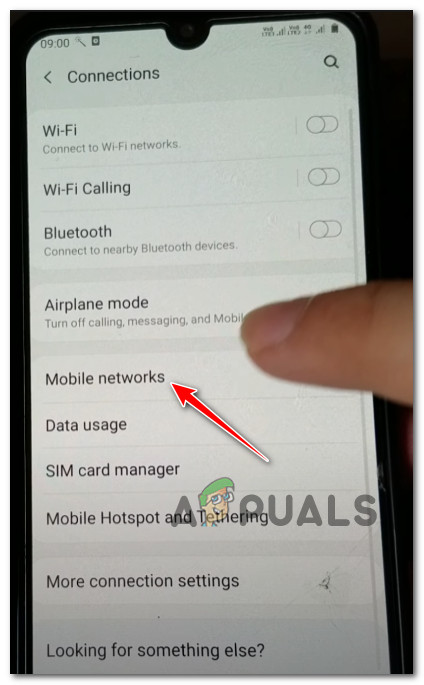
Access the Mobile Networks settings menu - Once you’re inside the Mobile network settings, you should see 2 different Network mode menus (if you’re on a dual SIM device).
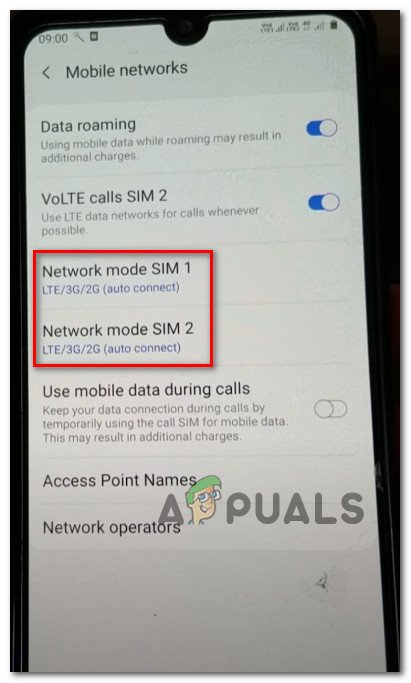
Set both to Auto Connect - Tap on both menus and ensure that the sub-option of each is set to Auto Connect.
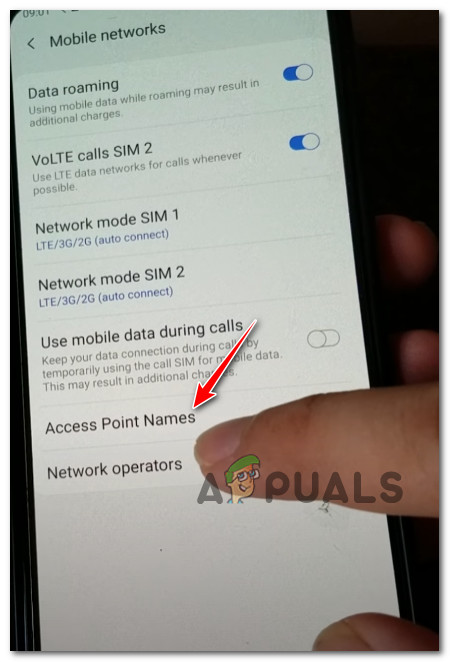
- Once you’ve done that, tap on Network Operators from the bottom of the Mobile Networks screen.
Accessing the Network operators list - Inside the Network operators menu, tap on Select Automatically and wait until the scan is complete.
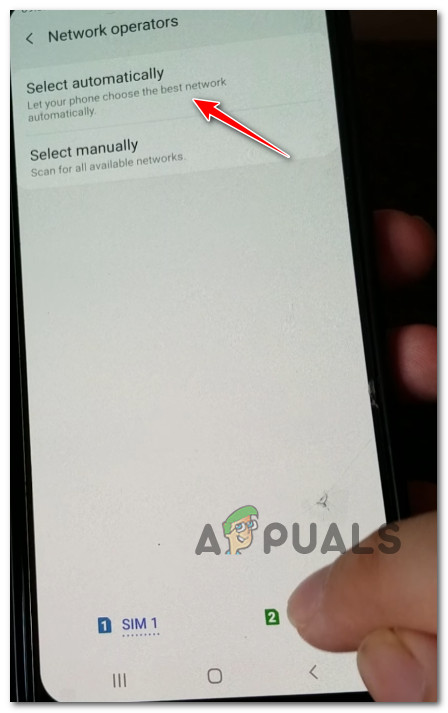
Select the correct network operators Note: If you are using a dual SIM setup, you will need to do this for both SIM cards by selecting them both from the menu at the bottom of the screen.
- Once you’ve done this, reboot your Android phone conventionally and see if the problem is fixed once the next startup is complete.


