How to Fix “No Connection could be made. ADB Error 10061”
Fix: No connection could be made because the target machine actively refused it. (10061)
Android Studio’s ADB (Android Debug Bridge) is a command-line tool to communicate with an Android device (either through a USB or by using TCP protocol). Many users, when issuing an ADB command e.g., adb connect, they encounter the ADB error 10061 with the following type of message:

The ADB error 10061 means that the remote device is refusing the client’s TCP connection request (either the IP or port). This error can occur due to many reasons but the following can be categorized as the main:
- Outdated System’s OS, Android Studio, or Device Drivers: The incompatibility between the system’s OS, Android Studio, or device driver (if any one of these is outdated) may lead to the error 10061.
- Improper Configuration of the USB Debugging: USB Debugging on the Android device is essential for the first authorization of the Android device to connect to ADB and if it is disabled or the proper connection method (like File Transfer, etc.) are not used, then ADB may fail to make a connection with error 10061.
- ABD’s Usage of Other Network Adapters: ADB is not good in handling multi-networks on a system and if your system is using multiple networks (like Ethernet and Wi-Fi connection at the same time), then it may lead to the current ADB error.
- Improper ADB Commands Used: If the proper ADB commands are not used (like not disconnecting from a previous session), then ADB may show the error at hand.
Update the PC’s OS to the Latest Build
The ADB error 10061 could be a result of the incompatibility between the outdated PC’s OS and other system modules (especially, related to ADB). In such a case, updating the PC’s OS to the latest build may solve the problem. For elucidation, we will discuss the process of updating a Windows PC.
- Click Windows, search and open Check for Updates.
- Now, in the right pane of the resulting window, click on Check for Updates, and if some updates are available, download and install the updates (optional updates as well).
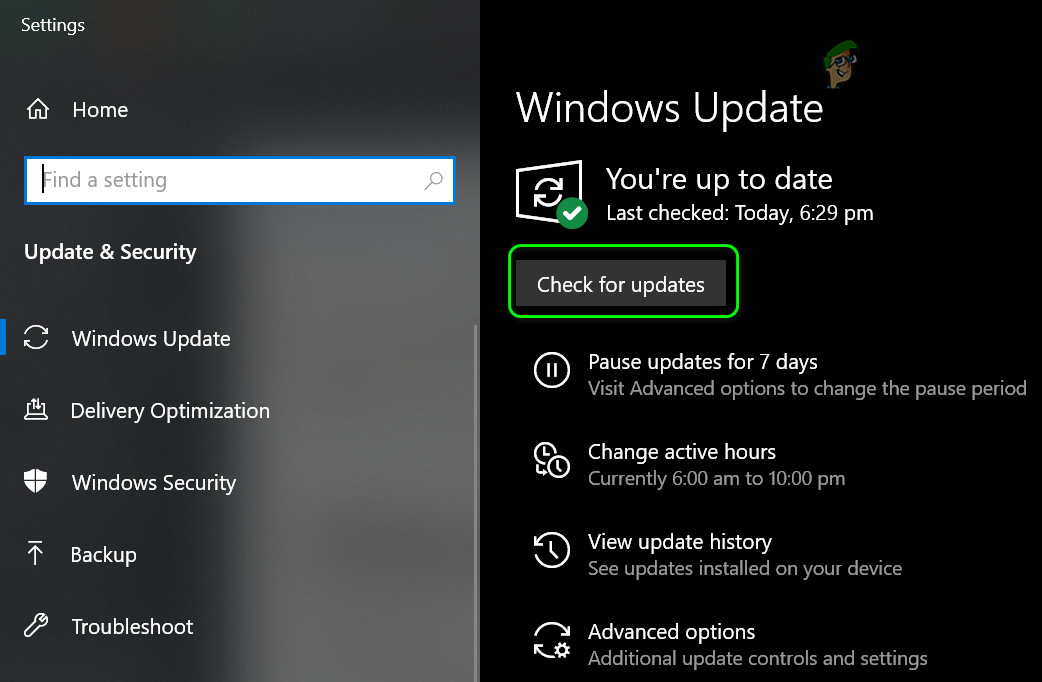
Check for Windows Updates - Once the PC’s OS is updated, restart the system and check if the ADB error 10061 is cleared.
Update the Android Studio and SDK Platform Tools
‘No connection could be made ADB error 10061’ can be a result of an outdated Android Studio or SDK Platform-tools as it may lead to incompatibility with the OS/host device. Here, updating the Android Studio and SDK Platform Tools may solve the problem.
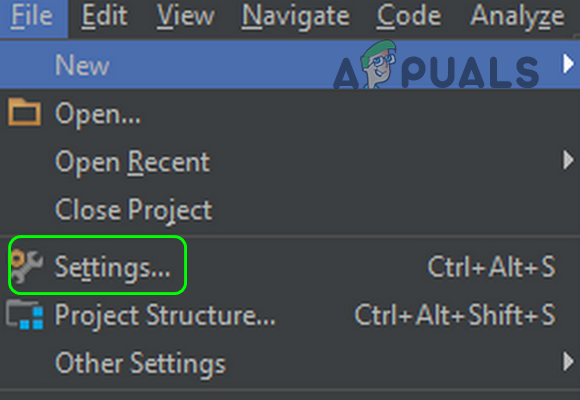
- Launch the Android Studio and expand its File menu.
- Now select Settings and in the left half of the resulting menu, expand Appearance and Behavior.
Open Android Studio’s Settings - Then expand System Settings and head to the Updates tab.
- Now, in the right half of the window, click on Check Now and if an update is available, download and install the update.
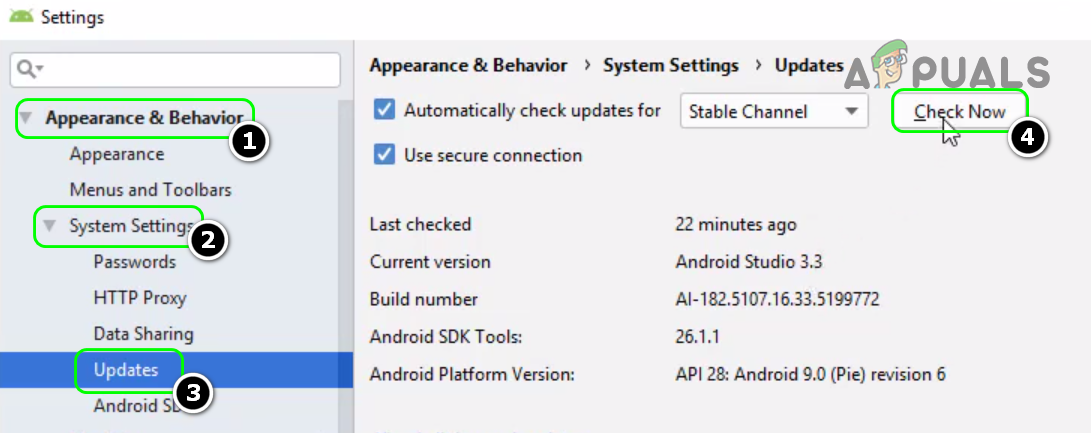
Check for Updates of Android Studio - Then relaunch the Android Studio and check if the ADB error 10061 is cleared.
- If not, again head to the System Settings tab of the Android Studio Settings and in the left pane, select Android SDK.
- Now, in the right pane, check if an update of the relevant packages is available. If so, download and install the update.
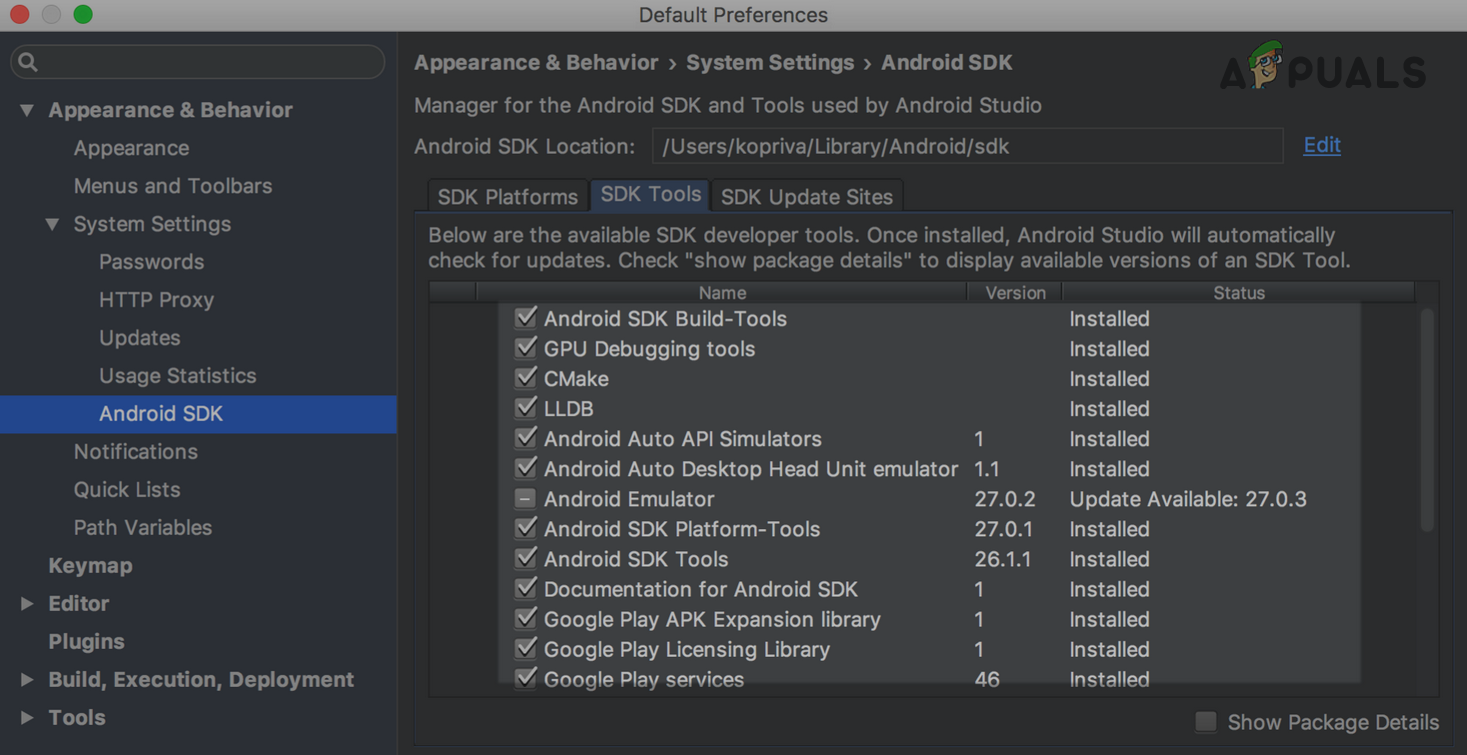
Update SDK Platform and SDK Tools in the Android Studio - Afterward, relaunch the Android Studio and check if the no connection could be made issue is resolved.
Update the Android Device Driver or Use an OEM-Provided Driver
If the driver of the Android device is outdated or improper in the system’s Device Manager, then you may encounter the ADB error 10061 in the Android Studio as it can cause incompatibility between the system and target machine. In this context, updating the Android device drive to the latest build or using an OEM-provided driver may solve the problem.
- Right-click on Windows and select Device Manager.
- Now, try to find the Android device in the options shown. You may find it under any of the different categories like Android devices, Android phones, portable devices, other devices, or USB controllers.
- Once found, right-click on the Android device and select Update Driver.
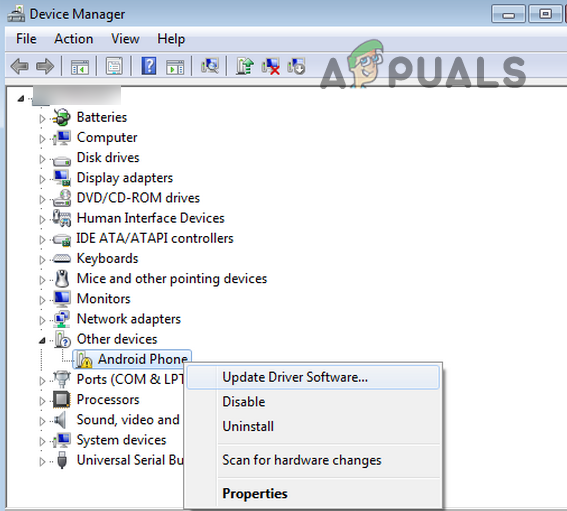
Update the Android Device Driver in the Windows Device Manager - Then click on Search Automatically for Drivers and if no update is available, then click on Search for Updated Drivers on Windows Update.
- If an updated driver is available, download and install the update.
- Once installed, restart your system, and upon restart, check if the ADB issue is resolved.
- If not, steer to the OEM website (like Huawei) and download the latest drivers as per the phone’s model.
- Now, right-click on the downloaded driver and select Run as Administrator.
- Then follow the prompts on the screen to install the driver and afterward, restart your system.
- Upon restart, check if the ADB error 10061 is cleared.
- If this doesn’t work, right-click on the Android device in the Device Manager and select Update Driver.
- Now, select Browse My Computer for Drivers and click on Let Me Pick from a List of Available Drivers on My Computer.
- Then select another driver and apply the changes made.
- Now restart your system and upon restart, check if the ADB issue is cleared.
- If this didn’t do the trick, then you may try all the other Android device drivers in the Device Manager one by one and check if any of the drivers solve the problem.
Disconnect the VPN on the System and Android Device
The Android Studio requires that both devices should be on the same network and if any of these devices have a VPN enabled on them, then the Android Studio may fail to find the other device on the same network, resulting in the ADB error 10061. In this context, disconnecting the VPN on both devices may solve the problem.
- Expand the hidden icon of the system tray and double-click on the VPN icon (e.g., AnyConnect).
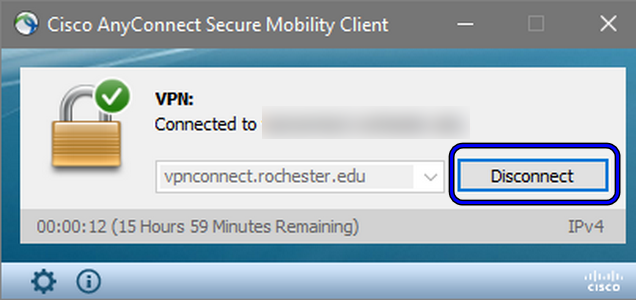
Disconnect VPN - Then select Disconnect and then, on the Android device, swipe up (or down) to show the Notifications tray of the device.
- Now, tap on VPN (if shown) and then tap on Disconnect.
- Once both devices are disconnected from the VPN, re-launch Android Studio, and while keeping the Troubleshoot device connection issues tab opened on the Studio, check if the target machine actively refused connection error 10061 is resolved.
- If that did not work, then check if disabling/enabling the Wi-Fi of the Android device solves the ADB problem.
Disable Other Network Adapters on the System
For proper functioning of the ADB, Android Studio requires both devices to be on the same network but the ADB debug bridge is not good at handling multiple networks. So, the usage of multiple networks (Ethernet or Wi-Fi) on a system may trigger the ADB behavior under discussion. In this scenario, disabling other network adapters on the system may solve the problem.
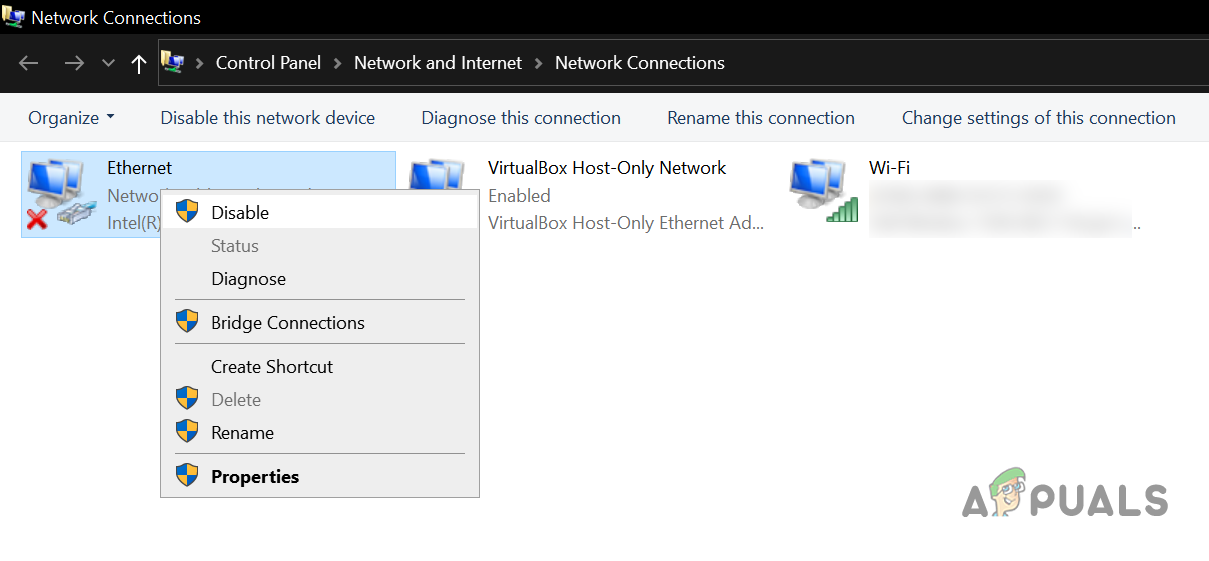
- Right-click on Windows and select Network Connections.
- Now, select Change Adapter Options and right-click on any of the network adapters.
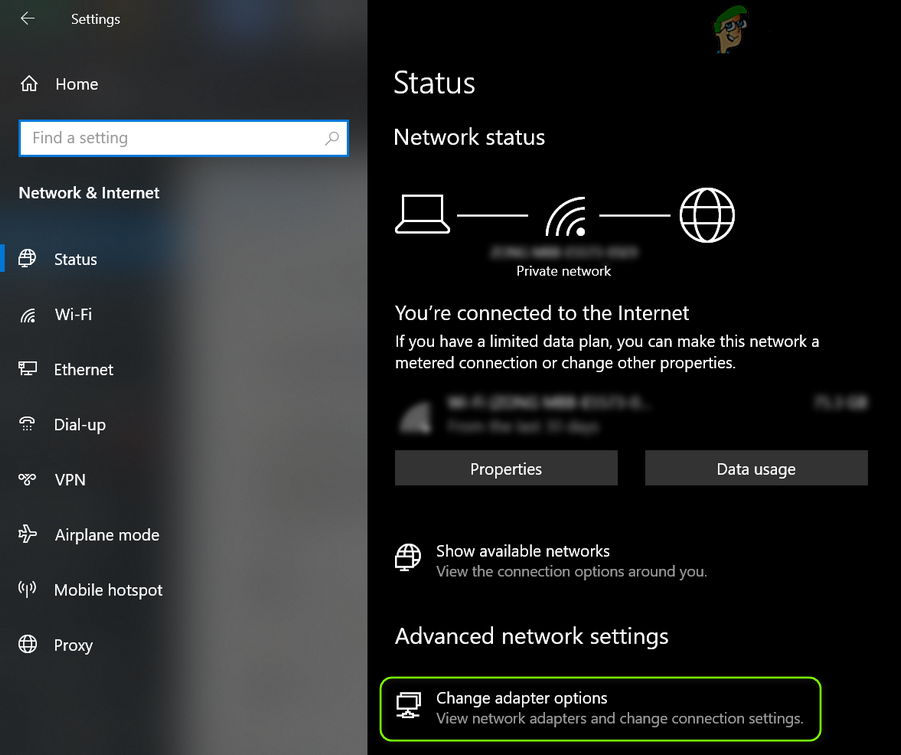
Open Change Adapter Options - Then select Disable and repeat the same on all the network adapters except the Wi-Fi adapter.
Disable Ethernet Adapter in Network Connections - Now restart the Android Studio and check if the ADB error 10061 is cleared.
- If that did not work, expand the hidden icon of the system tray and click on the Wi-Fi icon.
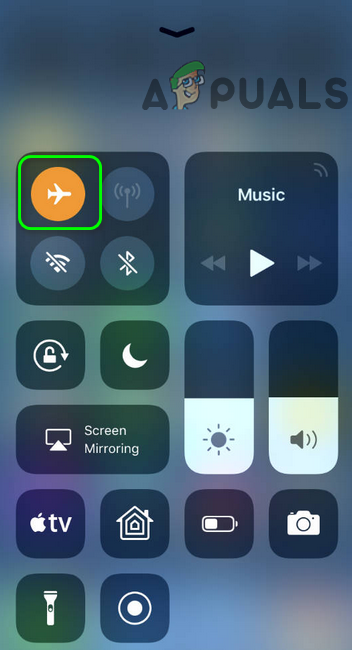
- Now select Airplane Mode and on the Android Device, swipe up (or down) to expand the Notifications tray of the device.
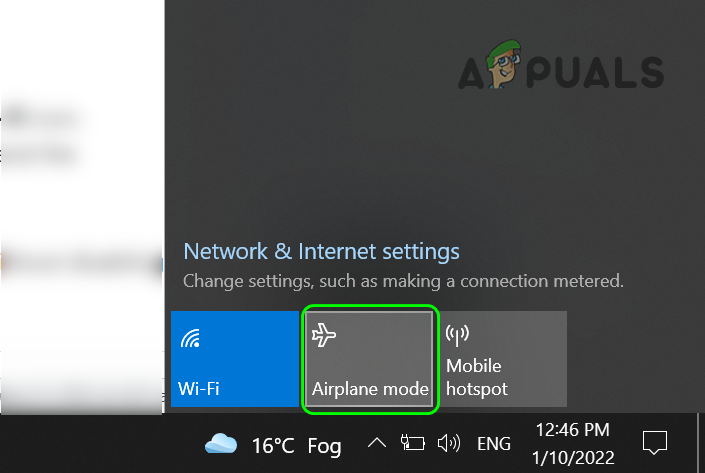
Enable Airplane Mode of the System - Then tap on the Airplane icon and afterward, enable the Wi-Fi on both devices (without disabling the Airplane mode).
Enable the Airplane Mode - Now re-launch the Android Studio and check if the ADB error 10061 is cleared.
- If the issue persists, check if disabling Wi-Fi in the router (not restarting the router) and then enabling it back solves the problem.
If that did not work, check if using Microsoft’s Your Phone app to connect the system/device and then executing the ADB commands solve the problem.
Edit the USB Debugging Settings of the Android Device
The USB debugging is an essential component of the ADB mechanism and if its settings are misconfigured, then ADB may show the warning of no connection could be made because the target machine actively refused it (10061). In this scenario, properly configuring the USB debugging of the Android device may solve the problem.
Enable USB Debugging in the Android Device Settings
- Firstly, enable the Developer Options of the Android device and then open the Android Settings.
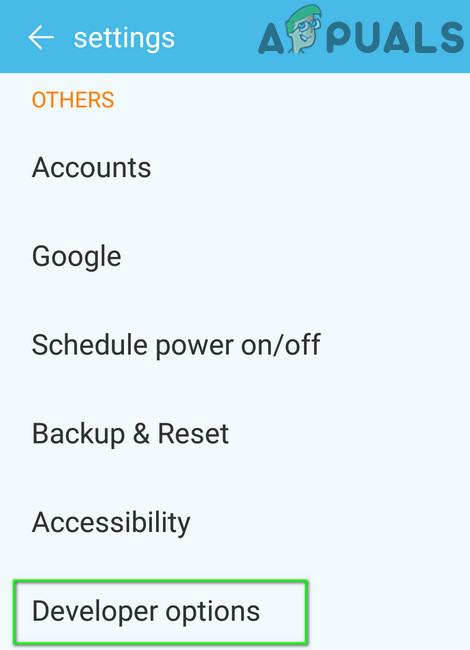
Open Developer Options - Now open Developer Options and enable USB Debugging (if disabled), otherwise disable/enable the USB Debugging. Keep in mind that for some Android models (like MXQ Pro), you may find the USB Debugging option in Apps > Settings (not in Android Settings).

Enable USB Debugging - Then execute the following in the elevated Command Prompt on the system:
adb connect <DeviceIP:Port>.
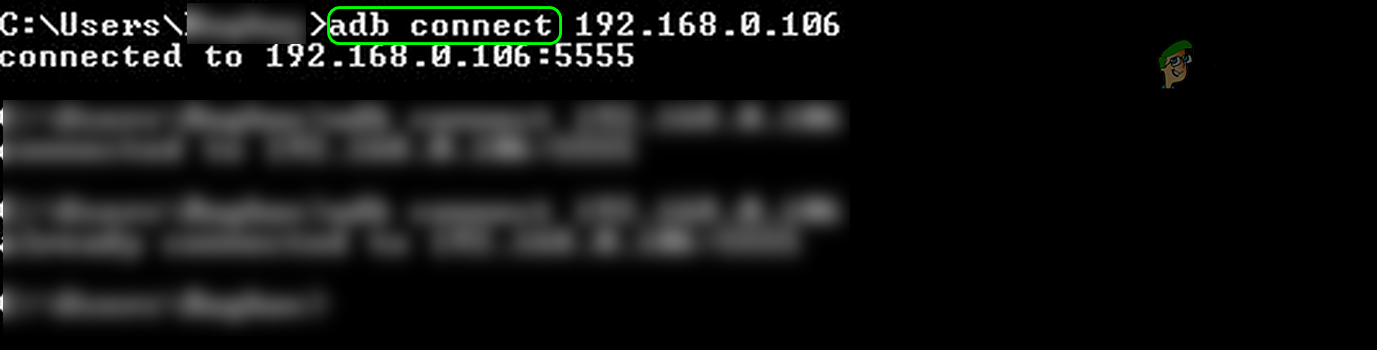
Use the ADB Connect Command - Then confirm the connection on the Android phone’s screen and check if the ADB error 10061 is cleared.
- If not, Revoke USB Debugging Authorizations and enable the Allow ADB Debugging in Charge Only Mode (some Android models might show the Allow ADB Debugging in Load Only Mode option) to check if that solves the problem.
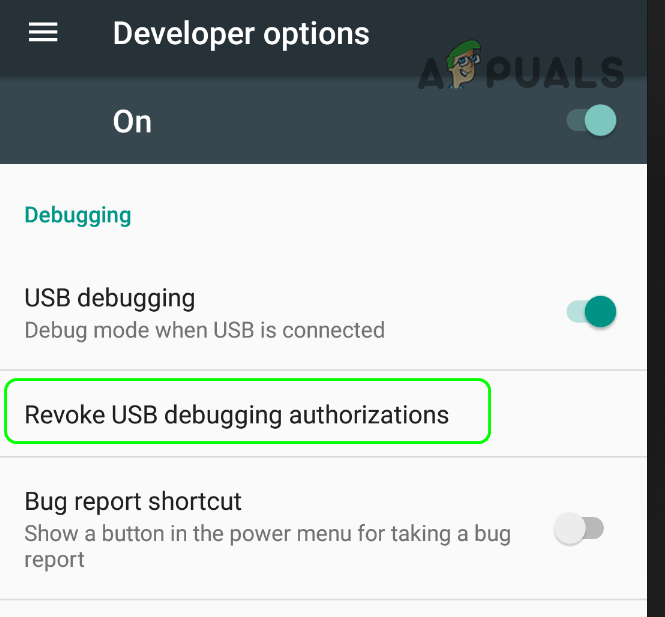
Revoke USB Debugging Authorizations - If that did not work, check if disabling the Aggressive Wi-Fi to Cellular Handover in the Developer’s Options solves the problem.
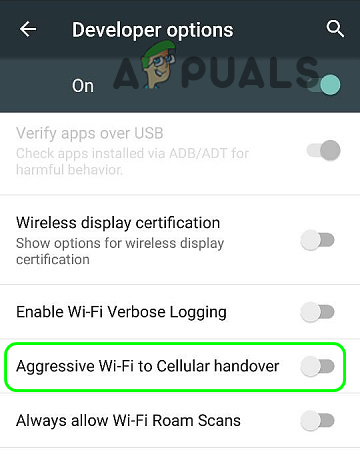
Disable Aggressive Wi-Fi to Cellular Handover
Enable Wireless, Network, or Bluetooth Debugging
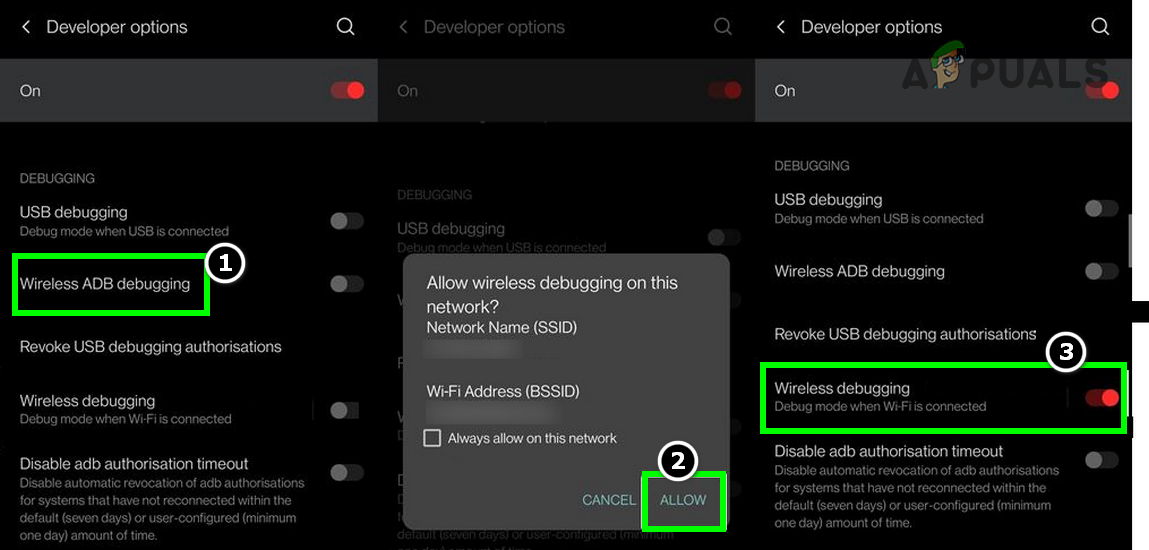
- Launch Settings of Android 11 (or above) and open its Developer Options.
- Now enable Wireless Debugging and then click on Allow in the Allow Wireless Debugging on This Network. If you trust and want to regularly use the wireless debugging feature on the current network, then checkmark Always Allow on This Network.
Enable Wireless Debugging - Now, on the system’s elevated Command Prompt, execute the following:
adb pair [Phone_IPAddress]:[PORT] [PAIRING CODE]

Use the ADB Pair Command - Once successful, execute the following and check if the ADB error 10061 is cleared:
adb connect [Phone_IPAddress]:[PORT]
Keep in mind that some Android TV devices may show a Network ADB option. Also, if you are trying to connect to a smart Android device (like a watch), then you may enable Bluetooth Debugging in the device settings.
Change the USB Connection Mode to the File Transfer
- Launch the Android device settings and open Developer Options.
- Now tap on Revoke USB Debugging Authorizations and connect the device with the PC via a USB cable.
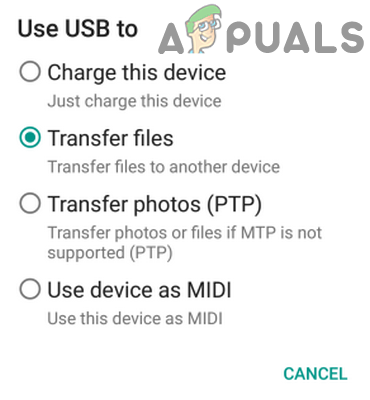
- Once connected, swipe up (or down) to open Notifications Tray and tap on USB Usage Mode.
- Then select File Transfer and execute the following in the elevated Command Prompt to check if the error 10061 is cleared:
adb connect <DeviceIP:5555>
Use the Transfer Files Mode of USB - If that did not work, check if changing the USB Connection Mode to Camera solves the problem.
- If the issue persists, check if disabling Stay Awake in the Developers Options solves the problem.
Execute the Different ADB Commands with Different Parameters
The ADB connection may get refused by the target machine if a wrong parameter is used in the ADB command e.g., if the device’s IP was changed after a restart and the previous IP was used in the ADB command, then a user may encounter the error 10061. In this context, executing the ADB command with different parameters may solve the connection refused error. But before going to that route, check if restarting everything involved in the process like Android Studio, computer, router, phone, etc. solves the problem.
Check the IP of the Target Device
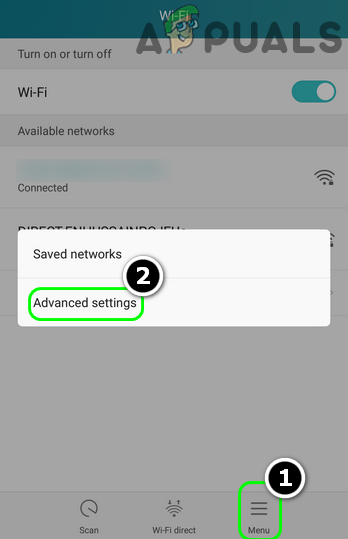
- Open the Android phone settings and tap on Wi-Fi.
- Now, click on the hamburger icon and select Advanced Settings.
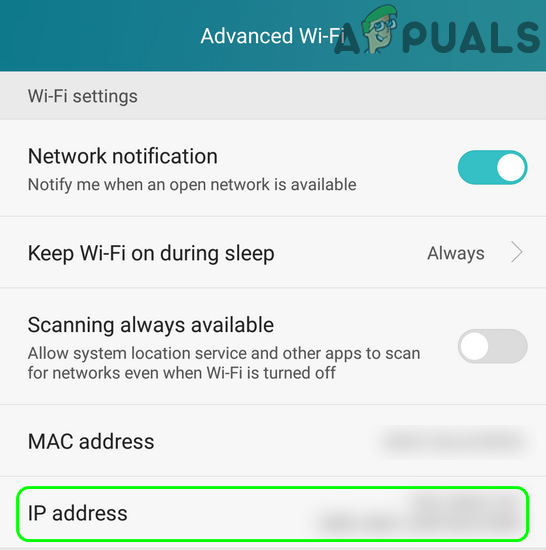
Open Advanced Wi-Fi Settings of Phone - Then check the IP address of the Android device and make sure you are executing the following in the elevated Command Prompt on the system with the correct IP:
adb connect <DeviceIP>
Check the Phone’s IP Address - Afterward, check if the connection actively refused issue is resolved.
Disconnect ADB from the Other Devices
If multiple devices are being used with the Android Studio or the same Android device is connected after some time, then a connection with the other device or previous connection to the current device might cause the target machine to actively refuse the connection. In such a case, disconnecting ADB from the other device may solve the problem.
- Right-click on Windows and search for Command Prompt.
- Now right-click on Command Prompt and in the mini-menu, choose, Run as Administrator.
- Then, execute the following:
adb disconnect
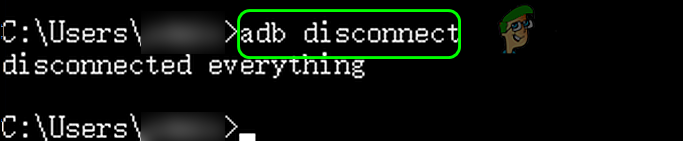
Use the ADB Disconnect Command - Now relaunch the Android Studio and execute the following to check if the ADB connection is successful:
adb tcpip 5555

adb connect <the_device_ip>
- If that did not work, then execute the following command in the elevated Command Prompt:
adb devices
- If there are multiple devices shown like the following:
List of devices attached

dfdcdc9c device

emulator-5554   device
- Then you may execute the TCPIP and connect commands as the device ID but add -s to them like the following:
adb -s dfdcdc9c tcpip 5555

adb -s dfdcdc9c connect <ip addr>
- Now check if the ADB error 10061 is cleared.
Use a Continual Ping on the System with Other ADB Commands
If that did not work, you may set up a continual Ping on the system to check if the system can connect to the device IP and then execute the ADB commands afterward.
- Launch the elevated Command Prompt on the system and execute the following (whenever you have to stop the Ping command, use the Ctrl+C shortcut):
ping -t (DeviceIP)
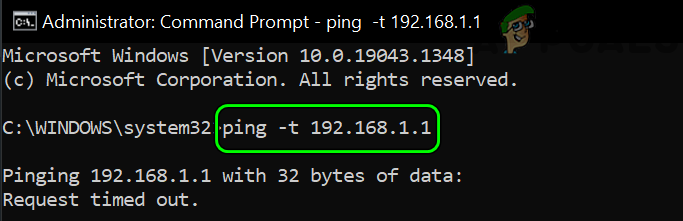
Run Ping Command in the Command Prompt - If the connection is successfully made, connect the device and system through a USB cable.
- Now try the following ADB commands to check if the issue is resolved.
adb disconnect

adb kill-server

adb start-server

adb usb

adb devices

adb tcpip 5555
- Then unplug the USB cable from the system and execute the following command in the system’s elevated Command Prompt:
adb connect <DeviceIP:Port>
- After a successful connection, you may expand Studio>>Run and then select Device to check if the ADB error is cleared.
If the ping command failed at step 2, then try to find out the networking issue causing the ADB error.
Use a Different Port in the ADB Commands
If the above ADB commands did not work, then the issue could be due to the wrong port number used in the commands. Here, trying different port numbers might solve the problem.
- Repeat the steps mentioned above but at the TCPIP command execute the following:
adb tcpip 5557

adb connect (DeviceIP)
- And then execute the following:
adb tcpip 5555

adb connect (DeviceIP)
Keep in mind some devices have port 5555 closed by default (like a Mi Box) and to open the required port, you may have to connect the device with a USB to the system and execute the following:
adb tcpip 5555
Also, do note that the port will be closed if the device restarts and you may have to repeat the above step to open the required port.
Use the IP Address of the Local Host in the Command if Using an Android Emulator
If the issue is occurring with an Android emulator, then it could be a result of the ADB attempts to connect to the localhost over IPv6 (that will be “::1”, not, 127.0.0.1). In this context, using the IPv4 address of the local host may solve the problem.
- Execute the following in the elevated Command Prompt on the system:
adb forward tcp:4444 localabstract:/adb-hub

adb connect 127.0.0.1:4444
- Then check if the ADB connection issue is resolved.
- If that did not work, then check if using the ADB connect command without specifying a port number solves the problem.
adb connect 127.0.0.1

If none of the above did the trick for you, then you may try an ADB plugin (like Wi-Fi ADB Ultimate or scrcpy) to solve the issue. If that did not work, then you may reset the system or phone to the factory defaults. For some advanced techies, adding the device’s IP to the ARP table of the system may solve the problem.


