Fix: Launcher Error “Failed to Get the Process Path” MultiVersus
“MultiVersus Launcher Error, Failed to get process path” occurs when the graphic drivers are outdated, background programs interrupt, third-party software interferes, or the user loses some important game files because of bugs and glitches. Moreover, when VPN is connected, the Easy Anti-cheat software cannot detect the player’s location, which might affect the game’s performance, and a launching error appears.
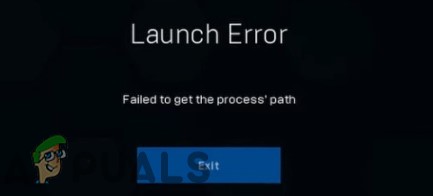
Here are some reasons why the “MultiVersus Launcher error | failed to get process Path” appears;
- Outdated GPU Drivers: The graphics drivers are responsible for controlling the display of your game. So, when the graphic drivers are obsolete, they do not support any feature and cause a launching error. In this case, update the drivers and then relaunch the game.
- Background Program’s Interruption: When more than one program runs on your system, the system gets confused and does not support the game properly. Sometimes, the background programs have some bugs and glitches that affect the game files and stop them from launching on your system.
- Antivirus Software: Third-party software is helpful for system protection from malware attacks. But sometimes, it considers some important game files as a bug and does not allow them to open or remove them from the system permanently. So, disable the Anti-virus, verify the integrity of game files, and then relaunch the game.
- Missing/Crashed Game Files: Any game launch effectively when it has all its files properly. The game stops when some of its files are lost or crashed, and a launching error appears.
1. Restart Your System:
When the MultiVersus Launching error occurs, you should reboot your system. The rebooting process refreshes the system content and eliminates the temporary errors mainly encountered by older cookies, cache, or other software clashes with your gaming software. So restart the system and then relaunch the game.
2. Run MultiVersus as an Administrator
When unnecessary and several programs open in the background, your system stops functioning well and ultimately fails to launch the MultiVersus on your system. In this case, run the game as an Administrator, so your PC focuses on performing one task.
- Launch your Steam App and then click on Library from the Menu bar.
- Now Navigate to MultiVersus, right-click on it, and select the Manage option. Select Browse local files.
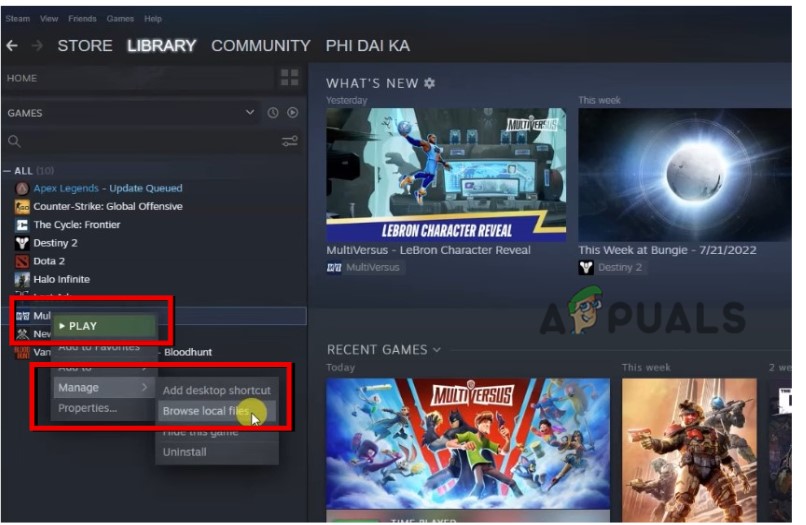
Go and Run MultiVersus as an Administrator - Right-click on the MultiVersus and click on Properties.
- Select Compatibility and check the box which says run the program as an Administrator. Press Apply and then Ok.
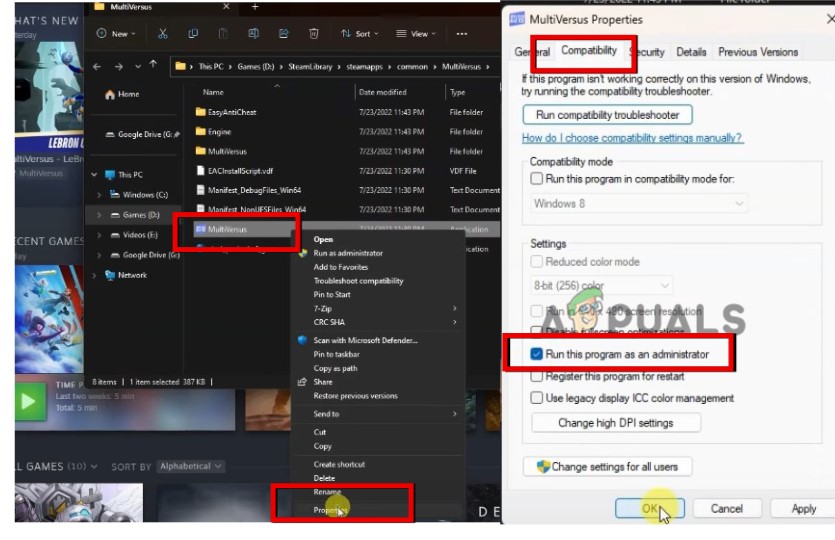
Run MultiVersus as an Administrator - Once you have done that, again go to Steam Client and click on Play, and check if an error occurs or not.
3. Disable the Antivirus
If a MultiVersus Launcher error appears, disable Antivirus software. The error usually occurs because of overprotective security or antivirus. The third-party software can block the game and stop it from being launched. So, follow the below steps and check if the problem fixes or not.
- Go to the Taskbar and click on Arrow Icon. Now right-click on Antivirus software and then select Disable option.
- Now Press the Window key + I and open the Windows Settings.
- Now click Privacy & Security from the left menu and select Windows Security.
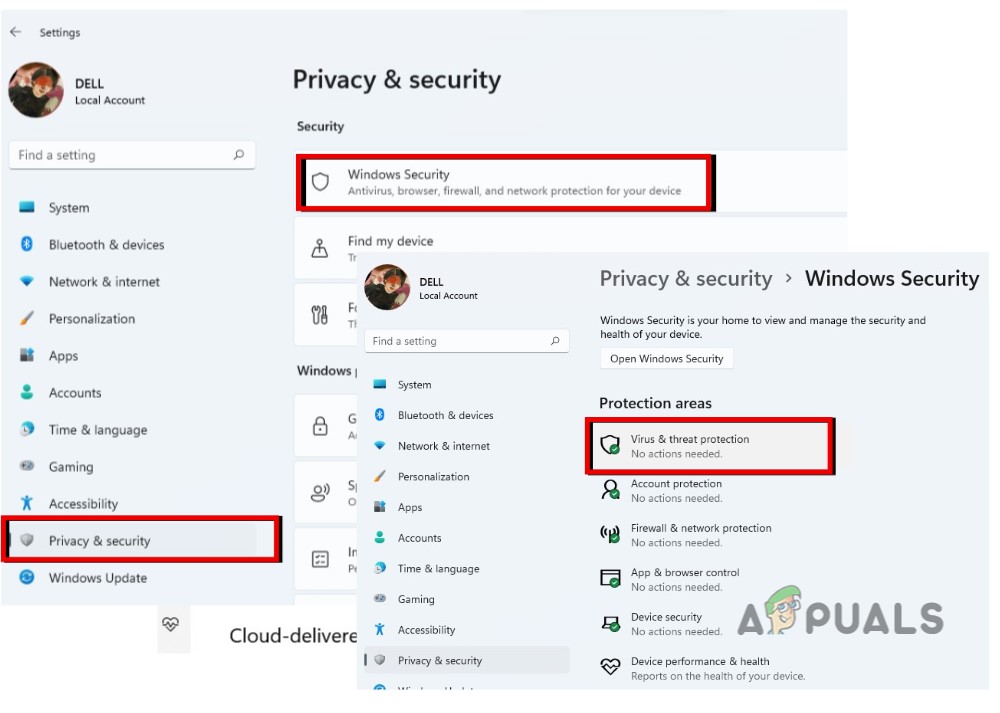
Windows Security - Click on Virus and Protection, then go to the virus and protection settings and Manage Settings.
- So, go to Real-Time Protection and disable it. Now relaunch the game and check problem appears or not.
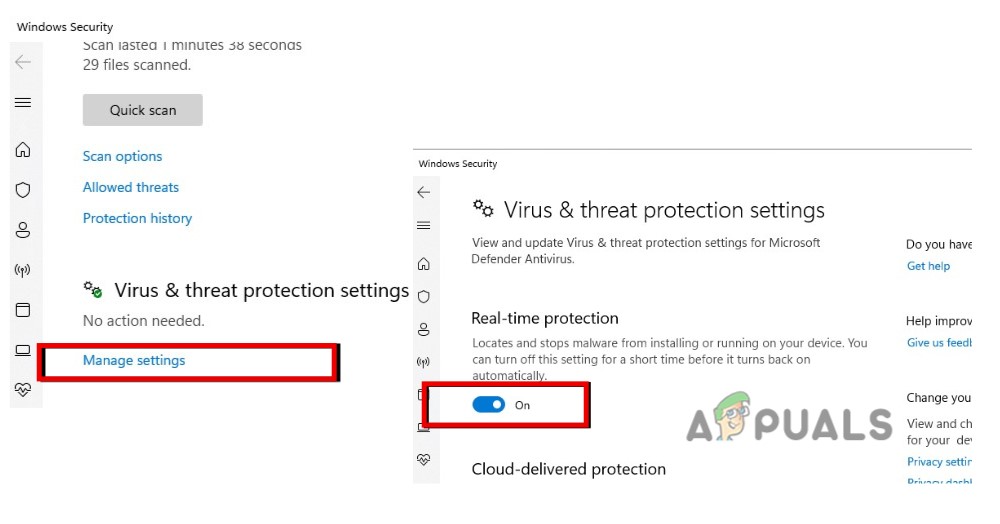
Disable the Anti-Virus Software
4. Repair the Easy Anti-Cheat Software
The Easy anti-Cheat code helps in reducing cheating in an online multiplayer game. It gives the tools to launch the game in protected mode. But when it gets some glitches, the game’s performance also reduces. Thus, an error appears. So, repair the Easy Anti-software by following these steps and check if the problem occurs or not;
- Launch the Steam app, then click on Library and navigate to MultiVersus.
- Right-click on MultiVersus and then click on Manage. So, click on Browse Local Files.
- So, right-click on the Easy Anti-Cheat folder—Press Run as an Administrator.
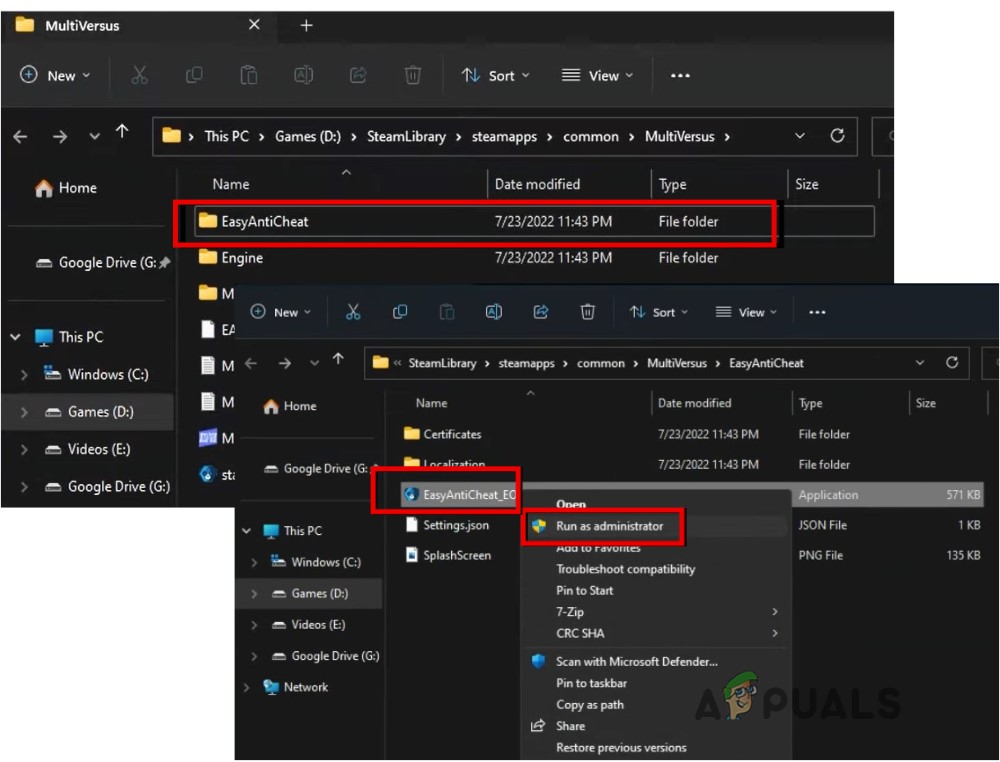
Repair Easy Anti-Cheat Software - Now select the Repair option and relaunch the game and check if the error appears or not.
5. Verify the Integrity of Game Files
If still, you are getting “MultiVersus Launcher Error, Failed to get process path,” then verify the game file Integrity. This process detects the missing and corrupt game files and repairs them themselves. So, here are some steps to verify the integrity of game files;
- Open the Steam app, go to the library, and then right-click on MultiVersus.
- Select properties, go to Local Files, and press Verify the integrity of game files.
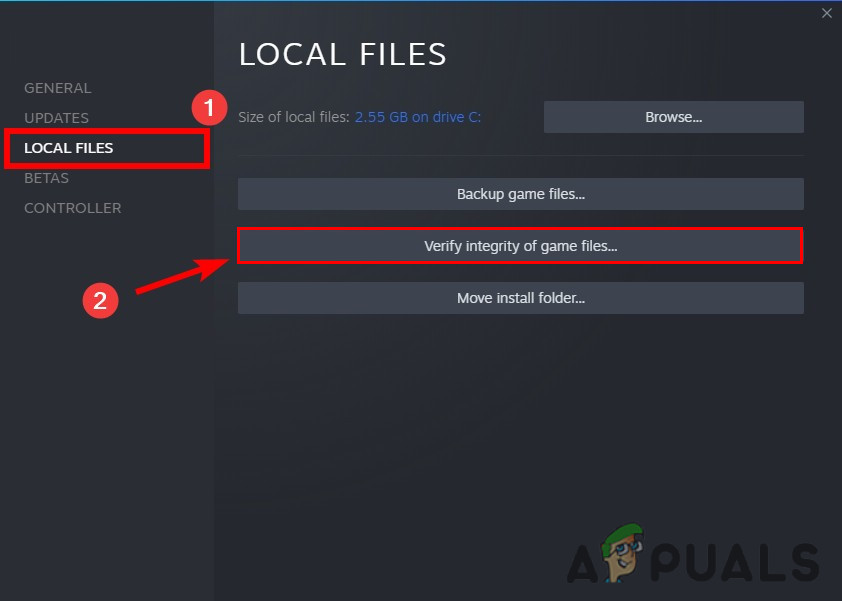
- It will take a few minutes. Once the process completes, play the game again and check if the problem fixes or not.
6. Disconnect VPN
VPN is another reason for the MultiVersus launching error. The VPN changes your network location while the Anti-Cheat Software considers it suspicious. So, this might be the reason for triggering the error. So, disable your VPN and then relaunch the game.
- Go to the Taskbar and click on the VPN icon. The dashboard will open.
- So, click on Disconnect. Restart your PC, relaunch the game, and check if the error appears.
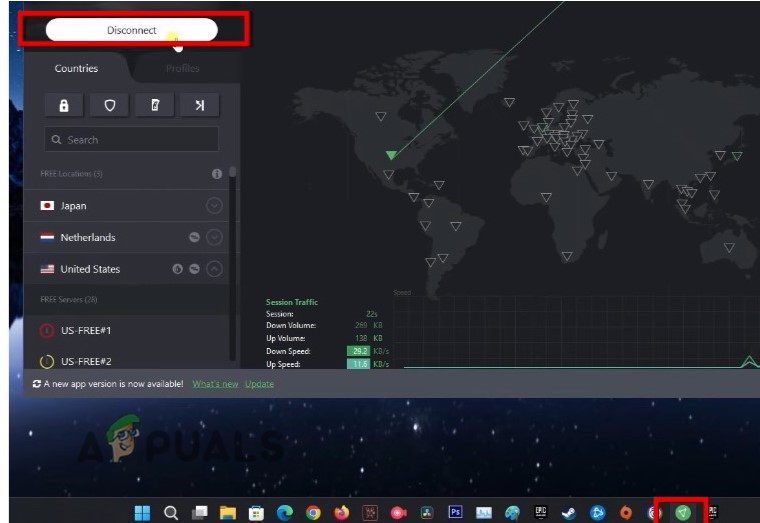
Disconnect VPN
7. Update the Graphic Drivers
As graphic drivers control the overall display of the games so, when they are outdated, games’ functioning disturbs, and the error appears. Follow the below steps to update the Graphic Drivers;
- Press the Window key + X from the keyboard and select the Device Manager.
- Now click on the Display adapter and right-click on the graphic drivers.
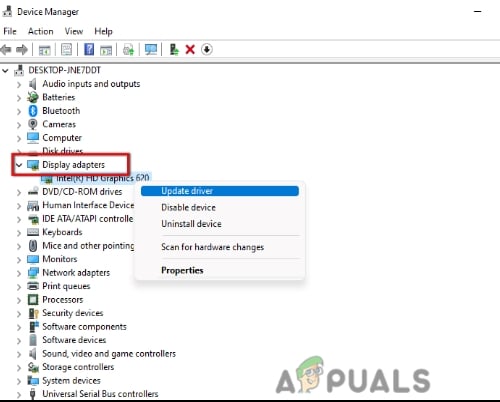
Update Graphic Drivers - Click on Update Drivers. Press the option of “Search update Drivers Automatically.”
- Now click on “Search for Updated Drivers on Windows Update.” Here check the available updates and download them. Once it completes, restart your computer and then launch MultiVersus to check if the error appears.
8. Perform a Clean Boot
This method removes the interrupted program from the background and runs the game smoothly. So, if the error is still appearing, perform a clean boot and check if the problem resolves or not. Follow the below steps;
- Open the Run dialog box by pressing Windows key + R and then type MSConfig. Hit the Enter key.
- Now choose Services from System Configuration Utility. Check the “Hide all Microsoft Services” box and click on “Disable all.”
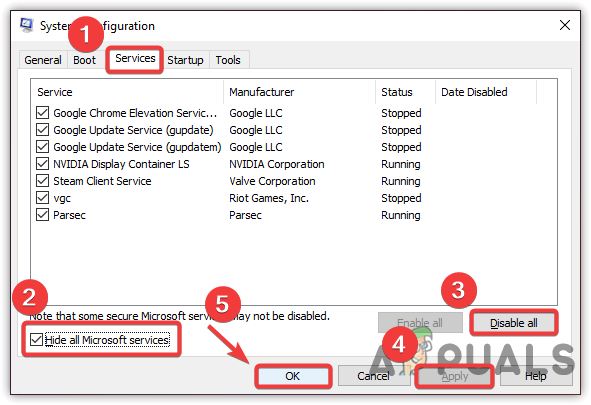
Performing a Clean Boot to Windows - Then click on Startup from the Menu bar. Click the option of “Open Task Manager.”
- Now select the application from Task Manager Utility one by one and press the Disable option.
- Once you have done this, restart your system and relaunch the app. Check if the error appears or not.
9. Reinstall the Game
If you still face the issue, uninstall the game and reinstall it in your system. When the game files get crashed or lost, then reinstallation of the game will add the missing files and replace the hit with proper files. So, follow the below steps to reinstall the game on Steam Client;
- From Steam App Home Screen, go to Library and right-click on MultiVersus.
- Now Click on Manage and then click on Uninstall option. Uninstallation will delete all the damaged game files.
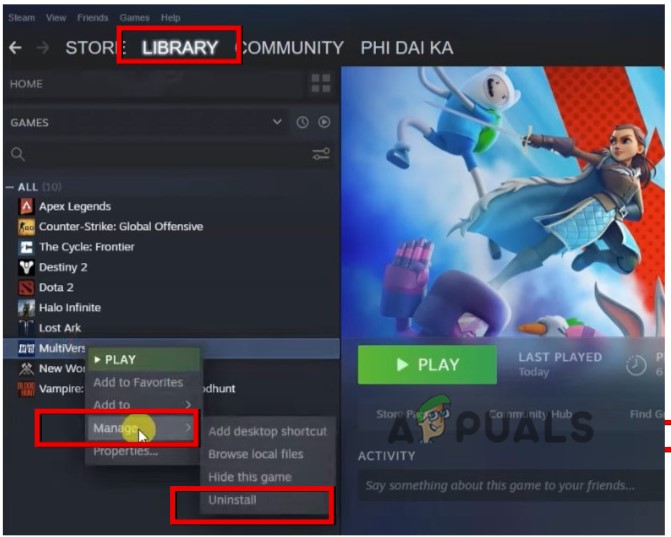
Uninstall MultiVersus - Now click on the Store from the Steam Home screen, search for MultiVersus and install it again. Now play the game and check if the error appears.


