MultiVersus Keeps Crashing? Here’s How to Fix
The MultiVersus keeps crashing, the desktop freezes or the game can fail to load because of outdated drivers and windows. The user may have inadequate system requirements for the game, many files running in the background, or some essential game files get crashed or lost. Due to all these issues, the game cannot run properly in your system.

Here are some reasons why the MultiVersus keeps on crashing on your system;
- Outdated GPU Driver: The Outdated drivers slow down game performance and affect overall system stability. Some computer functioning issues, including system freezes, damaged devices, lagging in video games, and even system crashes, are caused by obsolete and out-of-date graphic drivers.
- Background Program’s Interruption: When you open the game, many programs are running behind the game. It slows down your system, and MultiVersus does not launch efficiently and keeps crashing.
- Improper Installation: It is possible that MultiVersus isn’t installed on your system correctly. It may be because there is insufficient space or the files get missed due to poor internet connection. Your system might have some bugs which restrict the game files to installation. Thus the game stops working.
- Outdated Game: If the game is obsolete, it can crash. When an application is out-of-date, bugs have a higher possibility of attacking it and causing issues.
After identifying all the potential reasons for this issue, here are some possible methods you can use to resolve this issue;
1. Check System Requirements
Before anything else, you should carefully analyze the game’s system requirements since if your PC’s specifications don’t match them, it may frequently crash on startup. However, you will need to change the setup if your PC is sufficiently old or has a low-end specification. So, check the game and system’s requirements before trying any troubleshooting process.
2. Update Window
If you’re using an older version of Windows OS, It won’t allow many functions such as running a game or any task to perform well in your system. So, installing the latest windows updates on your PC is essential. Follow the below steps;
- Press the Windows key + I from the keyboard to open the windows Settings.
- Press the Windows Updates from the Left pane and check if any update is available. Install the update.
- Hold on until the updating procedure completes. Then Restart your computer, relaunch the game, and check if the problem fixes or not.
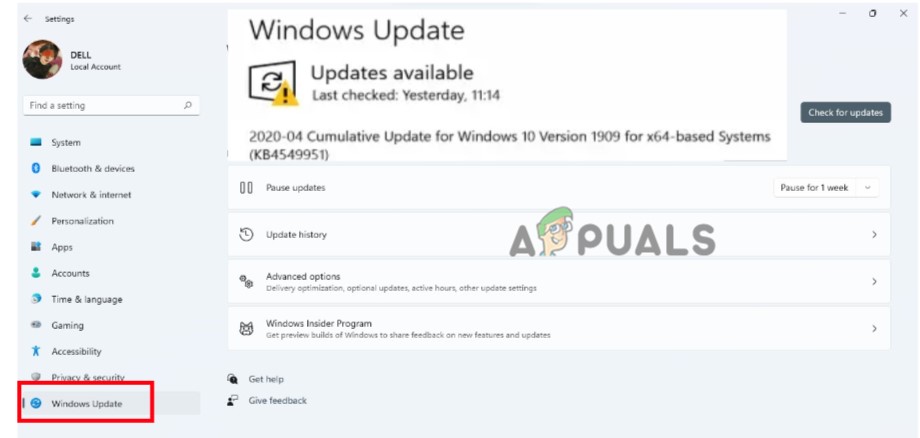
Check the Windows Updates
3. Update Graphic Drivers
You might try checking for graphics driver updates on your Windows PC and installing the most recent version of GPU drivers. An out-of-date or uninstalled driver may interfere with properly operating graphics-intensive programs and prevents the game from launching. So, follow the below steps to update the graphic drivers;
- Right-click on the Start menu and select Device Manager.
- Now go and expand the Display Adapter option. Then right-click on the available Graphic Drivers.
- Select the option of “Update drivers.” Then click on “Search automatically for the updates.”
- Click on the “Search for updated drivers on windows update” and check if any update is available. Install it in your system.
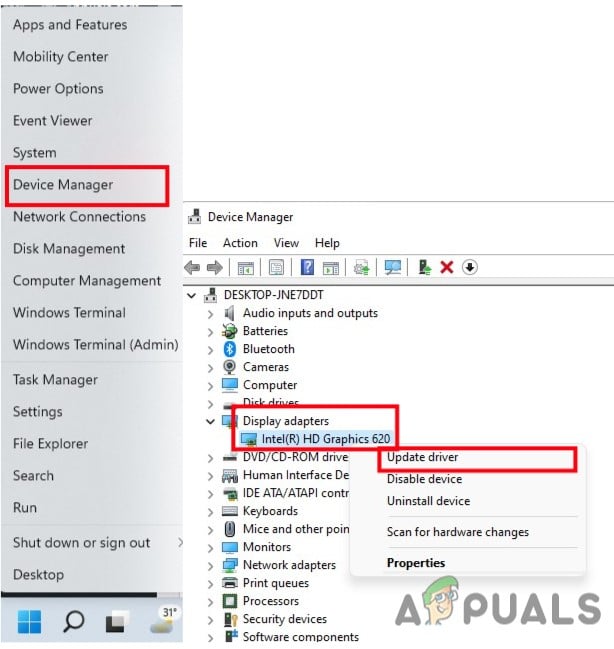
Update the GPU Drivers - Restart your PC, relaunch the game, and check whether the problem appears or not.
4. Close all running processes
Possibly, your system may slow down or become overworked by several unneeded background processes. These processes essentially use up system resources like CPU, memory, or internet traffic, which might negatively affect how smoothly a game launches. Try closing such tasks using the instructions below if you don’t need them.
- Press Ctrl +Shift + ESC to open the Task manager.
- Go to the Background process and select the programs one by one. Click on the End Task.
- Once all the programs close, restart your computer after closing the Task Manager window.
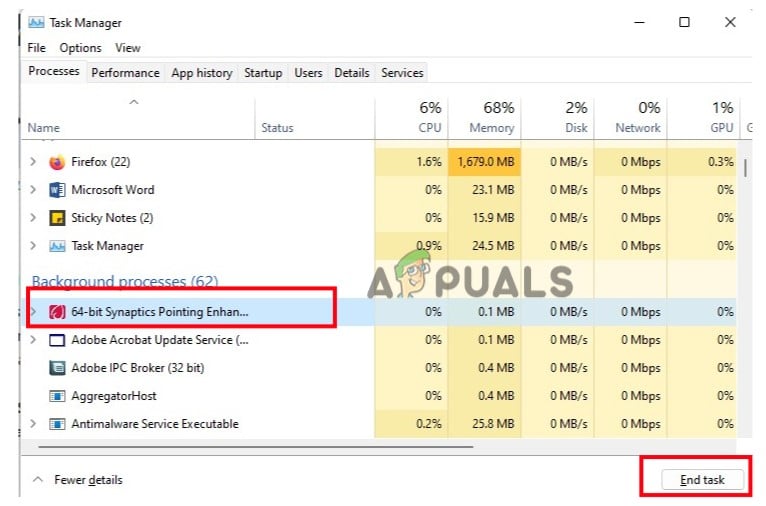
Close the Background Programs
5. Verify the Integrity of Game Files
When the game files are missing or crashed, the game stops working and ultimately does not launch on PC. So, verify the integrity of game files to recover and repair the game files. So, follow the below steps;
- Launch Steams Client, then go to Library and right-click on MultiVersus.
- Select the properties option. Now press the Local Files and click on Verify the Integrity of game files.
- It will take a few minutes. Then click the play button and check if the problem appears or not.
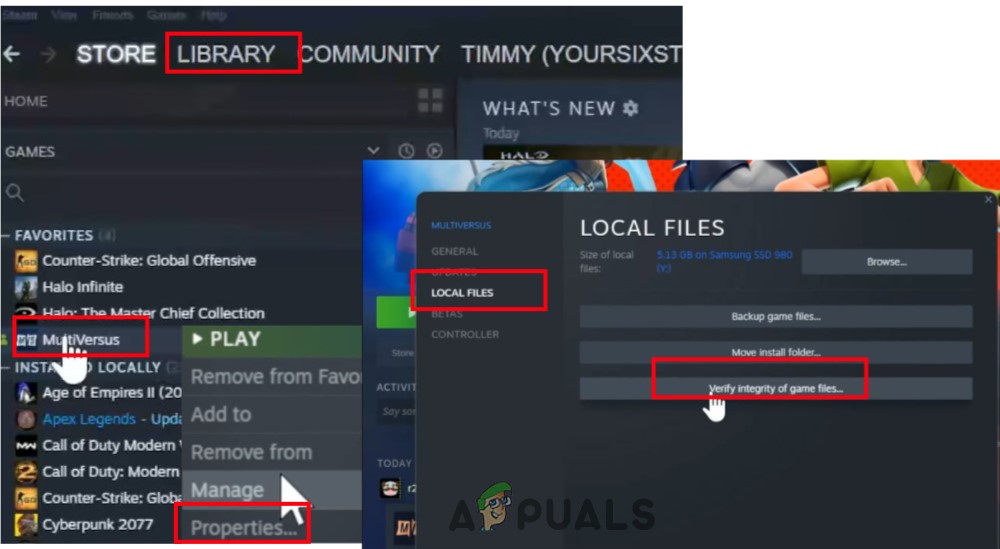
MultiVersus_Verifying the Integrity of the game
6. Make a clean boot
Several apps are reportedly constantly running in the background as soon as the Windows operating system starts. Those services may use system resources and internet data without your notice. Using the methods below, you may do a clean boot and disable any unnecessary starting programs.
- Press the Windows key + R to launch the Run dialogue box.
- Now type Msconfig to launch System Configuration. Press the OK option.
- Go to the service tab from the menu bar and enable the option of “Hide all the Microsoft services.” Then click press the “Disable All” option.
- So, go to the Startup tab and press the “Open Task Manager.” Option.
- Select the program one by one and click on Disable. Once all the programs are closed, restart your system and launch the game. Check if the error appears or not.
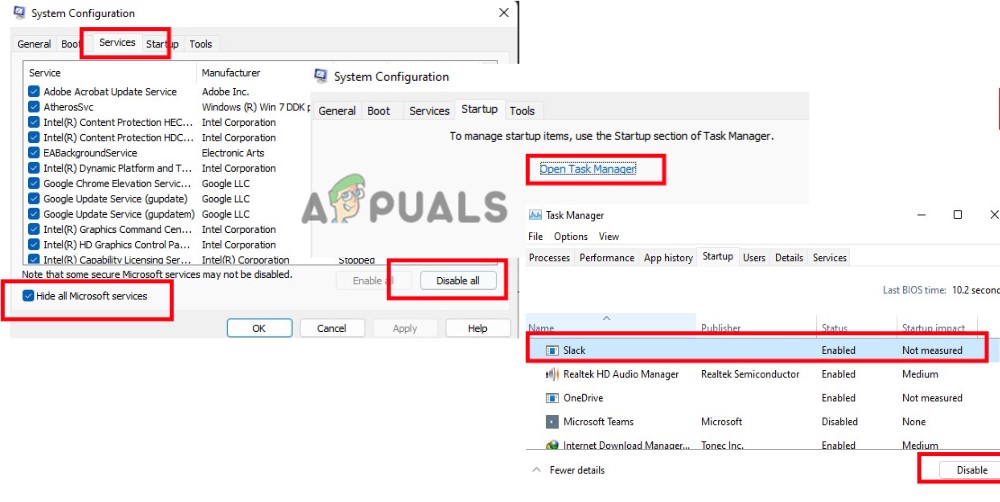
Perform a Clean Boot
7. Update MultiVersus
Even an outdated game patch version can cause the gaming device to crash, lag, stutter, and other problems. So, frequently check for game updates and install them as they become available. Here are a few steps you can follow to install the Windows update;
- Launch the Steam client, then choose Library.
- Select MultiVersus From the list of installed games. The client will now automatically look for any available updates.
- Click the Update option if any update is available. Wait until the game update is finished, which should take a few minutes.
- After finishing, be careful to shut off the Steam client. Then restart your computer to implement the modifications before starting the MultiVersus game.
8. Disable Antiviruses Software
Antivirus software is problematic and stops games from starting. It considers a few game file a bug and prevents them from reloading. Hence the MultiVersus keeps on crashing. The only solution for this problem is to turn off your existing antivirus program entirely. Here are some steps you can follow to complete the process;
- Press Windows Key + I from the keyboard and open Windows Settings.
- Then go to Privacy & Security and select Windows Security.
- Immediately access threat and virus protection. Select Manage settings from the newly opened window’s area for virus and threat protection options.
- Now disable the Real-time protection. Restart your system, relaunch the game and check if the problem appears or not.
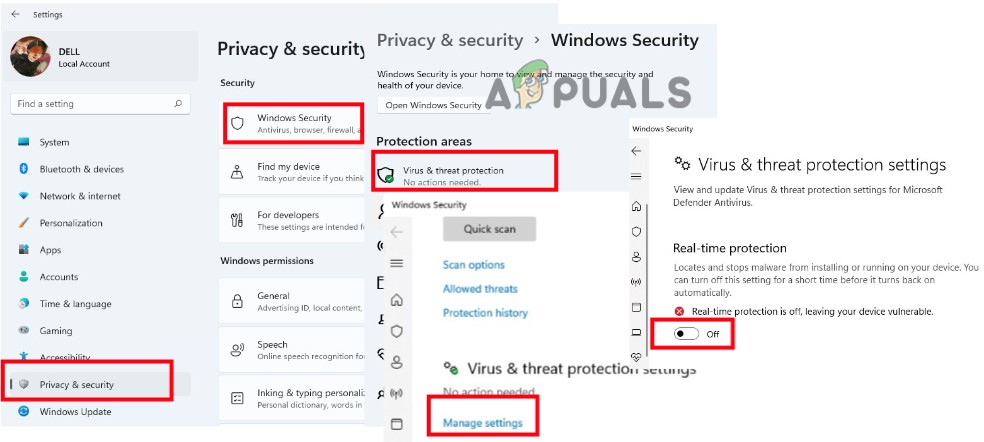
Disable Anti Virus Software
9. Reinstall the game
Reinstalling the game is your last remaining option, short of contacting the developers if none of the abovementioned methods have successfully resolved the MultiVersus crashing issue. Verifying the game files frequently does not repair some problems that can be fixed by reinstalling the game.
- Launch Steam App and go to the Library. Now right-click on the MultiVersus.
- Press the Manage option and then click on Uninstall.
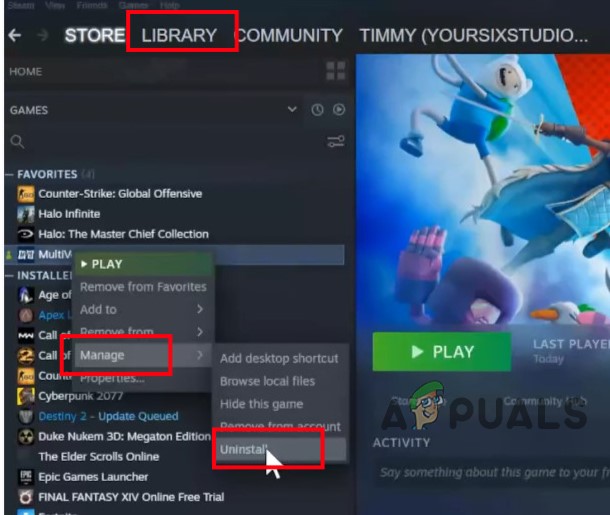
Uninstall MultiVersus Game - Afterward, go back to Steam’s Home Screen and click on Stores.
- Search for MultiVersus and download it again. Now launch it. Hopefully, the problem will fix after applying the possible fixes.


