SOLVED: Mouse Settings Reset by itself on Windows
Mouse settings resetting after every restart is a common bug in Windows 10. You may find that after downloading and upgrading your Windows system to Windows 10, the mouse works in an unusual manner. For instance, you may have the mouse scroll running backwards, slower/quicker speeds than your preferred mode, etc. After changing the mouse settings, everything turns out ok…for a while. Once you restart your PC it is back to square one with your default mouse settings. After so many restarts it will suddenly seem like a good idea to keep your PC on forever just so you could keep your mouse settings intact. Naturally, Windows 10 will work on a patch to fix bugs…but until then you can take things into your own hand and sort it out yourself.
Before diving into the more detailed solutions to fix your mouse settings on Windows 10, check if booting your PC with bare minimums sorts out the mouse issue. Also, make sure if your mouse is working fine on another system (or another mouse works fine on your system). Also, check if reinstalling the mouse driver in the compatibility mode solves the problem.
Update The PC’s Windows to the Latest Build
The mouse settings may keep resetting if the Windows of your PC is outdated as it may cause incompatibility with other drivers/OS modules. Updating the Windows of your PC (along with the system drivers) may solve the problem.
- Click Windows, key in Check for Updates, and then open it.
- Now click on the Check for Updates button and if updates are available, download and install them. Make sure that the optional updates are also applied to the system.
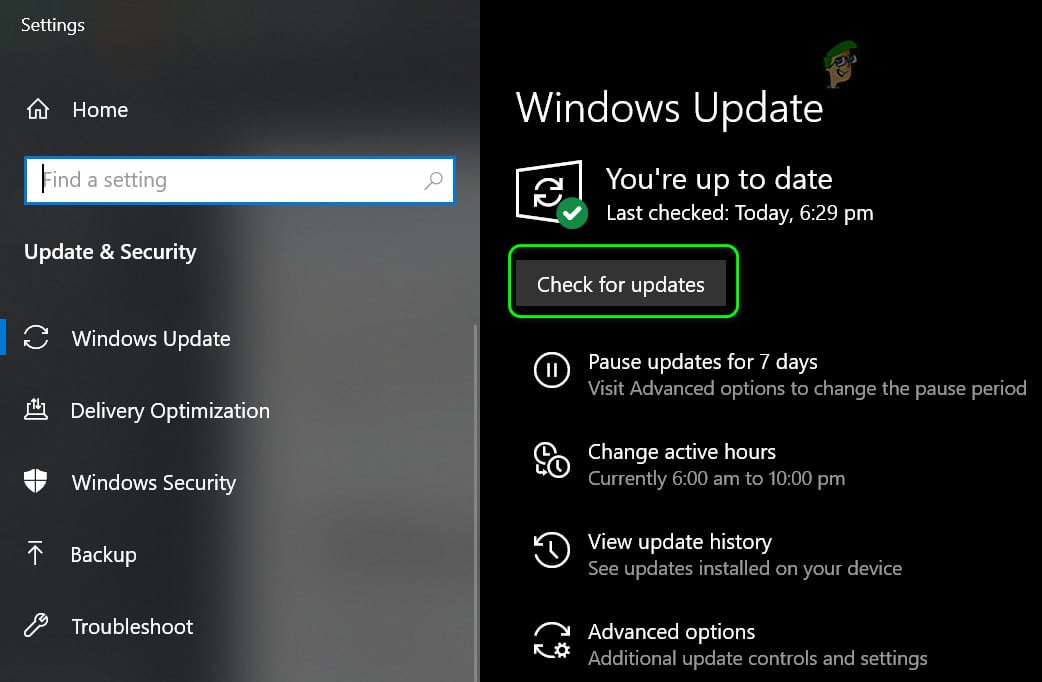
Check for Windows Updates - Then make sure that all the system drivers are up to date.
- Once the OS and system drivers are updated, check if the mouse settings are not resetting.
Run the Hardware Troubleshooter
The mouse resetting issue could be a result of a temporary malfunction of the hardware modules of the system and running the Windows built-in hardware troubleshooter (one of many troubleshooters) may solve the problem.
- Right-click Windows and open Run.
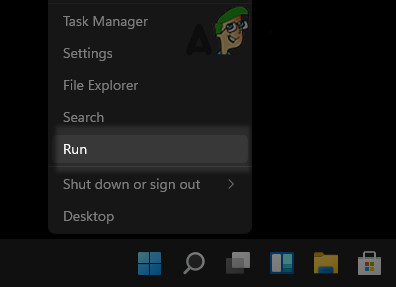
Open the Run Command Box from the Quick Access Menu - Now execute the following:
msdt.exe -id DeviceDiagnostic
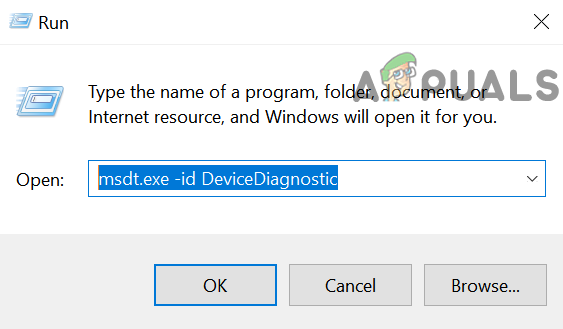
Open the Hardware and Devices Troubleshooter Through Run - Then, in the Troubleshooter window shown, click on Next and let the Hardware Troubleshooter run its course.
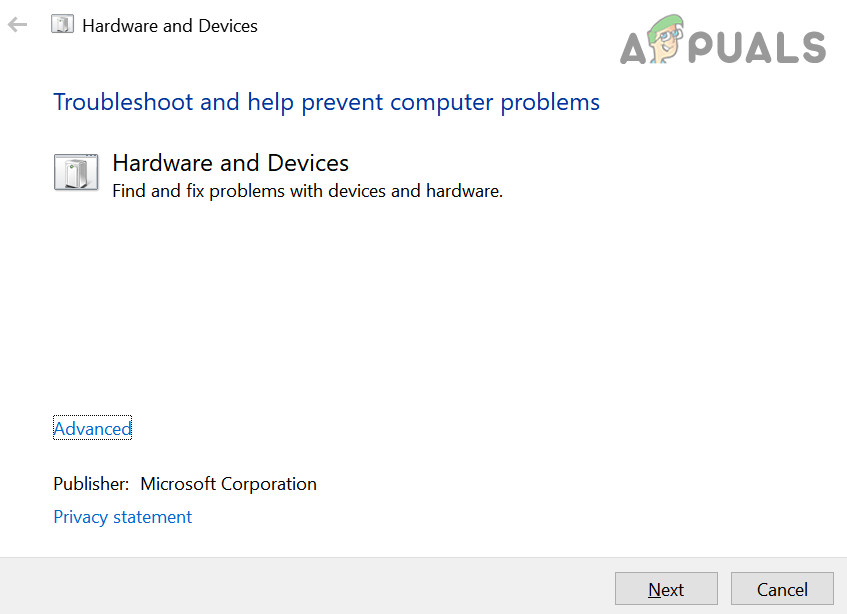
Hardware and Devices Troubleshooter - Once done, apply the recommended troubleshooting steps (if any) and then check if the mouse settings issue is resolved.
Use the Mouse Controlling Software
If you are using a mouse controlling application like Logitech Setpoint whose settings are overwriting the OS mouse settings, then the mouse setting may keep resetting in the OS. In this context, using the mouse controlling software to set the required settings or setting the controlling application to not overwrite the OS implementations may solve the problem. For illustration, we will discuss making the changes in the Logitech Setpoint application.
- Launch the Logitech Setpoint application as administrator and open its Keyboard and Mouse Settings page.
- Then select My Mouse Tab and click on the Castle icon to open its Game Settings.
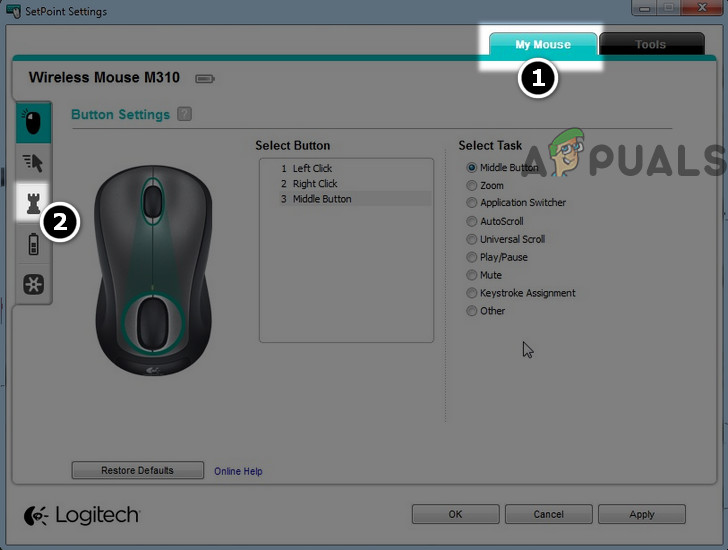
Open Game Settings of the Mouse in Setpoint - Now, under Speed and Acceleration, select the radio button of OS Implementation
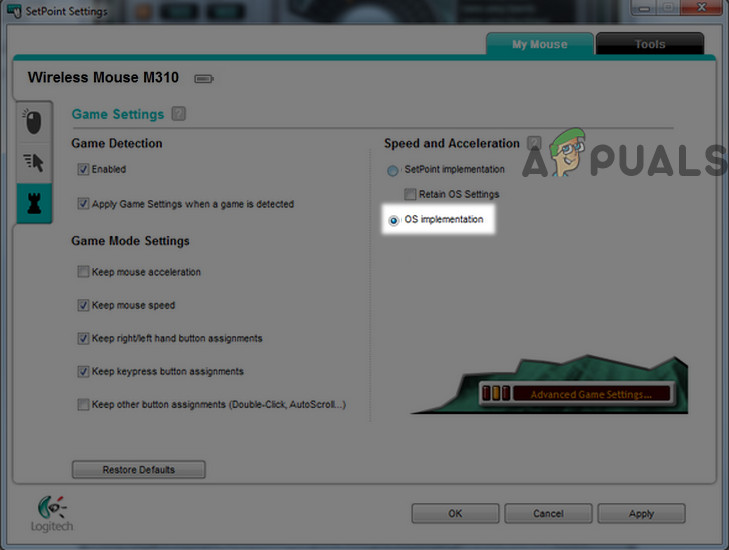
Setting Speed and Acceleration of the Mouse to OS Implementation in Setpoint - Then apply your changes are reboot your PC.
- Upon reboot, check if the Mouse resetting issue is resolved.
- If the issue persists, check if setting the mouse settings in the Logitech Setpoint to All Applications or All Programs (on the supported models) sorts out the problem.
If that did not do the trick or you are not able to locate your mouse controlling applications, then follow the under-mentioned steps to sort out the issue:
- Right-click Windows and open Settings.
- Now click on Devices and head to the Mouse tab.
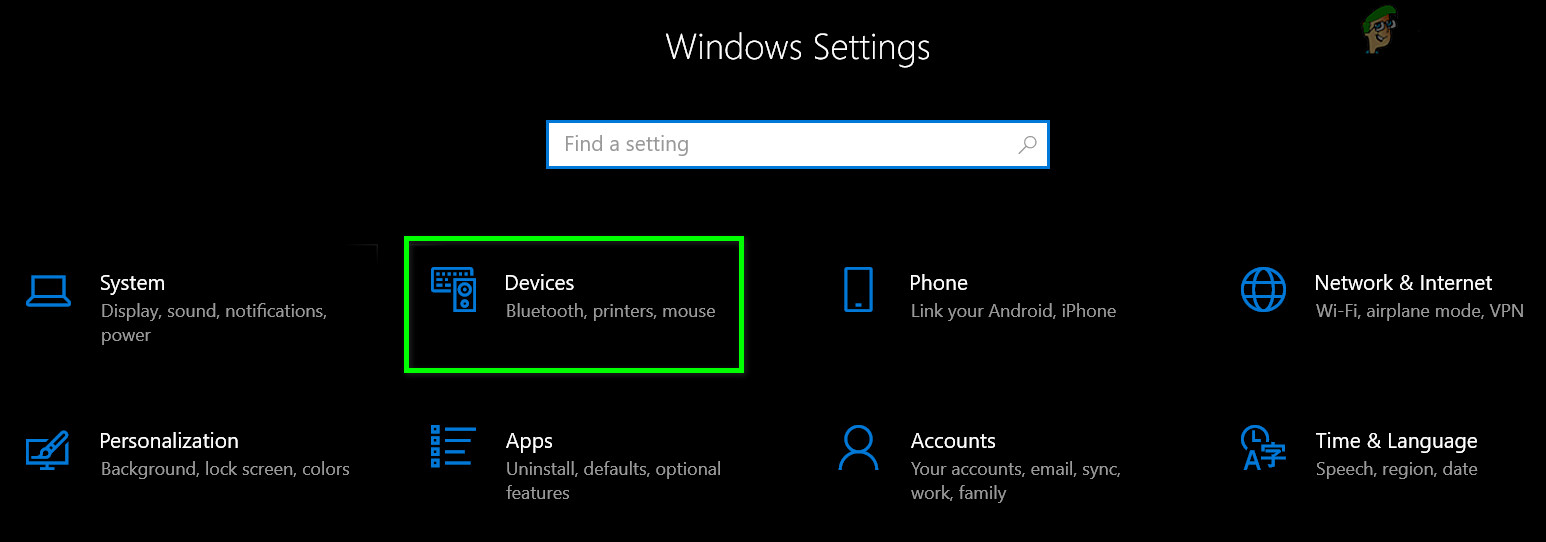
Open Devices in Windows Settings - Then, make your required changes (e.g., scroll, speed, etc.) and click on the Additional Mouse Options.
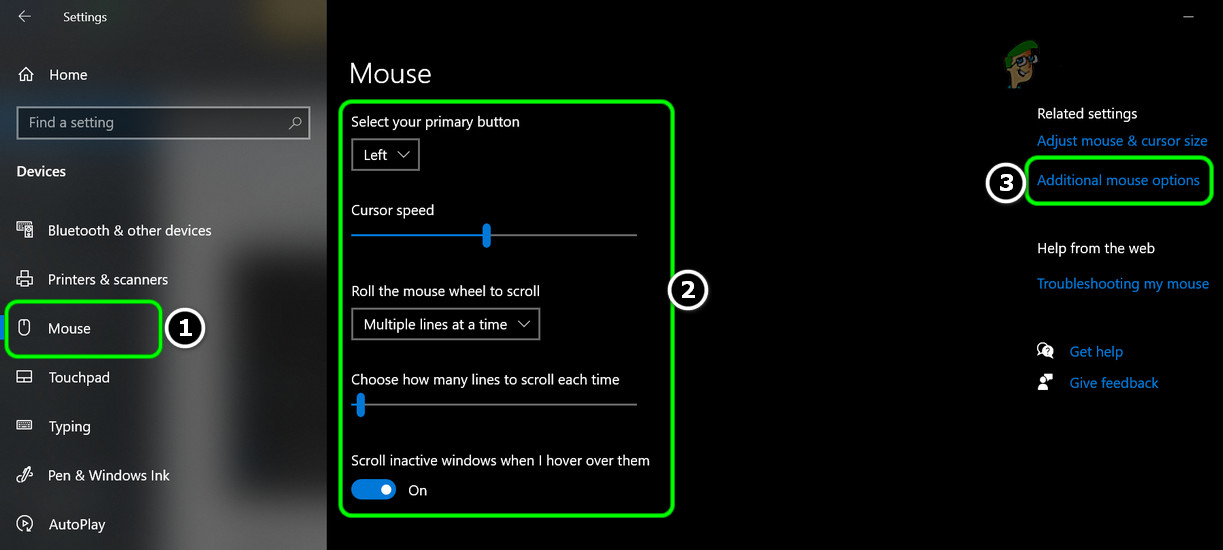
Open Additional Mouse Options - Now, in the Mouse Properties window, make the relevant changes in the different tabs (like Buttons, Pointers, Pointer Options, etc.) and then head to the first tab of the Mouse Properties window (e.g., Dell Touchpad).
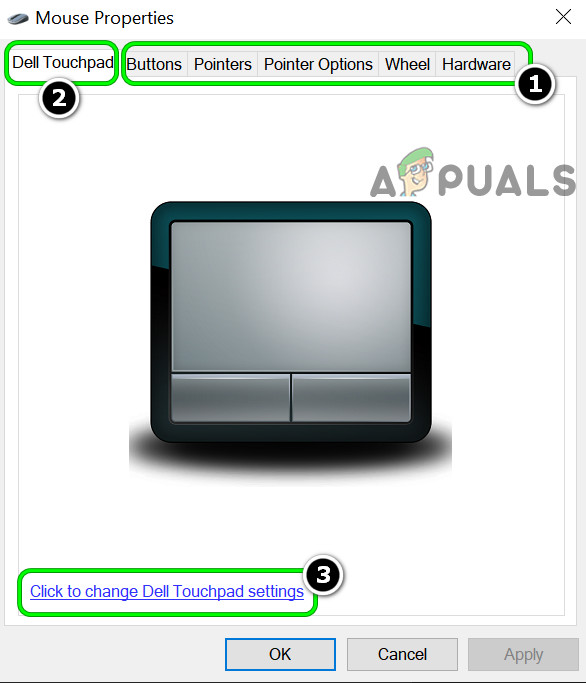
Make Relevant Changes in the Mouse Settings and Open Dell Touchpad Settings - Then click on the link near the bottom of the screen (e.g., Click to Change Dell Touchpad Settings) and in the resulting window (usually, you mouse controlling application) e.g., Dell Touchpad window, make the relevant changes (e.g., Pointer Speed, etc.).
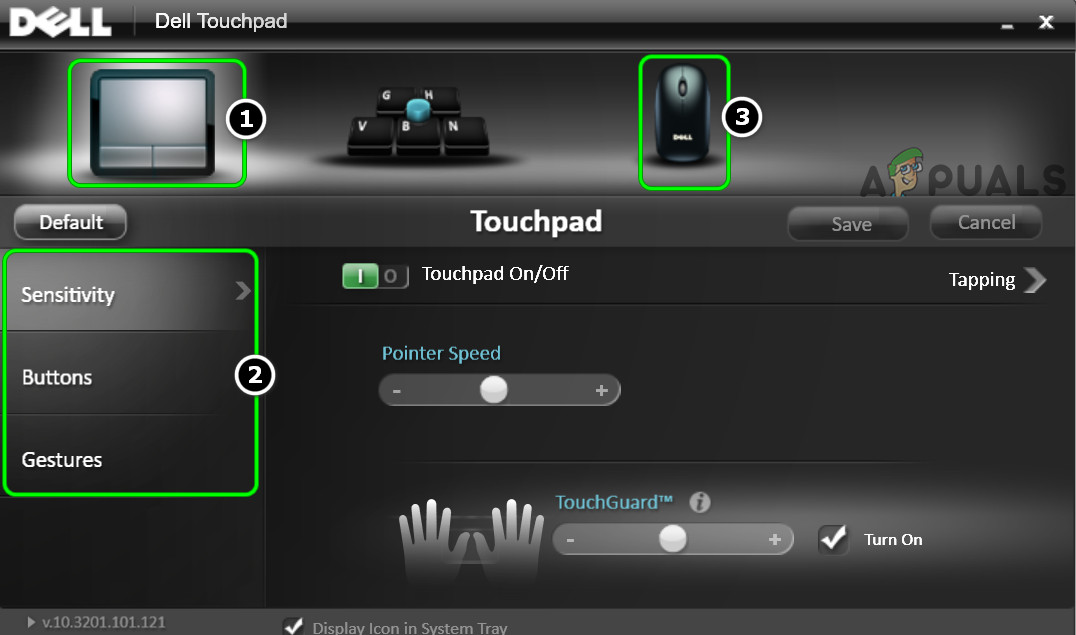
Edit the Touchpad and Mouse Settings in Dell Touchpad - Then apply your changes in all opened windows and reboot your PC.
- Upon reboot, check if the mouse is clear of the resetting issue.
Clean Boot Your PC and Uninstall the Conflicting Applications
The mouse settings of your Windows system may keep resetting if an application on the system is interfering with the mouse settings of your system. In this context, clean booting your Windows PC (to filter out issues from a startup item) and uninstalling the conflicting applications may solve the problem.
- Clean Boot your PC and check if the mouse settings are not resetting.
- If so, check which of the startup items is causing the issue. You may have to enable the disabled startup items one by one till you find the one causing the issue.
- Once found, either keep that startup item disabled or uninstall its application.
Following are the applications reported by users to cause the mouse resetting issue:
- Logitech Setpoint
- KHALMNPR (startup entry of Logitech Setpoint)
- ASUS ROG Gaming Mouse hid
- Corsair Gaming Software
- KensingtonWorks Customization Software
- League of Legends
So, if you have any of these applications or a similar one, then uninstalling that application may solve the problem. For illustration, we will discuss the process of uninstalling the Logitech Setpoint.
- Right-click Windows and open Apps & Features.
- Now select Logitech Setpoint and click on the Uninstall button.
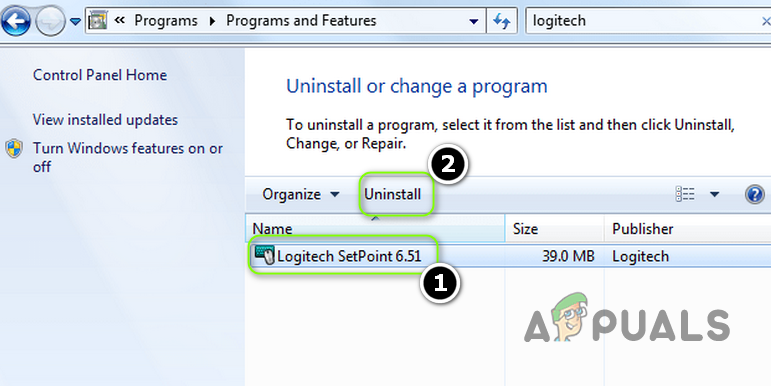
Uninstall Logitech Setpoint - Then confirm to uninstall the Setpoint application and follow the prompts to uninstall it.
- Once uninstalled, reboot your PC and check if the mouse settings are not resetting.
Create a New Profile/Scheme of the Mouse Settings
If none of the solutions did the trick for you, then you may have to create a new profile/scheme of the mouse settings in the mouse controlling application, and switching to that profile after every system restart (till the issue is permanently solved).
- Right-click Windows and select Settings.
- Now open Devices and steer to the Mouse tab.
- Then in the right pane click on the Additional Mouse Options and head to the ClickPAD Settings.
- Now make the required changes and apply your changes.
- Then open ClickPad Profiles and click on New.
- Now save your profile after entering a name for it and close the window.
- Then enable Static Tray Icon in the Taskbar and apply your changes.
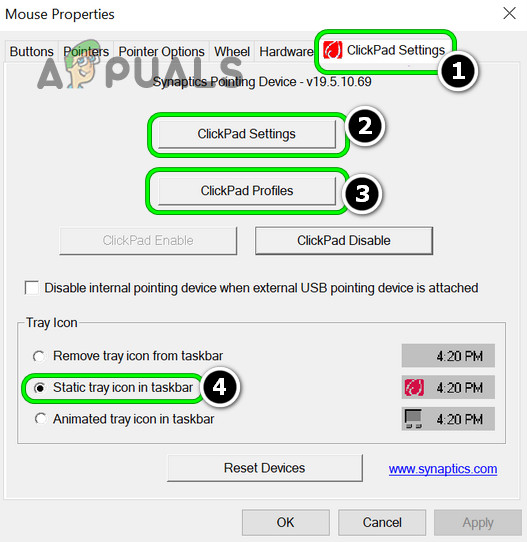
Edit ClickPad Settings, Save a New Profile of the Mouse Settings and Enable Static Tray Icon in the Taskbar - Now a mouse profile icon will be visible on your taskbar and whenever you want a particular set of mouse settings, select that profile.
If the issue persists, then check if editing the XML file of the driver (a task for tech-savvy users) resolves the issue. If that is not an option or not possible, then you may have to perform a clean installation of Windows.