Fix: Missing Display/Toggle for Adaptive Brightness
The adaptive brightness of your system may not work if your system lacks the light sensor or if its essential modules (like Windows or drivers) are outdated. Moreover, the adaptive brightness toggle may be missing if the same setting is being managed by the graphics control panel of your system.
Users have reported adaptive brightness issues (usually, after a Windows update) due to the non-presence of the display toggle in the Power Plan settings, which makes the computer quite difficult to use.

Before moving on to enable the adaptive brightness, keep in mind that the adaptive brightness feature is only available to those devices/graphic cards that are equipped with a light sensor, so, make sure your device has one. Moreover, check if your system does not have a physical button to control this feature (some OEMs do apply this feature through a hardware button). Furthermore, make sure to disable the Battery Saver (in Settings >> System>> Battery).
Solution 1: Update Windows, Drivers, and BIOS of Your System
The issue may arise due to the incompatibility between the different OS modules (Windows, drivers, and BIOS) as one of these entities is outdated. In this context, updating the Windows, BIOS, and drivers of your system to the latest build may solve the problem.
- Update the Windows, drivers (especially, the Graphics driver), and BIOS of your system to the latest build. Make sure to check the optional update as well. If you have an OEM utility (like Lenovo System Update), then use that utility to update the drivers.
- Now check if the adaptive brightness issue is resolved.
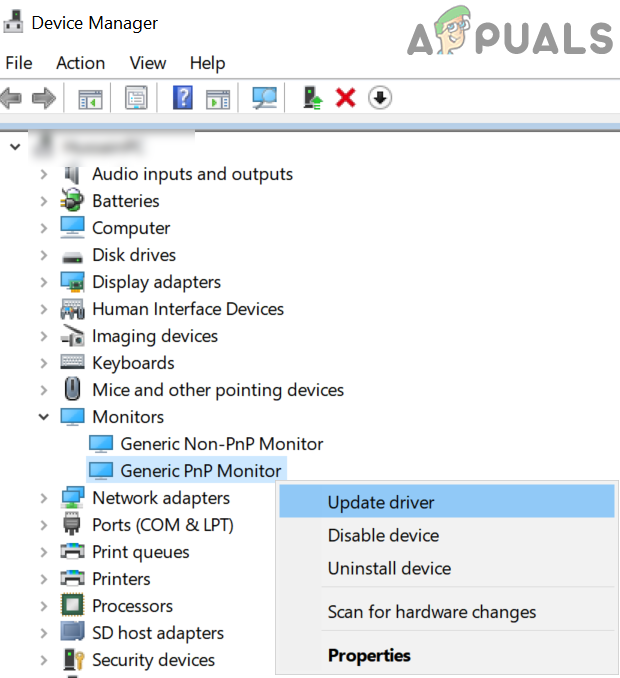
- If the issue persists, launch the Quick User menu (by simultaneously pressing Windows + X keys) and choose Device Manager.
Open Device Manager - Now expand Monitors and right-click on the Generic PnP Monitor.
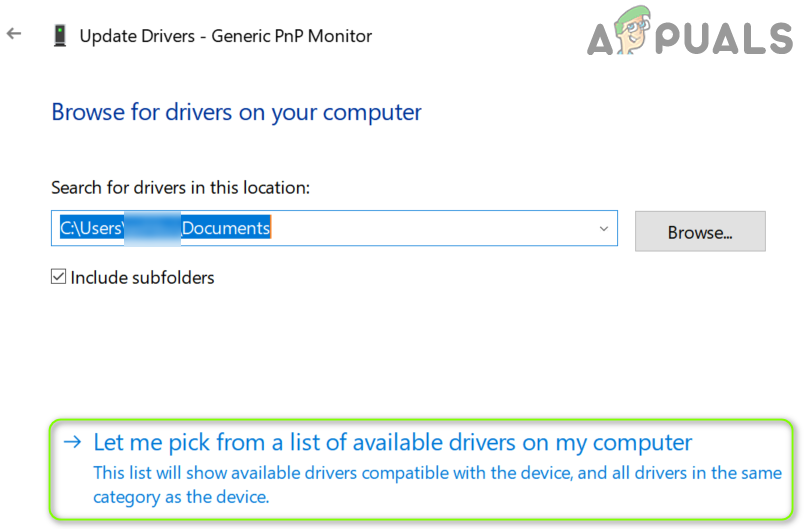
Update Driver of Generic PnP Monitor - Then select Update Driver and in the window shown, choose: Browse My Computer for Drivers.

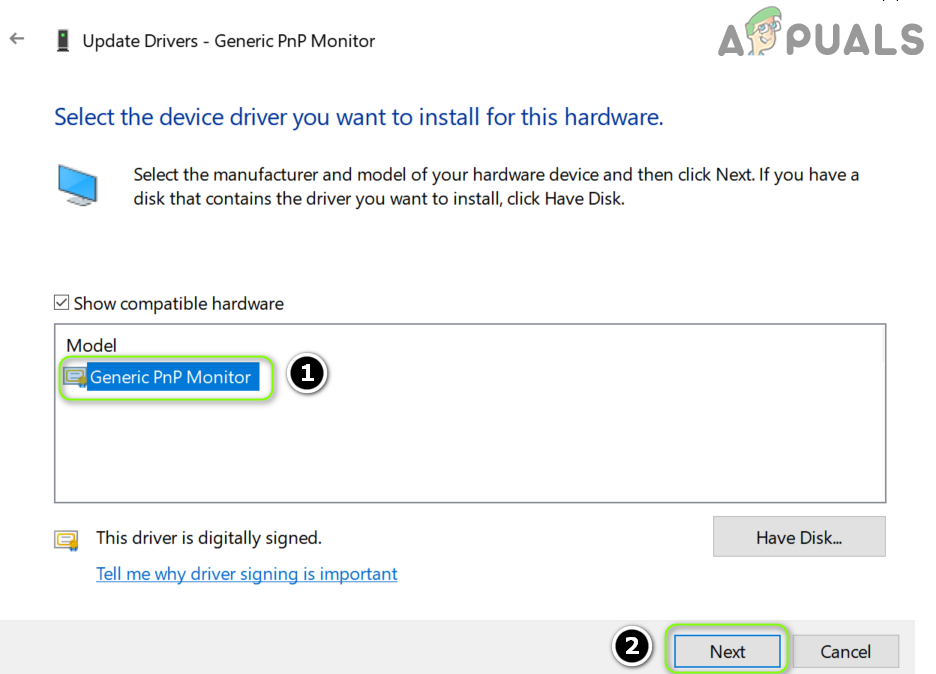
Select Browse My Computer for Drivers - Now, near the bottom of the window, open ‘Let Me Pick from a List of Available Drivers on My Computer’ and select Generic PnP Monitor.
Choose Let Me Pick from a List of Available Drivers on My Computer - Then reboot your PC and check if the adaptive brightness issue is resolved.
Install Generic PnP Monitor Driver - If the issue persists, then repeat steps 3 to 7 for your graphics card in the Display Adapters and check if that resolves the issue.
Solution 2: Run the Power Troubleshooter
You may encounter the adaptive brightness issue if the Power Options of your system are in an error state or misconfigured. In this case, running the built-in Power Troubleshooter may clear the glitch and thus solve the problem.
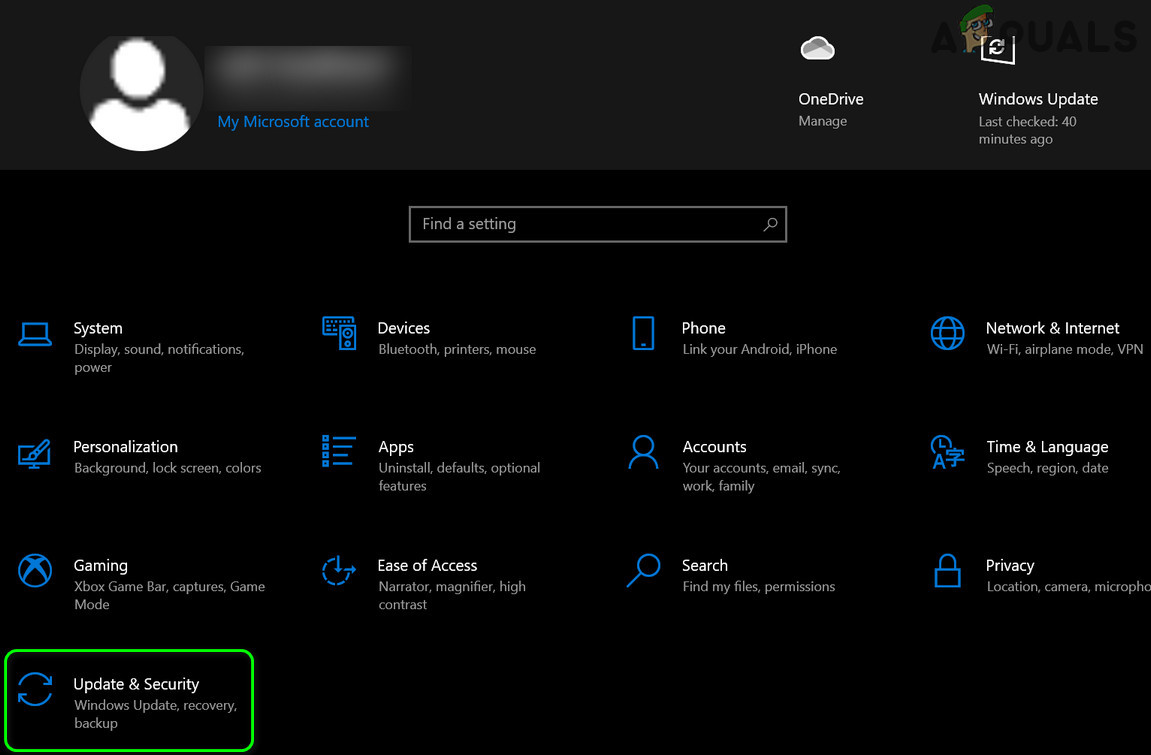
- Hit the Windows key and open Settings.
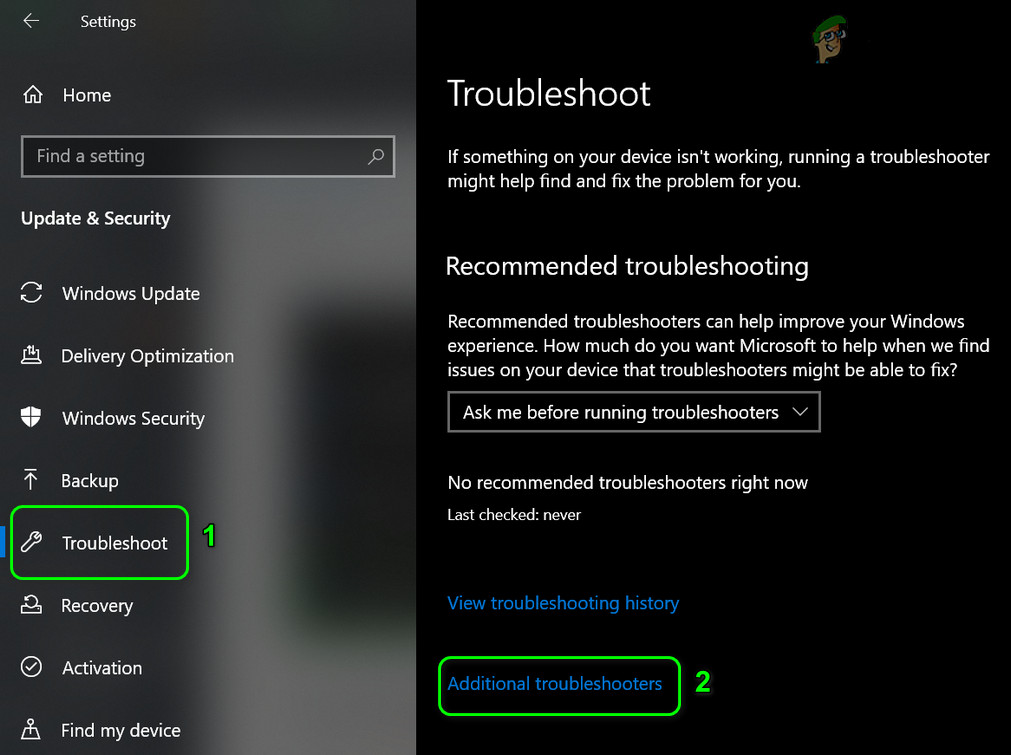
- Now select ‘Update and Security’ and in the left pane, steer to the Troubleshoot tab.
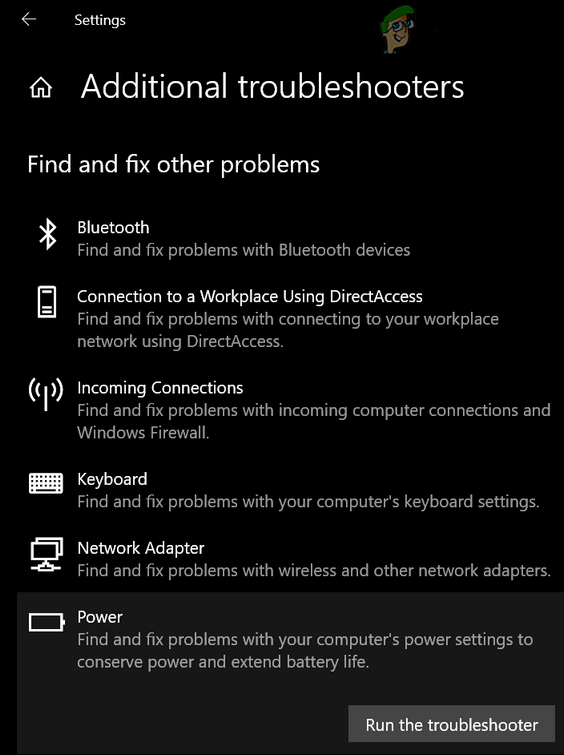
Open Update & Security - Then, in the right pane, open Additional Troubleshooters, and in the section of Find and Fix Other Problems, expand Power (you may have to scroll a bit to find the Power option).
Open Additional Troubleshooters - Now, under Power, click on Run the Troubleshooter and follow the prompts to complete the operation of the Power Troubleshooter.
Run the Power Troubleshooter - Then make sure to apply the changes suggested by the troubleshooter (if any) and check if the adaptive brightness issue is resolved.
- If that did not do the trick, then open Settings (step 1) and select Devices.
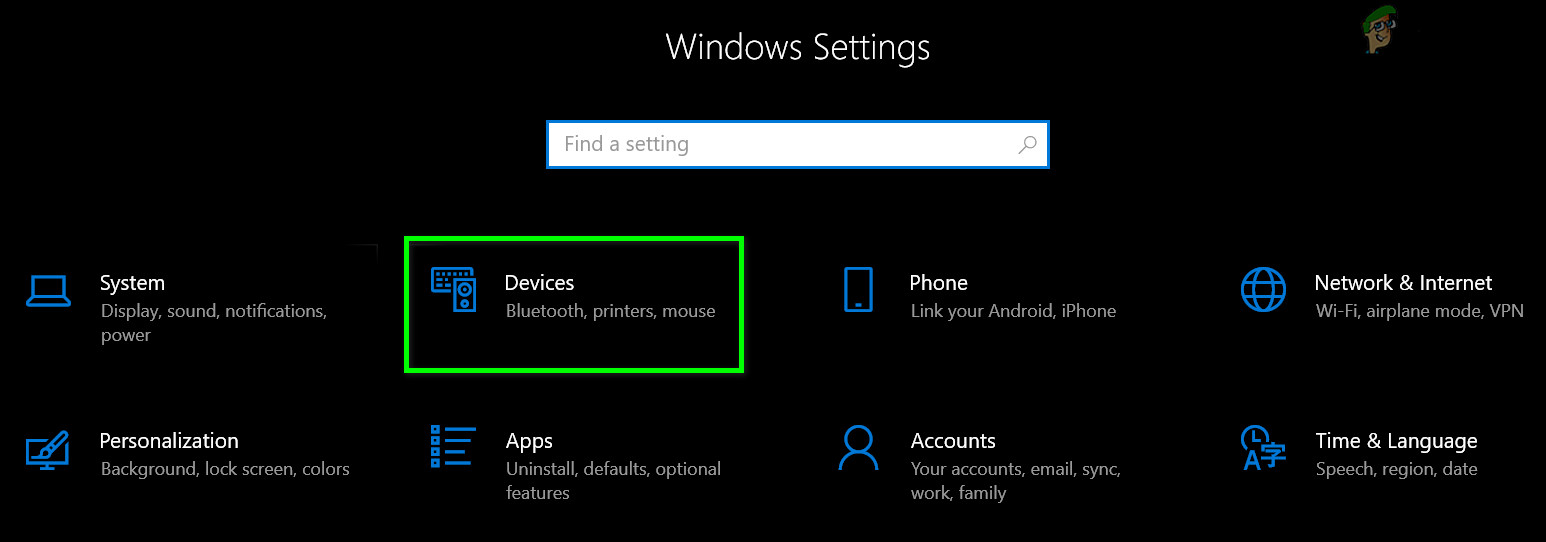
Open Devices in Windows Settings - Now, in the right pane, click on ‘Devices and Printers’ (under Related Settings) and make sure that none of the devices present there (e.g., Generic PnP) are reporting any issue (you may click on the device and check).
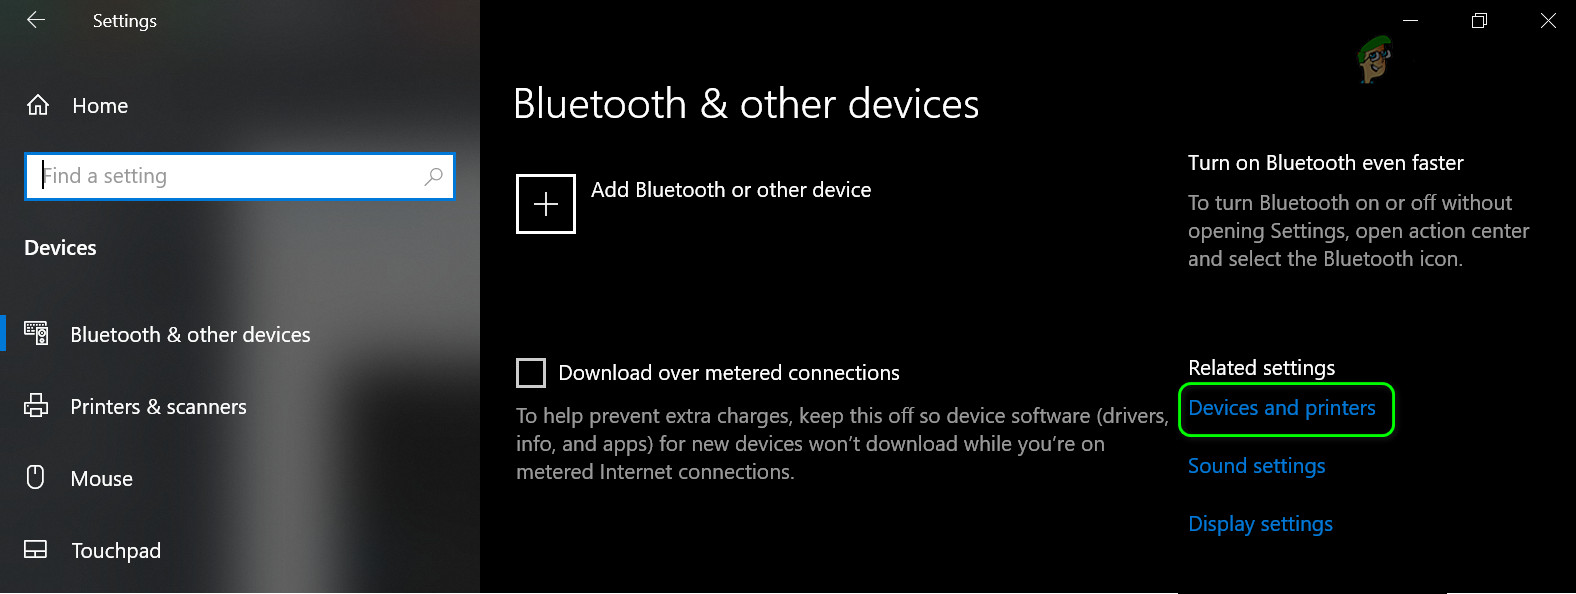
Open Devices and Printers Under Related Settings - Then check if the display brightness issue is resolved.
If not, then check if changing the contrast of your system solves the problem.
Solution 3: Create a Custom Power Plan for Your System
You may get the error at hand if the current power play of your system lacks the ability to manage the adaptive brightness. In this context, creating a new custom power plan with the ability to manage the adaptive brightness may solve the problem.
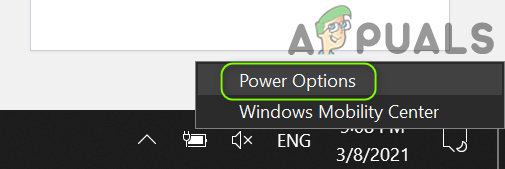
- In the system’s tray, right-click on the Battery icon and choose Power Options.
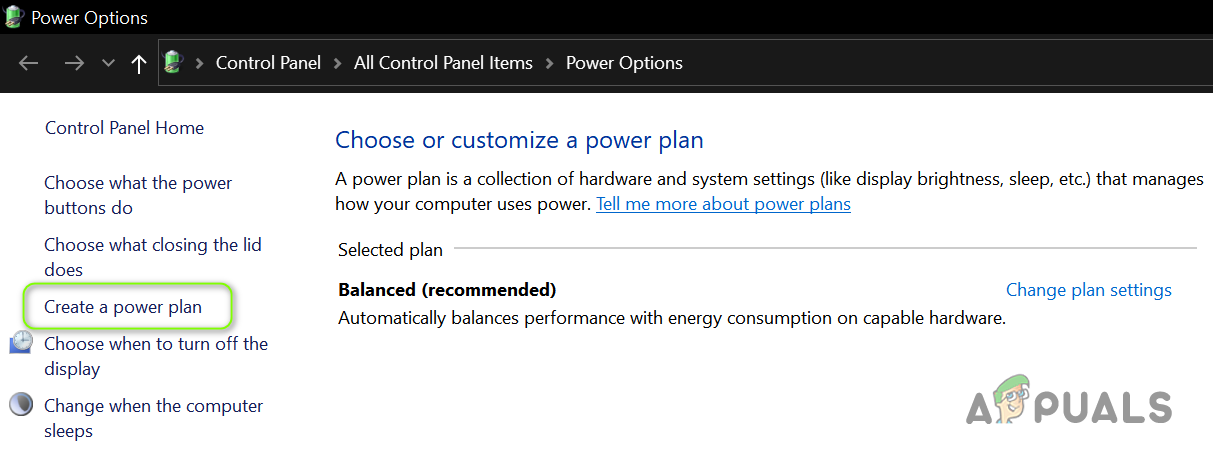
Open Power Options - Now, in the left pane, click on Create a Power Plan and select Power Saver (if available).
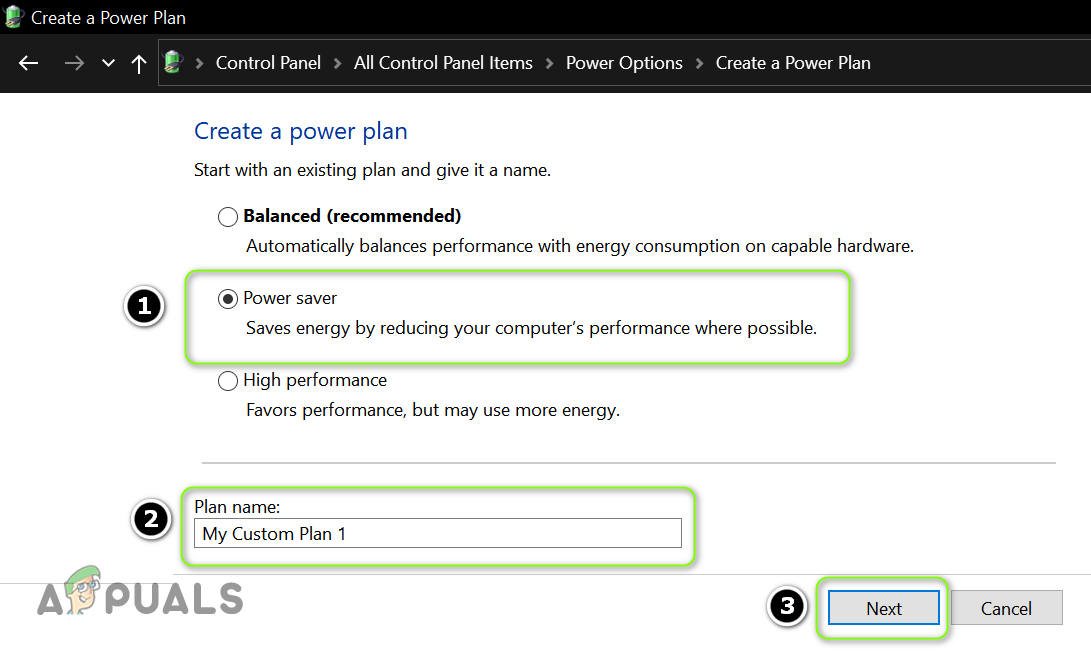
Create a Power Plan - Then enter the Plan Name as per your liking and click on Next.
Create a New Power Saver Plan - Now select the parameters as per your liking but make sure that Turn Off Display for both (i.e., On Battery and Plugged in) is not set to Never (any time limit will suffice).
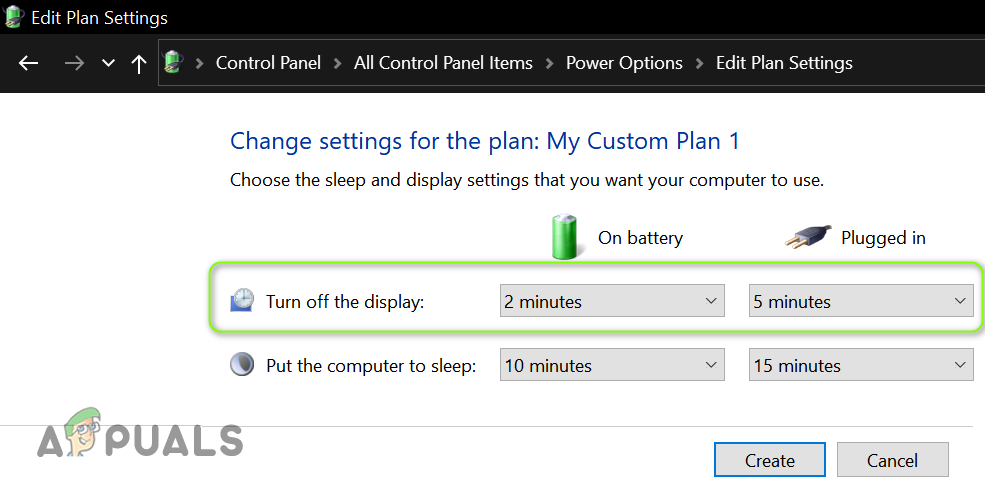
Set the Time Limit for Turn Off the Display - Now click on Create and then check if the display toggle issue is resolved.
But keep in mind that if you manually adjust brightness, then the brightness issue may return and you may have to perform the above steps again.
Solution 4: Edit the Graphics Control Panel Settings
The Display toggle for Adaptive Brightness may be missing as the said feature is controlled by the Graphics Control Panel. In this scenario, editing the relevant settings in the Graphics Control Panel may solve the problem. Some users have reported that they were able to sort out the issue by controlling the brightness through the Windows Mobility Center, so, check if that works for you.
AMD Radeon
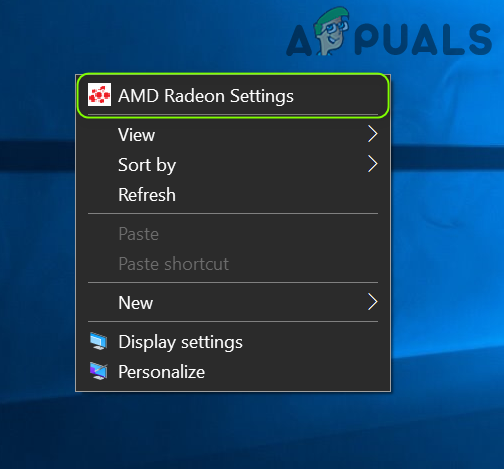
- Right-click on your desktop and open the AMD Radeon Settings.
Open AMD Radeon Settings - Now steer to the Display tab and disable the Vari-Bright to check if the adaptive brightness issue is resolved.
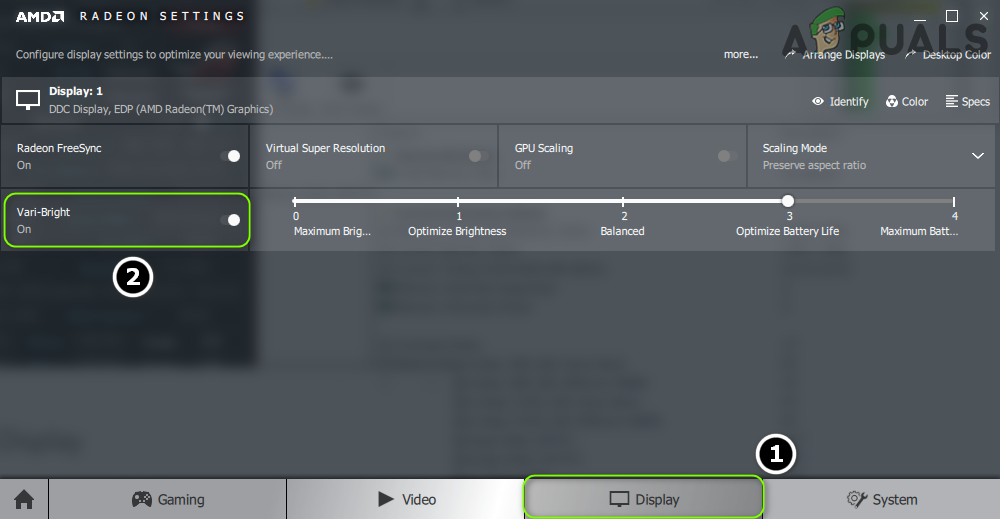
Disable Vari-Bright
Intel Graphics Control Panel
- Launch the Intel Graphics Control Panel (by right-clicking your desktop and selecting Graphics Properties).
- Now navigate to the Power tab (you may need to switch to the Basic Mode) and choose On-Battery (in the Power Source, if applicable).
- Then uncheck the option of Disable Power Saving Technology and apply your changes.
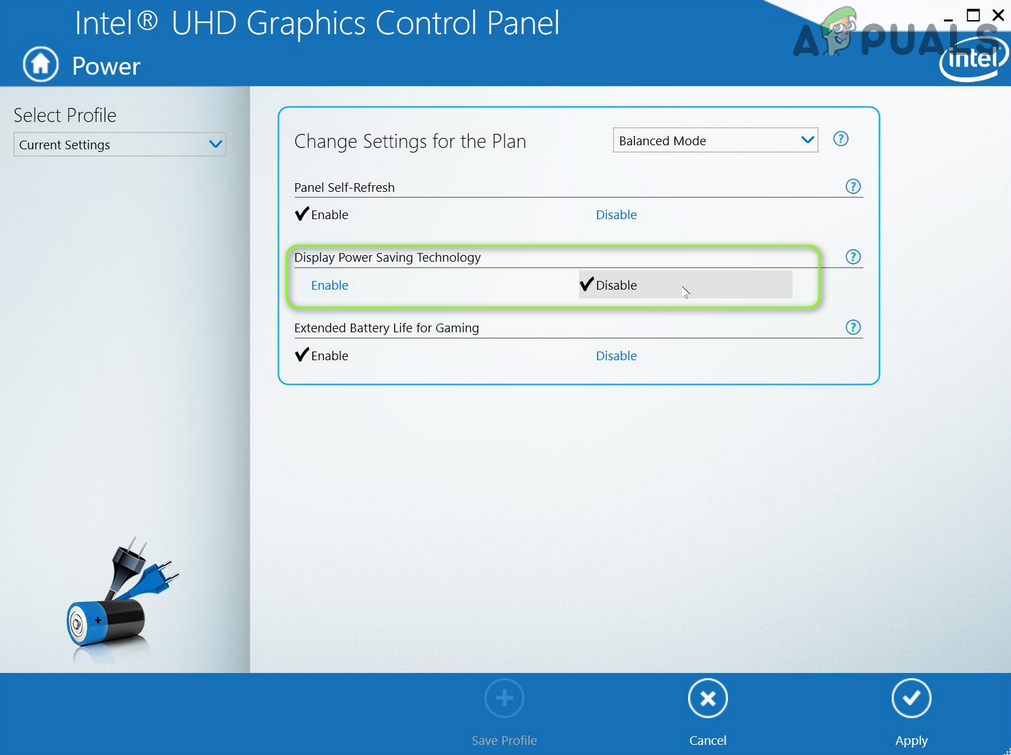
Disable Power Saving Technology - Now exit the Graphics Control Panel and check if the system is clear of the Adaptive Brightness problem.
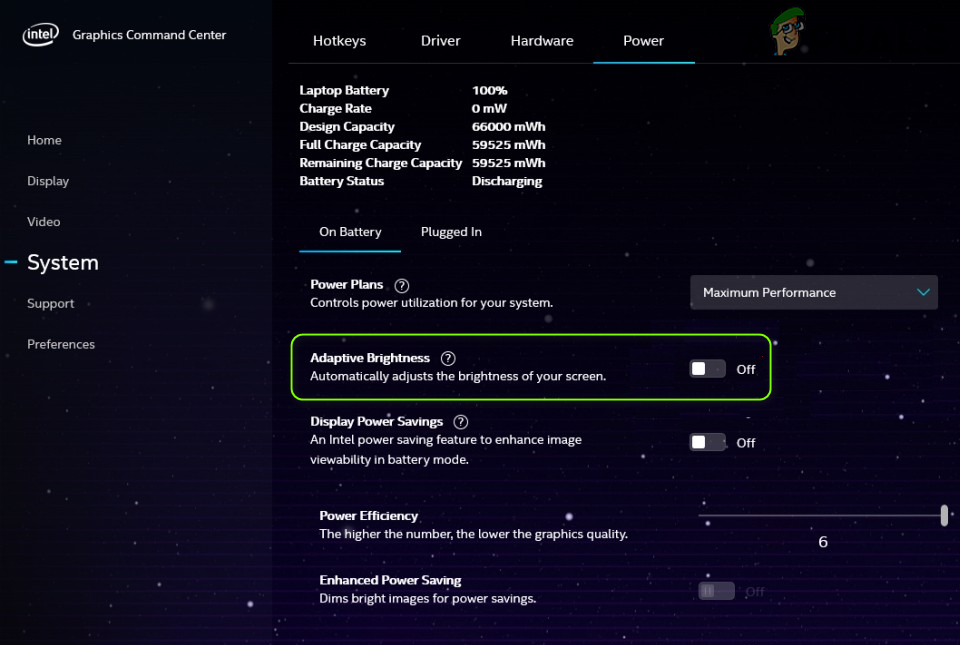
If you do not have Intel Graphics Control Panel or it does not have the power saving option, then install the Intel Graphics Command Center (from the Microsoft Store). Then check if disabling the Display Power Savings in On-Battery and Plugged-in tabs (in System>>Power) solves the problem.
If the issue persists, then check if you can manage the brightness in the Color Settings (in the Display tab) of the Graphics Control Panel (like Nvidia Control Panel).
Solution 5: Edit the BIOS Settings of Your System
The toggle for adaptive brightness may be missing from your system due to the misconfiguration of your system’s BIOS. In this context, editing the relevant BIOS settings may solve the problem. The instructions mentioned below may differ from user to user.
Warning: Editing the system’s BIOS is a skillful task and if not done properly, you may brick your system and cause everlasting damage to your data.
- Boot your system into the BIOS and in the left pane, expand the Video option.
- Now select Dynamic Backlight Control and in the right pane, disable it.
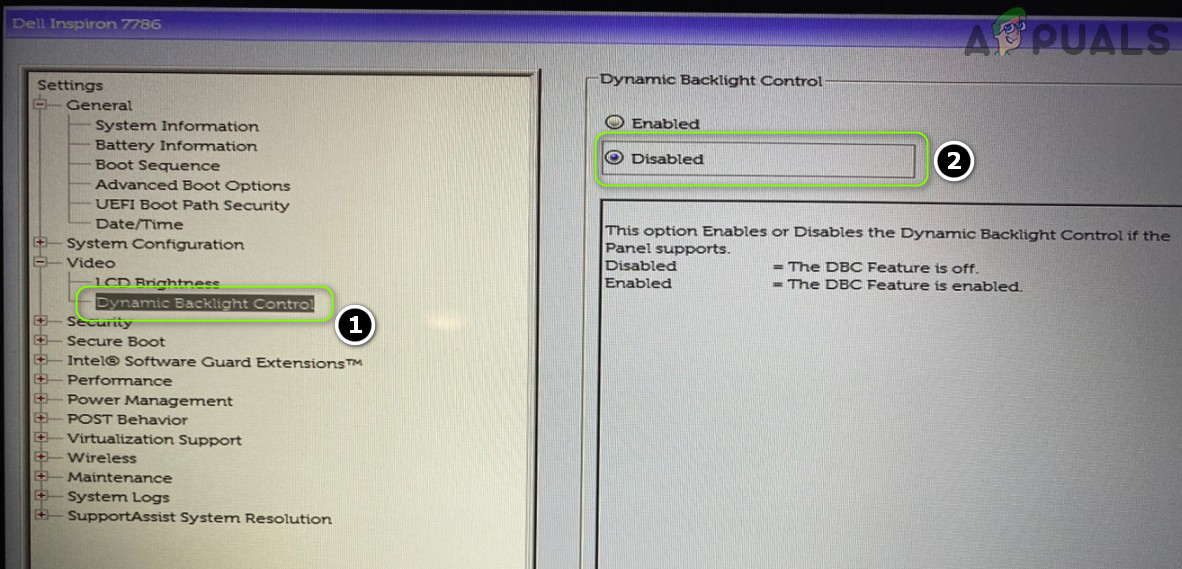
Disable Dynamic Backlight Control in BIOS - Then save your changes and boot your system into Windows to check if the adaptive brightness toggle issue is resolved.
Solution 6: Use the Command Prompt
If you cannot find the solution to the ‘display toggle’ issue so far, then there are some cmdlets of the Command Prompt that may let you disable/enable the adaptive brightness.
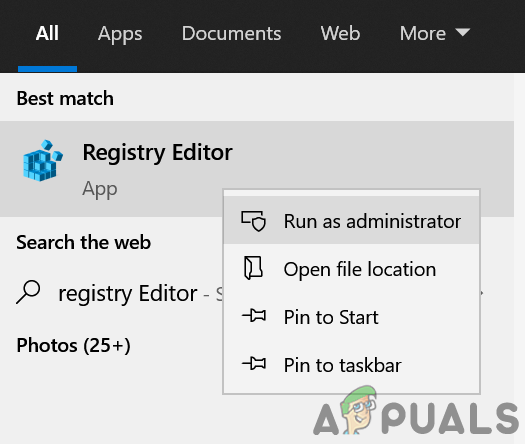
- Hit the Windows key and type: Command Prompt. Now hover over the result of the Command Prompt and then, in the right pane of the menu, choose Run as Administrator.
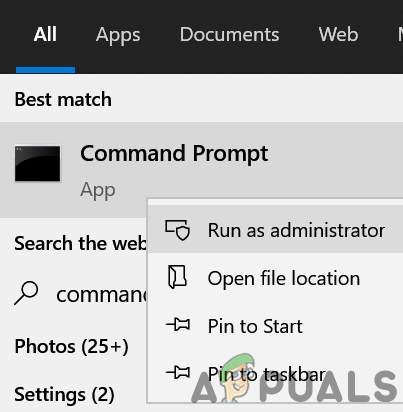
Open Command Prompt as Administrator - Click Yes if the UAC prompt received and then execute the following to disable the on-battery adaptive brightness:
powercfg -setdcvalueindex SCHEME_CURRENT 7516b95f-f776-4464-8c53-06167f40cc99 FBD9AA66-9553-4097-BA44-ED6E9D65EAB8 0
- Now execute the following to disable the Plugged-in adaptive brightness:
powercfg -setacvalueindex SCHEME_CURRENT 7516b95f-f776-4464-8c53-06167f40cc99 FBD9AA66-9553-4097-BA44-ED6E9D65EAB8 0
- Then close the Command Prompt and check if the adaptive brightness issue is resolved.
But keep in mind that whenever you want to re-enable the adaptive brightness, replace the last 0 of both commands (mentioned above) with 1 and execute them in an elevated Command Prompt.
Solution 7: Reinstall the Graphics Driver
The display toggle of adaptive brightness may not be shown in the Power Plan if the graphics driver of your system is corrupt. In this case, reinstalling the graphics driver may solve the adaptive brightness issue.
- Firstly, download the latest graphics driver from the OEM website and install it with administrative privileges to check if that resolves the problem.
- If not, launch the Power User menu (by pressing Windows + X keys simultaneously) and then choose Device Manager.
- Now expand the option of the Display Adapters and then right-click on your graphics card.
- Then, in the context menu, select Uninstall Device, and in the new window shown, checkmark the option of Delete the Driver Software for This Device and click on Uninstall.
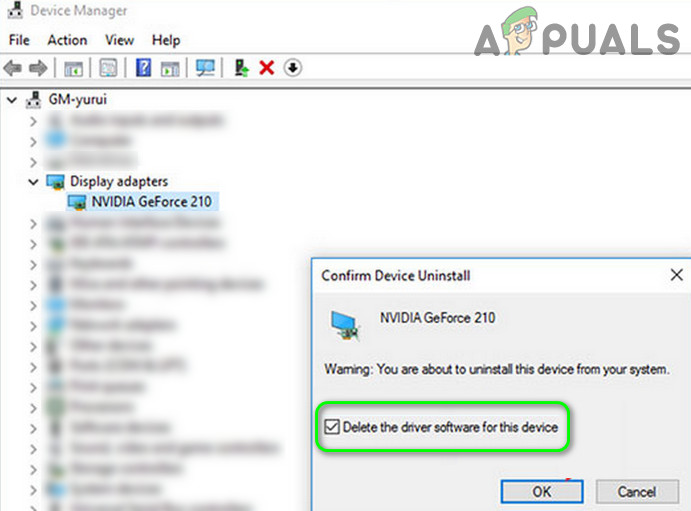
Uninstall Graphics Driver and Delete its Driver Software - Now let the uninstallation process complete (your screen may flicker or become a bit weird but do not worry) and then reboot your PC.
- Upon reboot, check if the adaptive brightness toggle issue is resolved (as Windows may try to install its default display driver).
- If not, then install the driver downloaded at step 1 with administrative privileges and reboot your PC.
- Upon reboot, check if the system is clear of the adaptive brightness issue.
- If that fails, then check if using an older driver of the graphics card solves the problem.
Even if that did not do the trick, then boot your system into the safe mode and use the DDU to uninstall the driver. Then boot into the normal mode and reinstall the latest driver to check if that solves the display toggle issue.
Solution 8: Use the Registry Editor
If none of the attempted solutions was successful, then you may edit the relevant registry keys of the system’s registry to sort out the problem.
Warning: Be very careful and advance at your own risk as editing the system’s registry requires proficient knowledge and if not done properly, you may cause undying harm to your system/data.
Before moving on, make sure to back up the system’s Registry (just in case…).
Set the Attributes of the PowerSettings Key
- Press the Windows key and type: Registry Editor. Then, hover your mouse over Registry Editor, and in the right pane of the menu, choose Run as Administrator.
Open Registry Editor as Administrator - Navigate to the following path:
HKEY_LOCAL_MACHINE\SYSTEM\CurrentControlSet\Control\Power\PowerSettings\7516b95f-f776-4464-8c53-06167f40cc99\FBD9AA66-9553-4097-BA44-ED6E9D65EAB8

Set the Attributes Value to 2 - Now, in the right pane, double-click on Attributes and set its value to 2.
- Then exit the editor and reboot your PC to check if the display toggle issue is resolved.
Edit the PowerSchemes Key
- Navigate to the following path:
HKEY_LOCAL_MACHINE\SYSTEM\CurrentControlSet\Control\Power\User\PowerSchemes\
- Then, in the left pane, expand the key of PowerSchemes and all the sub-keys under it till you find the following one (you can check the name of the power plan in the FriendlyName value of the parent key):
7516b95f-f776-4464-8c53-06167f40cc99
- Now expand the above-mentioned key and select the following key under it:
aded5e82-b909-4619-9949-f5d71dac0bcb
- Now make sure to take ownership of the above keys (so you can edit them).
- Then, in the right pane of the key mentioned in step 4, set the value of ACSettingIndex (for Plugged-in) and DCSettingIndex (for Battery) as you want to set the value of the brightness (in percentage e.g., 5%).
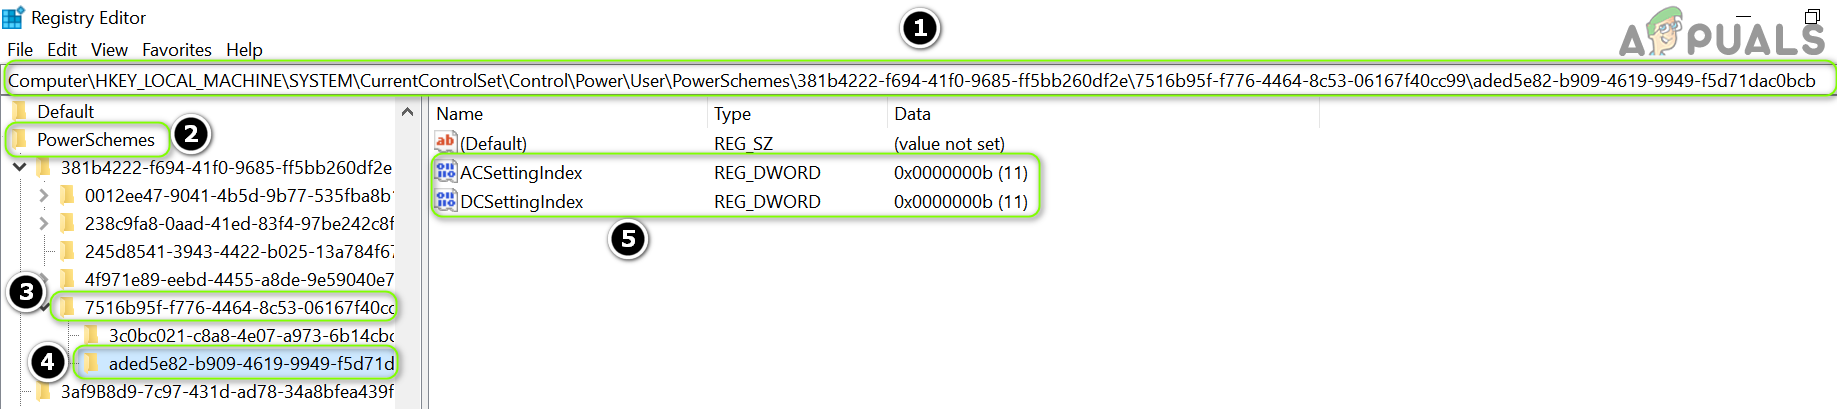
Set the Value of DCSettingIndex and ACSettingIndex - Now close the editor and reboot your PC to check if the adaptive brightness issue is resolved.
If the issue persists, make sure your laptop is plugged in and then put it to sleep. Now unplug the charger and wake up the system to check if the brightness issue is resolved (a workaround till the issue is resolved). If that does not work for you, you may try a 3rd party application to adjust the adaptive brightness.


THANK YOU! Holy Sh!t I scoured numerous articles and pages trying to figure out not only how to disable my adaptive brightness (actually how to disable power saving tech as I have intel) but also why I was missing the generic power plan display setting and where else to look. Endless frustrated scrolling compelled me to write this thank you for your incredibly thorough and well outlined guide, individuals like yourself are the unsung hero’s to frustrated users everywhere!