Fix: Session “Microsoft Security client OOBE” Stopped Error 0xC000000D
The Microsoft Security client belongs to the Microsoft Security Essentials package. Microsoft Security Essentials is a free download from Microsoft that is simple to install, easy to use, and it often comes preinstalled on users’ computers.
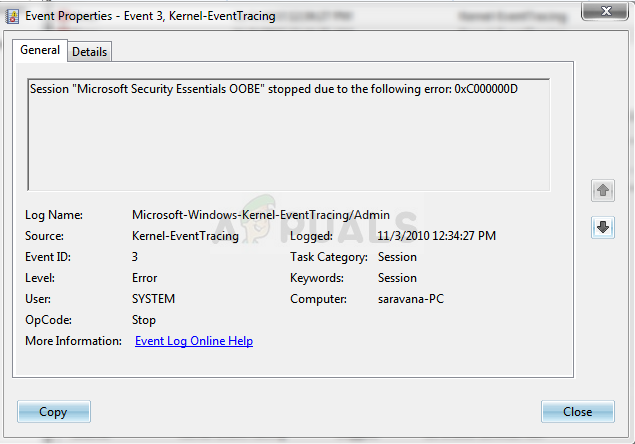
Microsoft Security Essentials runs quietly and efficiently in the background so you’re free to use your Windows-based PC the way you want – until an error such as this one appears. Sometimes it’s simply viewable in the Event Viewer on your computer and sometimes it even causes a BSOD! Even though the culprit is this tool, there are various ways to solve this problem so make sure you follow the solutions below!
Solution 1: Delete a Certain File
Plenty of users were able to solve the problem simply by deleting a single file which can easily be located on your computer and they have recommended this solution to everyone. The question to ask is will something happen to your Microsoft Security Essentials installation. The great fact is that this file will be automatically regenerated and you will be able to keep the problem but without the error addition!
- Navigate to the following location on your computer by opening the Windows Explorer and clicking on This PC:
C:\ProgramData\Microsoft\Microsoft Security Client\Support\EppOobe.etl
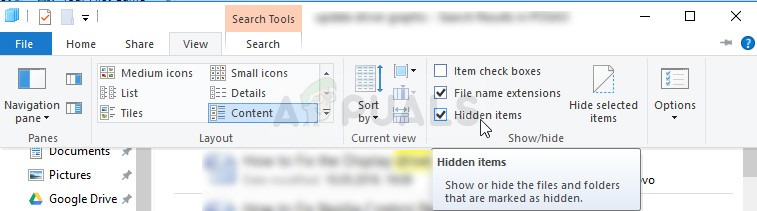
- If you are unable to see the ProgramData folder, you may need to turn on the option which enables you to view hidden files and folders. Click on the “View” tab on File Explorer’s menu and click on the “Hidden items” checkbox in the Show/hide section. File Explorer will show the hidden files and will remember this option until you change it again.
- Delete the EppOObe.etl file in the Support folder by right-clicking on it and choosing the Delete option. Restart your computer and check to see if the same problem still appears on your computer.
Solution 2: Uninstall Microsoft Security Essentials Completely
If you are not using this tool as it came preinstalled on your computer, you can uninstall it and that will probably get rid of the problem. However, sometimes simply uninstalling it won’t solve the problem as there are some remaining registry entries which need to be taken care of.
If you once had Microsoft Security Essentials installed on your computer, you should skip the first set of steps and go forward do deleting the registry files!
- First of all, make sure you have logged in with an admin account as you won’t be able to uninstall programs using any other type of account.
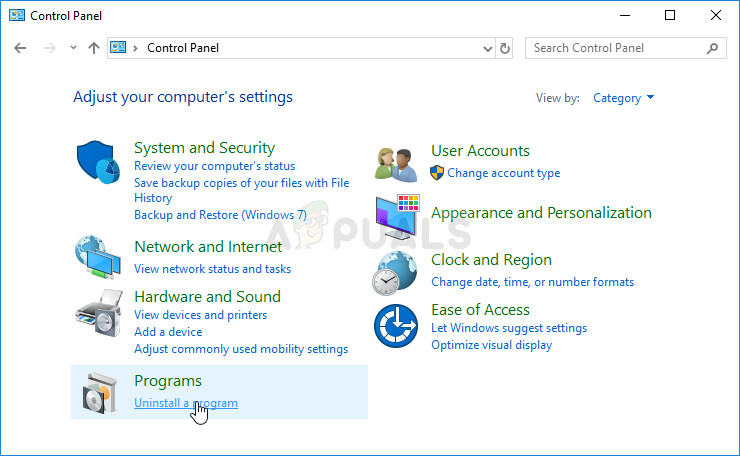
- Click on the Start menu and open Control Panel by searching for it. Alternatively, you can click on the gear icon in order to open settings if you are using Windows 10.
- In Control Panel, select to View as: Category at the top right corner and click on Uninstall a Program under the Programs section.
- If you are using the Settings app, clicking on Apps should immediately open a list of all installed programs on your PC.
- Locate the Microsoft Security Essentials entry on the list and click on it once. Click on the Uninstall button above the list and confirm any dialog boxes which may appear. Follow the instructions on-screen in order to uninstall Microsoft Security Essentials and restart your computer afterwards.
Now it’s time to get rid of the remaining stuff. First of all, check to see if the file from Solution 1 is still at the same folder and make sure you delete it along with other files which may have remained. Now, as registry goes, it’s enough to delete the registry keys related to the Microsoft Security Client OOBE in order to make the problem go away.
- Since you are going to edit the registry, we recommend you check out this article we have prepared in order to safely backup your registry to prevent further problems. Still, nothing wrong will occur if you follow the instructions carefully.
- Open the Registry Editor interface by typing “regedit” in either the search bar or the Run dialog box. Navigate to the following keys in Registry Editor by navigating in the left pane:
HKEY_LOCAL_MACHINE\SYSTEM\CurrentControlSet\Control\WMI\Autologger
HKEY_LOCAL_MACHINE\SYSTEM\ControlSet001\Control\WMI\Autologger
HKEY_LOCAL_MACHINE\SYSTEM\ControlSet002\Control\WMI\Autologger
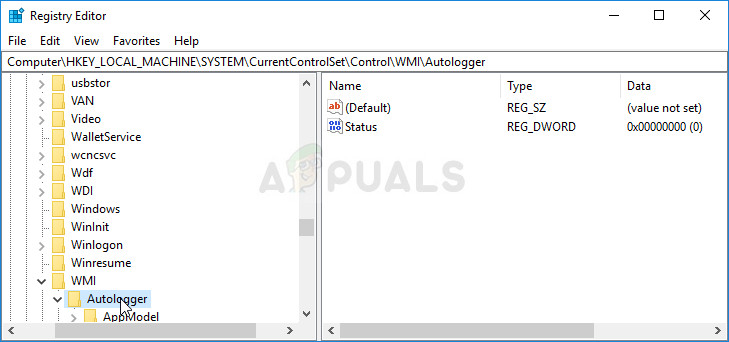
- In each of these registry keys, you should be able to locate the Microsoft Security Client OOBE key at the left navigation pane. Right-click on it for each CurrentControlSet and choose the Delete option. Make sure you confirm any confirmation dialogues and exit the registry. Check to see if the problem is gone after restarting your computer.
Solution 3: Disable the Microsoft Security Client in Computer Management
If you don’t want to uninstall Microsoft Security Essentials as you are using it to protect your computer against various threats, you can simply disable the OOBE as its purpose is not to keep you safe (other services and processes serve that process). OOBE stands for Out-of-box-experience and it involves setting up the core settings which you have already setup.
Here is how to disable Microsoft Security Client OOBE in Computer Management from starting up on your computer:
- Click the Start menu of your Windows 7 PC, locate the Computer entry at the right pane, right-click on it, and choose the Manage options. You will need administrator permissions in order to proceed.
- If you are using Windows 10, you can simply right-click the Start menu button and choose the Computer Management option.
- Navigate to Computer Management (Local) >> System Tools >> Performance >> Data Collector Sets >> Startup Event Trace Sessions by expanding these sessions clicking on the arrow icons left to their names.
- Right-click the Microsoft Security Client OOBE entry and choose the bolded Properties option. In the Properties window, navigate to the Trace Session tab and uncheck the Enabled option in order to disable it. Apply the changes and exit.
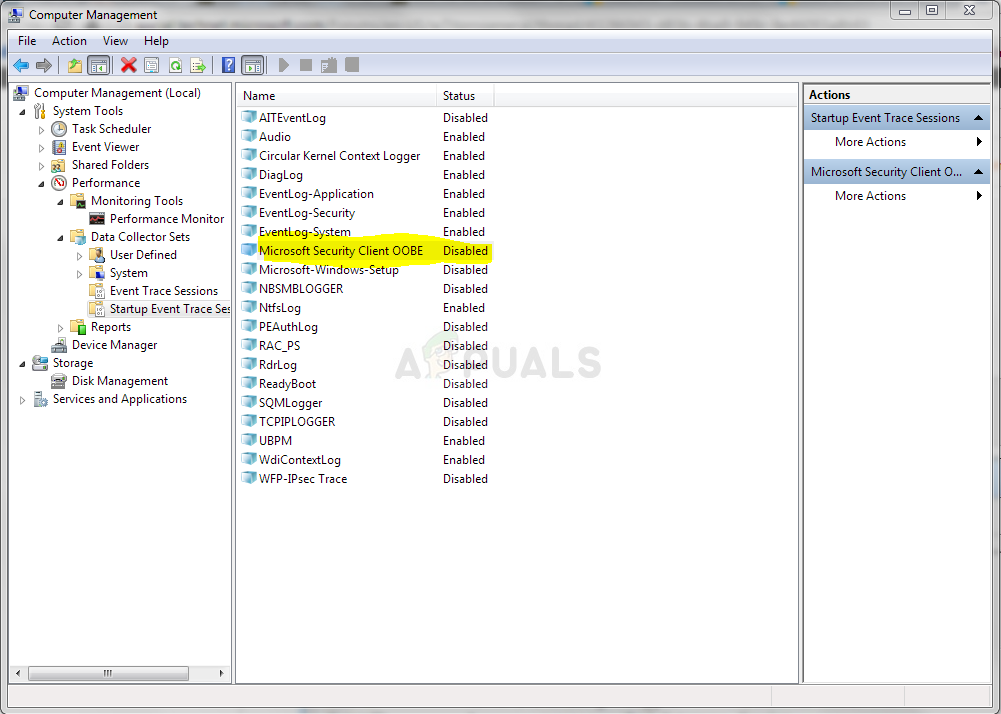
- Check to see if the problem still appears in the Event Viewer after you restart your computer.
Solution 4: Reinstall Microsoft Security Essentials and Enable Windows Defender
This is a somewhat more advanced fix and it involves reinstalling Microsoft Security Essentials which means you will be able to continue using this tool after this step is over but you hopefully won’t receive the error message. This method is aimed at Windows Vista or newer users.
- Follow the instructions from the Solution 2 in order to completely uninstall the Microsoft Security Essentials program. The next step would be to enable the Windows Defender feature which is automatically disabled when Microsoft Security Essentials is installed.
Windows 10 Users:
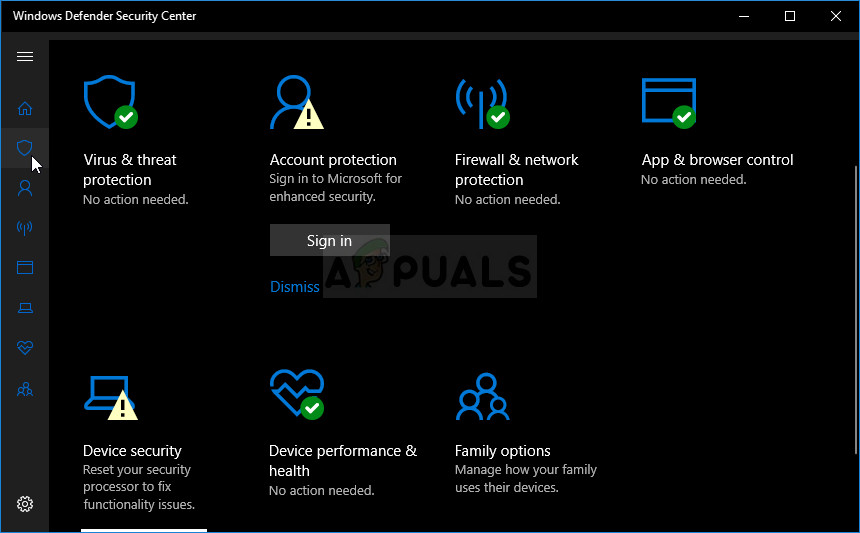
- Right-click on the shield icon on your taskbar and click on View Security Dashboard.
- When Windows Defender Security Center opens, click on the shield icon below the home button, open Virus & threat protection settings and turn off Real-time protection and Cloud-based protection.
- Navigate to the browser icon (second from the end) and turn on the Check apps and files option.
- You can also enable SmartScreen if you think it’s you should keep it during this process.
Other Versions of Windows:
- Open Control Panel by searching for it in the Start menu. You can also use the Windows Key + R key combination, type in “control panel” in the Run dialog box and click OK.
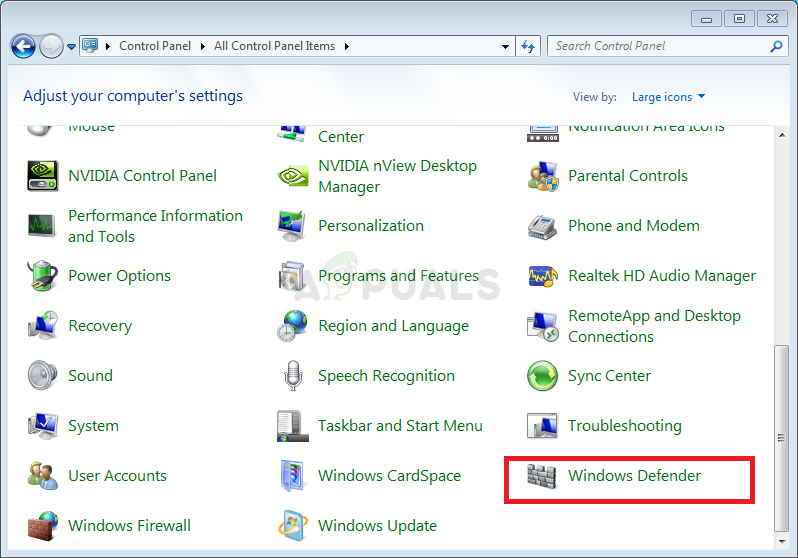
- Switch the View by setting in Control Panel to Large Icons and locate the Windows Defender entry.
- Click on the Tools button at the very top of the window, next to the gear-like icon and click on Options under the Settings section which will appear.
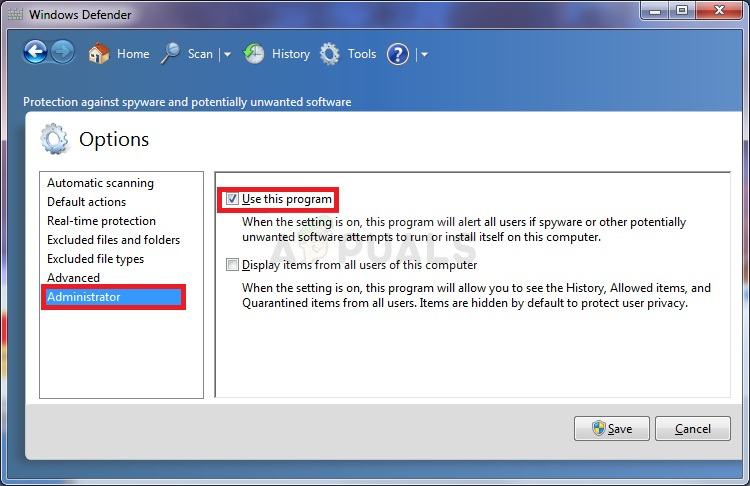
- Navigate to the Administrator tab in the Options window and check the box next to the Use this Program option. Click on Save in order to apply the changes and confirm admin prompts.
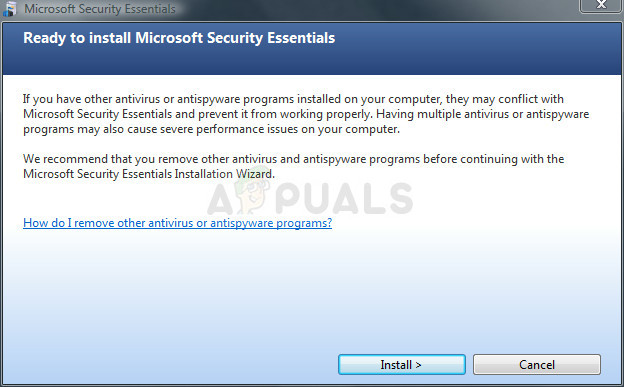
- The next step is to download and install Microsoft Security Essentials again. Visit this link in order to locate the download link for the program and save it to your computer.
- Open it from the Downloads folder and follow the instructions on screen in order to install the program to your computer again.
- Windows Defender should disable itself automatically and that is why enabling it was an important part of this solution. Check to see if the problem still appears.
Solution 5: Disable the Program Compatibility Assistant Service on Your Computer
This service and the Microsoft Security Client OOBE are apparently waging a war and users have reported that simply disabling this service on your computer has managed to solve their problem.
The Program Compatibility Assistant detects known compatibility issues in older applications. After you have run an older program in the new version of Windows, it notifies you if there is a problem and offers to fix it the next time you run the program. It’s not beneficial to your computer and you can disable by following the steps below:
- Open the Run dialog box by using the Windows Key + R key combination. Type in services.msc in the Run dialog box and click OK in order to open services-related settings.

- Locate Program Compatibility Assistant Service, right-click on it and select Properties from the context menu which will appear.
- If the service is stopped (you can check that just next to the Service status message), you should leave it as it is. If it is running, click the Stop button and wait for the service to close down before proceeding.
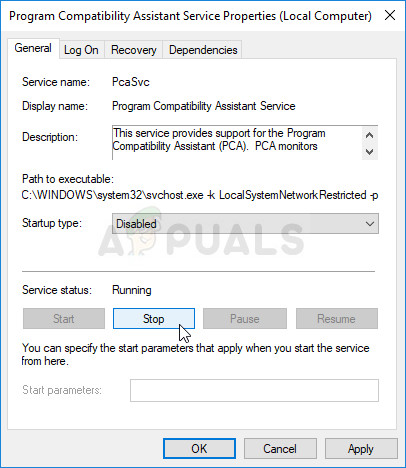
- Make sure that the option under the Startup type section in Program Compatibility Assistant Service’s Properties is set to Disabled before you exit Services.
- Check to see if the problem regarding the Microsoft Security Client has stopped is successfully gone forever.
You may receive the following error message when you click on Stop:
“Windows could not stop the Program Compatibility Assistant Service on Local Computer. Error 1079: The account specified for this service differs from the account specified for other services running in the same process.”
If this occurs, follow the instructions below to fix it.
- Follow the steps 1-3 from the instructions above in order to open Program Compatibility Assistant Service’s properties. Navigate to the Log On tab and click on the Browse… button.
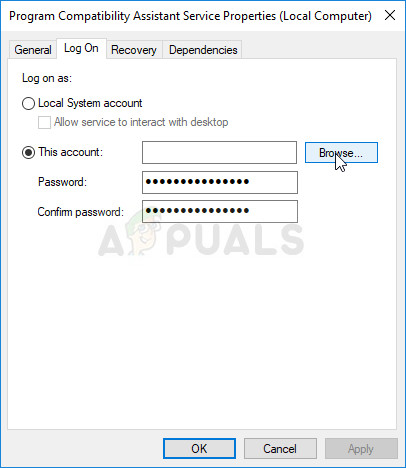
- Under the “Enter the object name to select” box, type in your account’s name, click on Check Names and wait for the name to become recognized.
- Click OK when you are finished and type in the password in the Password box when you are prompted with it, if you have setup a password.
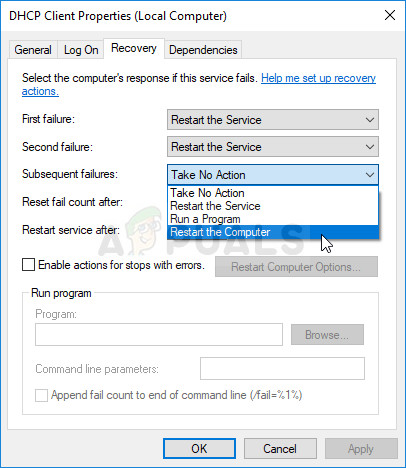
Note: If this does not solve your problem, there is one thing you could do while you are still in the Services window. There are some things which you can tweak with the DHCP Client in order to help you solve the problem, as suggested by a user.
- Locate the DHCP Client, right-click on it and select Properties from the context menu which will appear.
- Navigate to the Recovery tab in the Properties window and change the values for First, Second, and Subsequent failures to Restart the Service in the drop-down menu. Click on OK and check to see if the problem is gone.
Solution 6: Install the Latest Graphics Card Drivers
It appears that some people experienced the issue because of old graphics card drivers provided by Microsoft for their NVIDIA or AMD graphics card. No matter which card you are using, you should stick to drivers downloaded from their website and not the ones installed automatically by Windows.
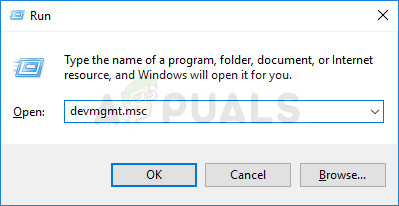
- Select the Start button, type in Device Manager, and select it from the list of results at the top. You can also use the Windows Key + R key combination in order to bring up the Run dialog box. Type in “devmgmt.msc” in the box and click OK.
- Expand one of the categories to find the name of the device you want to update, then right-click on it, and select Update Driver. For graphics cards, expand the Display adapters category, right click your graphics card and select Uninstall Device.
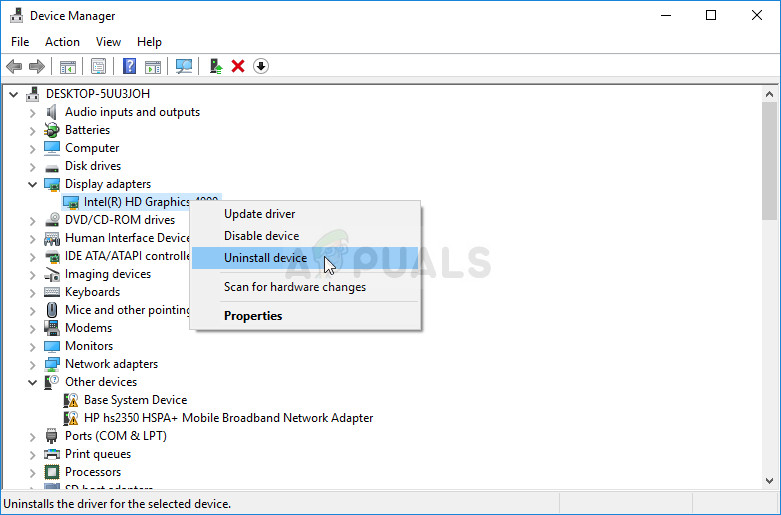
- Confirm any dialogues which may prompt you to confirm your choice and for the process to finish.
- Look for your graphics card driver on the device manufacturer’s website and follow their instructions. Save the installation file on your computer and run it from there. Your computer may restart several times during the installation.
Nvidia Drivers — Click Here!
AMD Drivers — Click Here!


