How to Fix the ‘Mic Not Working’ Issue with Ground Branch?
Many Ground Branch players have been experiencing microphone problems while playing the game. This has been a common issue for many players who are unable to use the voice chat in-game. This error is only seen on PC and seems much more common among people who use dedicated headsets.

After many reports were published by affected players, we’ve looked closer into this issue and come up with a shortlist of all the possible causes. As it turns out, the root cause that might cause this type of problem on your PC might be different depending on your hardware and Windows settings.
Here are the most common culprits that are known to cause this problem:
- Disabled microphone access – In many cases, this problem was caused by the fact that the microphone’s access was disabled. You can fix this by making sure that microphone access is enabled from Windows Settings. You can check the Privacy & security section, Sound Properties, or Device Manager.
- Outdated Windows – The fact that your microphone no longer works on Ground Branch and other games or applications might be caused by the Windows build you are using – chances are your Windows version is outdated and missing a key infrastructure update. Make sure that you don’t miss any updates that are available for your Windows.
- Incompatible microphone – Another cause that might not be letting your microphone work while you’re playing Ground Branch might be because the microphone is incompatible with the game. Or it could be a simple error that is not letting you use the mic. Try plugging in another mic, then test it to see if it works.
- Unrecognized microphone – This error could be also caused by the game which is not recognizing your mic for some reason. You can fix this by closing the game, then launching it back to force Ground Branch to recognize your speaking device. This fix is typically effective in situations where you have plugged in a new headset while the game was opened or running in the background.
- Interfering unused audio devices – Some players report that the microphone not working might be also caused by some unused audio input devices that share some drivers with the active audio input (thus creating a conflict). These devices could interfere with the mic you are using and with the game, now letting your microphone work. To fix this, you need to disable all the unused audio input devices.
- Enabled ‘Toggle’ mode – The mic not working error might be also triggered by the VOIP Toggle mode, which is an option in the game. This mode is still not implemented properly and you’re better off using PTT instead. To fix this, you need to go to the settings of the game and change the Voice Input Mode to Push To Talk(PTT).
- You have been muted by admin – Players that have experienced this Ground Branch issue have reported that it was caused by the admin of the server that they were playing on. Turns out, the reason why the microphone didn’t work in Ground Branch for them was that the admin muted them. In that case, the only thing you can do is to ask the admin of the server to unmute you.
Now that you know all the possible causes for this error, here is a list of methods that might help you fix this microphone problem:
1. Enable microphone access for Ground Branch
The first thing you can try when troubleshooting this issue is to enable the microphone access to let Ground Branch use your microphone. In some cases, players have found out that their microphone’s access was disabled, without any clear reason about why and how that happened.
Note: This problem might arise if you have configured Windows to reject any request from a newly installed app or game to use the primary audio recording device.
If you find yourself in this particular scenario and you wish to investigate and see whether this method is applicable, there are 3 ways to check if the microphone is disabled and enable it if necessary.
Keep in mind that every method below will ultimately help you achieve the same thing, just the execution is different.
Feel free to follow whichever sub-guide you feel most comfortable with from below:
Enable microphone from Privacy & security menu
To follow this method, you first need to go check if the microphone’s access is enabled in the Privacy & security section. You can find this section in the Settings of your computer.
Here’s how to do this:
Note: The instructions are identical regardless if you’re following the steps below from Windows 10 or Windows 11.
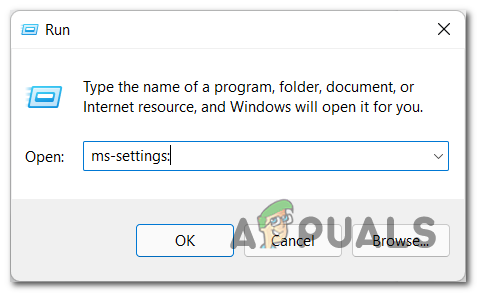
- Open a Run dialog box by pressing the Windows key + R and type inside the search bar ‘ms-settings:’, then press Enter to open the Settings.

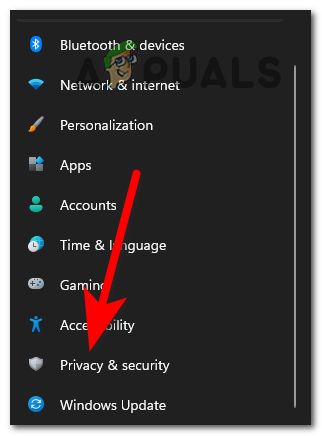
Accessing the Settings menu - Now that you are inside the Settings, go to the Privacy & security section.
Accessing the Privacy and Security menu - After that, scroll down through the list of App permissions until you find Microphone. Once you find it, click on it.
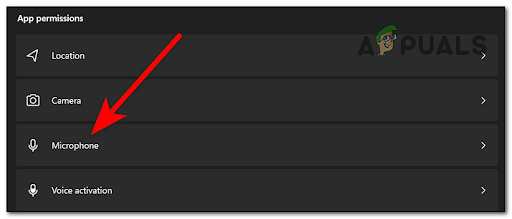
Accessing the Microphone settings - Now make sure that the toggle next to Microphone access is turned on (blue button).

Enable the Microphone access on Windows 10 or Windows 11 - Once you’ve ensured that Microphone access is granted, open Ground Branch once again and launch a multiplayer session to see if your microphone is now being picked up in-game.
Enable microphone from Sound Properties
If you want to avoid using the more modern audio interface menu (present on Windows 10 and Windows 11), you can also ensure that your microphone is enabled from the Sound Properties menu.
For step-by-step instructions on how to do this, follow the guide below:
- Press the Windows key + R to open a Run dialog box and inside the search box type ‘ms-settings:’ to open the Settings.

Access the Settings menu - Once you are inside the Settings, select the System section and click on Sound.
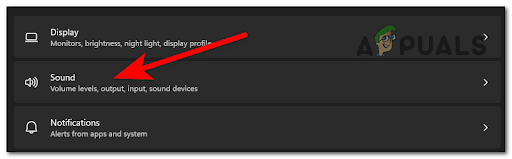
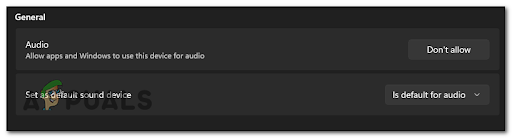
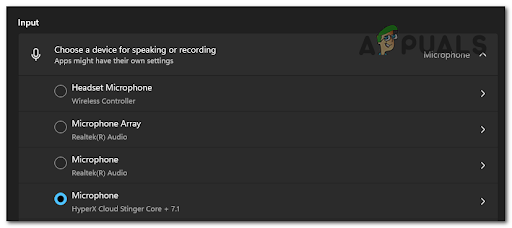
Accessing the Sound menu - Now scroll down until you see the Input devices, then click on the microphone you use. Now make sure that your microphone is enabled.
Make sure that the microphone is enabled - Launch Ground Branch once again and see if your microphone is now working while playing multiplayer sessions.
Enable microphone from Device Manager
You can also check if your microphone is enabled from Device Manager. This method will work on every Windows version (even Windows 7 and Windows 8) and should be the preferred approach in case you are familiar with the Device Manager interface.
Here are the steps on how to do that:
- Open a Run dialog box by pressing the Windows key + R, then type ‘devmgmt.msc’ inside the search bar to open the Device Manager.
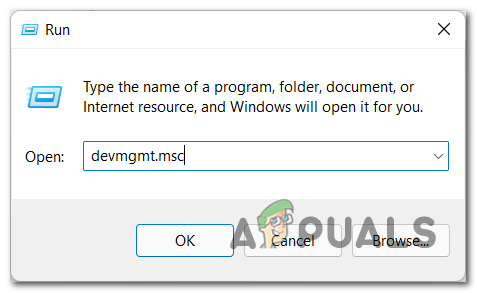
Opening up Device Manager - Once you are inside the Device Manager, click on the arrow next to Audio inputs and outputs to expand the drop-down menu.
- Right-click on the microphone you use and make sure it is enabled.
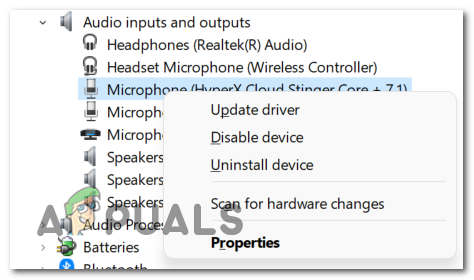
Make sure the microphone is enabled - After you’ve ensured that the microphone is enabled via Device Manager, launch the game once again and see if the problem is now fixed.
If the problem is still not resolved even after you followed one of the sub-guides above to make sure that the microphone is functional, move down to the next method below.
2. Update Windows to the latest version (if applicable)
The next thing you can do to try to fix the problem is to see if there are any available Windows updates that you missed and didn’t install.
As it turns out, Ground Branch requires a key infrastructure Windows Update in order to be rendered on low-end systems (using legacy GPUs) on Windows 11. Unless you install this essential infrastructure update on top of your Windows installation, expect to experience both audio and graphic issues with certain maps.
Fortunately, the installation of the missing infrastructure update will happen automatically – all you need to do is access the Windows Update screen and install every pending update until your OS is up to date.
If you don’t know how to update your Windows, here are the steps for doing so:
Note: The instructions below will work on both Windows 10 and Windows 11.
- Press the Windows key + R to open a Run dialog box. In the search bar, type ‘ms-settings:’ and press Enter to open Settings.

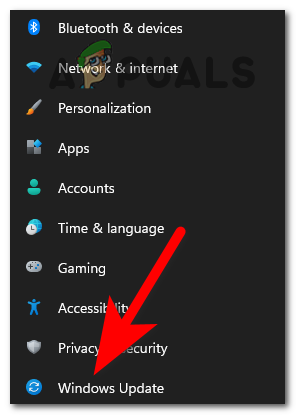
Accessing the Settings menu of Windows 10 or Windows 11 - Now that you’re in Settings menu, look for Windows Update and select it by clicking on it once.
Accessing the Windows Update menu - Then click on Check for updates in case there aren’t any pending updates. Wait until it is checked if there are any new updates.

Checking for updates Note: If any new updates are available, they will be queued and installed at the earliest convenience (or instantly if you click the Install button).
- If some new updates are found, install them by clicking on the Install Now button and waiting until the installation is done.
- Depending on how many updates are waiting to be installed, you might be required to restart before your OS gets the chance to install every pending item.
Note: This typically happens in situations where more than 1 infrastructure update is pending. In this case, restart your PC as instructed, but make sure to return to this Windows Update screen once the next startup is complete in order to finish up with the remaining installation. - After the final update is installed, reboot your computer one final time.
- Once the PC is back up and running, launch Ground Branch and test it out to see if your microphone now works.
In case your microphone is still not working only when playing Ground Branch (and other games), check the next method below.
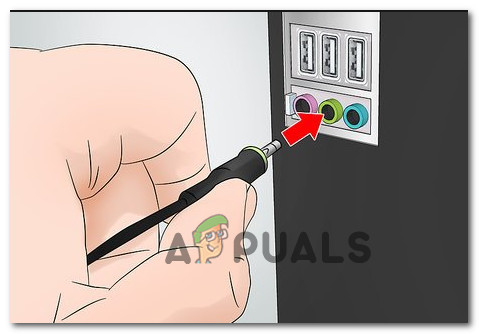
3. Plug in another mic and make it the default recording device
If none of the methods above have worked for you, some players have reported that what worked for them is using another microphone instead.
If you have a spare microphone or headset, going this route will show you if your microphone needs to be changed in order to be able to use it while playing Ground Branch.
Update: As it turns out, there are certain legacy headsets that seem to be incompatible with the VoIP implementation inside Ground Branch. In this case, there is no fix other than utilizing a different headset.
And keep in mind that simply plugging in your new headset or microphone will not be enough – you also need to ensure that the new headset you just plugged in is set as the default audio input device so that Ground Branch uses it by default.
Here are the steps you need to follow in case you don’t know how to make it your default input device:
Note: The instructions below will be applicable on Windows 10 and Windows 11.
- Press the Windows key + R to open a Run dialog box and type ’ms-settings:’, then press Enter to open the Settings.
Accessing the Settings menu on Windows 10 or Windows 11 - After that, select the System section and click on Sound.

Accessing the Sound Settings menu - Now scroll down to the Input devices and select the one that you just plugged in.
Making the latest recording device active in Windows Settings - After that, close the Settings and launch Ground Branch to see if the other mic will work.
If you still notice that your microphone doesn’t work while you play Ground Branch but it works for other applications or games, move down to the next method below.
4. Restart the game to recognize the new microphone
This error might be happening because Ground Branch is unable to see your microphone.
In most cases, this problem occurs when you plug in your headset after launching the game (or while the game is minimized or running in the background)
In case your microphone is not being recognized by the game despite being plugged in, you can force it to be recognized by closing the game, then launching it back.
After you close the game and exit to the desktop, unplug your microphone device and plug it back. This is how you will make sure that the microphone is connected to your PC.
Now you can open the game and test it to see if it will now recognize your microphone.
If your microphone is being recognized and is still not working, go to the next fix below.
5. Disable all unused audio input devices
Some affected players have managed to fix this issue by disabling all the unused audio input devices of your PC.
This fix will be effective in those situations where you might be using two headsets at the same time and the game entity is confused about which headset it’s supposed to use.
Several users dealing with the same kind of issue have confirmed that while they have more than one headset connected, the game disables both – most likely this is a development bug caused by the fact that the headsets are likely using the same driver.
So when the one headset is disabled in order to prevent it from interfering with the default option, what really happens is both are disabled.
If you suspect that this scenario is applicable as you currently have more than one headset connected, follow the instructions below to disable all unused audio input devices from the Classic Control Panel menu of your Windows installation.
Note: The instructions below will work on every recent Windows version including Windows 7, Windows 8.1, Windows 10, and Windows 11.
Here are the steps you need to follow if don’t know how to do this:
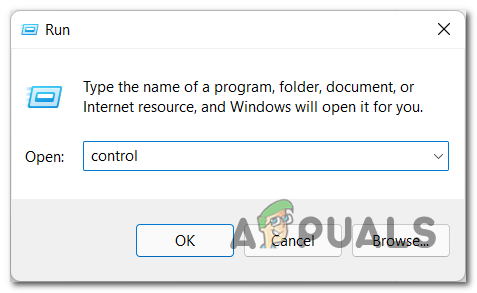
- Open a Run dialog box by pressing the Windows key + R, then type ‘control’ inside the search bar and press Enter to open the Control Panel.
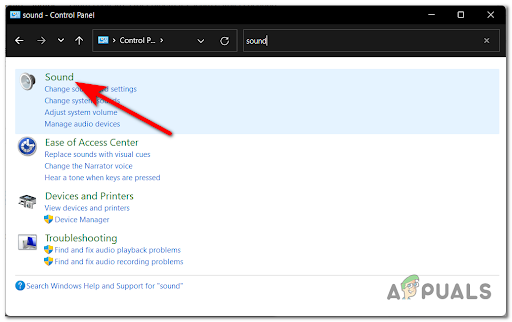
Accessing the Control Panel menu - Inside the Control Panel menu, search manually for the Sound section or use the search option on the right. When you find it, access it.
Accessing the Sound settings - After that, go to the Recording section and right-click on the device you are not using, then click on Disable to turn off the device.
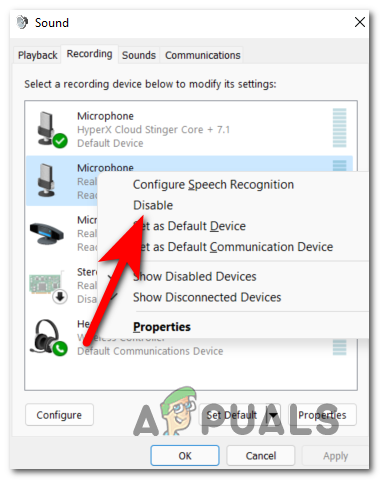
Disable every unused recording device under Windows - Now repeat the process with every unused input device that you see here.
- After the unused speaking devices are disabled, you can launch Ground Branch and see if your mic will now work.
In case your mic is still not working even after you made sure to disable every unused microphone currently connected to your system, go to the next potential fix for this issue.
6. Enable then Disable in-game VOIP ‘Toggle’ mode
If you got this far without a resolution to fix your microphone issues in Ground Branch, another thing you should try is to click on the Voice Input Mode (from the in-game menu) and enable the Toggle mode, then disable it again. You can do this from the main settings menu of the game.
This method was confirmed to work by a lot of users that we’re experiencing this problem on Windows 11 – the fact that this simple fix worked for so many users supports the theory that the developer incorrectly implemented the VoIP solution for Ground Branch (for Windows 11 users).
If you haven’t tried this fix yet, follow the instructions below to enable and disable the VOIP Toggle mode in the Ground Branch menu and see if you can fix your microphone issues:
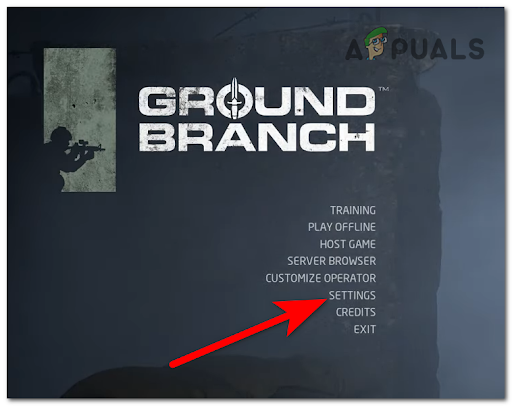
- Launch Ground Branch and access the Settings of the game.
Access the Settings menu - Now that you are inside the settings of the game, go to the Audio tab from the menu at the top.
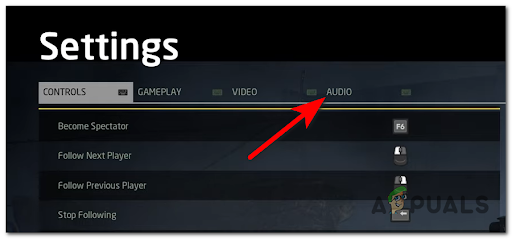
Access the Audi tab from the menu at the top - After that, go under the Communications category and select Voice Input Mode, then click on Toggle. Once you’ve done that, click on Apply to save the changes.
- Now click on Voice Input Mode again and select the Push To Talk (PTT) mode, then hit Apply again.
- Now start playing the game to see if the mic is now working.
If the problem is still not resolved, move down to the next method below.
7. Enable / Disable “Allow applications to take exclusive control of this device”
Another place that you need to check to make sure that your microphone is enabled is the Advanced tab of the mic Properties. Apparently, depending on which headset you’re using, you might find that the status of this toggle is different from the other places where you enabled your microphone (in the methods above).
Besides enabling and disabling the microphone, you also need to make sure that you enable the toggle named as “Allow applications to take exclusive control of this device” option.
In case you don’t know how to find that option, here is a guide that will help you do that:
- You first need to open the Control Panel. In order to do this, press the Windows key + R to open a Run dialog box and type inside the search bar ‘control’, then press Enter.

Access the Control menu - After you are inside the Control Panel, you need to access the Sound section. You can either search manually for it, or you can use the search bar.

Access the Sound menu - Now that you are inside the Sound menu, select the Recording section and right-click on the microphone you use, then click on Properties.
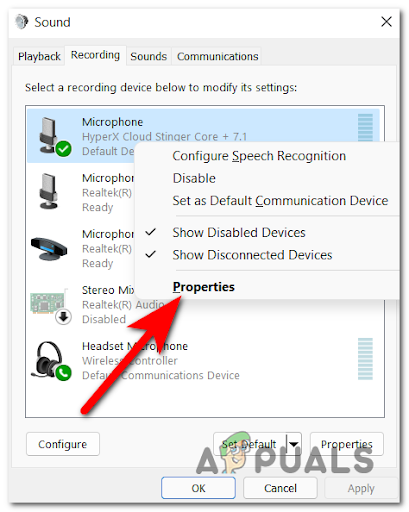
Accessing the Properties screen of the active headset - Once you see the Microphone Properties on your screen, go to the Advanced section.
- After that, make sure to enable, disable and enable again the Allow applications to take exclusive control of this device option. Leave the option enabled and click on Apply.
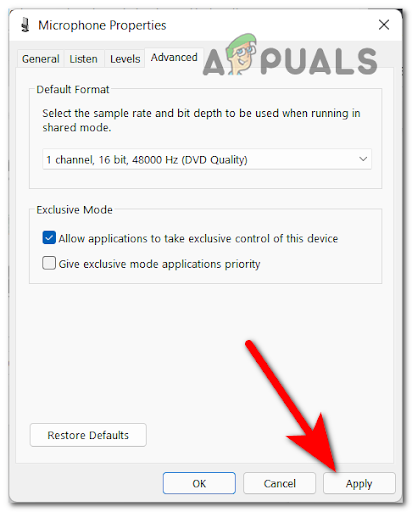
Allowing apps to take exclusive control of device - Now you can launch Ground Branch and see if the microphone is now usable.
In case this method didn’t work as well, check below the last thing you can try.
8. Ask the server admin to unmute you (if applicable)
The last thing you can try is to ask the server admin if he muted you, and if that is the case ask him to unmute you to be able to use the microphone.
In some cases, players have found out that they were unable to use the microphone because their communications were blocked by the admin of the server.
If none of the methods before have fixed your issue, it is worth at least asking him if you are muted. Especially if you were reported or engaged in activities that breached the community guidelines.
You can also try different servers to see if there your microphone will work if you connect to a brand new server where you haven’t played before.


