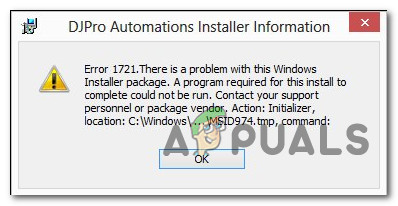
How to Fix Java Error 1721 on Windows
Some users are encountering the 1721 error when trying to install a program, update, or driver that uses Windows Installer and is built upon Java. This issue is reported to occur on Windows 7, Windows 8.1, and Windows 10.
After investigating this particular issue thoroughly, it turns out that there are several different underlying causes that might trigger this error code when installing a java program. Here’s a list of underlying causes:
- Windows Installer service is stuck – One of the most common instances that will spawn this error is an instance in which the Windows Installer service is stuck in a limbo state. In this case, you can fix the issue by using the Services screen to restart the Windows Installer service before trying to reinstall the program.
- Generic Windows installation issue – If you’re experiencing this issue consistently with a lot of installers, you might be dealing with a generic Windows Installer issue that Microsoft is already aware of. In this case, you might be able to fix the problem by running the Program Install troubleshooter and applying the recommended fix.
- The installer is incompatible with your Windows version – If you’re only encountering this problem while attempting to install a legacy program, it’s likely because the program was originally developed for an older Windows version. In this case, you can fix the issue by installing the program in compatibility mode.
- Missing Visual C++ dependencies – Another possible reason why you might see this error while installing legacy programs is a missing Visual C++ dependency that is not installed by default on Windows 10. In this case, you should probably be able to fix the issue by installing the missing dependencies manually.
- System File corruption – If you’re effectively seeing this error pop-up with literally every Java-based program that you’re trying to install, this is a sign of an underlying system file corruption. In this case, you can fix the issue by refreshing every Windows component with a procedure like clean installing or repair installing your Windows components.
Since you are now aware of the most common culprits, here’s a list of methods that other users encountering the same 1721 error have used successfully to fix this particular issue:
Method 1: Restarting the Windows Installer Service
In most documented scenarios, this particular issue occurred due to a glitched Windows Installer service. Computer technicians refer to this scenario as ‘the service is stuck in a limbo state’ – It’s neither opened nor closed.
This problem is way less frequent on Windows 10 than it was on Windows 7 and Windows 8.1, but it’s still known to occur. Several affected users finding themselves in a similar scenario have managed to fix this issue by using the Services screen to stopping the service before starting it again to ensure that it’s able to run properly.
If you haven’t tried this particular fix yet, follow the instructions below to use the Services screen to effectively restart the Windows Installer service:
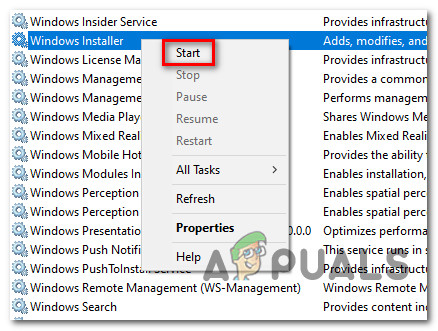
- Press Windows key + R to open up a Run dialog box. Next, type ‘services.msc’ and press Enter to open up the Services utility and click Yes at the UAC (User Account Control) if prompted to do so.

Accessing the Services screen - Once you’re inside the Services utility, scroll down through the list of services and locate the Windows Installer service from the right-hand side menu of the screen.
- After you manage to locate the correct service, right-click on it and choose Stop from the context menu that just appeared.
Note: If the service is already stopped, click on Start to get the service started. - Wait until the service is effectively stopped, then right-click the service entry once again and choose Start from the context menu.
Starting the Service Installer Screen - Repeat the installer that was previously triggering the 1721 error and see if the problem is now fixed.
In case you’re still encountering the same kind of issue, move down to the next potential fix below.
Method 2: Running the Program Install troubleshooter
If the reason for this issue is a generic installation issue that Microsoft is already aware of, chances are you will be able to fix this problem by running the Program Install and Uninstall troubleshooter – This utility can be downloaded remotely on any computer and will scan your computer for common issues that will inhibit Windows Installer from completing installation or uninstallation tasks.
If a culprit is found, the utility will recommend a fix that can be enforced either automatically or by following a series of manual steps (depending on the case).
In case you haven’t tried running this troubleshooter yet, here is some step by step instructions that will show you how to download and use the Program Install and Uninstall troubleshooter:
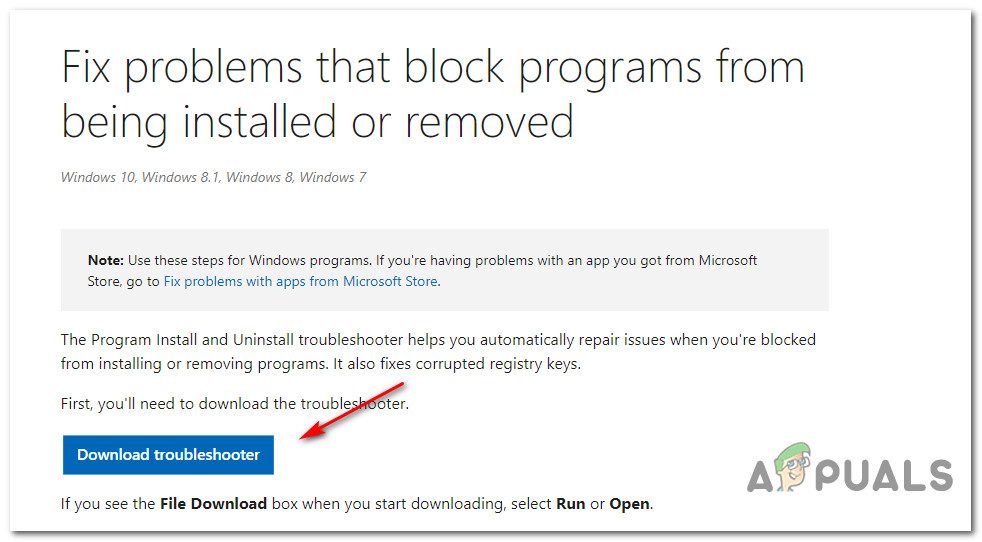
- Open your default browser and navigate to the download page of the Program Install and Uninstall troubleshooter.
- Once you are on the correct page, click on the Download troubleshooter button (under Fix problems that block programs from being installed or removed)
Downloading the correct troubleshooter - Once the download is complete, right-click on the .diagcab file that you’ve just downloaded and choose Run as Administrator from the context menu.
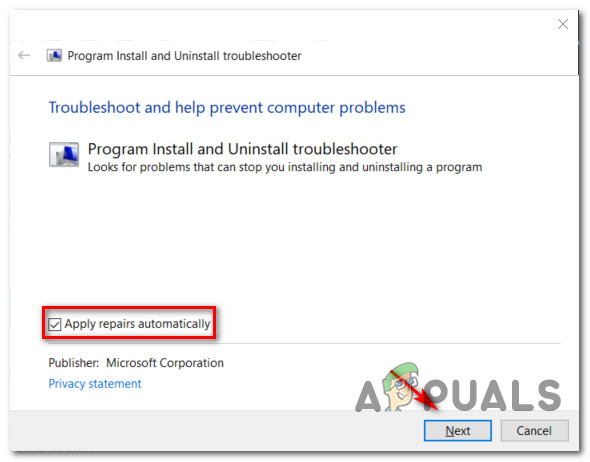
- Inside the Programs Install and Uninstall Troubleshooter, start by checking on the Advanced hyperlink and check the box associated with Apply repairs automatically before clicking on Next to advance forward.
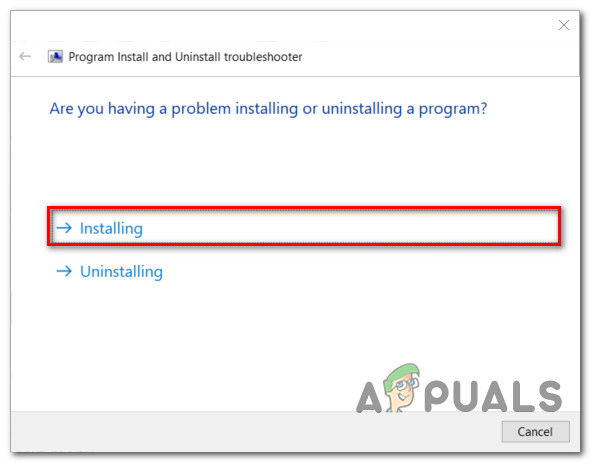
Configuring the Programs Install and Uninstall troubleshooter - When prompted to select the problem you’re having, choose Installing from the list of available options.
Choose Installing from the list of available options - Wait until the initial scan is complete, then select the program that you’re having trouble installing from the list of options. Once the correct program is selected, click on Next.
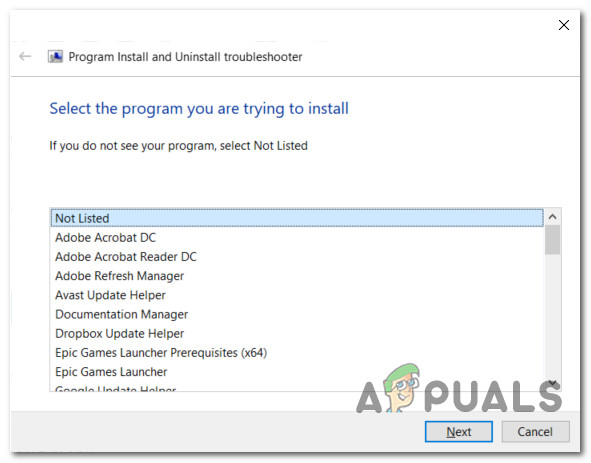
Choosing the Program from the list of available options Note: If the Program is not featured inside the list, choose Not Listed before clicking Next.
- If a viable repair strategy is found, click on Apply this fix to enforce it.
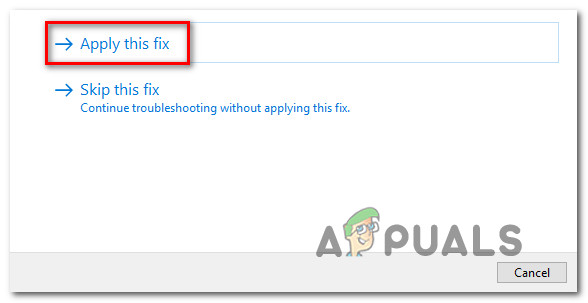
Applying the recommended fix Note: Depending on the fix that is recommended, you might also need to follow a series of manual steps.
- After you’re finally able to enforce the fix, restart your computer and see if the problem is fixed once the next startup is complete.
In case you’re still encountering the 1721 error code when trying to install a program developed in Java, move down to the next potential fix below.
Method 3: Installing the program in Compatibility Mode
If you’re encountering this problem while trying to install a legacy program that was originally developed for an older Windows version, you can expect to encounter these types of issues. Fortunately, Windows 10 has a mechanism that will allow you to install the programs in compatibility mode with an older Windows version.
This will not work in 100% of cases, but there are a lot of user reports confirming that the 1721 error was fixed after they have forced the installer to run in compatibility mode.
If you haven’t tried this potential fix yet, follow the instructions below:
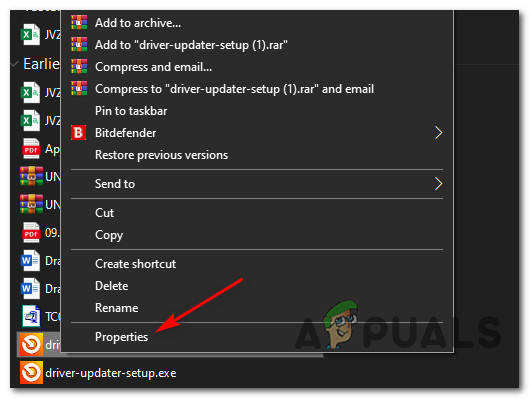
- Navigate to the location where you’re currently storing the installer that’s triggering this issue, then right-click on it and choose Properties from the context menu.
Accessing the Properties menu of the installer - Once you’re inside the Properties screen, click on the Compatibility tab from the menu at the top, then check the box associated with Run this program in compatibility mode for.
- Next, from the list of available options, choose the Windows version that this program was originally designed for and click Apply to save the change.
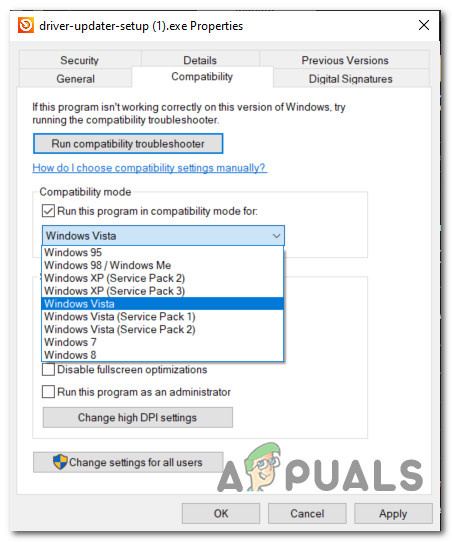
Running in Compatibility mode - Once you have successfully forced the installer to run in compatibility mode, run it again and see if the problem is now fixed.
In case you still end up seeing the same 1721 error, move down to the next potential fix below.
Method 4: Installing the missing Visual C++ Dependencies
Depending on the program that is giving you the issue, it’s possible to encounter this problem due to a couple of missing Visual C++ Redist packages that the installer needs in order to complete the process.
This particular issue is mostly reported to occur on Windows 10 with programs that were developed to make use of the Visual C++ Redistributable 2005 and Visual C++ Redistributable 2008 packages.
But since these distributions are mostly deprecated by now, Windows 10 will no longer maintain them via Windows Update. So if you find yourself in this scenario, you should be able to fix the problem by manually downloading & installing the Visual C++ Redistributable 2005 and Visual C++ Redistributable 2008 packages before retrying the installation.
If you’re looking for step-by-step instructions, follow the instructions below:
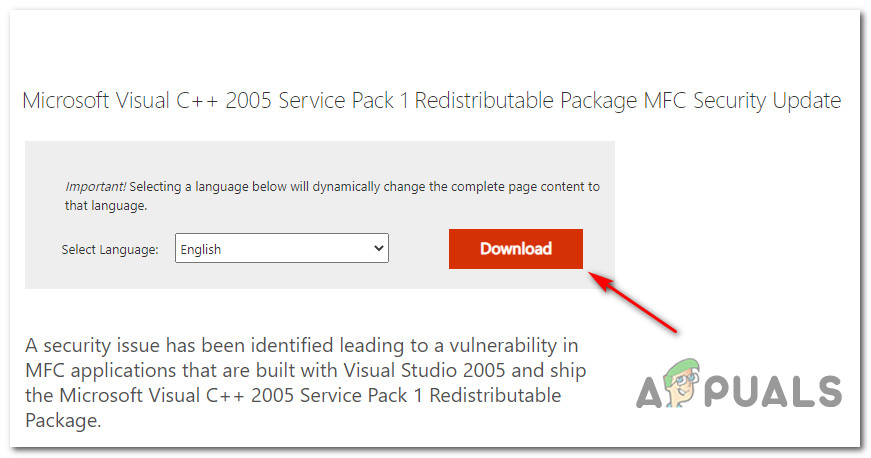
- Open your default browser and navigate to the download page for the Microsoft Visual C++ 2005 Redist. and click on Download to initiate the download.
Downloading the Virtual C++ Redist package - Once the executable is successfully downloaded, double-click on the executable follow the on-screen instructions to complete the installation.
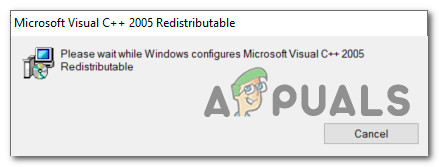
Installing the 2005 Visual C++ redist. Note: At this point, you will be asked to provide admin access – When this happens, click on Yes to grant admin access.
- Follow the remaining prompts to complete the installation, then restart your computer and wait for the next startup to complete.
- Follow steps 2 and 3 once again with the Visual C++ 2008 Redist. package to ensure that both necessary packages are correctly installed on your computer.
- Do one final restart, then attempt to install the program that was previously failing with the error 1721 and see if the problem is now fixed.
In case the same kind of issue is still occurring, move down to the next potential fix below.
Method 5: Refreshing every Windows Component
In case none of the methods above have worked in your case, the only potential culprit left is some kind of underlying system file corruption that is affecting the Windows Installer infrastructure.
If you find yourself in this particular scenario, there are only 2 ways forward that will hopefully allow you to fix the error 1721 and install new programs normally:
- Clean installing your Windows version – If you don’t have any virtual information on the OS drive, clean installing is a quick and easy procedure of resetting every important Windows component that will most likely fix this issue. You don’t need to use compatible installation media, but the major drawback is that unless you back up your data in advance, you will lose every bit of personal data that you’re currently storing on the Windows drive.
- Repair installing your Windows version – If you’re currently storing important information on the Windows drive, repair installing should be the procedure of choice for you. You will need to plug in a compatible Windows Installation media for this to work and the operation is a little more tedious, but the major advantage is that this process will only touch Windows Files – You get to keep your personal media, apps, games, and even some user preferences that you’re currently storing on the OS drive.


