Fix: Error Code 0x80240024 on Windows 10 Store
Windows 10 uses the Store which enables you users to download games and apps by using their Microsoft account. This is similar to the way it’s done on smartphones such as the Google Play Store on Android and App Store on iOS. This is actually a neat feature because you can skip all the hassle regarding the installation process since apps easily download and install with one click of the button.
However, even this simple process sometimes gets more difficult when users start experiencing various issues with their Windows Store. There are a lot of error codes which can pop-up when users try to open the Store or to download an app or a game. Let’s see just how to solve this one.
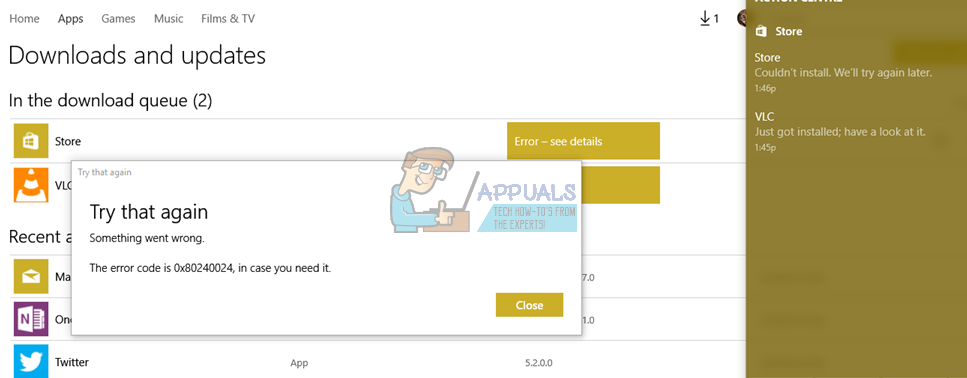
Error Code 0x80240024 in Windows Store
It appears that this particular error manifests itself only after the game or the app has finished downloading. When the installing process kicks in, users are presented with this error message and the app fails to install.
New errors and bugs are released with every new Windows update whereas the old ones are removed but users most definitely can’t afford to wait that long to fix this issue. Luckily, there are a couple of solutions which might just work so let’s check them out.
Solution 1: Restart Your Computer and Sign Out and Back In
This may seem like an oversimplified fix but it may prove to be successful, especially after a major Windows update. It’s also quite simple to execute which means it will only take a couple minutes to try it out and move forward to the next solution.
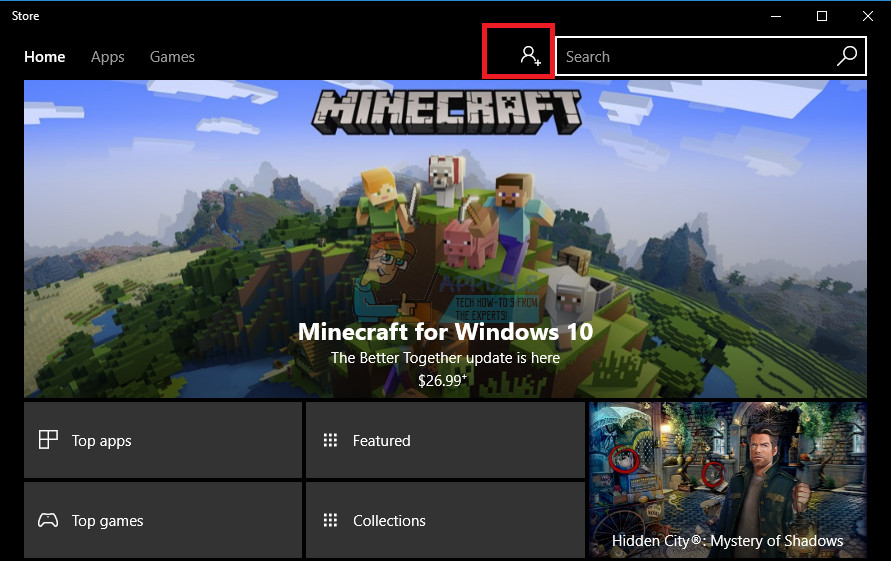
- Open the Search bar in the Start menu and type “Store”. Click on the first result.
- When the Store opens, click on the account icon next to the Store’s search bar and click on Sign Out.
- Restart your computer and open Store again.
- The account will be replaced with a similar one, only with a small plus sign in the bottom right corner.
- Click on it and select the Sign in option.
- Check to see if your updates are working now.
Solution 2: Reset the Windows Store Cache
If the Store’s cache is experiencing some issues, make sure you reset it with this simple command. Resetting the cache usually solves similar issues because they are caused when the Store is used excessively and its cache becomes larger than recommended.
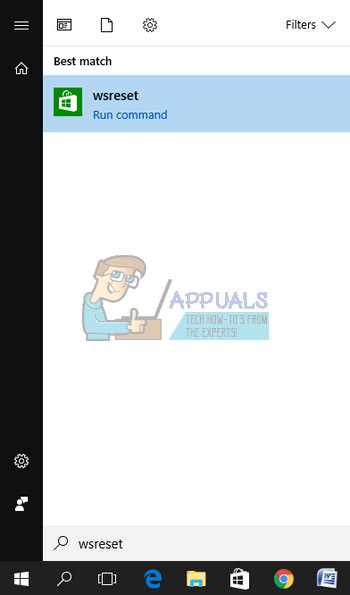
- Click on your Start menu and type the “wsreset” command. As soon as you type this in, the first result at the top should be “wsreset – Run command”.
- Click on this in order to reset the Store’s cache.
- Restart your computer in order to apply these changes and open Store to see if your downloads are working again.
Solution 3: Double-Check Your Windows Store Service
The processes and programs you run everyday such as Windows Update are handled by services. Long story short, if the service for a particular process or program is stopped, the program won’t be able to run or it will experience severe difficulties; especially if it’s a system program. Let’s check out the Windows Store Services to see if that it causing the problem.
- Open the Run dialog box by using the Windows Key + R key combination.
- Type “services.msc” without the quotation marks in the Run dialog box and click OK.
- Locate the Windows Store Services, right-click on them and select Properties.
- Make sure that the option under Startup type in Windows Store Services’ Properties is set to Automatic.
- If the service is not running (you can check that just next to the Service status message), you can start it immediately by clicking on the Start button.
Note: You may receive the following error message when you click on Start:
“Windows could not start the Windows Store Services on Local Computer. Error 1079: The account specified for this service differs from the account specified for other services running in the same process.”
If this occurs, follow the instructions below to fix it.
- Follow the steps 1-3 from the instructions above in order to open Windows Store Services properties.
- Navigate to the Log On tab and click on the Browser… button.
- Under the “Enter the object name to select” box, type in your computer’s name and click on Check Names and wait for the name to become authenticated.
- Click OK when you are done and type in the administrator password in the Password box when you are prompted with it.
- Click OK and close this window.
- Navigate back to Windows Store Services’ properties and click Start.
- Check to see if you are able to download and install apps.
Solution 4: Troubleshooting Windows 10 Apps
Windows definitely comes prepared when it comes to troubleshooting because the Settings app holds a place for plenty of troubleshooters for various things which can go wrong on your device. Troubleshooting Windows 10 apps can be quite useful because it can show you just where the problem is or it can even fix the problem for you automatically.
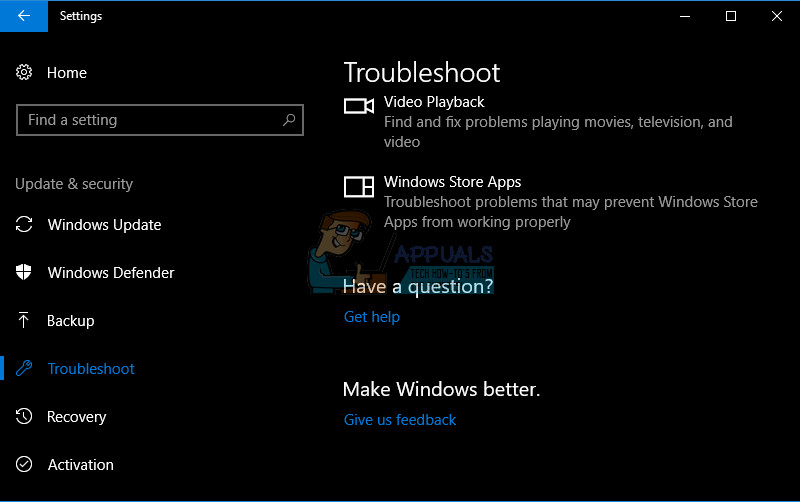
- Search for Settings in the Start menu and click on the first result.
- Locate the Update & security section and open it.
- Navigate to the Troubleshoot tab and check under the Find and Fix other problems.
- Windows Store Apps troubleshooter should be located at the bottom so make sure you click on it and follow the instructions on screen.
- Additionally, you can also troubleshoot your Microsoft Account by downloading this tool from Microsoft’s official website.
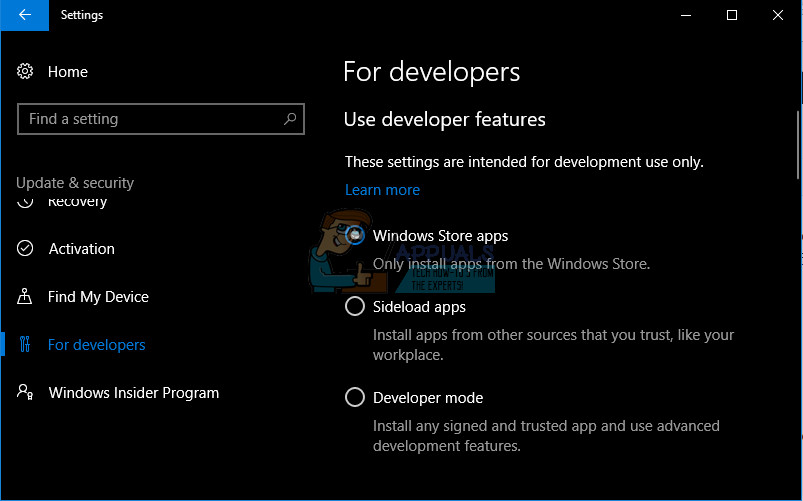
Solution 5: Disable Sideload Apps
Sideload apps is a useful option for people who won’t to test out different apps from various sources but this feature is somewhat advanced for casual users because of security. When you download an app from the Store, you know that the app passes certain tests and controls, meaning that you can use it safely.
However, when you sideload apps, you never know if you are going to get infected. Also, users have reported that turning this option off solved their issue with app installing immediately.
- Open the Settings app by searching for it in the Start menu.
- Locate the Update & security section and open it.
- Navigate to the For developers submenu and click on the Windows Store apps option.
- Restart your computer and check to see if your issue has been resolved.
Solution 6: Turn off the Defer Updates Option
Users have reported that turning off the Defer updates option regarding Windows Update managed to fix their issue completely. You should also know that Windows Update and Windows Store features are closely related and issues with one feature may affect the other quite easily.
- Use the Windows Key + R key combination in order to bring up the Run dialog box.
- Type “gpedit.msc” in the Run dialog box and click OK.
- When Group Policy Editor opens, navigate to the following location by using the left pane.
Computer Configuration > Administrative Templates > Windows Components > Windows Update
- Take a look at the right pane under the Setting column and locate the Defer Upgrades and Updates settings. Double-click on it in order to edit it.
- Make sure that the radio button next to Disables is selected at the top left part of the window.
- Apply these changes and close the Group Policy Editor.
- Restart your PC and check to see if your issue is solved.
Solution 7: Scan Your System Files For Errors
Missing or corrupt system files related to Windows Store or Windows Update are known to cause these errors and fixing them might be somewhat complicated. Luckily, SFC tool exists.
System File Checker (SFC.exe) is a tool which is used to scan your storage for missing or broken system files. The tool also automatically replaces or repairs your system files in order to fix your computer from errors such as this one.
- Take a look at our article on how to run SFC on Windows by clicking here.
- Restart your computer and check to see if you are able to install your apps.
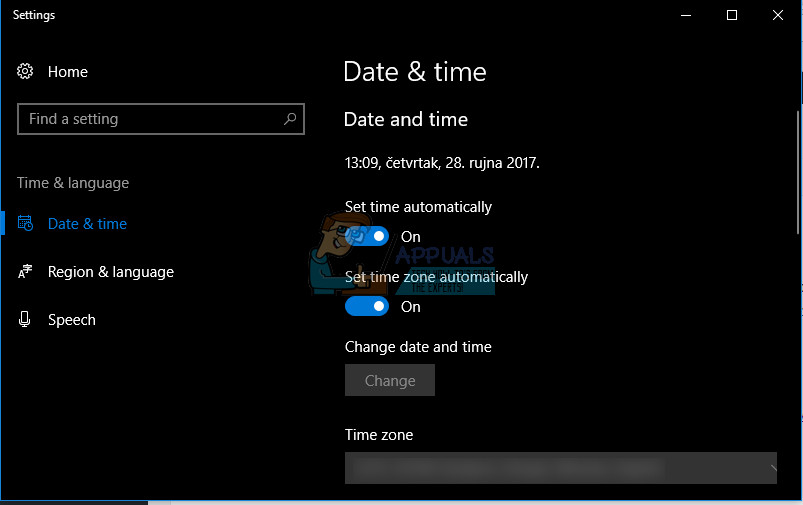
Solution 8: Make Sure Your Time, Date, and Region Settings Are Configured Correctly
You won’t be able to download updates from Microsoft if your computer’s settings are misconfigured because all the information from your computer need to match the information in Microsoft in order to download your app.
- Right-click on the time and date located at the right-part of your taskbar.
- Choose the Adjust date/time option which will open the Settings app.
- Make sure the “Set time automatically” and the “Set time zone automatically” options are turned on.
- While still in the Date & time section of the Settings app, switch to the Region & language submenu.
- Under the Country or region section, choose your country of residence.
Solution 9: Wait the Problem Out
This particular error code also appears when your computer is unable to communicate with Microsoft’s servers because of a problem on their end. Sometimes their servers experience heavy traffic and users are unable to do anything regarding that issue except to wait it out.
If problems with Microsoft servers are the real cause to this issue, you should wait for 24 hours since the problem will most likely be solved by then.