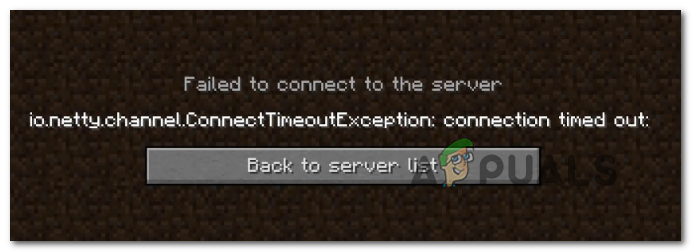
How to Fix ‘Io.Netty.Channel.ConnectTimeoutException’ Error in Minecraft Realms
The error ‘Io.Netty.Channel.ConnectTimeoutException’ typically appears when Minecraft users attempt to connect to a regular or Realm server. This problem seems to be PC exclusive and is reported to occur on Windows 7, Windows 8.1 and Windows 10.
After investigating this Minecraft Error code it turns out that this problem can be caused by a few different culprits:
- IP / TCP Inconsistency – One of the most common causes that might end up causing this problem is an IP or CP inconsistency facilitated by your router. In this case, you should be able to resolve this problem by going to a simple router reboot or a reset in more serious circumstances.
- JRE is blocked by Windows Defender – If you’re using the native Windows Defender to protect against malware infections, it’s possible that you’re seeing this error after the Java Runtime Environment is blocked from communicating with the Minecraft server due to a false positive. In this case, you can either whitelist the JRE or disabling real-time protection to resolve the problem.
- JRE is blocked by 3rd party AV – This problem can also occur with a 3rd party AV such as Avast, Comodo, or McAfee. In this case, you can either disable the real-time protection of your antivirus or you can uninstall it all together to eliminate the potential interference with Minecraft.
- Port number mismatch – It’s also possible that you’re seeing this issue in an instance where the port number of your client is not matching the port number of the server. In this case, you can fix the problem by retrieving the correct port from the startup script and then using the Direct Connect option to connect successfully.
- Inconsistent default DNS – If you’re using a second-tier ISP, chances are you might also see this error due to a DNS inconsistency. If this scenario is applicable, you should be able to resolve the problem by making the switch to the DNS values provided by Google.
Method 1: Restarting or Resetting your Router
As several affected users have reported, this problem can also occur due to a network inconsistency facilitated by an IP / TCP inconsistency rooted in your router. If this scenario is applicable, you should be able to fix this problem by going for a simple reboot – What this will do is it will refresh the IP and DNS that your PC currently uses and clear any temporary data packets.
To go for a router reset, simply turn Off your router using the On / Off button on the back of your network device or just physically unplug the power cable. After you do this, wait for at least 30 seconds to ensure that the power capacitors are completely drained.

After this time period has passed, turn on your router, wait for Internet access to be re-established, then launch Minecraft to see if the error is still occurring while attempting to connect to a hosted world.
If the problem is still persisting, your next step should be to go for a router reset. You can do this by using a sharp object to press and hold the Reset button on the back of your router.
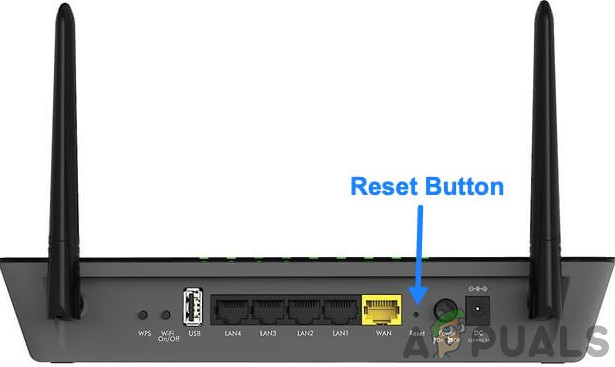
Note: Keep in mind that this procedure will reset your router settings to the factory state. This will override any custom settings, forwarded ports, or blocked devices. In some cases, it might also clear the ISP credentials the router is using to facilitate an Internet connection.
If you are prepared to go for a router reset, press and hold on the Reset button until you see the front LEDs flashing all at once. Once this happens, release the Reset button and re-establish the Internet connection.
Test to see if the problem is now resolved by opening Minecraft once again. In case the same io.netty.channel error is still occurring, move down to the next potential fix below.
Method 2: Whitelisting Java JRE in Windows Defender (if applicable)
As it turns out, one of the most common causes that will end up triggering the io.netty.channel error due to a false positive triggered by your Windows Defender Antivirus or by a 3rd party equivalent. As some affected users have reported, Windows Defender or a 3rd party suite might end up blocking JRE (Java Runtime Environment) from communicating with external servers.
Keep in mind that the Java environment is absolutely essential for Minecraft and connecting to other players will not be possible until you ensure that JRE is not inhibited by your antivirus.
In case you’re using the native security suite (Windows Defender), you can potentially deal with this issue in two different ways:
- A. Disabling the Real-Time Protection
- B. Whitelisting JRE and JDK in Windows Defender
Disabling the real-time protection is a quicker procedure that will allow you to determine whether this problem is indeed being facilitated by some kind of antivirus interference (sub-guide A). But if you want to fix the problem permanently, go directly for sub-guide B.
A. Disabling the Real-Time Protection
- Open up a Run dialog box by pressing Windows key + R. Next, type ‘ms-settings:windowsdefender’ and press Enter to open up the Windows Defender Security Center window.
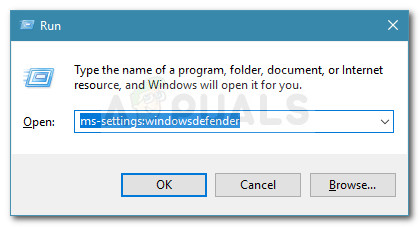
Run dialog: ms-settings:windowsdefender - Once you’re inside the Windows Security menu, use the menu on the left to click on Virus & Threat Protection.
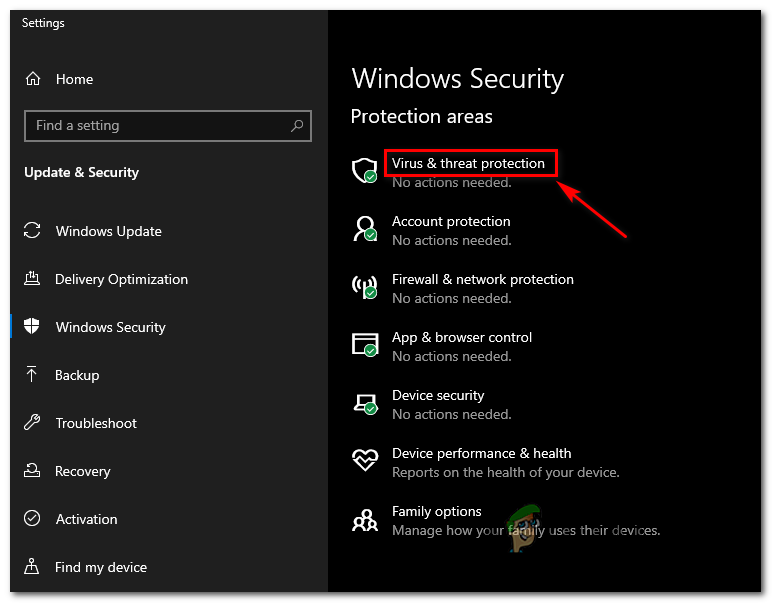
Accessing the Virus and Threat Protection - Inside the Virus & Threat protection menu, click on Manage settings (under Virus & threat protection settings)

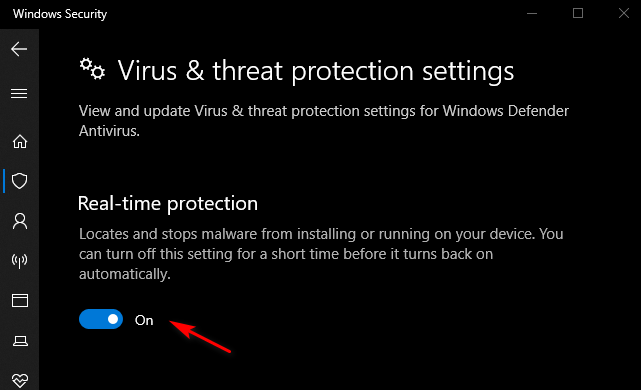
Managing Windows Defender Settings - Once you get to the second screen, uncheck the box associated with Real-Time Protection to ensure that it’s set to Off.
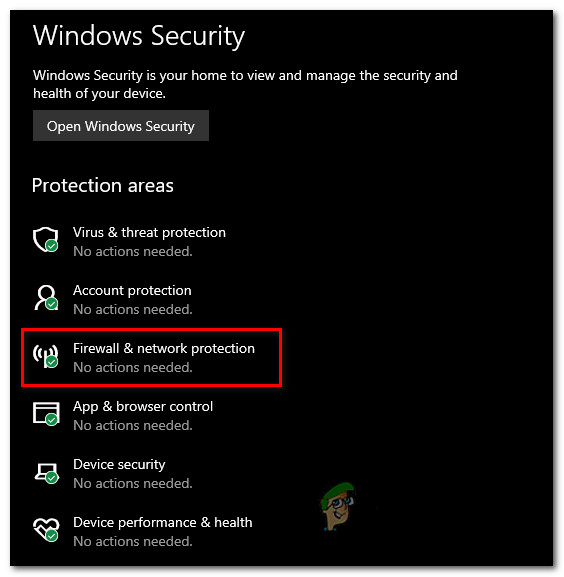
Disabling the Real-Time protection on Windows Defender - After you manage to disable the real-time protection, go back to the initial Windows Security menu ( to the right-hand section) and click on Firewall & network protection.
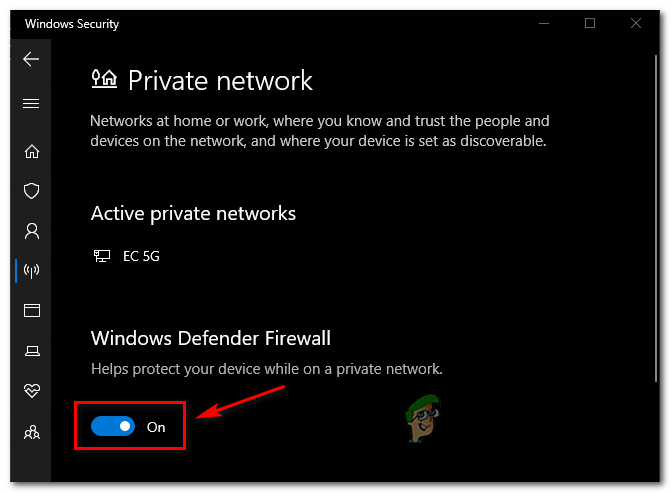
Accessing the Firewall & network protection settings - Once you get to the next screen, click on the network that you’re currently connected to, then scroll down to the Settings menus and disable the toggle associated with Windows Defender Firewall.
Disabling the Firewall component of Windows Defender - After you manage to disable both Windows Defender and both Windows Firewall, return to Minecraft and repeat the action that was previously causing the error ‘io.netty.channel’.
B. Whitelisting the JRE in Windows Defender
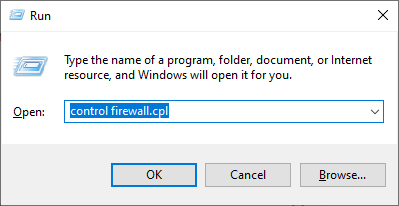
- Press Windows key + R to open p a Run dialog box. Next, type ‘control firewall.cpl‘ to open up the classing Windows Firewall interface.
Accessing the Windows Defender Firewall - Inside the Windows Defender firewall, use the menu on the left to click on Allow an app or feature through Windows Defender Firewall.
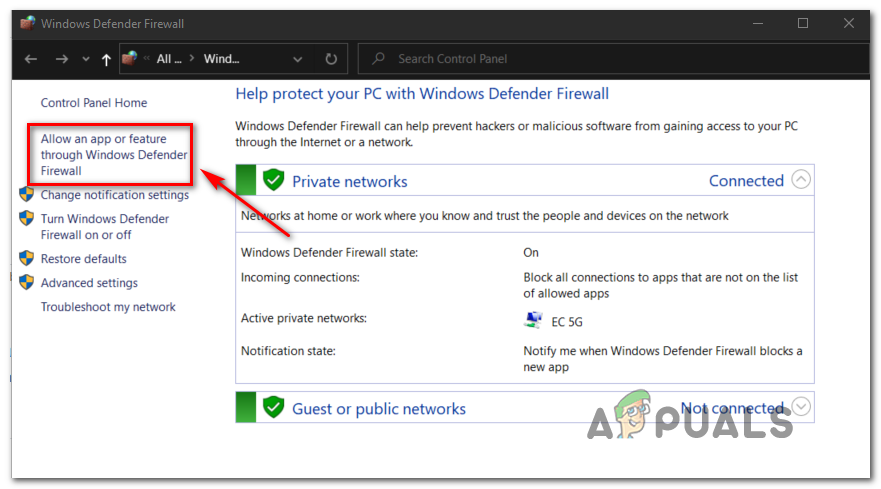
Allowing an app or feature through Windows Defender - At the next screen, click on the Change settings button, then click on Yes at the User Account Control (UAC) to grant admin access.
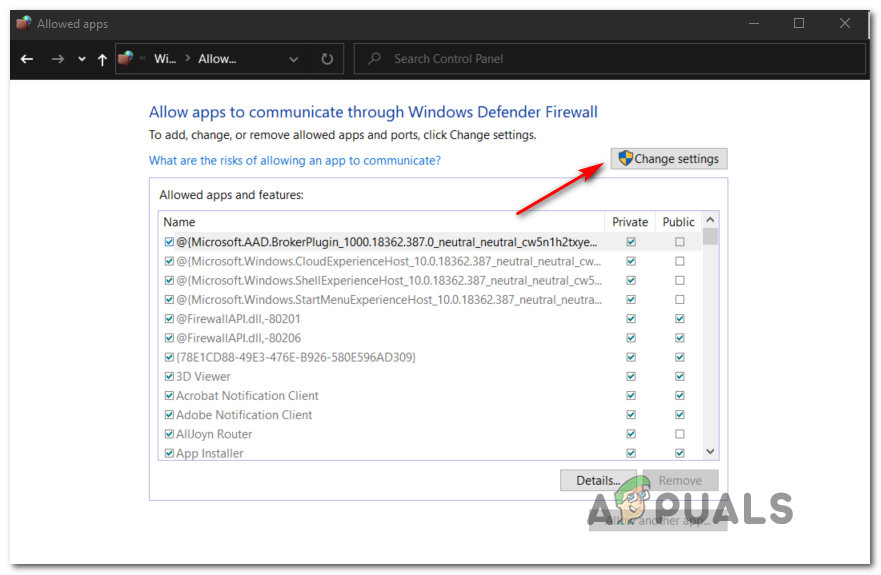
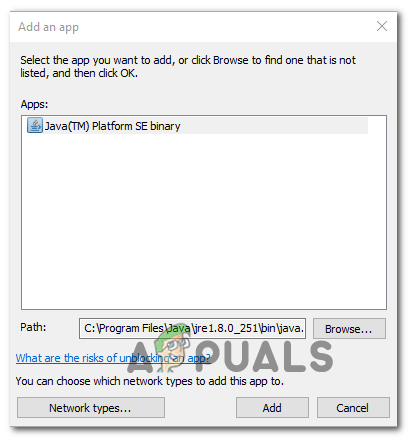
Changing the Settings of the Allowed Items in Windows Firewall - After you obtain full access, scroll down through the list of allowed items and see if Java Runtime Environment is already in the list of allowed apps. In case it isn’t, click on Allow another app, then click on Browse, navigate to the following location and whitelist Java.exe:
C:\Program Files\Java\'Java Version\bin
- After you have successfully loaded the Java(TM) Platform SE binary, click on Add to push the item into the list of Allowed Apps.
Loading the Java Platform SE binary into the list of Allowed Items - Next, ensure that the Private and Public boxes associated with the Java(TM) Platform SE Binary are checked, then save the changes by clicking Ok.
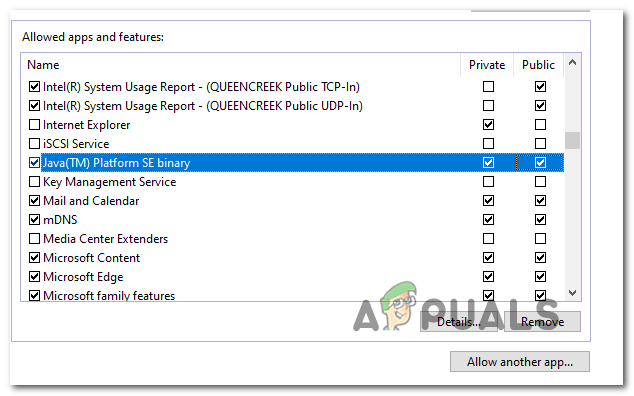
Allowing the Java Environment inside Windows Firewall - Once the Java environment is successfully whitelisted, launch Minecraft once again and see if the problem is now resolved.
In case you are still seeing the same type of error in Minecraft while attempting to join or host an online game, move down to the next potential fix below.
Method 3: Disabling / Uninstalling 3rd party Security Suite (if applicable)
Just because you’re using a 3rd party suite doesn’t mean that the io.netty.channel error isn’t actually produced by your security suite. In some cases, the JRE (Java Runtime Environment) is blocked from communicating with the Minecraft server due to a false positive.
If this scenario is applicable, your first attempt at determining whether your 3rd party AV is causing the problem should be to disable the real-time protection before launching Minecraft. Even though the procedure of doing this will be different, in most cases, you will be able to disable the real-time protection directly from the tray-bar icon.

Once you do this, repeat the action in Minecraft that was previously causing the issue. If the problem stops occurring while your 3rd party suite is disabled, you will be able to fix the problem by whitelisting JRE and the main Minecraft executable.
Note: The steps of whitelisting an item in a 3rd party AV will be different depending on which security product you’re using. Search online for specific steps.
However, you can also take the drastic approach and uninstall the overprotective suite altogether. Here’s a quick guide on how to do this & ensure that you don’t leave behind any remnant files that might cause the same behavior:
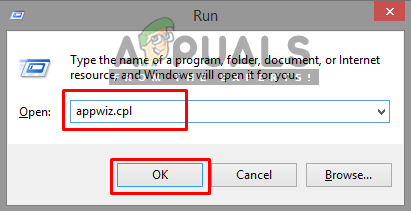
- Press Windows key + R to open up a Run dialog box. Next, type ‘appwiz.cpl’ and press Enter to open up the Programs and Files menu.
Opening programs and features - Next, once you are inside the Programs and Files menu, scroll all the way down through the list of installed applications and locate the security tool that you want to uninstall.
- When you manage to locate it, right-click on it and choose Uninstall from the newly appeared context menu.
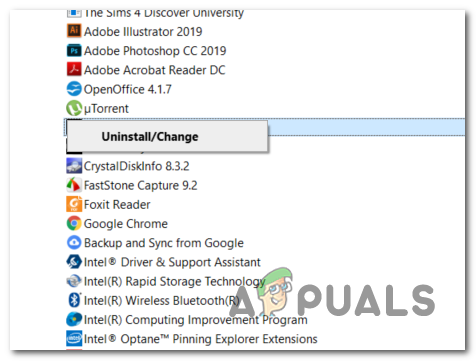
Uninstalling Avast Secure Browser - Once you’re inside the uninstallation screen, follow the on-screen prompts to complete the uninstallation of the intrusive security suite.
Note: If you want to be extra thorough and ensure that you’re not leaving behind any leftover files from the recently uninstalled AV, run the specialized uninstaller specific to the tool you’ve just uninstalled. - Open Minecraft and attempt to connect once again to see if the error is now resolved.
In case the same error code is still occurring, move down to the next potential fix below.
Method 4: Matching the Port number of Server
As it turns out, another common cause that might end up causing the io.netty.channel error is an instance where the port number of your client is not matching the port number of the server.
If this scenario is applicable, you should be able to fix the problem by opening up the startup script and fetching the real port of the Minecraft server, then using the Direct Connect option to connect using the correct port. A lot of affected users have confirmed that this operation was the only thing that allowed them to fix the problem.
Follow the instructions below to make sure that you are matching the port number of the server with the port that you connect to:
- After you get the io.netty.channel error, open up the startup script, and look for the following line: Starting Minecraft server on *XXXX* – Next, note down the server port (XXXX).
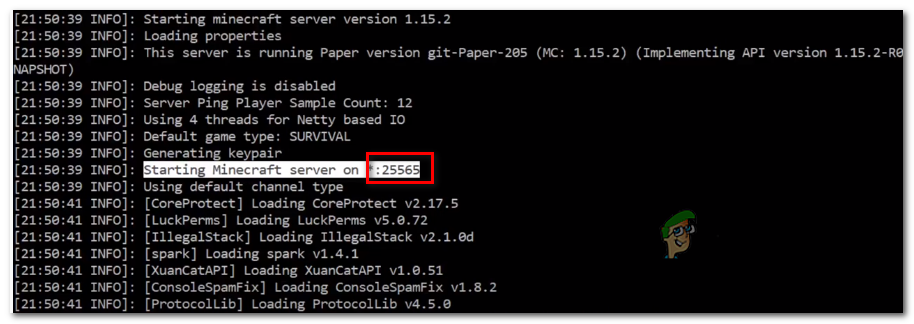
Fetching the correct port for your Minecraft server - Once you have successfully obtained the correct port, return to the Minecraft client, click on Direct Connect and modify the port (number after localhost:) to reflect the correct port that you’ve just obtained at step 1.
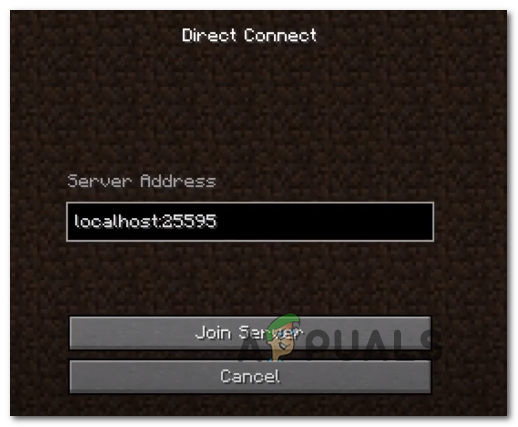
Correct local host in Minecraft - See if the connection is established successfully without the apparition of the same io.netty.channel error.
In case the same problem is still occurring, move down to the next potential fix below.
Method 5: Switching to Google’s DNS
If none of the potential fixes above have worked for you, it’s also possible that you’re seeing this problem due to an inconsistent default Domain Name System. This problem typically occurs with tier 2 ISPs.
Fortunately, a lot of affected users have confirmed that the issue was resolved completely after they made the switch to the DNS provided by Google. This fix will end up resolving the majority of issues facilitated by an inconsistent DNS.
If you’re still seeing the default DNS, follow the instructions below to make the switch to the Google DNS and see if this ends up resolving the io.netty.channel error:
- Open up a Run dialog box by pressing Windows key + R. Next, type ‘ncpa.cpl’ and press Enter to open up the Network Connections menu.
- Inside the Network Connection menu, go ahead and right-click on the network you’re currently connected to and choose Properties from the context menu.
Note: If you’re connected via cable, right-click on Ethernet (Local Area Connection). In case you’re currently using a wireless connection, right-click on Wi-Fi (Wireless Network Connection). - From the Properties screen, click on the Networking tab from the horizontal menu at the top.
- Next, go to the This connection uses the following item module, select Internet Protocol Version 4 (TCP / IPv4) and click on the Properties button below.
- Next, click on General and select the toggle associated with Use the following DNS server address and replace Preference DNS server and Alternate DNS server with the following addresses:
8.8.8.8
8.8.4.4
- Once you manage to modify the two values accordingly, follow steps 3 and 4 once again to change to the Google DNS for IPv6:
2001:4860:4860::8888
2001:4860:4860::8844
- Save the changes you’ve just implemented, then restart your PC and launch Minecraft once the next startup is complete to see if the problem is now resolved.


how do i open the start up script to find the correct port?????