Fix: Internet Explorer has stopped working
At the time of addressing this issue on Appuals, Windows 10 is out and with Windows 10, Microsoft Edge is out and has replaced Internet Explorer. Internet Explorer, has never been successful like Google Chrome and Firefox.
Microsoft in their Windows-versions made several features of Windows dependent on Internet Explorer, meaning that it not just served the purpose of a “Web Browser” but several other Windows based functions as well. For example: Proxy settings in IE would affect other applications as well needing the internet.
If you take my advice, I would suggest you to immediately switch to Google Chrome to avoid such issues once and for all. However, as i understand many users would still like to continue with IE and prefer things remain the same. If that is the case, then this guide will give you the solution to address “internet explorer has stopped working” and i would suggest that you either bookmark this page or print it out in case this happens again in future, which definitely will happen.
Method 1: Internet Explorer has stopped working
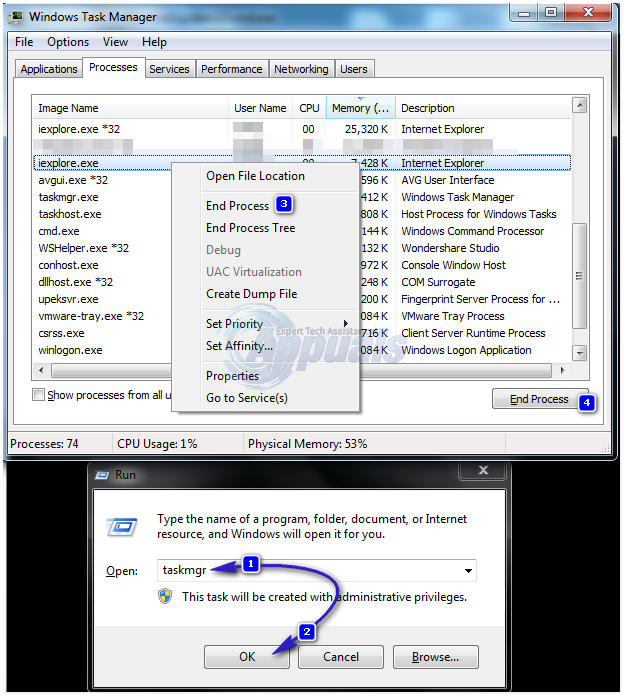
- Hold the CTRL + SHIFT + ESC Keys simultaneously, to pull up Task Manager. OR Hold the Windows Key and Press R and type taskmgr and then Click OK.
- Go through the list of the processes under the Processes tab, and locate iexplore.exe – If it is there, right click on it and choose End Task.

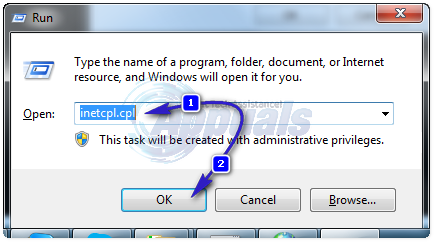
- Then, Hold the Windows Key and Press R again, and type inetcpl.cpl and Click OK.

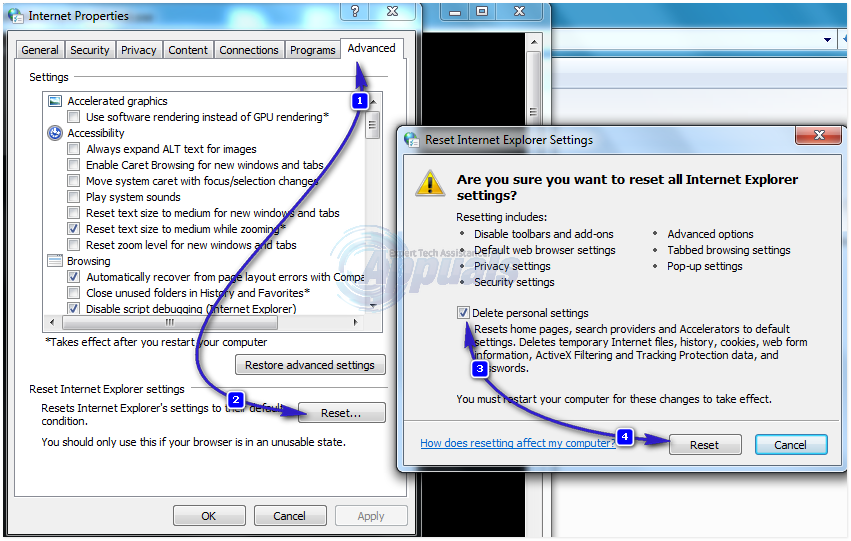
- Go to the Advanced Tab, and Click Reset. Place a check on Delete Personal Settings, and Hit Reset again. Click Apply/OK to close Internet Properties dialog.

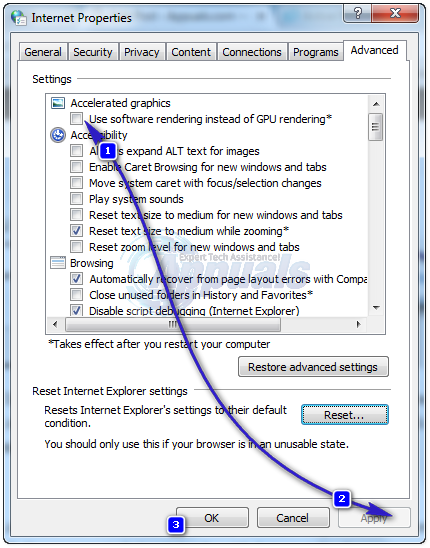
- Now test to see if Internet Explorer opens up, if not then Hold the Windows Key and Press R again, and type inetcpl.cpl and Click OK. Go to the Advanced tab, and place a check on Use software rendering instead GPU rendering.

- Click Apply/OK and this should fix the issue with Internet Explorer. In Resetting Internet Explorer, your bookmarks bar will disappears, to bring it back, with Internet Explorer open, Hold CTRL + SHIFT + B Keys simultaneously.
Method 2: Disable content indexing
For better Internet Explorer performance, you will need to turn off content indexing on Internet Explorer. We will show you how to turn off content indexing in Internet Explorer 11 using Windows 10. If you are using another version of Internet Explorer or operating system, you can follow this procedure to disable content indexing. So, let’s start. Because we do not have Internet Explorer shortcut on Desktop, we will first open Internet Explorer file location. If you have Internet Explorer shortcut on your Desktop you can start from step 3. Before you start with all steps, please close Internet Explorer.
- Right click to Start menu and type internet explorer
- Right click to Internet Explorer and choose Open File Location

- Right click on Internet Explorer and choose Properties
- Under General tab click Advanced
- Deselect Allow this file to have contents indexed in addition to file properties

- Click OK
- Click Apply and then OK
- Run Internet Explorer and enjoy your time on the Internet
Method 3: Disable third-party browser extensions*
When we decide to troubleshoot a problem with Internet Explorer, one of the steps we need to do is to disable third-party browser extensions. When we disable this feature in Internet Explorer, actually we disable third-party tool bands and Browser Helper Objects. We will show you how to disable third-party browser extensions on Internet Explorer 11 using Windows 10. If you are using another version of Internet Explorer or operating system, you can follow this procedure to disable third-party browser extensions.
- Open Internet Explorer
- Navigate to Settings and then choose Internet options

- Choose Advanced tab
- Deselect Enable third-party browser extensions*

- Click Apply and then OK
- Restart your Internet Explorer
- Run Internet Explorer and enjoy your time on the Internet
Method 4: Reset security zones to default level
In this method, you will reset security zones to default level. We will show you how to reset all zones to default level on Internet Explorer 11 using Windows 10. If you are using another version of Internet Explorer or operating system, you can follow this procedure to reset all zones to default level.
- Run Internet Explorer
- Navigate to Settings and choose Internet Options
- Choose Security tab
- Click Reset all zones to default level

- Click Apply and then OK
- Restart your Internet Explorer
- Run Internet Explorer and enjoy your time on the Internet
Method 5: Clear cached data in Internet Explorer
If temporary files or cached files are corrupted, this method will solve your problem. We will show you how to clear cached data in Internet Explorer 11 using Windows 10. If you are using another version of Internet Explorer or operating system, you can follow this procedure to clear cached data.
- Run Internet Explorer
- Navigate to Settings
- Choose Safety and then Delete Browsing History

- Select all options and choose Delete

- Restart your Internet Explorer
- Run Internet Explorer and enjoy your time on the Internet
Method 6: Remove toolbars, extensions, and search providers
Sometimes when you install some application, you install the additional toolbar, extension or search engines for your browser. All of them can be a potential problem for Internet Explorer. Regarding that, we are recommending you to remove extensions, toolbars and search providers. You can remove one by one to check which of them is the reason why your Internet Explorer is not working well. We will show you how to remove extensions and toolbars, and search providers in Internet Explorer 11 using Windows 10. If you are using another version of Internet Explorer or operating system, you can follow this procedure to remove extensions and toolbars, and search providers.
- Open Internet Explorer
- Click Setting and then choose Manage add-ons

- Choose Toolbars and Extensions
- Right click on the toolbar and choose Disable. In our example, it is Adobe Acrobat Create PDF Tool. If you are using another toolbar or extension, you should remove them, to check is a problem with that toolbar or extensions, or not.

- Click Disable again

- Choose Search Providers
- Right click on Search provider and choose Remove. In our example, it is search provider named Ebay. If you are using another search providers, you should remove them, to check is a problem with that search provider or not.

- Close the Manage Add-ons
- Restart your Internet Explorer
- Run Internet Explorer and enjoy your time on the Internet
Method 7: Disable application which is conflicting with Internet Explorer
Did you hear for application conflict? Yes, it is possible and maybe Internet Explorer is conflicting with other application. How will we discover that? We will use the clean boot, which provides booting your Windows without additional services. We will show you how to do a clean boot on Windows 10. If you are using another operating system, you can follow this procedure to activate clean boot.
- Hold Windows logo and press R
- Type msconfig and press Enter
- Choose General tab
- Uncheck Load system services under Selective startup

- Choose Services tab
- Select Hide all Microsoft services and then click Disable all

- Click Apply and then OK
- Restart your Windows
- Run Internet Explorer to see is a problem still there. If the problem is not there, that means there is a conflict between Internet Explorer and other software. If you want to find which software is conflicting with Internet Explorer you will need to activate one by one or few services and restart your Windows. Once you have identified which service/startup item causes the problem in Internet Explorer you will need to either disable/uninstall/update the program to avoid further problems. If the problem is still there, there is no conflict between Internet Explorer and other application, and you need to check next method.
Method 8: Reinstall Internet Explorer
In this method, we will remove Internet Explorer from Windows and install the same or another one version of Internet Explorer. Few users solved their problem by downgrading or updating Internet Explorer. We will show you how to do reinstall Internet Explorer on Windows 10. If you are using another operating system, you can follow this procedure to reinstall Internet Explorer.
- Hold Windows logo and press R
- Type appwiz.cpl and press Enter to open Programs and Features
- On the left side of window, click Turn Windows features on or off
- Navigate to Internet Explorer

- Deselect Internet Explorer
- Click Yes to confirm turning off Internet Explorer
- Click OK and wait until Windows turn off Internet Explorer
- Restart your Windows
- Hold Windows logo and press R
- Type appwiz.cpl and press Enter to open Programs and Features
- On the left side of window, click Turn Windows features on or off
- Navigate to Internet Explorer
- Select Internet Explorer
- Click OK and wait until Windows turn on Internet Explorer as Windows features
- Run Internet Explorer and enjoy your time on the Internet
Method 9: Change Windows 7 theme
This can be a weird solution, but few users changed their Windows 7 theme and solved the issue with internet Explorer. Based on end user experience, we are recommending you to change Windows 7 theme, you will not lose anything, except you will now do this method work or not. We will show you how to change Windows theme on Windows 7 Professional x64.
To change Windows 7 theme, please check this LINK, method 8.
Method 10: Install Malwarebytes and scan your computer for malware
If your machine is infected by malware, that is one of the reasons why Internet Explorer is not working good. We are recommending you to scan your machines using your current Antivirus. Also, we are recommending you to download Malwarebytes and scan your computer for malware. We will show you how to do download and run Malwarebytes on Windows 10. If you are using another operating system, you can follow this procedure to run Malwarebytes and scan your computer for malware.
- Open Internet Browser (Edge, Google Chrome or Mozilla Firefox)
- Open Malwarebytes site on this LINK and download Malwarebytes
- Install Malwarebytes

- Run Malwarebytes
- Click Scan

- Wait until Malwarebytes finishes scanning your hard disk
- Remove all threats
- Restart your Windows
- Run Internet Explorer and enjoy your time on the Internet
Method 11: Uninstall Systems Mechanic IOLO
If you installed Systems Mechanic software, your Internet Explorer will be automatically updated to newer version. What is Systems Mechanic? System Mechanic is a software which tunes up PC’s performance. We will show you how to uninstall System Mechanic from Windows 7 Professional x64. If you are using another operating system, you can follow this procedure to uninstall System Mechanic.
- Hold Windows logo and press R
- Type appwiz.cpl and press Enter to open Programs and Features
- Select Systems Mechanic Professional
- Right click on Systems Mechanic and choose Uninstall

- Follow the procedure to uninstall Systems Mechanic
- Reset your Windows
- Run Internet Explorer and enjoy your time on the Internet
Method 12: Reinstall Adobe Flash Player, Java, and Silverlight
In this method, you will reinstall Adobe Flash Player, Java, and Silverlight. If you are using Windows 10, Flash Player is integrated with Internet Explorer in Windows 10. If you are using the previous version of operating system, you will need to reinstall Adobe Flash Player.
We will show you how to reinstall Adobe Flash Player on Windows 7 Professional. The procedure for reinstalling Java and Silverlight is the same, the only difference is that you need to download Java and Silverlight from different websites. You can download Java on this LINK, and Silverlight on this LINK.
- Hold Windows logo and press R
- Type appwiz.cpl and press Enter to open Programs and features
- Navigate to Adobe Flash Player 26 ActiveX
- Follow the procedure to uninstall Adobe Flash Player 26 ActiveX
- Restart your Windows
- Open Internet browser (Google Chrome or Mozilla Firefox)
- Open Adobe’s website on this LINK
- In Step 1 choose your operating system
- In Step 2 choose your browser
- Uncheck all offers under Optional offers
- Click on Download

- Run Adobe Flash Player installation file
- Click Yes to confirm running installation as Administrator
- Under Update Flash Player Preferences click Allow Adobe to install updates (recommended) and click In case you do not want to Adobe installs updates automatically, you can choose another update option.
- Click Finish
- Restart your browser
- Run Internet Explorer and enjoy your time on the Internet
Method 13: Configure NVIDIA software
If you are using NVIDIA graphic card and NVIDIA software, maybe there is a compatibility issue between NVIDIA and Internet Explorer. We will show you how to configure NVIDIA software and avoid compatibility issue with internet Explorer.
- Left click on Start menu and type NVIDIA Control Panel
- Open NVIDIA Control Panel
- On the left side of windows, click on 3D Settings
- Choose Program Settings tab
- Under Select a program to continue choose Microsoft Internet Explorer
- Under Select the preferred graphic processor for this program choose Integrated graphic

- Click the Apply button at the bottom
- Restart your Windows
- Run Internet Explorer and enjoy your time on the Internet
Method 14: Disable UAC (User Account Control)
This solution can be weird, too, but few users solved the problem with Internet Explorer by disabling User Account Control. We will show you how to disable User Account Control on Windows 10. If you are using another operating system, you can follow this procedure to disable User Account Control.
- Hold Windows logo and press R
- Type control panel and press Enter to open Control Panel
- Sort icons by Category
- Choose User Accounts
- Click on User Accounts
- Click Change User Account Control Settings and choose Never Notify

- Click OK
- Close Control Panel
- Restart your Windows
- Run Internet Explorer and enjoy your time on the Internet
Method 15: Uninstall security updates
Did Windows do some update for the operating system or Internet Explorer? If you do not know we will show you how to check it. If Internet Explorer stopped to work after your Windows or Internet Explorer did the update, then we found the protentional problem. There are two updates which can damage make a problem with Internet Explorer. They are KB3008923 and KB3013126. KB3008923 is Security Update for Internet Explorer and KB3013126 is a security update for Microsoft Windows. They can be installed on the operating system from Windows Vista to Windows 10. We will show you how to uninstall update on Windows 7. If you are using another operating system, you can follow this procedure to uninstall the update.
- Hold Windows logo and press R
- Type appwiz.cpl and press Enter to open Programs and features
- On the left side click on View installed updates

- Navigate to KB3008923 and choose Uninstall
- Navigate to KB3013126 and choose Uninstall
- Restart your Windows
- Run Internet Explorer and enjoy your time on the Internet
Method 16: Update drivers
In this method, you will need to update drivers for your computer or notebook. How to do that? We are recommending you to download the latest drivers from vendor’s site. If you are using HP notebook, you will need to open HP Support website, type your notebook model and download the latest version of your drivers. We are recommending you to download and install all drivers available for your machine and operating system. The procedure is really simple, and there are fours steps as following:
- Download drivers
- Install drivers
- Restart your Windows
- Run Internet Explorer and enjoy your time on the Internet
Method 17: Update Norton products with LiveUpdate
If you are using some of Norton products we are recommending you to update them. How will you do it? You will need to download LiveUpdate from Norton website.
- Start your Norton product
- In the main window, click Security, and then click LiveUpdate

- When Norton LiveUpdate is finished, click OK
- Run LiveUpdate until you see the message Your Norton product has the latest protection updates.
- Exit all the programs
- Restart your Windows
- Run Internet Explorer and enjoy your time on the Internet
Method 18: System Restore
Implementation of backup and restore strategy is a crucial action for business and home environment. In the case of failure, you have a backup of your data, you can revert your system to previous state and other benefits which come together with backup and restore strategy. If you are not one of the users who ignored this, we are recommending you restore your Windows to the previous state using System Restore. If you know when computer worked without problems, revert your Windows to that date. If System Restore is not enabled on your computer, then you need to read Method 17. We are recommending you enable System Restore, by reading this LINK. The procedure for restoring Windows is the same on operating systems from Windows XP to Windows 10.
You can read on this LINK (method 13) how to do a system restore on your machine.
Method 19: Create another user account and move your data
In this method, we will show you how to create another user account with administrator privilege, how to move data and enjoy working on Windows without problems. We will show you how to create a user account in Windows 10. The procedure is the same or similar on another operating system from Windows Vista to Windows 8.1.
To create new user account and move your data, please check this LINK, method 14.
Method 20: Change Internet browser
If you are one of the users who do not care which Internet browser will use, we are recommending you to change your Internet browser. If you are using Windows 10, you can use Edge, the faster Internet browser for Windows 10. In case you are using the previous operating systems, from Windows XP to Windows 8.1, you can download Google Chrome or Mozilla Firefox. How will you download Google Chrome or Mozilla Firefox if your Internet Explorer does not work? If you have another machine, move on that machine and download Google Chrome from this LINK, or Mozilla Firefox from this LINK.