SOLVED: Internet Explorer 11 Not Responding
Internet Explorer is the default internet browser for all versions of the Windows Operating System that came before Windows 10. Internet Explorer is the browser that came with Windows computers out of the box until it was replaced by Microsoft Edge when Windows 10 hit the shelves. Although IE has been replaced by Microsoft Edge, it remains a sufficiently competent browser and continues to be used by numerous people worldwide. The latest and last version of Internet Explorer is Internet Explorer 11. Supporting both Windows 7 and Windows 8/8.1, Internet Explorer 11 is a major improvement over its predecessor and is overall a quite decent internet browser.
However, Internet Explorer 11 is far from perfect. Like most other Windows applications, it has a tendency to stop responding altogether, producing an error message that states, “Internet Explorer has stopped working.” Shortly after, the only option for a user affected by this problem is to close Internet Explorer 11. As alarming as it might be, it is not uncommon for IE 11 to stop responding and crash abruptly. In fact, in most cases, this issue can be remedied by simply restarting IE 11, and it will function as intended.
However, some users may be affected by an issue in which Internet Explorer 11 stops responding on their devices more often than it should. There are plenty of different factors that can cause IE 11 to stop responding and crash frequently, and as such, there are many potential solutions for the problem. The following are some of the most effective solutions that you can try if Internet Explorer 11 stops responding regularly:
Solution 1: Install any and all available Windows updates.
Stability updates and bug fixes for IE 11 come with Windows updates. This means that if IE 11 is constantly crashing due to vulnerabilities, outdated files, or obsolete drivers, installing the latest Windows updates might fix the problem.
Open the Start menu.
Search for ‘updates‘.
Click on the search result titled Check for updates.
When you see the Windows Update window, click on Check for updates and wait for your computer to look for available updates.
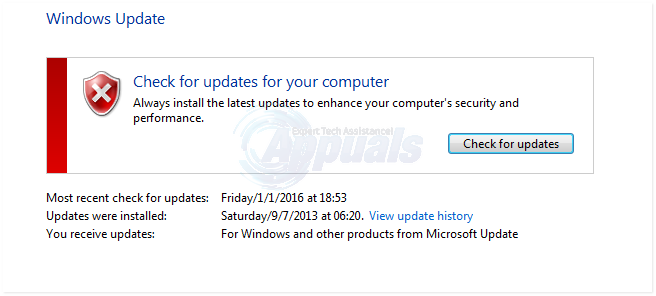
Once your computer has finished, download and install any available updates for your computer.
Solution 2: Run the Internet Explorer troubleshooter
Running the Internet Explorer troubleshooter can help with many IE-related issues, including this one. To run the Internet Explorer troubleshooter, you need to:
Open the Start Menu.
Search for “troubleshooting”.
Click on the search result titled Troubleshooting.
Please click on “View All” in the Troubleshooting section.
Click on Internet Explorer Performance. Follow the instructions in the troubleshooting wizard, and see it through to the end; it may be able to fix this problem for you.
Solution 3: Run several anti-malware and antivirus scans.
Internet Explorer 11 may be crashing on your computer on a regular basis because it has been infected with malware, a virus, or another harmful element. To rule out infection as a cause, it would be a good idea for you to run a few anti-malware and antivirus scans. Some popular programs for running these scans include Malwarebytes and Avast! Free Antivirus. Remember – the more programs you use to run scans, the more you can trust the results, as each malware/virus screening program does not search for the same harmful elements.
Solution 4: Delete Your Temporary Internet Files.
A buildup of Temporary Internet Files, along with corruption of these files, not only takes up a significant amount of space on your computer’s hard drive, but can also cause problems with Internet Explorer 11, including frequent crashes for its users. It is definitely a good idea to remove all of your computer’s Temporary Internet Files and see if that resolves the issue for you.
Open the Start Menu.
Search for ‘Internet Options‘.
Click on the search result titled Internet Options.
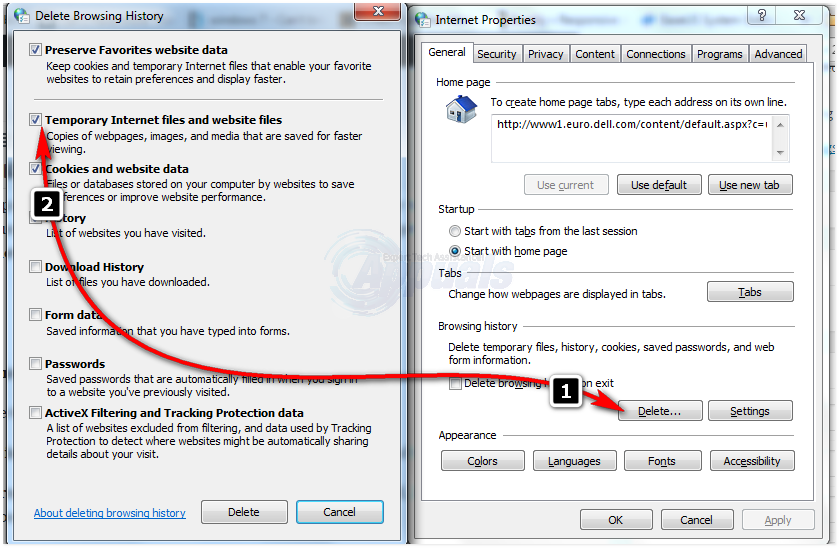
Under ‘Browsing History’ in the ‘General‘ tab, click on ‘Delete…’.
Make sure that the temporary internet files and website files option is selected, and then click on ‘Delete.’
Wait for your temporary internet files to be deleted, and once they have been deleted, launch IE 11 to see whether or not the problem has been fixed.
Solution 5: Disable Hardware Acceleration in IE 11.
Hardware acceleration is a feature in IE 11 that utilizes a computer’s GPU to speed up graphics-heavy tasks such as video streaming and online gaming. While hardware acceleration is designed to improve the overall user experience, it may sometimes cause IE 11 to stop responding frequently. Another potential solution to this issue for you is to disable hardware acceleration in IE 11. To do so, you need to:
Open the Start Menu.
Search for ‘Internet Options
Click on the search result titled Internet Options.
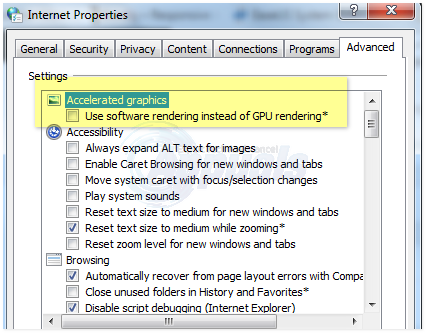
Navigate to the Advanced section.
Enable the ‘Use software rendering instead of GPU rendering’ option by selecting it.
Click on ‘Apply.’
Click on OK.
Close the Internet Options.
Launch Internet Explorer 11 and check to see whether or not the problem has been fixed.
Solution 6: Disable IE Add-ons.
Add-ons are essentially small applets that internet browsers utilize to communicate with various parts of the internet to serve different purposes for users. Although add-ons are generally created for good, they can sometimes cause more harm than good. Some add-ons, particularly incompatible or outdated ones, have been known to cause frequent unresponsiveness in Internet Explorer 11. If one or more harmful add-ons are causing this issue in your case, you can resolve the problem by identifying the problematic add-on and disabling it. To accomplish this, you need to:
Launch Internet Explorer 11.
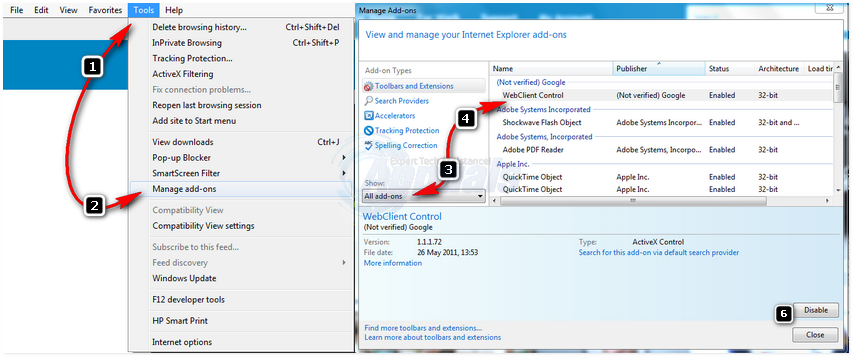
Click on the Tools icon in the top right side of the window (the icon is depicted by a gear). Press the ALT key on your keyboard if you don’t see Tools.
Click on Manage add-ons in the contextual menu.
Click on ‘All Add-ons’ under ‘Show‘.
One by one, select all the add-ons you have, and then click on ‘Disable‘ for each one.
Check to see if the problem persists. If the problem has been fixed, an add-on you disabled was the cause of the problem.
One by one, re-enable all of your add-ons until you start experiencing the problem again; the add-on you enabled just before the problem returned is your culprit.
Re-enable all of your add-ons, but make sure to keep the culprit add-on disabled permanently.
Solution 7: Reset Internet Explorer.
Resetting Internet Explorer 11 is another possible solution to this issue, but you should know that resetting IE 11 will make all of your custom settings and preferences go back to their defaults, which means that you are going to have to start from scratch. To reset IE 11, you need to:
Open the Start Menu.
Search for ‘Internet Options’.
Click on the search result titled Internet Options.
Navigate to the Advanced
Click on ‘Reset…’ under the ‘Reset Internet Explorer Settings.’
In the resulting popup, enable the Delete personal settings option.
Click on Reset.
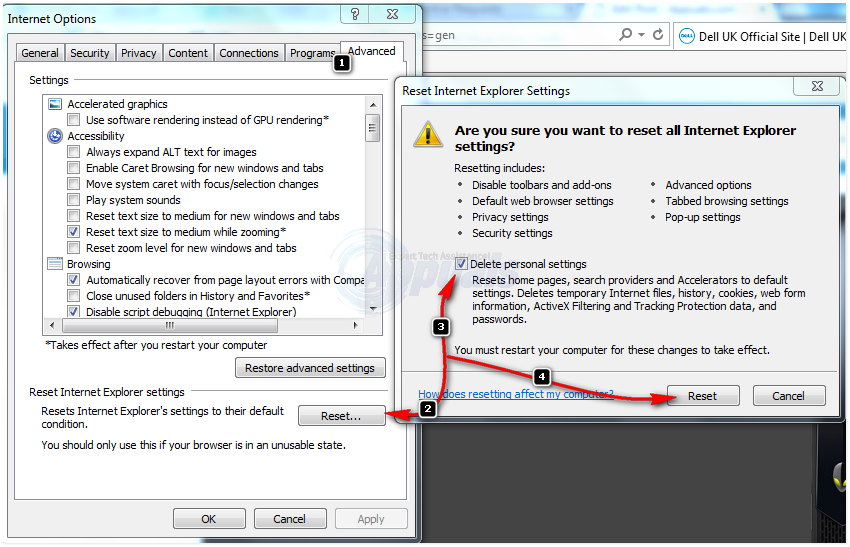
Restart your computer, and once it boots up, launch IE 11 to see whether the problem has been resolved or not.
Solution 8: Turn off and then turn on Internet Explorer 11.
If none of the solutions listed and described above have managed to resolve this issue for you, do not fret, as there is still one more solution that you can try – turning Internet Explorer 11 off and then turning it on. Since IE 11 is a built-in Windows program, it cannot be uninstalled and reinstalled in most cases. Given that, the simplest alternative is to disable and then re-enable it. Although this solution may sound like a long shot, it has managed to fix this issue for quite a lot of people.
Open the Start Menu.
Search for “Windows features.
Click on the search result titled Turn Windows features on or off.
In the list of Windows features, locate and clear the checkbox beside Internet Explorer 11 to turn it off.
Click on Yes in the resulting popup to confirm the action.
Restart your computer.
Repeat steps 1-3 once your computer boots up.
In the list of Windows features, locate and select the checkbox beside Internet Explorer 11 to turn it on. Confirm the action if required, by doing so in the resulting pop-up.
Restart your computer and, once it boots up, check to see if the problem has been fixed.