How to Increase Windows 10 Lock Screen Timeout Settings
Windows 10 arguably provides the best graphical interface to be seen on a PC yet. From the interactive sessions to the screensaver feature known as the lock screen. The lock screen is now designed to provide news when you are not using your PC, but like the old screensaver, most people use it for entertainment by displaying a slideshow of captivating images when the computer is not in use.
Essentially, screensavers were used to prevent burn out on Cathode Ray Tube (CRT) screens but they are now used as a security feature besides their new functions mentioned above. If your computer has been set right, it should go to the lock screen after a few minutes of not being in use. It should then ask for a password when you resume use if it has been set so. To set the time the computer waits till lock screen is engaged, go to the control panel and under the appearance and display settings, open the screensaver. Set a screensaver, set a waiting time and set the screensaver type back to none. The system will wait for the predetermined time and then go to the lock screen.
The problem however arises when the lock screen times out after a few minutes and then switches off the monitor before the computer goes to sleep, thus diminishing the usefulness of the lock screen. If you love the images and information displayed on your lock screen, you would want to set a high timeout value. The same applies to those that want to get back to their work quickly without having to wait for the computer to wake up. This guide will show you how you can increase the timeout of the lock screen and stop your monitors from going off.
Method 1: Turn on Console Lock Display Timeout and set a value
Console lock display off timeout is the number of minutes Windows will wait idle with no activity while on the lock screen before timing out and automatically turning off the display. This setting is not available for configuration but can be turned on. Since this setting is tied to a specific user account, it will only work after logging in and not after startup.
- Open notepad
- Copy-paste the key below:
Windows Registry Editor Version 5.00
[HKEY_LOCAL_MACHINE\SYSTEM\CurrentControlSet\Control\Power\PowerSettings\7516b95f-f776-4464-8c53-06167f40cc99\8EC4B3A5-6868-48c2-BE75-4F3044BE88A7]
"Attributes"=dword:00000002

- If you want to disable the console settings just replace the last line with “Attributes”=dword:00000001
- On your notepad utility click file, and go to save as
- Choose a location and save as “consoleshow.reg” and click save
- Go to the saved registry file and double click to open it
- If asked if you want to merge the key, click on yes. The key will then be added to your registry.
- Restart your PC
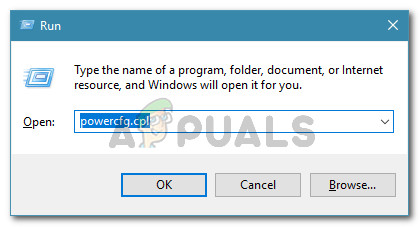
- Login and Press Window + R to open run
- Type powercfg.cpl and hit enter to open the power options window.
Running dialog: powercfg.cpl - The power plan you are running will be the selected one. Click on “change plan settings” on the right-hand side of your running power plan.
- On the bottom of the next page click. “change advance power settings”
- On the popup window, expand the “display” section and then the “console lock display off timeout” section. The Console lock display off timeout may not be available in some Windows 10 configs.
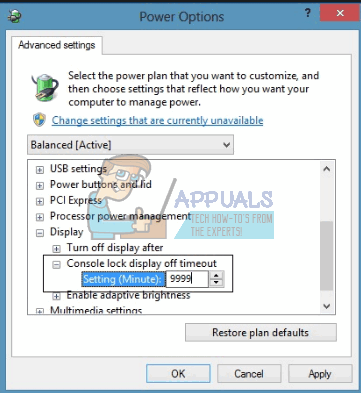
- Set the time you would like to display your lock screen. For laptops, you will have an option for on battery and on ac (while charging/plugged in).
- Set the value to ‘0’ if you don’t want the monitor to ever go off
- Click Apply, then OK
Method 2: Using the PowerCfg.exe utility
Using the PowerCfg.exe power options utility, you can configure the display timeout used when the PC is in an unlocked state as well as when it is at a locked screen. From an administrative command prompt, the following commands can be used to control the display timeout. Just follow these steps:
- Press start and type ‘cmd’
- In the search results right-click on ‘cmd’ and choose ‘open as administrator’ to enter the elevated command prompt shell environment.
- Type the command below “each time replacing the time in seconds with your preferred figure.
powercfg.exe /setacvalueindex SCHEME_CURRENT SUB_VIDEO VIDEOIDLE <time in seconds>
powercfg.exe /setacvalueindex SCHEME_CURRENT SUB_VIDEO VIDEOCONLOCK <time in seconds>
powercfg.exe /setactive SCHEME_CURRENT
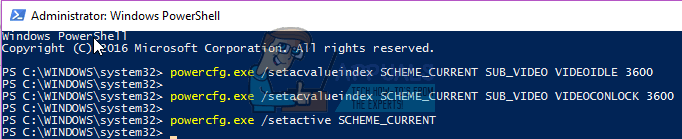
The VIDEOIDLE timeout is used when the PC is unlocked and the VIDEOCONLOCK timeout is used when the PC is at a locked screen. If your screensaver time is set lower than the VIDEOIDLE time, the lock screen will be engaged before the monitor goes off on idle timeout. The screensaver can be changed from the appearance and display control panel setting.
These commands set the timeout used when the system is plugged in and using AC power. To set the timeouts used when on DC (battery) power, use the /setdcvalueindex switch instead of /setacvalueindex.