How to Use SD Card as Extra RAM in Android
RAM is a crucial part of smartphones – mostly, it holds your phone’s data and allows for multitasking. The sweet spot seems to be around 4GB of RAM. Phones with 1GB of RAM suffer tremendously in performance, whereas phones with 6B of RAM see barely any performance gains over 4GB.
There is currently no way of adding RAM to an Android phone the same way you would add RAM to a computer – most Android devices are “system on chip”, meaning the CPU / GPU / RAM are on a single chip. You can’t simply replace or upgrade this chip.
What we can do however is use an SD card and third-party apps to create swap file space using the SD card’s storage. This is not the same as actually increasing the RAM – rather, it allows us to use a set amount of partition space as virtual memory.
The main thing to know is that your performance gains will vary depending on the type of SD card you’re using – this is because SD cards are rated in terms of transfer speed. Your SD card for this task should be at least a class 10, but much better if you’re able to get a UHS-II or UHS-III rated SD card. The fastest available SD cards out there right now are the Sony SF-G UHS-II U3, the Lexar Professional 2000x UHS-II U3, the Toshiba Exceria Pro UHS-II U3, and the SanDisk Extreme PRO UHS-II U3.
Allof the methods on this list require a rooted phone – search Appual’s Android root guides for your device if you aren’t already rooted. If you can’t find a root guide for your device on Appual’s, leave a comment with your phone model!
As a final note, we do not recommend “task killer” and “RAM booster” apps. They’re largely a placebo effect, and it actually puts more strain on your device (and reduces battery lifetime) when you’re re-opening apps. The RAM cache exists for a very good reason. It’s much better to frequently use a tool like Trimmer (Fstrim) which can restore performance to NAND chips that have grown sluggish over time (mostly due to many read/writes and IO errors). It’s the same principal as the TRIM function on SSDs for computers.
Method 1: ROEHSOFT RAM Expander (Root Required)
- ROEHSOFT Ram Expander is around $5 on Google Play store, and its probably the most reliable app for what we want to achieve (aside from writing all the bash scripts yourself). It has all the features we need and an intuitive GUI – the only drawback is that Ram Manager must be compatible with your device.
- To check if your device is compatible, you can download the (free) Memoryinfo and Swapfile testing app – this app will let you know whether your phone supports swap file partition from the SD card.
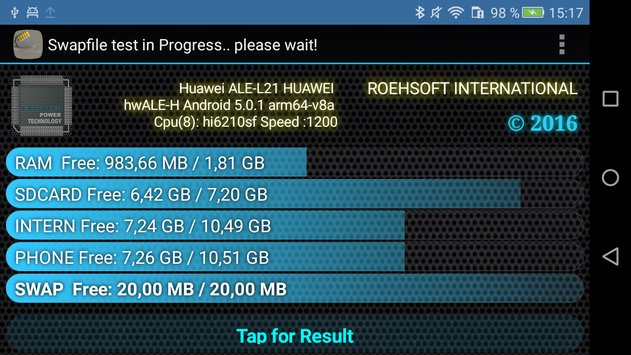
- So just install the Memoryinfo and Swapfile testing app, launch it, and at the bottom press the “Start RAMEXPANDER Test Here” button. Then just use your phone normally for a while, around 5 or 10 minutes, so that the test app can get a basic idea of your memory usage.
- After about 5 minutes of normal phone usage, the Memoryinfo and Swapfile testing app will display your memory results – if everything is good to go, it won’t display any errors. However, if it displayed errors in the memory testing results, you will need to try another method in this guide.
- Assuming the test results were fine, you can now download the ROEHSOFT Ram Expander app. It will ask for root access when you launch it.
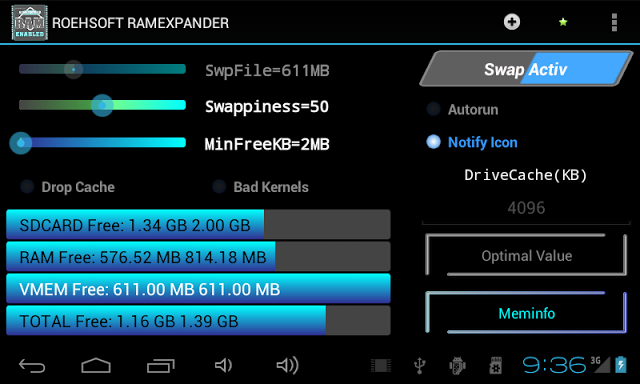
- On the main screen, it will display various information about your RAM and SD card, and a few checkboxes at the top of the screen.
- First you want to check the Autorun box, as this will allow the app to run when your phone boots up.
- Next, press the button “Optimal Value” in the lower left corner – this will automatically set the paging file to its optimal capacity. If you want, you can also manually increase the slider for SD card storage that you want allocated as additional swap memory.
- Next, press the “Swap active” button. This will begin the process of increasing your swap memory – you will not see an increase in RAM in your Settings. Remember that we are not actually adding RAM to your phone. However, your device should feel a bit faster and smoother overall.
- You can test to see if the app is working by trying to play a game that normally stutters and lags a lot on your device. There’s really no other way to check if the app is working, besides using your device normally (or trying to do RAM-heavy multitasking) and see if it performs better than before.
Method 2: RAM Manager Pro (Root)
This is a tool similar to ROEHSOFT Ram Expander, but a little bit cheaper – it has a “basic” version, but the RAM features aren’t unlocked, so you need the pro version for what we want to do.
In any case, RAM Manager Pro was born out of a successful RAM optimization script from the XDA forums, and it gives you various RAM profiles to work with, which you can easily switch between.
- The first step is to actually download and install the RAM Manager Pro app on your Android phone, then launch the app and press the “VM Heap Size” button.
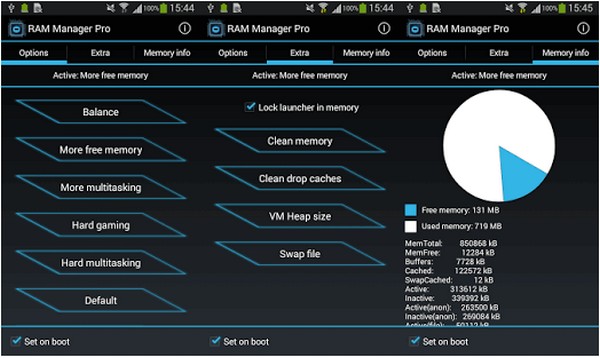
- VM Heap Size is the maximum memory that any single app can use on your device – so if one particular app is a RAM hog (looking at you, Facebook), you can limit its RAM usage.
- But what we really want is the Swap File feature. This will allow you to use your SD card as a swap file partition, thus giving you more memory to work with.
- RAM Manager Pro also has various profiles as mentioned earlier – you can use the “Hard Gaming” profile for when you want to play RAM-heavy games, or the “Hard multitasking” profile for when you’ve got Facebook, Whatsapp, and Youtube all open at once. You can also create custom profiles and just the swap file and RAM usage to your personal tastes.
Method 3: Do It Yourself SD Card Partitioning (Root Required)
- For this method, you need an external SD card reader, and a tool like Mini Tool Partition Wizard.
- Connect your external SD card reader to your PC and insert your SD card.
- Launch the Mini Tool Partition Wizard (or partition tool of your choice) and format the SD card.
- Now create a partition from your SD card – make it a Primary partition as a FAT32, but leave about 1GB of space unallocated.
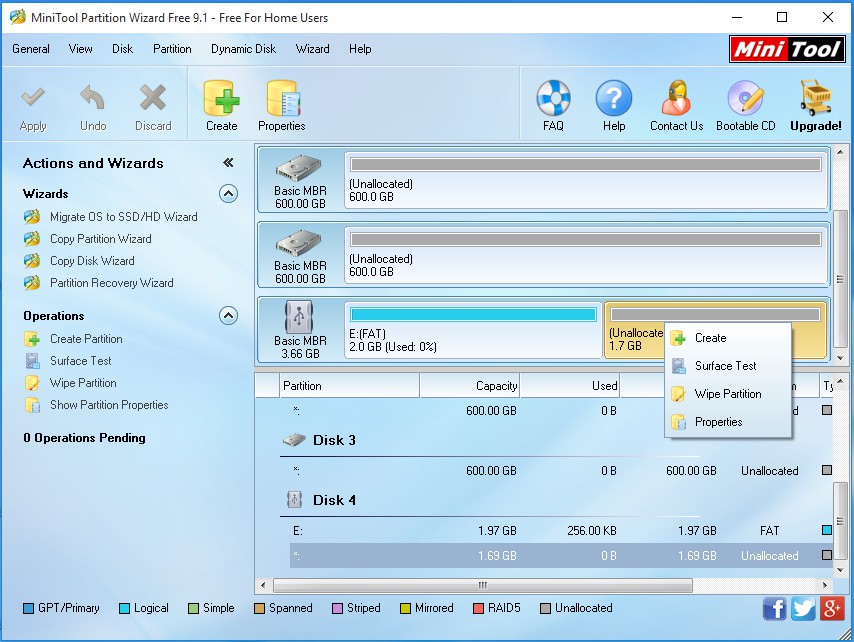
- Now create another partition, but this time as either EXT2, EXT3, or EXT4. Apply the changes and insert your newly partitioned SD card into your Android phone.
- Now download Link2SD from the Google Play store onto your Android device.
- Launch Link2SD, grant it root access, and choose the EXT partition you made, and link them.
- Now download Swapper For Root app, launch it, and choose the amount of RAM you want to increase.
- Swapper For Root will create a .SWP file and “increase” your RAM – it will even show the RAM increase in your Settings > About Phone (or wherever your RAM is displayed). Don’t be fooled, however, this is merely swap memory from the SD card, not actual physical RAM.


Hmmm.. Near the top, I quote;”Some of the methods on this list require a rooted phone”Some – meaning ALL *3* methods. All 3 require a rooted phone, and “some” of the 3 cost money. You should start with that.