How to: Uninstall Kodi on Windows 10
Uninstalling apps and programs on Windows 10 is supposed to be an easy process and there are even two features you can use to uninstall apps: Control Panel and Settings. However, people are often not aware of the fact that certain apps may cause issues during the uninstalling process and they may malfunction.

If that is the case, you may run into issues the next time you want to install the same app as certain files will remain and cause instability. Let’s find out about Kodi and how is Kodi causing issues during the uninstalling process.
Uninstalling Kodi on Windows 10
Kodi (formerly XBMC) is a free and open-source media player software application developed by the XBMC Foundation, a non-profit technology consortium. It is available for use on multiple operating systems and it can be used with televisions and remote controls. It allows its users to play and stream most media such as videos, music, and podcasts from the Internet. It’s customizable and it allows different skins and plug-ins to be installed which can add new features.

However, Windows 10 users have reported that uninstalling this program from their computers was a difficult process and they were unable to uninstall it properly. Find out how to uninstall it yourself by following the instructions below!
Solution 1: Use the Conventional Methods Through Control Panel or Settings
This is the first method you tried yourself but let’s try this again to make sure we tried to uninstall it the usual way. If this method helps you deal with Kodi-related error messages, you don’t have to continue with other solutions. This is also the easiest solution for casual users.
- First of all, make sure you are logged in with an administrator account as you won’t be able to delete programs using any other account.
- Backup the data you want to save because deleting Kodi will remove it.
- Click on the Start menu and open Control Panel by searching for it. Alternatively, you can click on the gear icon to open Settings if you are using Windows 10.
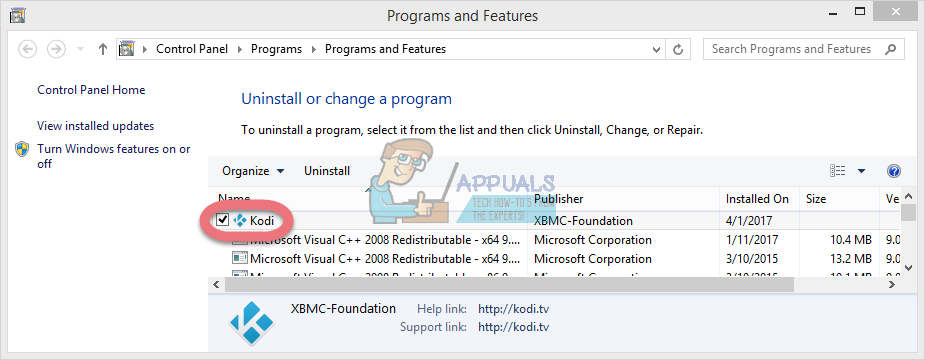
- In Control Panel, select to View as Category at the top right corner and click on Uninstall a Program under the Programs section.
- If you are using the Settings app, clicking on Apps should immediately open a list of all installed programs on your PC.
- Locate Kodi in Control Panel or Settings and click on Uninstall.
- Kodi’s uninstall wizard should open with two options: Repair and Remove. Select Remove and click Next to uninstall the program.
- A message will pop up asking “Do you want to completely remove Kodi for Windows?” Choose Yes.
- Click Finish when the uninstalled completes the process and restart your computer to see whether errors will still appear.
Solution 2: Use Windows PowerShell to Uninstall Kodi
Windows PowerShell is a powerful tool that can help you automate tasks using a command-line shell and a scripting language that was built using .NET Framework and .NET Core. It used to be exclusive to Windows but it was made open-source and now it’s available to all platforms. You can use PowerShell to uninstall various apps and you can even use it to delete preinstalled Windows Apps such as Photos, Video, Calculator, etc.
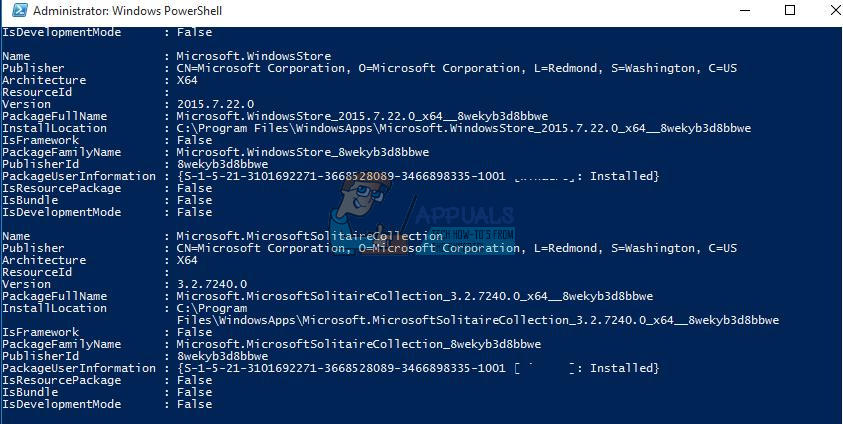
- Type PowerShell in your Search bar, right-click on the first result and select Run as administrator.
- Copy and paste the following command to receive the full list of the apps you have installed along with detailed info regarding every single one.
Get-AppxPackage -AllUsers | Select Name, PackageFullName
- Wait for the list to load and try to search for Kodi. This might take a while but be patient while you look through the installed apps.
- When you find it, copy everything next to the PackageFullName line by selecting the entire text and using the Ctrl + C key combination.
- Use the following command to uninstall Kodi from your PC. Replace the bolded PackageFullName with the actual name you just copied and click Enter.
Remove-AppxPackage -package PackageFullName
- Restart your computer and see if there are any changes regarding the error messages.
Solution 3: Remove the Add-ons
If the previous two solutions have failed and if you are still experiencing Kodi-related issues, please refer to the instructions below to also remove the add-ons before proceeding. If some of the Kodi add-ons remain, you may receive some Kodi-related error messages when in fact you have uninstalled it.
- To do this, simply go to the specific addon folder that you wish to clean.
- The path to that folder is dependent on the platform you’re on and the folder you chose to install it to.
- Please note that in older versions of the software, the Kodi directories were named XBMC.
- In Windows, the folder where the addons are usually located should be named
C:\Users\”YourUserName”\AppData\Roaming\Kodi.
- Another way to find it is to enter
%APPDATA%\kodi\userdata
via the search box located at the left part of the taskbar, next to the Start Menu button.
Solution 4: Use the Built-In Uninstaller
Follow the instructions related to this solution to use Kodi’s built-in uninstaller but also to remove the remaining files and registry entries after the process is over. Follow the instructions below carefully to remove Kodi completely from your Windows 10 PC.
First of all, let’s make sure nothing related to Kodi is currently running on our computer as this may prevent the uninstallation process from running normally.
- In the bottom-right corner of your screen, check the taskbar and the System Tray for the Kodi icon. If you see it, right-click on it and select the option related to closing the program.
- To make sure nothing related to the program is running in the background, use the Ctrl + Shift + Esc key combination on your keyboard to open the Task Manager. Find and End the processes related to the program.
After we have disabled Kodi from running on our computer during the uninstallation process, let’s proceed with the proper removal.
- Open the File Explorer by clicking the folder icon on the taskbar which should lead you to the Quick Access feature.
- Navigate to
X:\Programs Files (x86)\Kodi\
Find Uninstall.exe file and double-click on it to remove Kodi by activating the built-in uninstaller. (X represents the disk you installed the program.)
- Follow the on-screen instructions to proceed with the removal.
- In the middle you’ll be given the option (“Yes, I am sure and grant permission to also delete the profile folder”) to delete the profile folder of Kodi – Leave the option box unchecked to keep the folder which contains Kodi’s settings and library data for later use, and click Uninstall. Otherwise, tick the option and click Uninstall.
- Wait for the built-in uninstaller to finish its job and remove Kodi from your computer.
After the uninstaller removes Kodi from your PC, it’s time to remove all of the related registry keys too. Let’s proceed with this process but first let’s make sure we back up our work, the original registry in case something goes wrong.
- Open the Registry Editor by searching for it in the Search box located in the Start menu or by using the Ctrl + R key combination to bring up the Run dialog box where you need to type “Regedit”.
- Click on the File menu located at the top left part of the window and select the Export option.
- Choose where you want to save the changes to your registry.
- In case you cause some damage to the registry by editing it, simply open Registry Editor again, click File >> Import and locate the .reg file you exported beforehand.
- Alternatively, if you fail to Import the changes made to the registry, you can restore your system to a previous working state by using System Restore.
Since our registry is backed up and safe, we can remove the Kodi registry entries by following the instructions below.
- In the Registry Editor, navigate to this folder:
HKEY_CURRENT_USER\Software\Kodi\
and delete it.
- On the navigator, click Edit > Find and enter “Kodi” to search for other remaining files of the program, and delete them if found to completely remove Kodi.
- If you haven’t restarted your computer once, restart it now. Then you can check whether the removal was successful and whether your computer has gotten rid of Kodi.
Solution 5: Use Advanced Uninstaller Pro to Remove Kodi
There are a lot of different uninstallers designed to replace the Control Panel and Settings as they often get unresponsive and they sometimes freeze in the middle of the uninstallation process.
You don’t have to use this particular uninstaller but this one was able to help people who were dealing with this problem in particular and that is exactly why we recommend it. It will also get rid of the registry entries and app data for you if you will like you are not the man for that job or if you are a casual user.
- Download Advanced Uninstaller Pro from their official website or CNET.
- Locate the file you downloaded, double-click on it, and follow the instructions on the screen to uninstall it. Be careful not to install any additional programs you might be prompted to install and uncheck them all. Select Custom Installation and uncheck everything except Advanced Uninstaller Pro.
- Open the program and open General Tools.
- Under General Tools, click on Uninstall Programs and a list of all your installed programs should appear.
- Select Kodi and click the Uninstall button located to the left under the information about the program you selected.
- After clicking on the Uninstall button, the uninstaller will probably fail since it’s either displaying an error message or it has already been used or deleted.
- However, this program implements a scanner whose purpose is to scan your hard drive and your registry for leftovers. It will locate these files and you can click on Select All and remove them.
- Reboot your PC and check to see if Kodi has been removed from your device.
Hello! I’ve tried the powershell way, because I had no Kodi app traces under Program Files or Program and Features and it worked great! Thanks!!!