How to Turn on your PC Remotely using Wake-on-Lan
Do you like the idea of having the ability to turn on your computer from miles away without pushing the power button? If this is something you’d like to implement, you’re in luck – Wake-on-Lan is a technology that will enable you to do just that. Here’s just how it works, how to enable it and what program to use to set it up.

What is Wake-On-Lan?
The Wake-on-LAN technology (abbreviated WoL) is the industry standard for waking up turned off computers. But keep in mind that a turned off computer is not actually completely off – it’s actually maintained into a very low power mode.
A lower power mode means that the computer maintains access to a power source while it is turned ‘off’. This low-power mode is precisely what allows for this supplementary Wake-On-Lan feature that this article is all about.
The Wake-On-Lan technology is essentially capable of starting your PC remotely as if the power button has been pressed. This is possible because once the Wake-On-Lan function is enabled, the NIC (Network Interface Card) is still receiving power.
Wake-on-LAN is a type of feature that could come in handy in a wide variety of situations. The biggest advantage is that you will maintain non-stop access to all your files and programs. And if you’re worried about the energy costs, don’t be – Your PC is already shutting down in a low-power state, so you won’t see a boost in your electricity bill.
Wake-on-LAN is ideal to be used in conjunction with a program like TeamViewer or VNC. Also, it’s a good feature to have on if you’re using the computer as a file server or game server.
Also see our article covering the best free Wake-on-LAN tools.
How does Wake-on-LAN work?
The technology works by essentially preparing wake-on-LAN enabled computers to wait for an information packet that includes the network’s card MAC address in it. This information is usually sent out by specialized software from any platform, but internet-based apps and routers cand also send this information.
Typically Wake-on-LAN ports used for information packets are UDP 7 and UDP 9. Keep in mind that in order to listen for a packet, your computer will consume some power maintaining the network card active. This is not a problem for desktop computers, but you might want to turn this feature off on a laptop if you’re on the road.
Requirements
There are two things that you should look at when verifying if Wake-on-Lan is supported on your PC:
- Motherboard – The only requirement here is that your motherboard is hooked up to an ATX-compatible power supply. This is almost a given fact if your computer was manufactured in the last decade or so.
- Network card – You ethernet or wireless card must also support Wake-on-Lan in order to get this working. Keep in mind that this ie either set up through BIOS or through your network card’s firmware, so you don’t need to install any specific software for it.
- WakeOnLan – Get this free Wake-On-LAN tool from here.
Bottom line is, Wake-on-Lan is widely adopted today. Even if it’s not advertised as a feature on most computers, if you have a computer build in the past 10 years you should have no issues getting this to work.
How to Enable Wake-On-Lan on Your System
If you are determined to follow the steps to enable the Wake-on-LAN technology and wake your system remotely, keep in mind that you have some work to do. To ensure that Wake-on-LAN works properly, you will have to enable it from a couple of places (from BIOS / UEFI and from within Windows).
Then, we’ll have to install and configure a software equipped to send ‘magic’ Wake-on-LAN packets to your low-powered state computer. To get started, follow the steps below in order and stick with the instructions until you reach the end of the guide.
By the end of it, you will have a system that will enable you to wake your system remotely, regardless of your location.
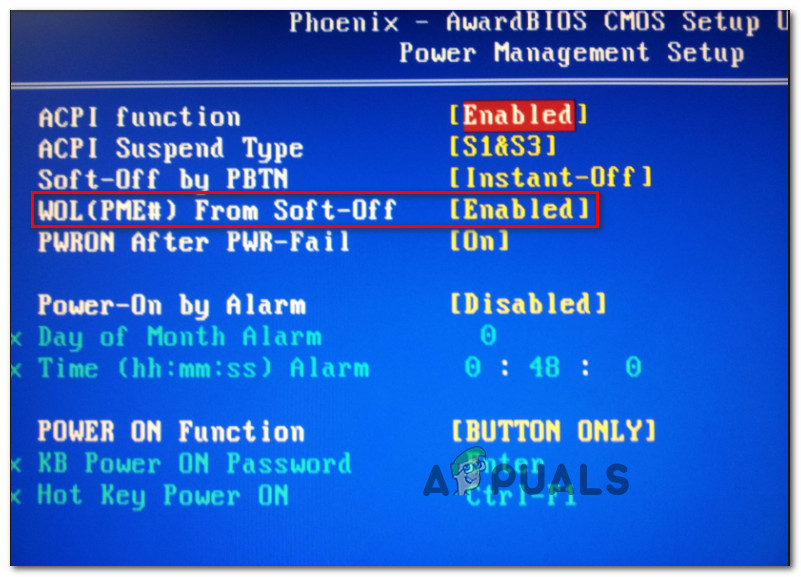
Step 1: Enable Wake-on-LAN from BIOS / UEFI
From the get-go, you should be aware that most older computers (and some modern ones) will have their Wake-on-LAN settings buried deep inside the BIOS settings. To access the BIOS setup, you will need to press the Setup key during the initial startup sequence.

If you have a newer PC configuration, you might need to access the newer UEFI BIOS. The quickest way to do this is to go to Settings app > Update & Security > Recovery > Advanced startup > Restart now > Troubleshoot > Advanced Options > UEFI Firmware Settings.
Once you reach the BIOS/UEFI menu, start looking under Power Management / Advanced Options / Power on by PCIE / PCI for a setting similar to Wake-On-LAN or WOL.
Keep in mind that your BIOS / UEFI menu might vary a lot from what was mentioned above. If you’re unable to find the equivalent setting, do an online search with your motherboard model.
Step 2: Enable Wake-on-LAN from Windows
In this next part, we are going to enable Wake-on-LAN from the current operating system. Luckily, this party is universal among all Windows version. Here’s what you need to do:
- Press Windows key + R to open up a Run dialog box. Then, type “devmgmt.msc” and press Enter to open up Device Manager.
- Inside Device Manager, expand the Network adapters drop-down menu and right-click on your network card. Then choose Properties to access the Advanced menu.
Note: Unless you’re using a dedicated network controller, the default controller should be Realtek PCIe GBE Family Controller. - In the Properties screen, go over to the Advanced tab, select Wake on Magic Packet from the Property menu and set it’s Value to Enabled.
- Move over to the Power Management tab and make sure that the boxer associated with Allow this device to wake the computer and Only allow a magic packet to wake the computer are both checked.
- Hit Ok to save the changes that you just operated.

On macOS, you can enable Wake-on-Lan by going to System Preferences and choosing Energy Saver. Then, simply enable the checkbox next to Wake for Network Access.
On Linux, use the following commands in order to enable Wake-on-Lan:
sudo apt-get install ethtool
sudo ethtool -s eth0 wol g
Step 3: Fetching the necessary information
Before you go ahead and install the required software to wake your computer up, let’s finish with this computer by fetching the required information. To wake the computer up from a remote location we’ll need two things:
- MAC address
- IP Adress
Here’s a quick guide on how to find out the information required to wake this computer up:
- Press Windows key + R to open up a Run dialog box. Then, type “cmd” and press Enter to open up a Command Prompt.

Opening Command Prompt via Run dialog box - In the Command prompt, type the following command to fetch the required information:
ipconfig /all
- Once you get returned the results, scroll down to the network adapter that is currently connected to the internet and look for Physical Address (MAC Adress) and IPv4 Adress (IP Adress).
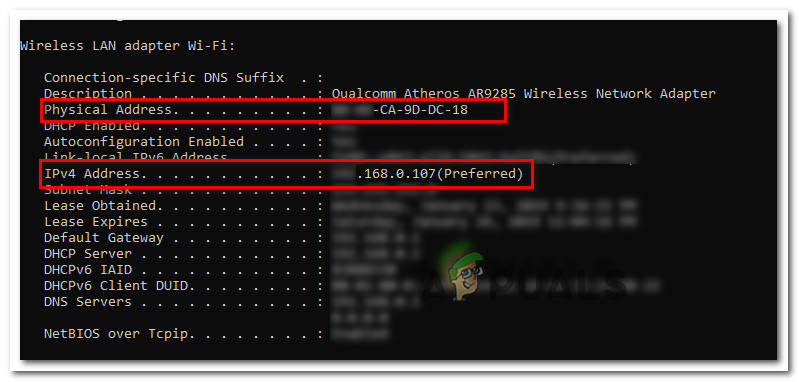
Finding the MAC address and IP address - Note these two values down as you’ll need them to wake your PC remotely.
Step 4: Installing the necessary software
There are lots of different software that you can choose from when you’re looking for a product capable of sending out Wake-on-LAN requests. Some options are paid, some are free, but we are going to recommend an option that is not only free but entirely reliable.
Follow the steps below to install and configure Wake-On-Lan from Solar Winds:
Important: This software needs to be installed on the laptop/desktop that you are going to use to wake the one we previously configured.
- Visit this link (here), enter the required details and hit the “Proceed to the Free Download button” to initiate the download.

Accessing the Wake-on-LAN download - Download Wake-On-Lan by clicking the Download button under Windows.

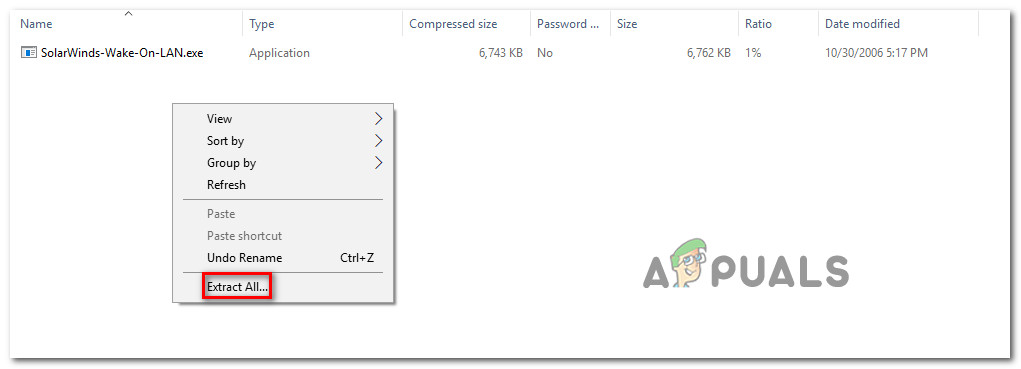
Downloading Wake-On-Lan - Wait until the download is complete. Once the procedure is complete, double-click on the .zip archive. Once inside, extract the installation file in an easy to reach folder.
Extracting the installation executable - Open the installation executable and choose Yes at the UAC prompt to grant administrative privileges.
- Follow the on-screen instructions to install the software on your system. Accept the license agreement, choose the location and follow through to install Wake-On-Lan on your computer.

Installing Wake-On-LAN
Step 5: Waking the Computer with Wake-on-Lan
The tedious part is over. Now that we managed to configure everything, your computer is ready to be woken up at all times.
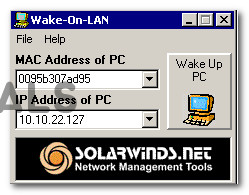
To do this, open the software that we installed at Step 4 (Wake-up-LAN), type the MAC Adress and the IP Adress into the two boxes and hit Wake up PC. Immediately after you hit this button, the software will send the necessary ‘magic’ packets to wake the computer up.
If the process is completed, you will get a success message similar to this one:

That’s it! But it might be a good idea to test this process properly before you go away and begin to rely on it.


